In this tutorial, we will review how to start a Jenkins agent as a Linux service with systemd.
When using Docker for my agents, entering the correct options on the command line should cause the agents to restart automatically.
Sometimes, such as when you want to use the famous Dockerfile: true option, you need to start the agent manually with a java command and not with Docker (for various security reasons).
Then you need to restart it manually if you have to reboot, or if you forget to use nohup to start it in the background, and then close the terminal.
Pre-requisites
Let’s say we’re starting with a fresh Ubuntu 22.04 Linux installation. To get an agent working, we’ll need to do some preparation. Java is necessary for this process, and Docker allows us to use Docker for our agents instead of installing everything directly on the machine.
Java
Currently, openjdk 11 is recommended, and openjdk 17 is supported. Let’s go with openjdk 17:
sudo apt-get update
sudo apt install-y--no-install-recommends openjdk-17-jdk-headless
Let’s now verify if java works for us:
java -version
openjdk version "17.0.3" 2022-04-19
OpenJDK Runtime Environment (build 17.0.3+7-Ubuntu-0ubuntu0.22.04.1)
OpenJDK 64-Bit Server VM (build 17.0.3+7-Ubuntu-0ubuntu0.22.04.1, mixed mode, sharing)
Jenkins user
While creating an agent, be sure to separate rights, permissions, and ownership for users. Let’s create a user for Jenkins:
sudo adduser --group--home /home/jenkins --shell /bin/bash jenkinsDocker
Now, to get a recent version of Docker, we should install the docker-ce package and a few others with a particular repo.
First, let’s add the needed dependencies to add the repo:
sudo apt-get install ca-certificates curl gnupg lsb-releaseIn my case, these packages were already installed and up to date. The next step is to add Docker’s official GPG key:
sudo mkdir-p /etc/apt/keyrings
curl -fsSL https://download.docker.com/linux/ubuntu/gpg | sudo gpg --dearmor-o /etc/apt/keyrings/docker.gpg
Then, we can set up the repo:
echo\"deb [arch=$(dpkg --print-architecture) signed-by=/etc/apt/keyrings/docker.gpg] https://download.docker.com/linux/ubuntu \$(lsb_release -cs) stable" | sudo tee /etc/apt/sources.list.d/docker.list > /dev/nullThe last thing to do is to update the list of available packages, and then install the latest version of Docker:
sudo apt-get update
sudo apt-get install docker-ce docker-ce-cli containerd.io docker-compose-plugin
If you’re - like me - running a recent version of Ubuntu or Debian, you won’t need to create the docker group, because it has been created with the installation of Docker.
On the contrary, you can then issue a sudo groupadd docker command to create the docker group.
Now, let’s add our current user to the docker group:
sudo usermod -aG docker $USERAnd if you’re not using the default user, but jenkins, you can do the same:
sudo usermod -aG docker jenkins
sudo usermod -aGsudo jenkins
Now log out, and log back in so that your group membership is updated.
If you get any error, just reboot the machine, this sometimes happens.
¯_(ツ)_/¯
Mandatory ``Hello World!'' Docker installation test:
docker run hello-world
Unable to find image 'hello-world:latest' locally
latest: Pulling from library/hello-world
2db29710123e: Pull complete
Digest: sha256:53f1bbee2f52c39e41682ee1d388285290c5c8a76cc92b42687eecf38e0af3f0
Status: Downloaded newer image for hello-world:latest

Hello from Docker!
This message shows that your installation appears to be working correctly.

To generate this message, Docker took the following steps:
 1. The Docker client contacted the Docker daemon.
 2. The Docker daemon pulled the "hello-world" image from the Docker Hub.
    (amd64)
 3. The Docker daemon created a new container from that image which runs the
    executable that produces the output you are currently reading.
 4. The Docker daemon streamed that output to the Docker client, which sent it
    to your terminal.

To try something more ambitious, you can run an Ubuntu container with:
 $ docker run -it ubuntu bash

Share images, automate workflows, and more with a free Docker ID:
 https://hub.docker.com/

For more examples and ideas, visit:
 https://docs.docker.com/get-started/
Nice!
Create a new node in Jenkins
Quoting the official documentation,
Nodes are the "machines" on which build agents run.
and also:
Agents manage the task execution on behalf of the Jenkins controller by using executors. An agent is actually a small (170KB single jar) Java client process that connects to a Jenkins controller and is assumed to be unreliable. An agent can use any operating system that supports Java. Tools required for builds and tests are installed on the node where the agent runs; they can be installed directly or in a container (Docker or Kubernetes).
To conclude:
In practice, nodes and agents are essentially the same but it is good to remember that they are conceptually distinct.
We will now create a new node in Jenkins, using our Ubuntu machine as the node, and then launch an agent on this node.
Node creation in the UI
Go to your Jenkins dashboard
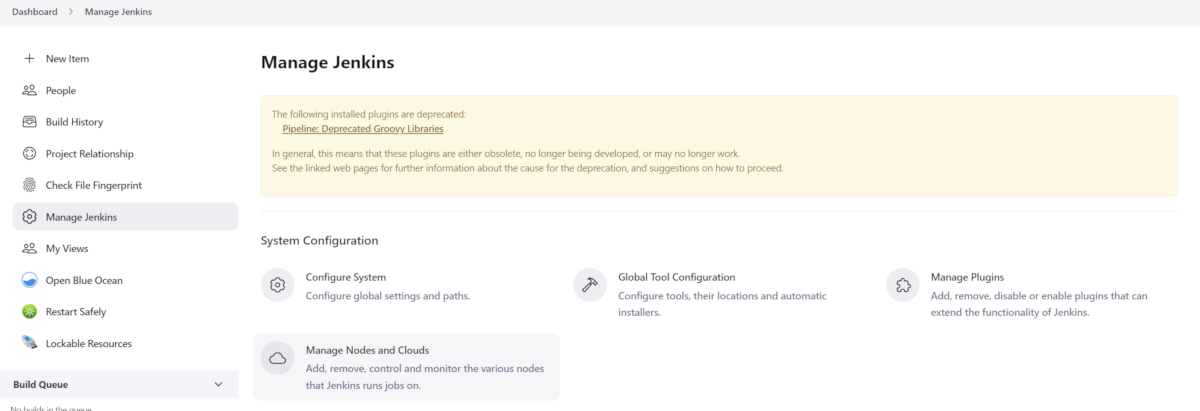
Go to Manage Jenkins option in the main menu
Go to Manage Nodes and clouds item

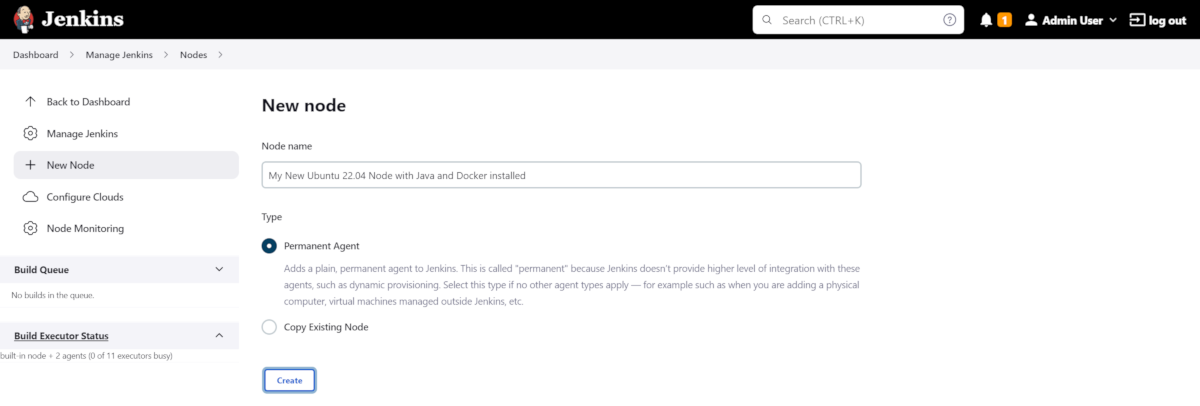
Go to New Node option in the side menu
Fill in the Node name (My New Ubuntu 22.04 Node with Java and Docker installed for me) and type (Permanent Agent for me)

Click on the Create button
In the Description field, enter if you want a human-readable description of the node (My New Ubuntu 22.04 Node with Java and Docker installed for me) -
Let
1as the number of executors for the time being. A good value to start with would be the number of CPU cores on the machine (unfortunately for me, it’s1) - As Remote root directory, enter the directory where you want to install the agent (/home/jenkinsfor me)
An agent should have a directory dedicated to Jenkins. It is best to use an absolute path, such as
/var/jenkinsorc:\jenkins. This should be a path local to the agent machine. There is no need for this path to be visible from the controller.
Regarding the Labels field, enter the labels you want to assign to the node (
ubuntu linux docker jdk17for me), which makes four labels. This will help you group multiple agents into one logical group)For the Usage now, choose Use this node as much as possible for the time being, you will be able to restrict later on the kind of jobs that can be run on this node.
The last thing to set up now: choose Launch agent by connecting it to the controller . That means that you will have to launch the agent on the node itself and that the agent will then connect to the controller. That’s pretty handy when you want to build Docker images, or when your process will use Docker images… You could also have the controller launch an agent directly via Docker remotely, but then you would have to use Docker in Docker, which is complicated and insecure.
Node configuration
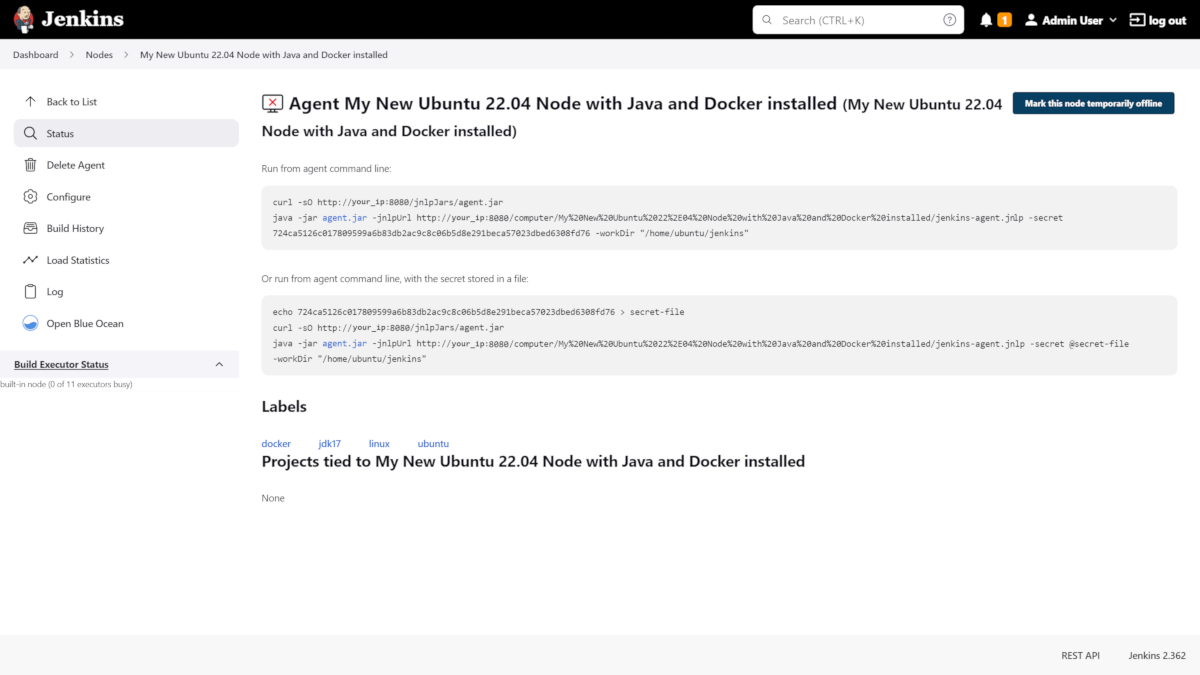
The Save button will create the node within Jenkins, and lead you to the Manage nodes and clouds page. Your new node will appear brown in the list, and you can click on it to see its details. The details page displays your java command line to start the agent.

This command looks like that for me:
curl -sO http://my_ip:8080/jnlpJars/agent.jar
java -jar agent.jar -jnlpUrl http://my_ip:8080/computer/My%20New%20Ubuntu%2022%2E04%20Node%20with%20Java%20and%20Docker%20installed/jenkins-agent.jnlp -secret my_secret -workDir"/home/jenkins"
You can now go back into Jenkins’ UI, select the Back to List menu item on the left side of the screen, and see that your new agent is running.

After this is running, there are a few more actions that need to be completed. Whenever you close the terminal you launched the agent with, the agent will stop. If you ever have to reboot the machine after a kernel update, you will have to restart the agent manually too. Therefore, you should keep the agent running by declaring it as a service.
Run your Jenkins agent as a service
Create a directory called jenkins or jenkins-service in your home directory or anywhere else where you have access, for example /usr/local/jenkins-service.
If the new directory does not belong to the current user home, give it the right owner and group after creation.
For me, it would look like the following:
sudo mkdir-p /usr/local/jenkins-service
sudo chown jenkins /usr/local/jenkins-service
Move the agent.jar file that you downloaded earlier with the curl command to this directory.
mv agent.jar /usr/local/jenkins-serviceNow (in /usr/local/jenkins-service) create a start-agent.sh file with the Jenkins java command we’ve seen earlier as the file’s content.
#!/bin/bashcd /usr/local/jenkins-service
# Just in case we would have upgraded the controller, we need to make sure that the agent is using the latest version of the agent.jar
curl -sO http://my_ip:8080/jnlpJars/agent.jar
java -jar agent.jar -jnlpUrl http://my_ip:8080/computer/My%20New%20Ubuntu%2022%2E04%20Node%20with%20Java%20and%20Docker%20installed/jenkins-agent.jnlp -secret my_secret -workDir"/home/jenkins"exit 0
Make the script executable by executing chmod +x start-agent.sh in the directory.
Now create a /etc/systemd/system/jenkins-agent.service file with the following content:
[Unit]
Description=Jenkins Agent

[Service]
User=jenkins
WorkingDirectory=/home/jenkins
ExecStart=/bin/bash /usr/local/jenkins-service/start-agent.sh
Restart=always

[Install]
WantedBy=multi-user.target
We still have to enable the daemon with the following command:
sudo systemctl enable jenkins-agent.serviceLet’s have a look at the system logs before starting the daemon:
journalctl -f&Now start the daemon with the following command.
sudo systemctl start jenkins-agent.serviceWe can see some interesting logs in the journalctl output:
Aug 03 19:37:27 ubuntu-machine systemd[1]: Started Jenkins Agent.
Aug 03 19:37:27 ubuntu-machine sudo[8821]: pam_unix(sudo:session): session closed for user root
Aug 03 19:37:28 ubuntu-machine bash[8826]: Aug 03, 2022 7:37:28 PM org.jenkinsci.remoting.engine.WorkDirManager initializeWorkDir
Aug 03 19:37:28 ubuntu-machine bash[8826]: INFO: Using /home/jenkins/remoting as a remoting work directory
Aug 03 19:37:28 ubuntu-machine bash[8826]: Aug 03, 2022 7:37:28 PM org.jenkinsci.remoting.engine.WorkDirManager setupLogging
Aug 03 19:37:28 ubuntu-machine bash[8826]: INFO: Both error and output logs will be printed to /home/jenkins/remoting
Aug 03 19:37:28 ubuntu-machine bash[8826]: Aug 03, 2022 7:37:28 PM hudson.remoting.jnlp.Main createEngine
Aug 03 19:37:28 ubuntu-machine bash[8826]: INFO: Setting up agent: My New Ubuntu 22.04 Node with Java and Docker installed
Aug 03 19:37:28 ubuntu-machine bash[8826]: Aug 03, 2022 7:37:28 PM hudson.remoting.Engine startEngine
Aug 03 19:37:28 ubuntu-machine bash[8826]: INFO: Using Remoting version: 3046.v38db_38a_b_7a_86
Aug 03 19:37:28 ubuntu-machine bash[8826]: Aug 03, 2022 7:37:28 PM org.jenkinsci.remoting.engine.WorkDirManager initializeWorkDir
Aug 03 19:37:28 ubuntu-machine bash[8826]: INFO: Using /home/jenkins/remoting as a remoting work directory
Aug 03 19:37:29 ubuntu-machine bash[8826]: Aug 03, 2022 7:37:29 PM hudson.remoting.jnlp.Main$CuiListener status
Aug 03 19:37:29 ubuntu-machine bash[8826]: INFO: Locating server among [http://controller_ip:58080/]
Aug 03 19:37:29 ubuntu-machine bash[8826]: Aug 03, 2022 7:37:29 PM org.jenkinsci.remoting.engine.JnlpAgentEndpointResolver resolve
Aug 03 19:37:29 ubuntu-machine bash[8826]: INFO: Remoting server accepts the following protocols: [JNLP4-connect, Ping]
Aug 03 19:37:29 ubuntu-machine bash[8826]: Aug 03, 2022 7:37:29 PM hudson.remoting.jnlp.Main$CuiListener status
Aug 03 19:37:29 ubuntu-machine bash[8826]: INFO: Agent discovery successful
Aug 03 19:37:29 ubuntu-machine bash[8826]:   Agent address: controller_ip
Aug 03 19:37:29 ubuntu-machine bash[8826]:   Agent port:    50000
Aug 03 19:37:29 ubuntu-machine bash[8826]:   Identity:      31:c4:f9:31:46:c3:eb:72:64:a3:c7:d6:c7:ea:32:2f
Aug 03 19:37:29 ubuntu-machine bash[8826]: Aug 03, 2022 7:37:29 PM hudson.remoting.jnlp.Main$CuiListener status
Aug 03 19:37:29 ubuntu-machine bash[8826]: INFO: Handshaking
Aug 03 19:37:29 ubuntu-machine bash[8826]: Aug 03, 2022 7:37:29 PM hudson.remoting.jnlp.Main$CuiListener status
Aug 03 19:37:29 ubuntu-machine bash[8826]: INFO: Connecting to controller_ip:50000
Aug 03 19:37:29 ubuntu-machine bash[8826]: Aug 03, 2022 7:37:29 PM hudson.remoting.jnlp.Main$CuiListener status
Aug 03 19:37:29 ubuntu-machine bash[8826]: INFO: Trying protocol: JNLP4-connect
Aug 03 19:37:29 ubuntu-machine bash[8826]: Aug 03, 2022 7:37:29 PM org.jenkinsci.remoting.protocol.impl.BIONetworkLayer$Reader run
Aug 03 19:37:29 ubuntu-machine bash[8826]: INFO: Waiting for ProtocolStack to start.
Aug 03 19:37:30 ubuntu-machine bash[8826]: Aug 03, 2022 7:37:30 PM hudson.remoting.jnlp.Main$CuiListener status
Aug 03 19:37:30 ubuntu-machine bash[8826]: INFO: Remote identity confirmed: 31:c4:f9:31:46:c3:eb:72:64:a3:c7:d6:c7:ea:32:2f
Aug 03 19:37:30 ubuntu-machine bash[8826]: Aug 03, 2022 7:37:30 PM hudson.remoting.jnlp.Main$CuiListener status
Aug 03 19:37:30 ubuntu-machine bash[8826]: INFO: Connected
We can now check the status with the command below, and the output should be similar to what is shown here.
sudo systemctl status jenkins-agent.service
● jenkins-agent.service - Jenkins Agent
     Loaded: loaded (/etc/systemd/system/jenkins-agent.service; enabled; vendor preset: enabled)
     Active: active (running) since Wed 2022-08-03 19:37:27 UTC; 4min 0s ago
   Main PID: 8825 (bash)
      Tasks: 22 (limit: 1080)
     Memory: 63.1M
        CPU: 9.502s
     CGroup: /system.slice/jenkins-agent.service
             ├─8825 /bin/bash /usr/local/jenkins-service/start-agent.sh
             └─8826 java -jar agent.jar -jnlpUrl http://controller_ip:8080/computer/My%20New%20Ubuntu%2022%2E04%20Node%20with%20Java%20and%20Docker%20installed/jenkins-agent.jnlp -secret my_secret>
Just for fun, we can now reboot the machine and see in the UI if the agent is still running once the boot is finished!
