Quantcast
Channel: Jenkins Blog
Viewing all 1088 articles
Browse latest View live

Custom Distribution Service : Midterm Summary

$
0
0

Hello, After an eventful community bonding period we finally entered into the coding phase. This blog post will summarize the work done till the midterm of the coding phases i.e. week 6. If some of the topics here require a more detailed explanation, I will write a separate blog post. These blogs posts will not have a very defined format but would cover all of the user stories or features implemented.

Project Summary

The main idea behind the project is to build a customizable jenkins distribution service that could be used to build tailor-made jenkins distributions. The service would provide users with a simple interface to select the configurations they want to build the instance with eg: plugins, authorization matrices etc. Furthermore it would include a section for sharing community created distros so that users can find and download already built jenkins war/configuration files to use out of the box.

Quick review

Details

I have written separate blog posts for every week in GSoC and the intricate details for each of them can be found at their respective blog pages. I am including a summary for every phase supported with the respective links.

Community Bonding

This year GSoC had a longer community bonding than any of the previous editions due to the Coronavirus pandemic and therefore this gave me a lot of time to explore, so I spent it by building a prototype for my project. I realised some of the blockages I might face early on, and therefore it gave me more clarity in terms of how I can proceed. I also spent this time preparing a design document which you can find here.

Week 1

In week one, I spent time getting used to the tech stack I would be using, I was pretty familiar with Spring Boot but React was something I was going to be using for the first time, so I spent time studying more about it. I also got the project page ready, the issues I was going to tackle and the milestones that I had to achieve before the evaluation. I also spent a bit of time setting up the home page and a bit of front-end components.

Week 2

Once we were done with the initial setup, it was time to work on the core of the project. In the second week, I worked on generating the package configuration and the plugin list dummy display page setup. I also ran into issues with the Jenkinsfile so the majority of time was spent fixing it. Finally I managed to get around those problems. You can read more about it in the Week 2 Blog post.

Week 3

The last week was spent cleaning up most of the code and getting the remaining milestones in. This was probably the hardest part of phase 1 because it involved connecting the front and back end of the project.You can read more about it here.

Midterm Update

The second phase has been going on for the past 3 weeks and we have already accomplished a majority of the deliverables including community configurations, war downloading and filtering of plugins. More details about the mid term report can be found here.

Getting the Code

The Custom Distribution Service was created from scratch during GSoC and can be found here on Github.

Pull Requests Opened

38

Github Issues completed

36


Jenkins 2.235.3: New Linux Repository Signing Keys

$
0
0

The Jenkins core release automation project has been delivering Jenkins weekly releases since Jenkins 2.232, April 16, 2020. The Linux repositories that deliver the weekly release were updated with new GPG keys with the release of Jenkins 2.232.

Beginning with Jenkins LTS release 2.235.3, stable repositories will be signed with the same GPG keys that sign the weekly repositories. Administrators of Linux systems must install the new signing keys on their Linux servers before installing Jenkins 2.235.3.

Debian/Ubuntu

Update Debian compatible operating systems (Debian, Ubuntu, Linux Mint Debian Edition, etc.) with the command:

Debian/Ubuntu
# wget -qO - https://pkg.jenkins.io/debian-stable/jenkins.io.key | apt-key add -

Red Hat/CentOS

Update Red Hat compatible operating systems (Red Hat Enterprise Linux, CentOS, Fedora, Oracle Linux, Scientific Linux, etc.) with the command:

Red Hat/CentOS
# rpm --import https://pkg.jenkins.io/redhat-stable/jenkins.io.key

Frequently Asked Questions

What if I don’t update the repository signing key?

Updates will be blocked by the operating system package manager (apt, yum, dnf) on operating systems that have not installed the new repository signing key. Sample messages from the operating system may look like:

Debian/Ubuntu
Reading package lists... Done
W: GPG error: https://pkg.jenkins.io/debian-stable binary/ Release:
    The following signatures couldn't be verified because the public key is not available:
        NO_PUBKEY FCEF32E745F2C3D5
E: The repository 'https://pkg.jenkins.io/debian-stable binary/ Release' is not signed.
N: Updating from such a repository can't be done securely, and is therefore disabled by default.
N: See apt-secure(8) manpage for repository creation and user configuration details.
Red Hat/CentOS
Downloading packages:
warning: /var/cache/yum/x86_64/7/jenkins/packages/jenkins-2.235.3-1.1.noarch.rpm:
    Header V4 RSA/SHA512 Signature, key ID 45f2c3d5: NOKEY
Public key for jenkins-2.235.3-1.1.noarch.rpm is not installed

Why is the repository signing key being updated?

The original repository GPG signing key is owned by Kohsuke Kawaguchi. Rather than require that Kohsuke disclose his personal GPG signing key, the core release automation project has used a new repository signing key. The updated GPG repository signing key is used in the weekly repositories and the stable repositories.

Which operating systems are affected?

Operating systems that use Debian package management (apt) and operating systems that use Red Hat package management (yum and dnf) need the new repository signing key.

Other operating systems like Windows, macOS, FreeBSD, OpenBSD, Solaris, and OpenIndiana are not affected.

Are there other signing changes?

Yes, there are other signing changes, though they do not need specific action from users.

The jenkins.war file is signed with a new code signing certificate. The new code signing certificate has been used on weekly releases since April 2020.

Git Plugin Performance Improvement Phase-2 Progress

$
0
0

The second phase of the Git Plugin Performance Improvement project has been great in terms of the progress we have achieved in implementing performance improvement insights derived from the phase one JMH micro-benchmark experiments.

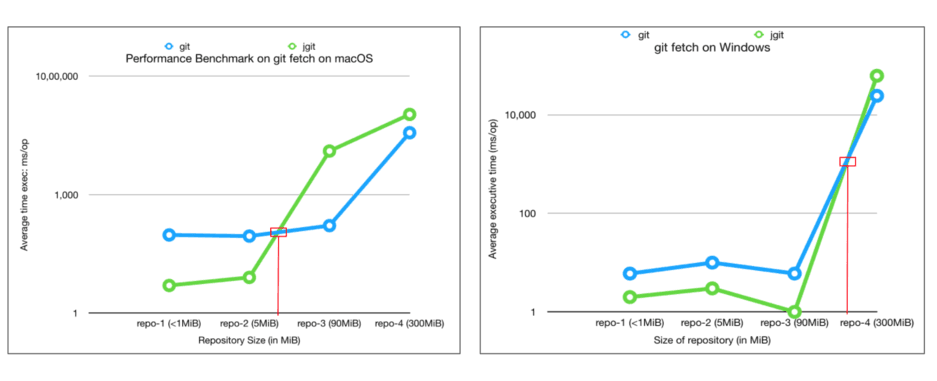
What we’ve learned so far in this project is that a git fetch is highly correlated to the size of the remote repository. In order to make fetch improvements in this plugin, our task was to find the difference in performance for the two available git implementations in the Git Plugin, git and JGit.

Our major finding was that git performs much better than JGit when it comes to a large sized repository (>100 MiB). Interestingly, JGit performs better than git when size of the repository is less than 100 MiB.

In this phase, we were successful in coding this derived knowledge from the benchmarks into a new functionality called the GitToolChooser.

GitToolChooser

This class aims to add the functionality of recommending a git implementation on the basis of the size of a repository which has a strong correlation to the performance of git fetch (from performance Benchmarks).

It utilizes two heuristics to calculate the size:

  • Using cached .git dir from multibranch projects to estimate the size of a repository

  • Providing an extension point which, upon implementation, can use REST APIs exposed by git service providers like Github, GitLab, etc to fetch the size of the remote repository.

Will it optimize your Jenkins instance? That requires one of the following:

  • you have a multibranch project in your Jenkins instance, the plugin can use that to recommend the optimal git implementation

  • you have a branch Source Plugin installed in the Jenkins instance, the particular branch source plugin will recommend a git implementation using REST APIs provided by GitHub or GitLab respectively.

The architecture and code for this class is at: PR-931

Note: This functionality is an upcoming feature in the subsequent Git Plugin release.

JMH benchmarks in multiple environments

The benchmarks were being executed on Linux and macOS machines frequently but there was a need to check if the results gained from those benchmarks would hold true across more platforms to ensure that the solution (GitToolChooser) is generally platform-agnostic.

To test this hypothesis, we performed an experiment:

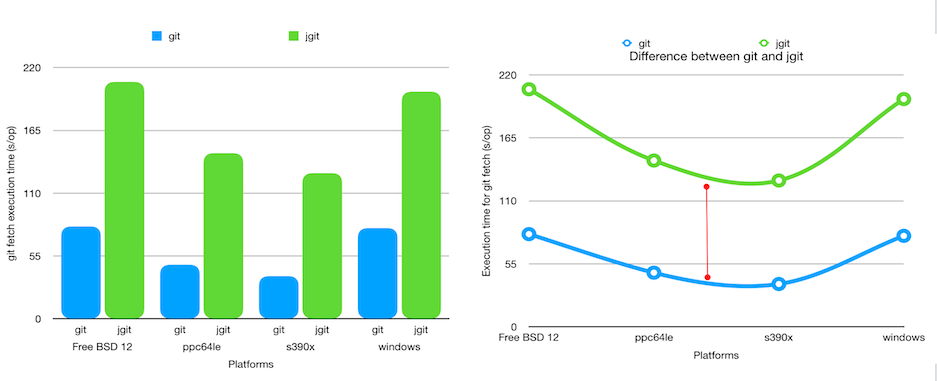
Running git fetch operation for a 400 MiB sized repository on:

  • Windows

  • FreeBSD 12

  • ppc64le

  • s390x

The result of running this experiment is given below:

Performance on multiple platforms

Observations:

  • ppc64le and s390x are able to run the operation in almost half the time it takes for the Windows or FreeBSD 12 machine. This behavior may be attributed to the increased computational power of those machines.

  • The difference in performance between git and JGit remains constant across all platforms which is a positive sign for the GitToolChooser as its recommendation would be consistent across multiple devices and operating systems.

Release Plan 🚀

JENKINS-49757 - Avoid double fetch from Git checkout step This issue was fixed in phase one, avoids the second fetch in redundant cases. It will be shipped with some benchmarks on the change in performance due to the removal of the second fetch.

GitToolChooser

  • PR-931 This pull request is under review, will be shipped in one of the subsequent Git Plugin releases.

Current Challenges with GitToolChooser

  • Implement the extension point to support GitHub Branch Source Plugin, Gitlab Branch Source Plugin and Gitea Plugin.

  • The current version of JGit doesn’t support LFS checkout and sparse checkout, need to make sure that the recommendation doesn’t break existing use cases.

Future Work

In phase three, we wish to:

  • Release a new version of the Git and Git Client Plugin with the features developed during the project

  • Continue to explore more areas for performance improvement

  • Add a new git operation: git clone (Stretch Goal)

Reaching Out

Feel free to reach out to us for any questions or feedback on the project’s Gitter Channel or the Jenkins Developer Mailing list.

GitHub Checks API Plugin Project - Coding Phase 2

$
0
0

Another great coding phase for GitHub Checks API Project ends! In this phase, we focused on consuming the checks API in two widely used plugins:

Besides the external usage, we have also split the general checks API from its GitHub implementation and released both of the plugins:

Coding Phase 2 Demo [starts from 25:20]

Warning Checks

The newly released Warnings NG plugin 8.4.0 will use checks API to publish different check runs for different static analysis tools. Without leaving GitHub, users are now able to see the analysis report they interested in.

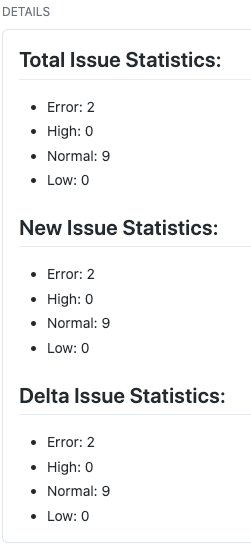
Warning Checks Summary

On GitHub’s conversation tab for each PR, users will see summaries for those checks like the screenshot above. The summaries will include:

  • The status that indicates the quality gate

  • The name of the analysis tool used

  • A short message that indicates statistics of new and total issues

More fine-grained statistics can be found in the Details page.

Severity Statis

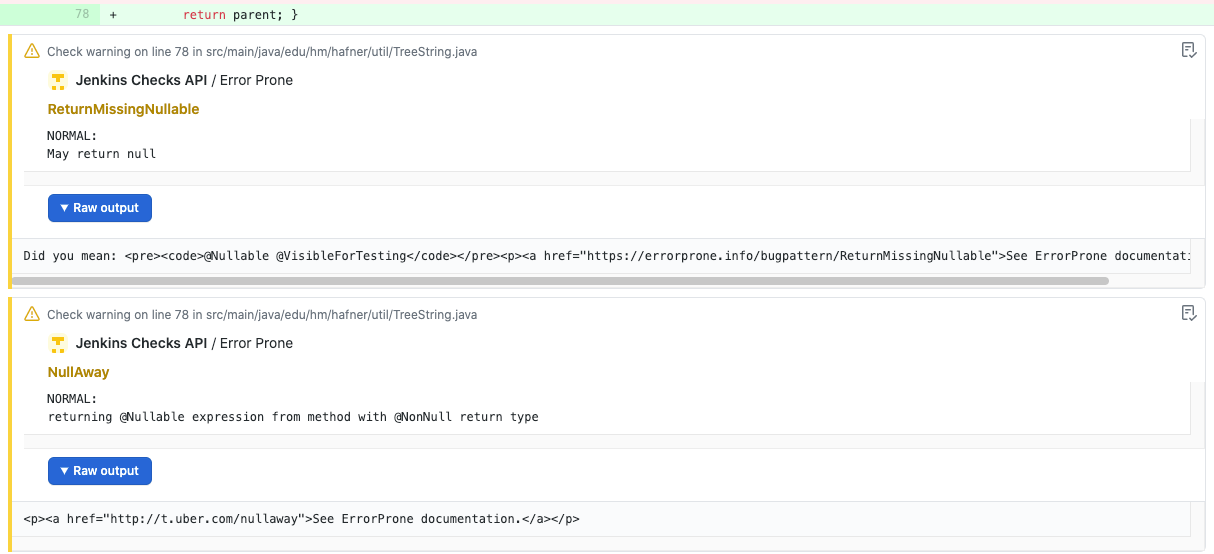
Another practical feature is the annotation for specific lines of code. Users can now review the code alone with the annotations.

Warning Annotations

Try It

In Wanings NG plugin 8.4.0, the warning checks is set as a default feature only for GitHub. For other SCM platforms, a NullPublisher will be used which does nothing. Therefore, you can get those checks for your own GitHub project just in a few steps:

  1. Update Warnings NG plugin to 8.4.0

  2. Install GitHub Checks plugin on your Jenkins instance

  3. Follow the GitHub app authentication guide to configure the credentials for the multi-branch project or GitHub organization project you are going to use

  4. Use warnings-ng plugin in your Jenkinsfile for the project you configured in the last step, e.g.

node {
    stage ('Checkout') {
        checkout scm
    }

    stage ('Build and Static Analysis') {
        sh 'mvn -V -e clean verify -Dmaven.test.failure.ignore'

        recordIssues tools: [java(), javaDoc()], aggregatingResults: 'true', id: 'java', name: 'Java'
        recordIssues tool: errorProne(), healthy: 1, unhealthy: 20
        recordIssues tools: [checkStyle(pattern: 'target/checkstyle-result.xml'),
            spotBugs(pattern: 'target/spotbugsXml.xml'),
            pmdParser(pattern: 'target/pmd.xml'),
            cpd(pattern: 'target/cpd.xml')],qualityGates: [[threshold: 1, type: 'TOTAL', unstable: true]]
    }
}

For more about the pipeline usage of warnings-ng plugin, please see the official documentation.

However, if you don’t want to publish the warnings to GitHub, you can either uninstall the GitHub Checks plugin or disable it by adding skipPublishingChecks: true.

recordIssues enabledForFailure: true, tools: [java(), javaDoc()], skipPublishingChecks: true

Coverage Checks

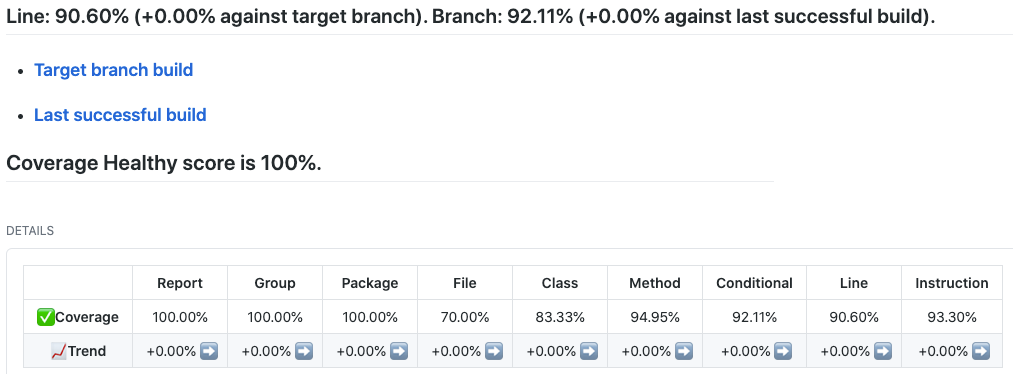
The coverage checks are achieved by consuming the API in Code Coverage API plugin. First, in the conversation tab of a PR, users will be able to see the summary about the coverage difference compared to previous builds.

Coverage Summary

The Details page will contain some other things:

  • Links to the reference build, including the target branch build from the master branch and the last successful build from this branch

  • Coverage healthy score (the default value is 100% if the threshold is not configured)

  • Coverages and trends of different types in table format

Coverage Details

The pull request for this feature will soon be merged and will be included in the next release of Coverage Checks API plugin. After that, you can use it by adding the below section to your pipeline script:

node {
    stage ('Checkout') {
        checkout scm
    }

    stage ('Line and Branch Coverage') {
        publishCoverage adapters: [jacoco('**/*/jacoco.xml')], sourceFileResolver: sourceFiles('STORE_ALL_BUILD')
    }
}

Like the warning checks, you can also disable the coverage checks by setting the field skipPublishingChecks, e.g.

publishCoverage adapters: [jacoco('**/*/jacoco.xml')], sourceFileResolver: sourceFiles('STORE_ALL_BUILD'), skipPublishingChecks: true

Next Phase

In the next phase, we will turn our attention back to Checks API Plugin and GitHub Checks Plugin and add the following features in future versions:

  • Pipeline Support

    • Users can publish checks directly in a pipeline script without requiring a consumer plugin that supports the checks.

  • Re-run Request

    • Users can re-run Jenkins build through Checks API.

Lastly, it is exciting to inform that we are currently making the checks feature available on ci.jenkins.io for all plugins hosted in the jenkinsci GitHub organization, please see INFRA-2694 for more details.

Jenkins graduates in the Continuous Delivery Foundation

$
0
0

We are happy to announce that the Jenkins project has achieved the graduated status in the Continuous Delivery Foundation (CDF). This status is officially effective Aug 03, 2020. Jenkins is the first project to graduate in the CD Foundation. Thanks to all contributors who made our graduation possible!

In this article, we will discuss what the CD Foundation membership and graduation mean to the Jenkins community. We will also talk about what changed in Jenkins as a part of the graduation, and what are the future steps for the project.

To know more about the Jenkins graduation, see also the announcement on the CD Foundation website. Also see the special edition of the CD Foundation Newsletter for Jenkins user success stories and some surprise content. The press release is available here.

How does CDF membership help us?

About 18 months ago, Jenkins became one of the CDF founding projects, along with Jenkins X, Spinnaker and Tekton. A new foundation was formed to provide a vendor-neutral home for open source projects used for Continuous Delivery and Continuous Integration. Special interest groups were started to foster collaboration between projects and end user companies, most notably:Interoperability,MLOps andSecurity SIGs. Also, a Community Ambassador role was created to organize local meetups and to provide public-facing community representatives. Many former Jenkins Ambassadors and other contributors are now CDF Ambassadors, and they promote Jenkins and other projects there.

Thanks to this membership we addressed key project infrastructure needs. Starting from Jan 2020, CDF covers a significant part of the infrastructure costs including our services and CI/CD instances running on Microsoft Azure. The CD Foundation provided us with legal assistance required to get code signing keys for the Jenkins project. Thanks to that, we were able to switch to a new Jenkins Release Infrastructure. The foundation sponsors the Zoom account we use for Jenkins Online Meetups and community meetings. In the future we will continue to review ways of reducing maintenance overhead by switching some of our self-hosted services to equivalents provided by the Linux Foundation to CDF members.

Another important CDF membership benefit is community outreach and marketing. It helped us to establish connections with other CI/CD projects and end user companies. Through the foundation we have access to the DevStats service that provides community contribution statistics and helps us track trends and discover areas for improvement. On the marketing side, the foundation organizes webinars, podcasts and newsletters. Jenkins is regularly represented there. The CD Foundation also runs the meetup.com professional account which is used by local Jenkins communities forCI/CD and Jenkins Area Meetups. Last but not least, the Jenkins community is also represented at virtual conferences where CDF has a booth. All of that helps to grow Jenkins visibility and to highlight new features and initiatives in the project.

Why did we graduate?

Jenkins Graduation Logo

The Jenkins project has a long history of open governance which is a key part of today’s project success. Starting from 2011, the project has introduced the governance meeting which are open to anyone. Most of the discussions and decision making happen publicly in the mailing lists.In 2015 we introduced teams, sub-projects and officer roles.In 2017 we introduced the Jenkins Enhancement Proposal process which helped us to make the key architecture and governance decisions more open and transparent to the community and the Jenkins users.In 2018 we introduced special interest groups that focus on community needs.In 2019 we have expanded the Jenkins governance board so that it got more bandwidth to facilitate initiatives in the project.

Since the Jenkins project inception 15 years ago, it has been steadily growing. Now it has millions of users and thousands of contributors. In 2019 it has seen 5,433 contributors from 111 countries and 272 companies, 67 core and 2,654 plugin releases, 45,484 commits, 7,000+ pull requests. In 2020 Q2 the project has seen 21% growth in pull requests numbers compared to 2019 Q2, bots excluded.

One may say that the Jenkins project already has everything needed to succeed. It is a result of continuous work by many community members, and this work will never end as long as the project remains active. Like in any other industry, the CI/CD ecosystem changes every day and sets new expectations from the automation tools in this domain. Just as the tools evolve, open source communities need to evolve so that they can address expectations, and onboard more users and contributors. The CDF graduation process helped us to discover opportunities for improvement, and address them. We reviewed the project processes and compared them with the Graduated Project criteria defined in the CDF project lifecycle. Based on this review, we made changes in our processes and documentation. It should improve the experience of Jenkins users, and help to make the Jenkins community more welcoming to existing and newcomer contributors.

What changed for the project?

Below you can find a few key changes we have applied during the graduation process:

Public roadmap

We introduced a new public roadmap for the Jenkins project. This roadmap aggregates key initiatives in all community areas: features, infrastructure, documentation, community, etc. It makes the project more transparent to all Jenkins users and adopters, and at the same time helps potential contributors find the hot areas and opportunities for contribution. The roadmap is driven by the Jenkins community and it has a fully public process documented in JEP-14.

More details about the public roadmap are coming next week, stay tuned for a separate blogpost. On July 10th we had an online contributor meetup about the roadmap and you can find more information in its materials (slides, video recording).

User Documentation
  • Jenkins Weekly Release line is now documented on our website (here). We have also reworked the downloads page and added guidelines explaining how to verify downloads.

  • A new list of Jenkins adopters was introduced on jenkins.io. This list highlights Jenkins users and references their case studies and success stories, including ones submitted through the Jenkins Is The Way portal. Please do not hesitate to add your company there!

Community
  • We passed the Core Infrastructure Initiative (CII) certification. This certification helps us to verify compliance with open source best practices and to make adjustments in the project (see the bullets below). It also provides Jenkins users and adopters with a public summary about compliance with each best practice. Details are on the Jenkins core page.

  • Jenkins Code of Conduct was updated to the new version of Contributor Covenant. In particular, it sets best practices of behavior in the community, and expands definitions of unacceptable behavior.

  • The default Jenkins contributing template was updated to cover more common cases for plugin contributors. This page provides links to the Participate and Contribute guidelines hosted on our website, and helps potential contributors to easily access the documentation.

  • The Jenkins Core maintainer guide was updated to include maintenance and issues triage guidelines. It should help us to deliver quality releases and to timely triage and address issues reported by Jenkins users.

What’s next?

It an honor to be the first project to reach the graduated stage in the Continuous Delivery Foundation, but it is also a great responsibility for the project. As a project, we plan to continue participating in the CDF activities and to work with other projects and end users to maintain the Jenkins' leader role in the CI/CD space.

We encourage everyone to join the project and participate in evolving the Jenkins project and driving its roadmap. It does not necessarily mean committing code or documentation patches; user feedback is also very important to the project. If you are interested to contribute or to share your feedback, please contact us in the Jenkins community channels (mailing lists, chats)!

Acknowledgements

CDF graduation work was a major effort in the Jenkins community. Congratulations and thanks to the dozens of contributors who made our graduation possible. I would like to thankAlex Earl,Alyssa Tong,Dan Lorenc,Daniel Beck,Jeff Thompson,Marky Jackson,Mark Waite,Olivier Vernin,Tim Jacomb,Tracy Miranda,Ullrich Hafner,Wadeck Follonier, and all other contributors who helped with reviews and provided their feedback!

Also thanks to the Continuous Delivery Foundation marketing team (Jacqueline Salinas, Jesse Casman and Roxanne Joncas) for their work on promoting the Jenkins project and, specifically, its graduation.

About the Continuous Delivery Foundation

CDF Logo

The Continuous Delivery Foundation (CDF) serves as the vendor-neutral home of many of the fastest-growing projects for continuous delivery, including Jenkins, Jenkins X, Tekton, and Spinnaker, as well as fosters collaboration between the industry’s top developers, end users and vendors to further continuous delivery best practices. The CDF is part of the Linux Foundation, a nonprofit organization. For more information about the foundation, please visit its website.

More information

To know more about the Jenkins graduation in the Continuous Delivery Foundation, see the announcement on the CD Foundation website. Also see the special edition of the CD Foundation Newsletter for Jenkins user success stories and some surprise content. The press release is available here.

Custom Distribution Service : Phase 2 Blogpost

$
0
0

Hello everyone, It is time to wrap up another successfull phase for the custom distribution service project, and we have incorporated most of the features that we had planned at the start of the phase. It has been an immense learning curve for me and the entire team.

To understand what the project is about and the past progress, please refer to the phase one blogposthere.

Front-End

Filters for Plugins

In the previous phase we implemented the ability to add plugins to the configuration, and the ability to search these plugins via a search bar. Sometimes though we would like to filter these plugins based on their usage, popularity, stars etc. Hence we have added a certain set of filters to these plugins. We support only four major filters for now. They are:

  1. Title

  2. Most installed

  3. Relevance

  4. Trending

Filter implementation

The major heavy lifting is done by the plugin api which takes in the necessary parameters and returns the relevant plugins in the form of a json object, here is an example of the api call url: const url = https://plugins.jenkins.io/api/plugins?$params.

For details, see:

  • Feature request #9

  • Pull Request #76

Community Configurations

One major deliverable for the project was the ability for users to share the configurations developed by them, so that they can be used widely within the community. For example we see quite a lot of jenkins configurations involve being run on AWS and kubernetes and so on. Therefore it would be really good for the community to have a place to find and run these configurations right out of the box.

community-config

Design Decision

The major design decision taken here was whether to include the configurations inside the repository or to have them in a completely new repository. Let us talk about both these approaches.

Having the configurations in the current repository:

This allows us to have all of the relevant configurations inside the repository itself, and so users would not have to go fetch this in different repositories. We could have issues with the release cycle and dependencies since, it would have to happen along with the custom distribution service project releases.

Having the configurations in a different repository:

This allows us to manage all of the configurations and the relevant dependencies separately and easily, thus avoiding any release conflict with the current repository. However it would be a bit difficult if users were to not find this repository.

Decision : We still cannot quite agree on what is the best method so for now, I have included the url from which the community configurations are picked up as a configuration variable in the .env file which can be configured later and therefore it can be up to the user to configure. Another advantage of having it configurable, is that the user can decide to load configurations which are private to his organization as well.

For details, see:

Back-End

War Generation

The ability to generate and download war files has finally been achieved, the reason this feature took so long to complete is because we had some difficulty in implementing the war generation and its tests. However this has been completed and can now be tested successfully.

Things to take care while generating war files

In its current state the war generation cannot include casc.yml or groovy files if they are included in the configuration they would have to be added externally. There is an issue opened here. The war file generation would yell at you if you tried to build a war file with a jcasc file configuration.

For details, see:

Pull Request Creation

This feature was included in the design document that I created after my GSoC selection. It involves the ability to create pull requests via the front-end of the service. The User Story behind this feature was that If I want to share a configuration with the community and I do not quite know how to use github or I do not want to do it via the terminal. This feature includes creation of a bot that handles the creation of pull requests in the repository. This bot would have to be installed by the jenkins organization in this repository and the bot would handle the rest.

For details, see:

Disclaimer:

This feature has however been put on the back-burner for now because we are focusing on getting the project to be self hosted and therefore would like to implement this once we have a clear path for the project to be hosted by the jenkins-infra team.If you would like to participate in the discussion here are the links for the pull requests,PR 1 and link: PR 2, or you can even jump in our gitter channel.

If you have been following my posts, I mentioned in my second week blog post that pulling in the json file consisting of more than 1600 plugins took a bit more time that my liking. We managed to solve that issue using a caching mechanism, so now the files are pulled in the first time you start the service and downloaded in a temporary folder. The next time you want to view the plugin cards they are pulled in directly from the temp directory bam ! thereby reducing time.

For details see Pull Request #90

Fixes and improvements

Port 8080

Port 8080 now does have a message instead of a whitelabel error message which is present by default in the spring-boot tomcat server setup. Turns out it requires overriding a particular class, and inserting a custom message

For details, see:

  • Pull Request #92

War Generation

Till now while you were generating the war file, if something went wrong during genration the service would not complain it would just swallow the error and throw back a corrupted war file, however now we have added an error support feature that will alert you when something goes wrong, the error is not very informative as of now, but we are working on making it more informative in the future.

For details, see:

  • War generation error handling #91

  • Add Github controller and jwt helper #66

Dockerfile

One of the major milestones of this phase was to have a project that can be self hosted, needless to say we needed the dockerfile i.e docker-compose.yml to spin the project with a few commands. The major issue we faced here was that there was a bit of a problem making the two containers talk to each other. Let me give you a little bit of context here. Our docker-compose is constructed using two separate dockerfiles one for the backend of the service and the other for the front-end. The backend makes api calls to the front-end via the proxy url i.e localhost:8080. We now had to change this since the network bridge between the two containers spoke to each other via the backend-server name i.e app-server. To brige that gap we have this PR that ensured that the docker compose works flawlessly.

For details, see:

  • Pull Request #82

However there is a minor draw-back of the above approach was now the entire project just relied on the docker compose and could not run using the simple combination of npm and maven since the proxy was different. In order to fix this I decided to follow a multiple environment approach, where we have multiple environment files that pick up the correct proxy and insert it at build time, to elaborate further we have two environment files, (using the env-cmd library ) .env and the docker.env and we insert, the correct file depending on how you want to build the project. For instance if you want to run it using the dockerfile the command that is run under the hood is something along these lines — npm --env-cmd -f docker.env start scripts.

For details, see:

  • Pull Request #88

Windows Installer Upgrades

$
0
0

This article describes the transition from the old Jenkins Windows installer 2.235.2 (32 bit) to the new Jenkins Windows installer 2.235.3 (64 bit)

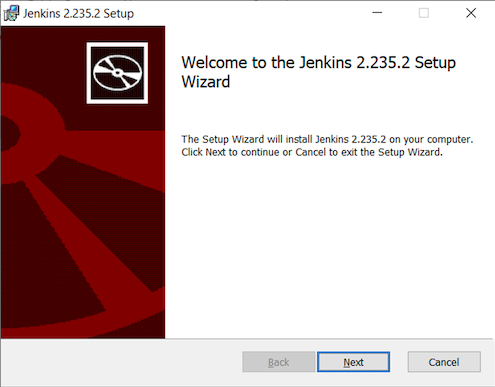
Let’s take a look how Jenkins installation on Windows happened before release of this upgrade.

Step 1

Installer Startup

It’s evident that branding information is not present here.

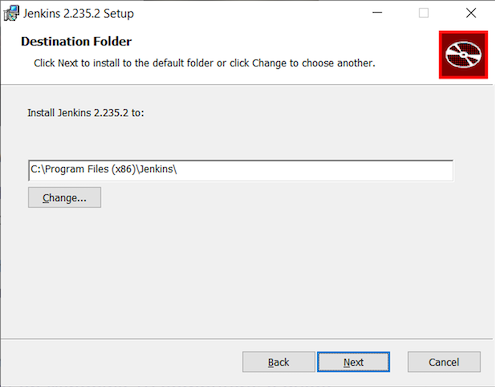
Step 2

Installation Directory

Jenkins would be installed into the 32 bit programs directory along with a 32 bit Java 8 runtime environment.

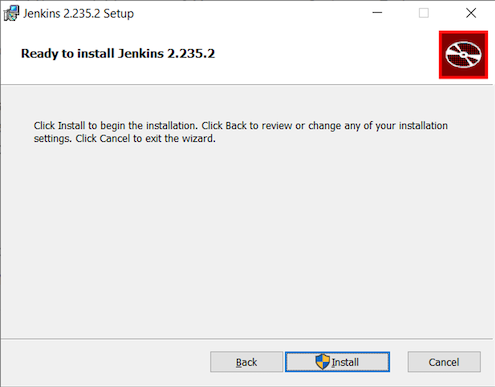
Step 3

Install It

There was no option to select the user that would run the Jenkins service or the network port that would be used.

Issues

The previous installer had issues that needed to be resolved:

  • Only supported 32-bit installations

  • Bundled an outdated Java 8 runtime environment

  • No support for Java 11

  • No port selection during installation

  • No choice of account for the Jenkins service

  • The Program Files (x86) directory was used for the Jenkins home directory

Road Forward

The new Jenkins Windows Installer resolves those issues

  • Supports 64 bit installations and drops 32 bit support

  • Supports 64 bit Java 8 and 64 bit Java 11

  • Port selection and validation from the installer

  • Service account selection and validation from the installer

  • Program is installed in Program Files with Jenkins home directory in %AppData% of the selected service account

  • The JENKINS_HOME directory is placed in the LocalAppData directory for the user that the service will run as, this aligns with modern Windows file system layouts

  • The installer has been updated with branding to make it look nicer and provide a better user experience

Screenshots

You may see below the sequence of screenshots for the new installer:

Step 1

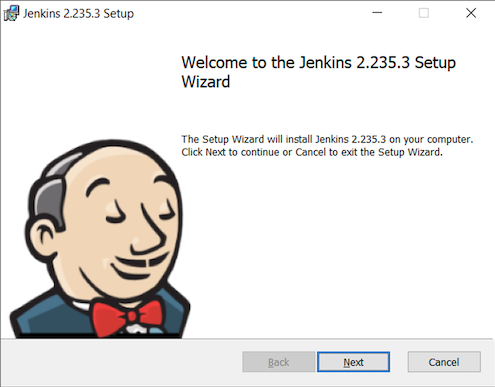
Installer Startup

We can see now the Jenkins logo as a prominent part of the installer UI.

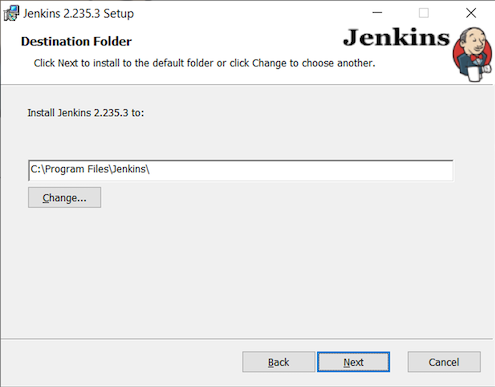
Step 2

Installation Directory

Jenkins installs by default in the 64 bit programs folder rather than in the 32 bit folder. Now the Jenkins logo and name are in the header during entire process of installation.

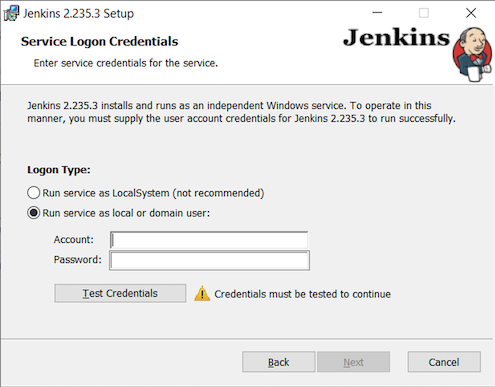
Step 3

Account Selection

Now the installer allows both specifying and testing the credentials by validating that the account has LogonAsService rights.

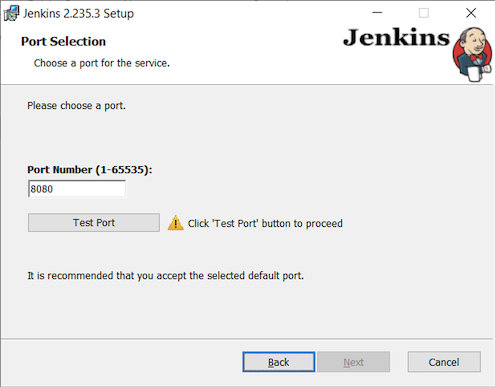
Step 4

Port Selection

Now the installer also allows specifying the port that Jenkins should run on and will not continue until a valid port is entered and tested.

Step 5

JRE Selection

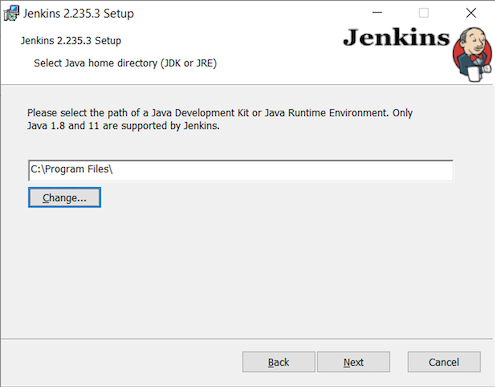
Now instead of bundling a JRE, the installer searches for a compatible JRE on the system (in the current search no JRE was installed). In case you would like to use a different JRE from the one found by the installer, you can browse and specify it. Only Java 8 and Java 11 runtimes are supported. In case the selected JRE is found to be version 11 the installer will automatically add the necessary arguments and additional jar files for running under Java 11.

Step 6

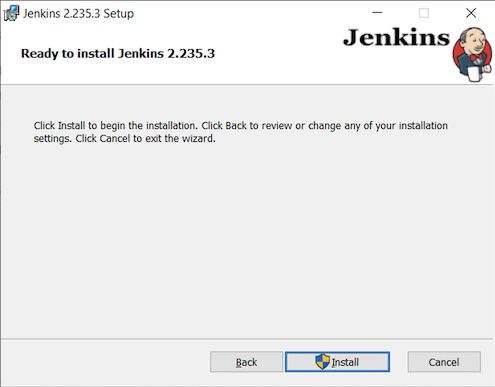
Install It

All of the items that users can enter in the installer should be overridable on the command line for automated deployment as well. The full list of properties that can be overridden will be available soon.

Next Steps

Windows users have alternatives for their existing Jenkins installations:

Upgrade from inside Jenkins

The "Manage Jenkins" section of the running Jenkins will continue to include an "Upgrade" button for Windows users. You may continue to use that "Upgrade" button to update the Jenkins installation on your Windows computer. Upgrade from inside Jenkins will continue to use the current Java version. Upgrade from inside Jenkins will continue to use the current installation location.

Upgrade with the new Jenkins MSI installer

If you run the new Jenkins MSI installer on your Jenkins that was installed with the old Jenkins MSI installer, it will prompt for a new port and a service account.

  1. Stop and disable the existing Jenkins service from the Windows Service Manager

  2. Run the new installer to create the new installation with desired settings

  3. Stop the newly installed Jenkins service

  4. Copy existing Jenkins configuration files to the new Jenkins home directory

  5. Start the newly installed Jenkins service

After the new Jenkins MSI installer has run, the "Manage Jenkins" section of the running Jenkins will continue to include an "Upgrade" button for Windows users. You may continue to use that "Upgrade" button to update the Jenkins installation on your Windows computer.

External Fingerprint Storage Phase-3 Update: Introducing the PostgreSQL Fingerprint Storage Plugin

$
0
0

The final phase for the External Fingerprint Storage Project has come to an end and to finish off, we release one more fingerprint storage plugin: the PostgreSQL Fingerprint Storage Plugin!

This post highlights the progress made during phase-3. To understand what the project is about and the past progress, please refer to thephase-1 post and thephase-2 post.

Introducing the PostgreSQL Fingerprint Storage Plugin

Why PostgreSQL?

There were several reasons why it made sense to build another reference implementation, especially backed by PostgreSQL.

Redis is a key-value storage, and hence stores the fingerprints as blobs. The PostgreSQL plugin defines a relational structure for fingerprints. This offers a more powerful way to query the database for fingerprint information. Fingerprint facets can store extra information inside the fingerprints, which cannot be queried in Redis directly. PostgreSQL plugin allows powerful (indexing) and efficient querying strategies which can even query the facet metadata.

Another reason for building this plugin was to provide a basis for other relational database plugins to be built. It also validates the flexibility and design of our external fingerprint storage API.

Since PostgreSQL is a traditional disk storage database, it is more suitable for systems storing a massive number of fingerprints.

Among relational databases, PostgreSQL is quite popular, has extensive support, and is open-source. We expect the new implementation to drive more adoption, and prove to be beneficial to the community.

Installation:

The plugin can be installed using theexperimental update center. Follow along the following steps after running Jenkins to download and install the plugin:

  1. Select Manage Jenkins

  2. Select Manage Plugins

  3. Go to Advanced tab

  4. Configure the Update Site URL as: https://updates.jenkins.io/experimental/update-center.json

  5. Click on Submit, and then press the Check Now button.

  6. Go to Available tab.

  7. Search for PostgreSQL Fingerprint Storage Plugin and check the box along it.

  8. Click on Install without restart

The plugin should now be installed on the system.

Usage

Once the plugin has been installed, you can configure the PostgreSQL server details by following the steps below:

  1. Select Manage Jenkins

  2. Select Configure System

  3. Scroll to the section Fingerprints and choose PostgreSQL Fingerprint Storage in the dropdown forFingerprint Storage Engine.

  4. Configure the following parameters to connect to your PostgreSQL instance:

    Configure Redis

    • Host - Enter hostname where PostgreSQL is running

    • Port - Specify the port on which PostgreSQL is running

    • SSL - Click if SSL is enabled

    • Database Name - Specify the database name inside the PostgreSQL instance to be used. Please note that the database will not be created by the plugin, the user has to create the database.

    • Connection Timeout - Set the connection timeout duration in seconds.

    • Socket Timeout - Set the socket timeout duration in seconds.

    • Credentials - Configure authentication using username and password to the PostgreSQL instance.

  5. Use the Test PostgreSQL Connection button to verify that the details are correct and Jenkins is able to connect to the PostgreSQL instance.

  6. [IMPORTANT] When configuring the plugin for the first time, it is highly important to press the Perform PostgreSQL Schema Initialization button. It will automatically perform schema initialization and create the necessary indexes. The button can also be used in the case the database is wiped out and schema needs to be recreated.

  7. Press the Save button.

  8. Now, all the fingerprints produced by this Jenkins instance should be saved in the configured PostgreSQL instance!

Querying the Fingerprint Database

Due to the relational structure defined by PostgreSQL, it allows users/developers to query the fingerprint data which was not possible using the Redis fingerprint storage plugin.

The fingerprint storage can act as a consolidated storage for multiple Jenkins instances. For example, to search for a fingerprint id across Jenkins instances using the file name, the following query could be used:

SELECT fingerprint_id FROM fingerprint.fingerprint
WHERE filename = 'random_file';

A sample query is provided which can be tweaked depending on the parameters to be searched:

SELECT * FROM fingerprint.fingerprint
WHERE fingerprint_id = 'random_id'
        AND instance_id = 'random_jenkins_instance_id'
        AND filename = 'random_file'
        AND original_job_name = 'random_job'
        AND original_job_build_number = 'random_build_number'
        AND timestamp BETWEEN '2019-12-01 23:59:59'::timestamp AND now()::timestamp

The facets are stored in the database as jsonb. PostgreSQL offers support to query jsonb. This is especially useful for querying the information stored inside fingerprint facets. As an example, the Docker Traceability Plugin stores information like the name of Docker images inside these facets. These can be queried across Jenkins instances like so:

SELECT * FROM fingerprint.fingerprint_facet_relation
WHERE facet_entry->>'imageName' = 'random_container';

At the moment these queries require working knowledge of the database. In future, these queries can be abstracted away by plugins and the features made available to users directly inside Jenkins.

Demo

External Fingerprint Storage Demo

Releases 🚀

We released the 0.1-alpha-1 version for the PostgreSQL Fingerprint Storage Plugin. Please refer to the changelog for more information.

Redis Fingerprint Storage Plugin1.0-rc-3 was also released. The changelog provides more details.

A few API changes made in the Jenkins core were released in Jenkins-2.253. It mainly includes exposing fingerprint range set serialization methods for plugins.

Future Directions

The relational structure of the plugin allows some performance improvements that can be made when implementing cleanup, as well as improving the performance of Fingerprint#add(String job, int buildNumber). These designs were discussed and are a scope of future improvement.

The current external fingerprint storage API supports configuring multiple Jenkins instances to a single storage. This opens up the possibility of developing traceability plugins which can track fingerprints across Jenkins instances.

Please consider reaching out to us if you feel any of the use cases would benefit you, or if you would like to share some new use cases.

Acknowledgements

The PostgreSQL Fingerprint Storage Plugin and the Redis Fingerprint Storage plugin are maintained by the Google Summer of Code (GSoC) Team for External Fingerprint Storage for Jenkins. Special thanks to Oleg Nenashev,Andrey Falko, Mike Cirioli,Tim Jacomb, and the entire Jenkins community for all the contribution to this project.

As we wrap up, we would like to point out that there are plenty of future directions and use cases for the externalized fingerprint storage, as mentioned in the previous section, and we welcome everybody to contribute.

Reaching Out

Feel free to reach out to us for any questions, feedback, etc. on the project’s Gitter Channel or theJenkins Developer Mailing list. We use Jenkins Jira to track issues. Feel free to file issues under either the postgresql-fingerprint-storage-plugin or theredis-fingerprint-storage-plugin component depending on the plugin.


Machine Learning Plugin project - Coding Phase 3 blog post

$
0
0
jenkins gsoc logo small

Good to see you all again !

This is my final blog post about coding phase 3 in Jenkins Machine Learning Plugin for GSoC 2020. Being at the end of GSoC 2020, we had to finish all the pending issues and testing before a stable release in the main repository. Throughout this program, there were lots of learning and hard work will make this plugin valuable to the Data Science and Jenkins community.

Summary

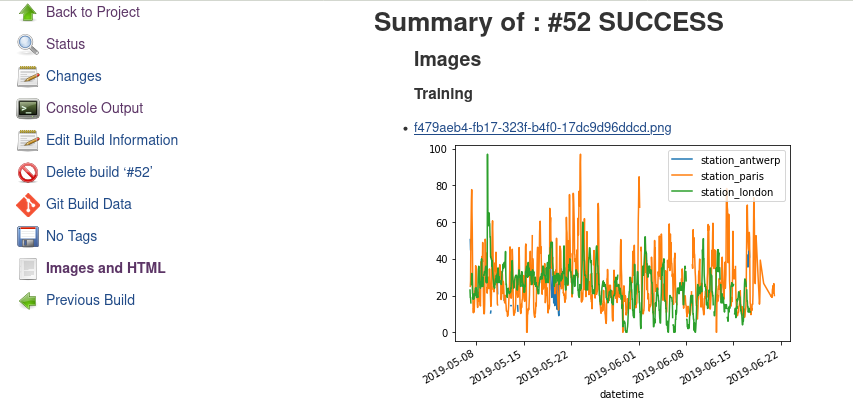
With combining all of the work in phase 1, 2 and 3, initial version of Machine learning plugin( 1.0 ) was successfully released in Jenkins plugin repository. An interesting feature which allows users to connect to their existing programming language kernels more than connecting to only IPython kernel was introduced in this phase. It can be selected in multiple steps with different kernel. Images and graphs produced by Jupyter notebooks will be saved in user preferred folder in the workspace that can be used for reporting/analytic purposes later. Hoping this blog summarizes the Machine Learning’s features and future contributions. Thank you for your interest and support !!!

Main features of Machine Learning plugin

  • Execute Jupyter notebooks directly

  • Run different language scripts using multiple build steps

  • Convert Jupyter Notebooks to Python

  • Configure Jupyter kernels( IPython, IRKernel, IJulia etc) properties

  • Support to execute Notebooks/scripts on Agent

  • Extract graph/map/images from the code

  • Each build step can be associated with a machine learning task

  • Support for Windows and Linux

Future improvements

  • Improving performance of the plugin

  • Try to implement JENKINS-63377

  • Support parameterized definitions in Notebooks JENKINS-63478

  • Increasing testing code coverage

Multiple language kernel support

If there are existing kernels in the system, user will be able to configure in the global configurations in order to apply in the builder/step configuration.

Some popular interactive kernels

  • IPython for python

  • IRKernel for R

  • IJulia for Julia

  • IJavascript for javascript

More kernels and installation guides are found here. https://github.com/jupyter/jupyter/wiki/Jupyter-kernels

Dump images and graphs

Text output will be displayed in the console log. At the same time images/graphs/heat maps and HTMLs will be saved in the workspace. An action is shown in the left panel to display images in realtime. Due to the Content Security Policy of jenkins, some HTMLs which contain harmful javascript may not render in jenkins UI.

action image view

Fixed bugs

There were more bugs identified and fixed with many interactive testings. Setting the working directory of kernels was a big issue while getting datasets/files by script. Zeppelin process launcher was bypassed to fix this issue.

Patch version released

A major bug which was created while setting the process working directory had patched in the v1.0.1. The latest release is more stable now.

Acknowledgement

Machine Learning plugin had been developed under GSoC 2020 program. A huge thanks to Bruno P. Kinoshita, Marky Jackson, Shivay Lamba, Ioannis Moutsatsos and Org admins for this wonderful experience. I would be grateful for contributing this plugin continuously and more in Jenkins.

Jenkins Windows Services: YAML Configuration Support - GSoC Project Results

$
0
0

Hello, world! GSoC 2020 Phase 3 has ended now and it was a great period for thw Jenkins Windows Services - YAML Configuration Support project. In this blog post, I will announce the updates during the GSoC 2020 - Phase 2 and Phase 3. If you are not already aware of this project, I would recommend reading this blog post which was published after GSoC 2020 - Phase 1.

Project Scope

  • Windows Service Wrapper - YAML configuration support

  • YAML schema validation

  • New CLI

  • XML Schema validation

YAML Configuration Support

Under WinSW - YAML configurations support, these tasks will be done.

YAML to Object mapping

At the moment YAML object mapping is finished and merged. You can find all the implementations in this Pull Request.

Extend WinSW to support both XML and YAML

This task is already done and merged. Find the implementation in this Pull Request.

YAML Configuration support for Extensions

At the moment there are 2 internal plugins in WinSW. RunAwayProcessKiller and SharedDirectoryMapper. We allow users to provide configurations for those plugins in the same XML and YAML configuration file which is used to configure WinSW. This task is merged as well.Pull Request

YAML schema validation

Users can validate YAML configuration file against JSON schema file. Users can use YAML utility tool from Visual Studio market place to validate YAML config file against JSON schema.

Key updates in Phase 2 and Phase 3

Sample YAML Configuration File

id: jenkinsname: Jenkinsdescription: This service runs Jenkins automation server.env:
    - name: JENKINS_HOMEvalue: '%LocalAppData%\Jenkins.jenkins'
    - name: LM_LICENSE_FILEvalue: host1;host2executable: javaarguments: >-
    -Xrs -Xmx256m -Dhudson.lifecycle=hudson.lifecycle.WindowsServiceLifecycle
    -jar "E:\Winsw Test\yml6\jenkins.war" --httpPort=8081log:mode: rotateonFailure:
    - action: restartdelay: 10 sec
    - action: rebootdelay: 1 hourextensions:
    - id: killOnStartupenabled: yesclassname: WinSW.Plugins.RunawayProcessKiller.RunawayProcessKillerExtensionsettings:pidfile: '%BASE%\pid.txt'stopTimeOut: 5000StoprootFirst: false
    - id: mapNetworDirsenabled: yesclassname: WinSW.Plugins.SharedDirectoryMapper.SharedDirectoryMappersettings:mapping:
                - enabled: falselabel: Nuncpath: \\UNC
                - enabled: falselabel: Muncpath: \\UNC2

New CLI

Let me explain in brief, why we need a new CLI. In WinSW, we will keep both XML and YAML configuration support. But according to the current implementation, the user can’t specify the configurations file explicitly. Also, we want to let the user skip the schema validation as well. So We decided to move into new CLI which is more structured with commands and options. Please read my previous blog post to learn more about commands and options in the new CLI.

Key updates in Phase 2 and Phase 3

  • Remove the /redirect command

  • testwait command was removed and add the wait option to the test command.

  • stopwait command was removed and add the wait option to the stop command.

How to try

User can configure the Windows Service Wrapper by both XML and YAML configuration files using the following steps.

  1. Create the configuration file (XML or YAML).

  2. Save it with the same name as the Windows Service Wrapper executable name.

  3. Place the configuration file inside the directory(or in a parent directory), where the Windows Service Wrapper executable is located.

If there are both XML and YAML configuraiton files, Windows Service Wrapper will be configured by the XML configuration file.

GSoC 2020 Phase 2 Demo

GSoC 2020 Phase 3 Demo

Future Works

  • XML Schema validation

    • XML configuration file will be validated with the XSD file. I have started working on this feature and you can find the implementation in this Pull Request.

  • YAML Configuration validate on startup

How to contribute

You can find the GitHub repository in this link. Issues and Pull requests are always welcome. Also, you can communicate with us in the WinSW Gitter channel, which is a great way to get in touch and there are project sync up meetings every Tuesday at 13:30 UTC on the Gitter channel.

Git Plugin Performance Improvement: Final Phase and Release

$
0
0

Since the beginning of the project, the core value which drove its progress was "To enhance the user experience for running Jenkins jobs by reducing the overall execution time".

To achieve this goal, we laid out a path:

  • Compare the two existing git implementations i.e CliGitAPIImpl and JGitAPIImpl using performance benchmarking

  • Use the results to create a feature which would improve the overall performance of git plugin

  • Also, fix existing user reported performance issues

Let’s take a journey to understand how we’ve built the new features. If you’d like to skip the journey part, you can directly go to the [major performance improvements] section and the [minor performance section] to see what we’ve done!

Journey to release

The project started with deciding to choose a git operation and then trying to compare the performance of that operation by using command line git and then with JGit.

Stage 1: Benchmark results with git fetch

git-fetch-results

  • The performance of git fetch (average execution time/op) is strongly correlated to the size of a repository

  • There exists an inflection point on the scale of repository size after which the nature of JGit performance changes (it starts to degrade)

  • After running multiple benchmarks, it is safe to say that for a large sized repository command line git would be a better choice of implementation.

  • We can use this insight to implement a feature which avoids JGit with large repositories.

Stage 2: Comparing platforms

The project was also concerned that there might be important differences between operating systems. For example, what if command line Git for Windows performed very differently than command line Git on Linux or FreeBSD? Benchmarks were run to compare fetch performance on several platforms.

Running git fetch operation for a 400 MiB sized repository on:

  • AMD64 Microsoft Winders

  • AMD64 FreeBSD

  • IBM PowerPC 64 LE Ubuntu 18

  • IBM System 390 Ubuntu 18

The result of running this experiment is given below:

Performance on multiple platforms

The difference in performance between git and JGit remains constant across all platforms.

Benchmark results on one platform are applicable to all platforms.

Stage 3: Performance of git fetch and repository structure

git repo diagram

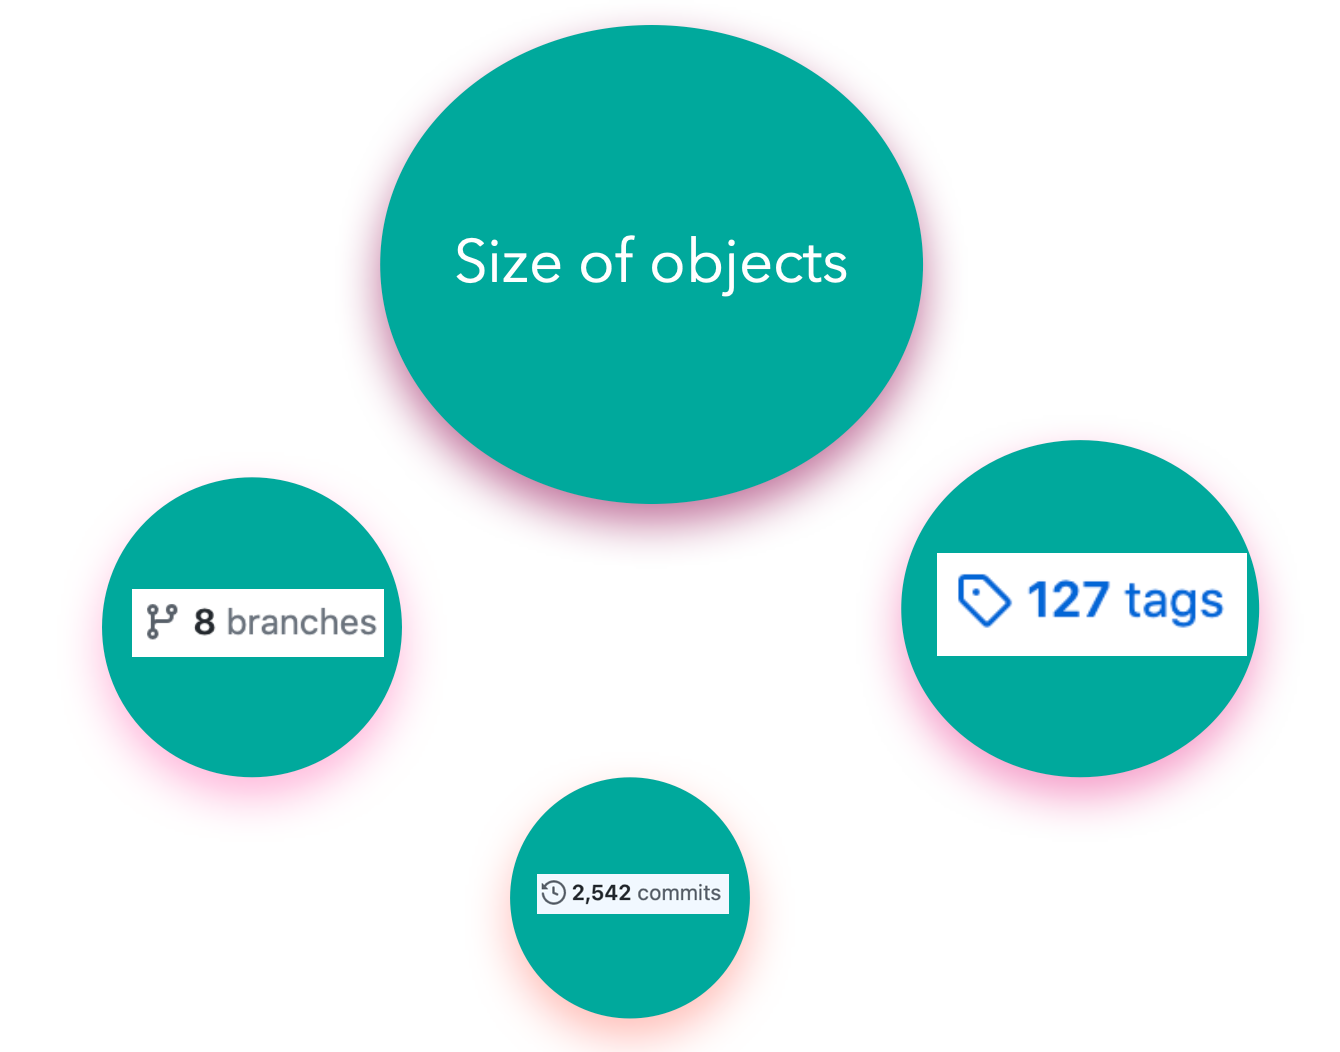
The area of the circle enclosing each parameter signifies the strength of the positive correlation between the performance of a git fetch operation and that parameter. From the diagram:

  • Size of the aggregated objects is the dominant player in determining the execution time for a git fetch

  • Number of branches and Number of tags play a similar role but are strongly overshadowed by size of repository

  • Number of commits has a negligible effect on the performance of running git fetch

After running these experiments from Stage-1 to Stage-3, we developed a solution called the GitToolChooser which is explained in the next stage

Stage 4: Faster checkout with Git tool chooser

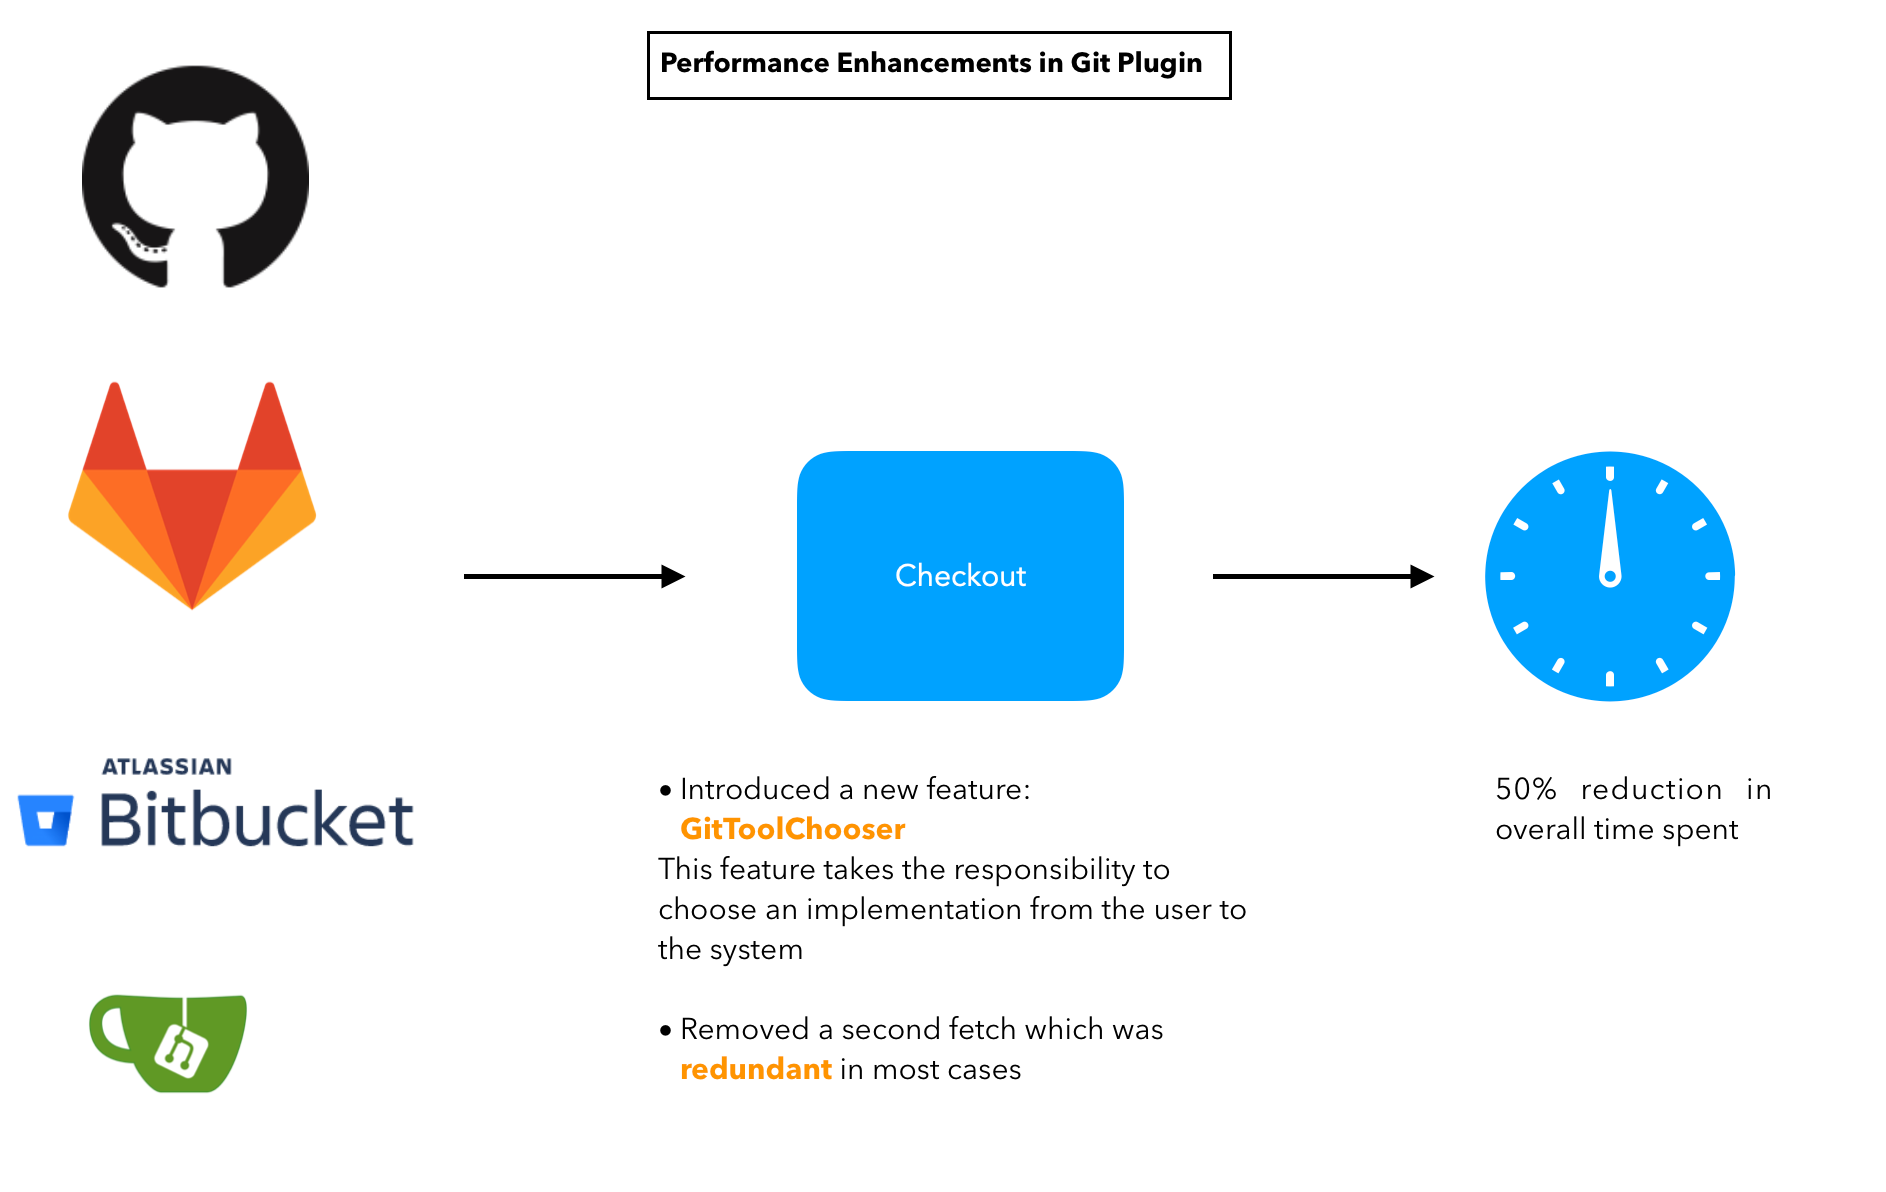
This feature takes the responsibility of choosing the optimal implementation from the user and hands it to the plugin. It takes the decision of recommending an implementation on the basis of the size of the repository. Here is how it works.

git perf improv

The image above depicts the performance enhancements we have performed over the course of the GSoC project. These improvements have enabled the checkout step to be finished within half of what it used to take earlier in some cases.

Let’s talk about performance improvements in two parts.

Major performance improvements

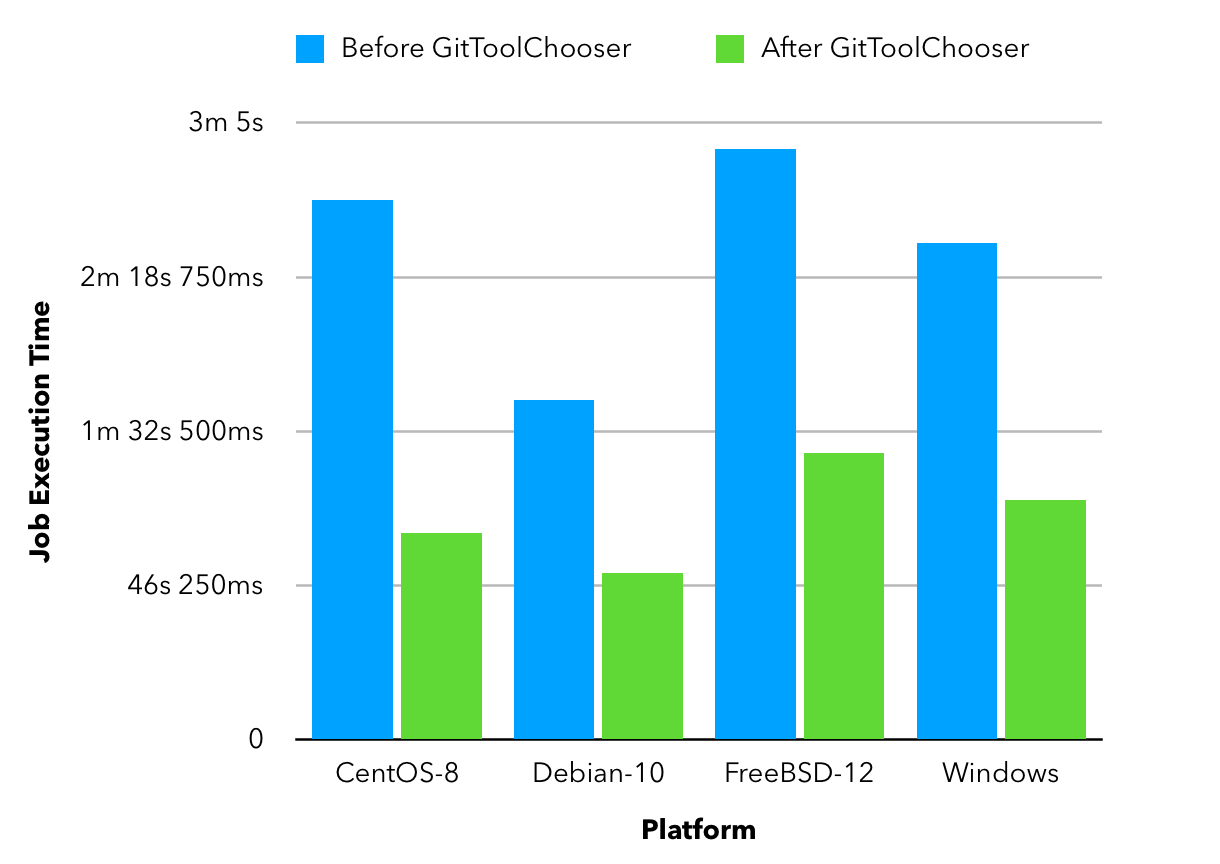
Major performance enhancements

Building Tensorflow (~800 MiB) using a Jenkins pipeline, there is over 50% reduction in overall time spent in completing a job! The result is consistent multiple platforms.

The reason for such a decrease is the fact that JGit degrades in performance when we are talking about large sized repositories. Since the GitToolChooser is aware of this fact, it chooses to recommend command line git instead which saves the user some time.

Minor performance improvements

Note: Enable JGit before using the new performance features to let GitToolChooser work with more optionsHere’s how

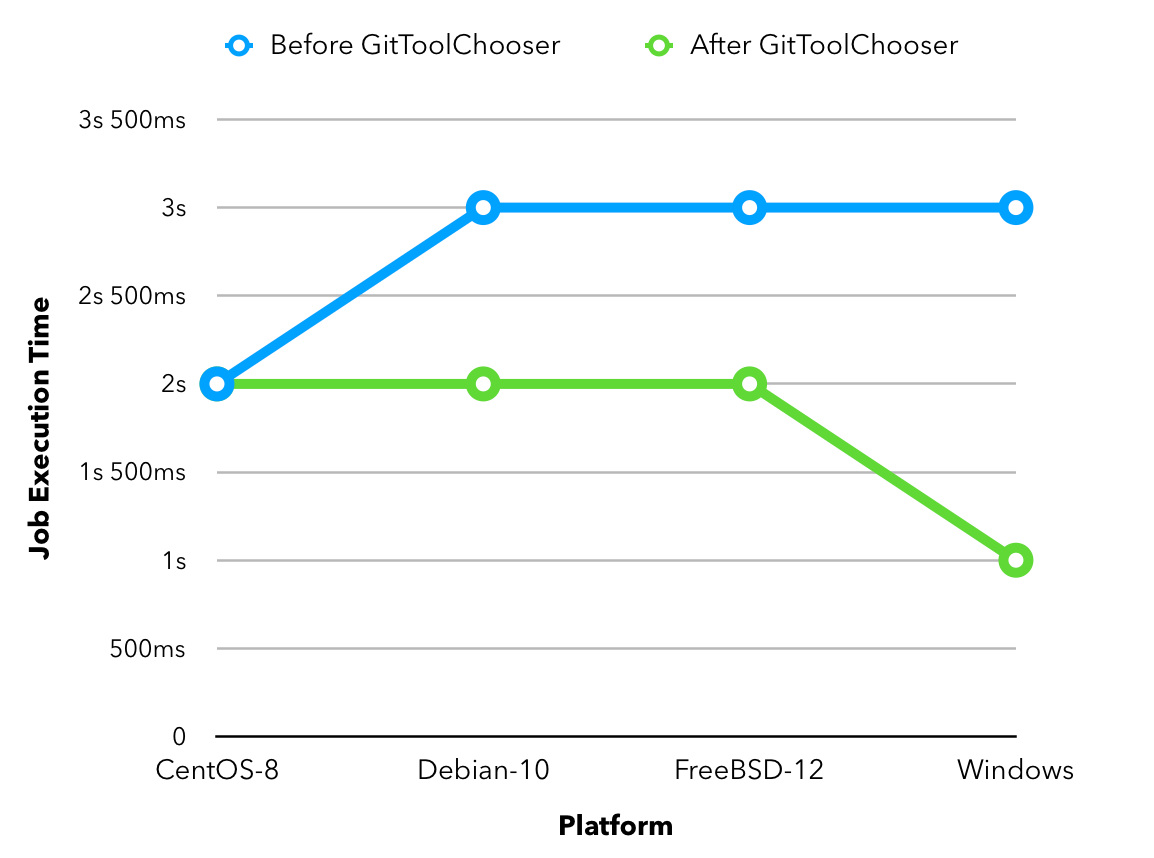
git minor perf

Building the git plugin (~ 20 MiB) using a Jenkins pipeline, there is a drop of a second across all platforms when performance enhancement is enabled. Also, eliminating a redundant fetch reduces unnecessary load on git servers.

The reason for this change is the fact that JGit performs better than command line git for small sized repositories (<50MiB) as an already warmed up JVM favors the native Java implementation.

Releases

The road ahead

  • Support from other branch source plugins

    • Plugins like the GitHub Branch Source Plugin or GitLab Branch Source Plugin need to extend an extension point provided by the git plugin to facilitate the exchange of information related to size of a remote repository hosted by the particular git provider

  • JENKINS-63519: GitToolChooser predicts the wrong implementation

  • Addition of this feature to GitSCMSource

  • Detection of lock related delays accessing the cache directories present on the controller

    • This issue was reported by the plugin maintainer Mark Waite, there is a need to reproduce the issue first and then find a possible solution.

Reaching out

Feel free to reach out to us for any questions or feedback on the project’s Gitter Channel or theJenkins Developer Mailing list. Report an issue at Jenkins Jira.

GitHub Checks API Plugin Project - Coding Phase 3

$
0
0

This blog post is about our phase 3 progress on GitHub Checks API Project, you can find our previous blog posts for phase 1 and phase 2.

At the end of this summer, the GSoC journey for GitHub Checks API Project comes to an end as well. In this blog post, I’ll show you our works during the last month:

  • Pipeline Support

  • Rerun Request Support

  • Git SCM Support

  • Documentation

All the above features will be available in our planned 1.0.0 version of Checks API Plugin and GitHub Checks Plugin.

Coding Phase 3 Demo

Pipeline Support

The pipeline support allows users to directly publish checks in their pipeline script without depending on any other consumers.

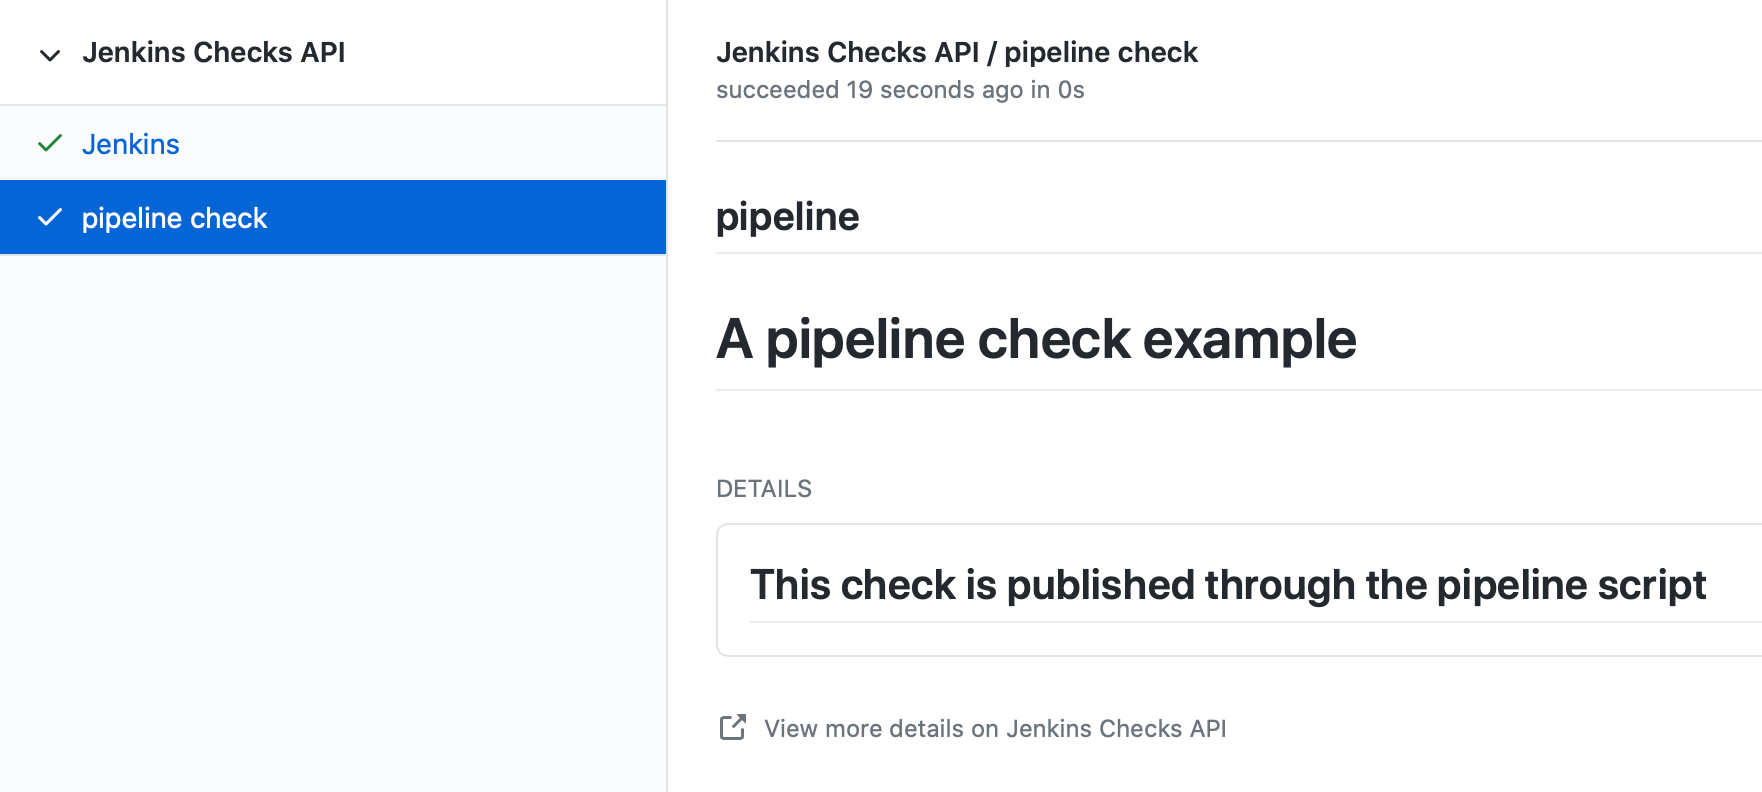
Pipeline Checks

The check in the above screenshot is published by script:

publishChecks name: 'pipeline check', title: 'pipeline ', summary: '# A pipeline check example',text: "## This check is published through the pipeline script",detailsURL: 'https://ci.jenkins.io'

If you want to publish checks to GitHub, please install the GitHub implementation and refer to the GitHub API documentation for the requirements for each field. A default value (build link) for detailsURL will be provided automatically.

This feature can be useful when many stages exist in your pipeline script and each takes a long time: you can publish a check for each stage to keep track of the build.

Rerun Request Support

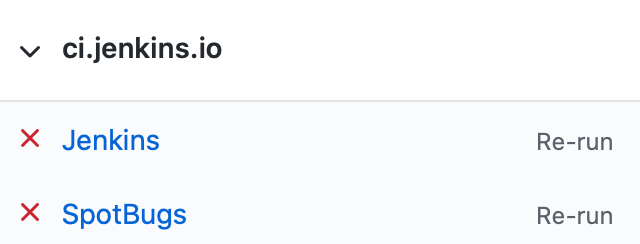
The rerun request allows GitHub users to rerun the failed builds. When a build failed (which leads to a failed check), a Re-run button will be added automatically by GitHub.

Failed Checks

By clicking the Re-run button, Jenkins will reschedule a build for the last commit of this branch.

Since all checks of a commit are produced by a single build, you don’t have to rerun all failed checks, just rerun any one of the failed check will refresh all checks.

Git SCM Support

Thanks to Ullrich's great help, the GitHub Checks Plugin now supports Git SCM. This means now you can publish checks for your freestyle project or any other projects that use Git SCM.

Document

Consumers Guide and Implementation Guide are now available. As a Jenkins developer, you can now start consuming our API or even providing an implementation for other SCM platforms beside GitHub.

Acknowledgment

The whole GitHub Checks API project is started as a Google Summer of Code project. Much appreciate my mentors (Tim and Ullrich) for their great help during the whole summer. Also huge thanks to the Jenkins GSoC SIG and the whole community for the technique support and resources.

Custom Distribution Service : Phase 3 Blogpost

$
0
0

Hello everyone,

This is the final blog post for the Custom Distribution Service project during the Google Summer of Code timeline. I have mixed feelings since we are almost near the finish line for one of the most amazing open source programs out there. However, it is time to wrap things up for this project and achieve a state where the project can be built upon and extended further. This phase has been super busy with respect to the bug fixes, testing and getting the project hosted, so let us get straight into the phase 3 updates.

Fixes and Code quality assurance

Set Jenkinsfile agent to linux

We realised that the build was failing on windows and that there was not really a use-case for running it on windows for right now. Maybe it could be on a future roadmap. Therefore, we decided to shift the testing to only linux agents with respect to running the tests on the jenkins server.

Backend port error message

Spring boot has a default message on the port:8080 and therefore we wanted to change it to a custom message on the backend. So the major takeaway here is that we needed to implement the Error Controller interface and include a custom message in it. This was technical debt from the last phase and was completed and merged during this phase.

  • Pull Request #92

PMD Analysis

In order to enhance the quality of the code, the PMD source code analyser was applied to the project. It helped me catch tons of errors. When the initial PMD check was run and we found approximately 162 PMD errors. We realised some of them were not relevant and some of them could be fixed later.

Findbugs Analysis

Another tool to improve code quality that we included in this phase was findbugs. It did catch around 5-10 bugs in my code which I immediately resolved. Most of them were around the Closeable HTTP Request and an easy fix was the try with resources.

Jacoco Code Coverage

We needed to make sure most of the code we write had proper coverage for all branches and lines. Therefore we decided to include a JaCoco Code Coverage reporter that helped us find the uncovered lines and areas we need to improve coverage on.

Remove JCasC generation

While developing the service we quickly realised that the generation of the war package broke if we included a configuration as code section but did not provide a path to the corresponding required yml file. Therefore we took a decision to remove the casc section all together. Maybe it will comeback in a future patch

  • Pull Request link: #127

  • Issue link: #65

Minor Fixes

  • Logging Fix: #99

  • Docs Fix : link: #120

  • Update Center Dump Fix : link: #125

  • Class Path Fix: link: #126

  • Release Drafter Addition: link: #136

Front end

There was no community configuration link present for navigation which was added here. Now it is easier to navigate to the community page from the home page itself.

Docker updates

Build everything with Docker

This was one of the major changes this phase with respect to making the service very easy to spin up locally, this change will greatly help community adoption since it eliminates the tools one needs to install locally. Initially the process was to run maven locally, generate all of the files and then copy all of its contents into the container. However, with this change we are going to generate all of the files inside the docker container itself. Allowing the user to just run a couple of commands to get the service up and running.

So some of the major changes we did with respect to the dockerfile was:

a) Copy all of the configuration files and pom.xml into the container.

b) Run the command mvn clean package inside the container which generates the jar.

c) Run the jar inside the container.

Hosting updates

This process was supposed to be a future roadmap, however the infra team approved and was super helpful in making this process as smooth as possible. Thanks to Gavin, Tim and Oblak for making this possible. Here is the google group dicussion

The project has now been hosted here as a preview. It still needs some fixes to be fully functional.

  • Infra Docker PR #131

  • Infra Project Addition PR link: #393

Testing Updates

Unit test the services

With respect to community hosting and adoption, testing of the service one of the most important and major milestones for this phase was to test the majority of the code and we have completed the testing with flying colors. All of the services have been completely unit tested, which is a major accomplishment. For the testing of the service we decided to go with wiremock which can be used to mock external services. Kezhi’s comment helped us to understand what we needed to do since he had done something quite similar in his Github Checks API project.

So we basically wiremocked the update-center url and made sure we were getting the accurate response with appropriate control flow logic tested.

wireMockRule.stubFor(get(urlPathMatching("/getUpdateCenter"))
                .willReturn(aResponse()
                        .withStatus(200)
                        .withHeader("Content-Type", "application/json")
                        .withBody(updateCenterBody)));

Add Update Center controller tests

Another major testing change involved testing the controllers. For this we decided to use the wiremock library in java to mock the server response when the controllers were invoked.

For example: If I have a controller that serves in an api called /api/plugin/getPluginList wiremock can be used to stub out its response when the system is under test. So we use something like this to test it out.

 when(updateService.downloadUpdateCenterJSON()).thenReturn(util.convertPayloadToJSON(dummyUpdateBody))

When the particular controller is called the underlying service is mocked and it returns a response according to the one provided by us. To find more details the PR is here.

Add Packager Controller Tests

Along with the update center controller tests another controller that needed to be tested was the packager controller. Also we needed to make sure that all the branches for the controllers were properly tested. Additional details can be found in the PR below.

Docker Compose Tests

One problem that we faced the entire phase was the docker containers. We regularly found out that due to some changes in the codebase the docker container build sometimes broke, or even sometimes the inner api’s seemed to malfunction. In order to counteract that we decided to come up with some tests locally. So what I did was basically introduce a set of bash scripts that would do the following:

a) Build the container using the docker-compose command.

b) Run the container.

c) Test the api’s using the exposed port.

d) Teardown the running containers.

User Documentation

We also included a user docs guide so that it makes it super easy to get started with the service.

Future Roadmap

This has been a super exciting project to work on and I can definitely see this project being built upon and extended in the future.

I would like to talk about some of the features that are left to come in and can be taken up in a future roadmap discussion

a) JCasC Support:

Description: Support the generation of a Jenkins Configuration as Code file asking the user interactively for the plugins they select what would be the configuration they would want eg: If the user selects the slack plugin we need to ask him questions like what is the slack channel? what is the token? etc, and on the basis of this generate a casc file. This feature was initially planned to go into the service but we realised this is a project in its own capacity.

b) Auto Pull Request Creation:

Description: Allow users to create a configuration file and immediately open a pull request on github without leaving the user interface. This was originally planned using a github bot and we started the work on it. But we were in doubt if the service would be hosted or not and therefore put the development on hold. You can find the pull requests here:

  • Github Controller #72

  • Pull Request Creation Functions #66

c) Synergy with Image Controller

Description: This feature requires some planning, some of the questions we can ask are:

a) Can we generate the images (i.e Image Controller). b) Can we have the service as a multipurpose generator ?

Statistics

This phase has been the busiest of all phases and it has involved a lot of work, more than I had initially expected in the phase. Although lines of code added is not an indication of work done, however 800 lines of Code added is a real personal milestone for me.

Pull Requests Opened

26

Lines of Code Added

1096

Lines of Docs Added

200

Learn more about Jenkins' continuous evolution at CDCon

$
0
0

The Jenkins project has been around for over fifteen years and is the defacto platform for CI/CD. One of the reasons it continues to be so ubiquitous is that Jenkins constantly evolves and offers flexibility to integrate other tools that work well for your solution.

At CDCon, on October 7-8, there are two particular Jenkins talks that will focus on new directions that the Jenkins platform is evolving too and getting better and better for users.

Heard of JCasC and Not Sure Where to Start? Let me Help You!

Configuration as code is a best practice for your CI/CD setup as it makes the complex process of setting up Jenkins simpler and more reproducible. Jenkins Configuration as Code (JCasc) enables Jenkins users to define the whole configuration as a simple, plain text YAML syntax. With JCasc, setting up a new Jenkins controller is easier than ever before. To get started with JCasC some initial effort is required. This talk walks you through a basic setup for easily spinning up new Jenkins instances.

October 7 at 2:20 PM PST Speaker: Ewelina Wilkosz, Eficode

Ewelina W is passionate about making sure that her customers' software is being built, tested and released in the best possible way. And, most importantly, that software developers don’t hate the process. Ewelina has been involved in Jenkins Configuration as Code plugin development from the very beginning. This is a must-see talk where Ewelina will also share some tips and tricks. The talk will feature using Docker, Jenkins and GitHub Actions as a quick way to build… Jenkins!

Bridging the Gap with Tekton-client-plugin for Jenkins

Tekton provides Kubernetes-native CI/CD building blocks. It enables users to take full advantage of cloud-native features around scalability and high availability. Jenkins flexibility enables integration with Tekton. This talk showcases the new tekton-client-plugin for Jenkins that enables Jenkins to interact with Tekton pipelines on a Kubernetes cluster. Tekton and Jenkins are both CDF projects and this talk highlights the first steps towards better Tekton and Jenkins interoperability, a key goal of the CD Foundation.

October 7 at 11:40 AM PST Speaker: Vibhav Bobade, Red Hat

Register for CDCon

Both these talks showcase the ultimate flexibility and power of the Jenkins platform and how it continues to evolve to meet the challenges of modern-day CI/CD. Don’t miss out; register for CDCon to attend.

CDCon has pledged to donate 100% of the proceeds received from CDCon 2020 registration to charitable causes: Black Girls Code, Women Who Code and the CDF Diversity Fund. Registrants indicate which charitable fund they want their 25 USD registration fees to go to during registration. If you can’t afford the registration cost, please apply for the diversity scholarship.

Register for CDCon

Testing Jenkins 2.249.1 on Windows

$
0
0

This article describes our observations during Windows testing of the Jenkins 2.249.1 release candidate.

Upgrade testing

Jenkins 2.249.1 is a new long term support release with user interface improvements and changes in Windows support. It is the first long term support release to drop support for Microsoft.NET framework 2.0. The end of support for Microsoft.NET framework 2.0 was announced in the Windows Support Updates blog post. The Windows support upgrade guidelines describe major things to consider when upgrading Jenkins controllers and agents on Windows.

As part of our preparation for the release, we tested several configurations. This article describes our experiences with those configurations.

Upgrade approaches

We tested controller and agent upgrades from Jenkins 2.235.x to 2.249.1-rc on Windows. The tests included:

Upgrade process

Our upgrade process included:

  • Install a previous version of Jenkins controller on Windows

  • Install a previous version of Jenkins agent on Windows and configure it as a service

  • Upgrade Jenkins controller from "Manage Jenkins"

  • Restart the Jenkins Windows service for the controller

  • Upgrade the Jenkins agent on Windows with the latest agent.jar

  • Restart the Jenkins Windows service for the agent

Testing results

We successfully tested

We confirmed that we can continue our Level 1 support policy for Jenkins 2.249.1.

32 bit Windows MSI

Prior to Jenkins 2.235.3, the Jenkins LTS Windows installer was provided as a 32 bit MSI and included a bundled Java 8 runtime environment. The Jenkins agent can be downloaded and run through Java web start using the bundled Java 8 runtime environment. The agent can also be configured to run as a service using the bundled Java 8 runtime environment.

Jenkins controller

Jenkins 2.235.1 installs JRE 8u144 for 32 bit Windows. The installer configures the Jenkins controller to run as the SYSTEM user.

Refer to the Windows Installer Updates blog post for details of the controller installation process with the 32 bit MSI.

Jenkins agent

Jenkins agents on Windows are often configured to "Launch agent by connecting it to the master". The Jenkins agent configuration correctly warns that the controller must open the TCP port for inbound agents in the "Configure Global Security" page. It is easiest to allow Jenkins to choose the port (a "Random" port). Jenkins selects a random available port number and shares that port number with agents during their initial connection to the Jenkins http port.

TCP port for inbound agents

Configure the agent

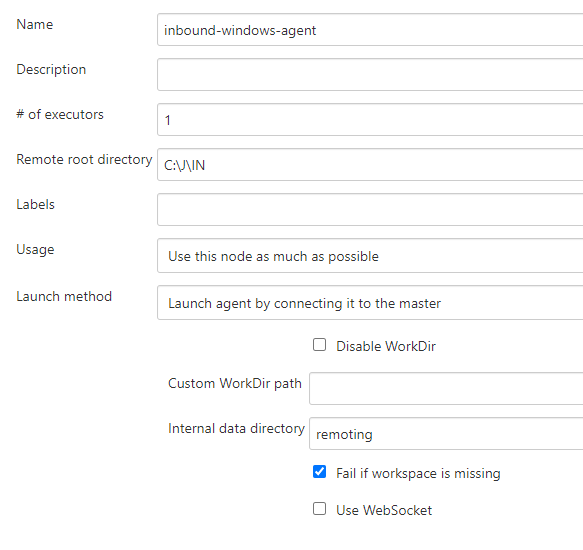
Once the Jenkins TCP port is open for inbound agents, a new agent is configured from the Jenkins "Nodes" menu This creates an "inbound Jenkins agent" that uses the Jenkins agent.jar to initiate the connection to the Jenkins controller.

Inbound agent configuration

Download the agent

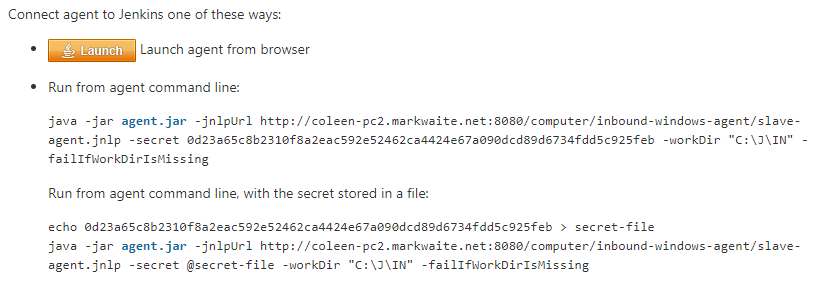
The agent starts the first time by clicking the "Launch" button on the agent configuration page (only available with Java 8). That downloads the "slave-agent.jnlp" file from the web browser.

Launch inbound agent from Jenkins

Start the agent

The downloaded file needs to be opened from a command prompt using the javaws command that is included with the bundled JRE:

C:\> "C:\Program Files (x86)\Jenkins\jre\bin\javaws.exe" -wait slave-agent.jnlp
The javaws program has been removed from the most recent releases of Java 8 and from Java 11. Refer to [Jenkins agent and icedtea] for a technique that can help users of the most recent releases of Java 8.

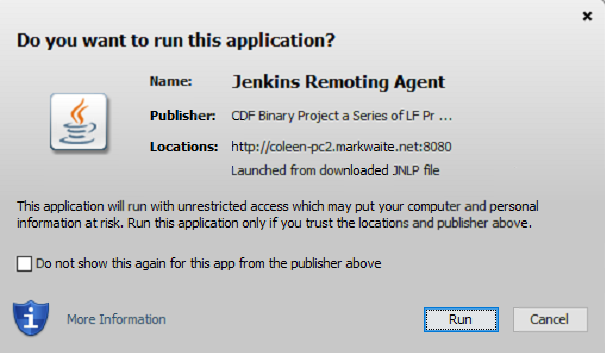
Java web start (javaws.exe) prompts for permission to run the program with this dialog:

Java Web Start prompt for remoting agent

Install the agent as a service

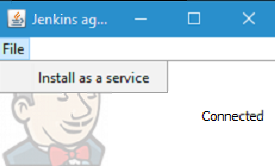
The agent runs and displays a window on the desktop with a single menu entry, "Install as a service".

Install agent as a service

When the "Install as a service" menu item is clicked, the agent is adjusted to run as a Windows service using the SYSTEM account.

Upgrade the controller

The Jenkins controller on Windows can be upgraded to Jenkins 2.249.1 from the "Manage Jenkins" page. The upgrade process downloads the new jenkins.war file, saves the current version in case of later downgrade, and offers to restart.

Upgrade Jenkins from Manage Jenkins

Upgrade the agent

The Jenkins inbound agent is not upgraded automatically. The agent administrator downloads the most recent agent.jar from their Jenkins controller, stops the running agent, and replaces the installed agent.jar with the downloaded version. The agent service will reconnect to the Jenkins controller after the administrator restarts it.

64 bit Windows MSI

Beginning with Jenkins 2.235.3, the Jenkins LTS Windows installer is a 64 bit MSI. It runs Jenkins with the 64 bit JDK (Java 8 or Java 11) selected by the user.

Jenkins controller

Jenkins 2.235.3 was installed using AdoptOpenJDK Java 8u262 in one test. It was installed using AdoptOpenJDK Java 11.0.8 in another test. In both cases, the installer configured the Jenkins controller to run with the Windows service account we had previously configured.

Refer to the Windows Installer Updates blog post for details of the controller installation process with the 64 bit MSI.

Jenkins agent

Jenkins agents on Windows are often configured to "Launch agent by connecting it to the master". The Jenkins agent configuration correctly warns that the controller must open the TCP port for inbound agents in the "Configure Global Security" page. It is easiest to allow Jenkins to choose the port (a "Random" port). Jenkins selects a random available port number and shares that port number with agents during their initial connection to the Jenkins http port.

TCP port for inbound agents

Configure the agent

Once the Jenkins TCP port is open for inbound agents, a new agent is configured from the Jenkins "Nodes" menu This creates an "inbound Jenkins agent" that uses the Jenkins agent.jar to initiate the connection to the Jenkins controller. Once the Jenkins TCP port is open for inbound agents, a new agent is configured from the Jenkins "Nodes" menu This creates an "inbound Jenkins agent" that uses the Jenkins agent.jar to initiate the connection to the Jenkins controller. Once the Jenkins TCP port is open for inbound agents, a new agent is configured from the Jenkins "Nodes" menu This creates an "inbound Jenkins agent" that uses the Jenkins agent.jar to initiate the connection to the Jenkins controller.

Inbound agent configuration

Download the agent

The agent was started the first time by clicking the "Launch" button on the agent configuration page (only available with Java 8). That downloads the "slave-agent.jnlp" file from the web browser.

Launch inbound agent from Jenkins

Start the agent with IcedTea-Web

Recent versions of Java 8 and all versions of Java 11 have removed the javaws command. Jenkins agents for Java 8 can still be started with the javaws command, but it needs to be downloaded separately from the JVM. We open "slave-agent.jnlp" from a command prompt using the javaws command that is available from AdoptOpenJDK IcedTea:

C:\> C:\icedtea-web-1.8.3.win.bin\icedtea-web-image\bin\javaws.exe -wait slave-agent.jnlp

Java web start (javaws.exe) prompts for permission to run the program with this dialog:

Java Web Start prompt for remoting agent

Install the agent as a service

The agent runs and displays a window on the desktop with a single menu entry, "Install as a service".

Install agent as a service

When the "Install as a service" menu item is clicked, the agent is installed and configured to run as a Windows service using the SYSTEM account.

Upgrading the controller

The Jenkins controller on Windows was upgraded to Jenkins 2.249.1 from the "Manage Jenkins" page. The upgrade process downloads the new jenkins.war file, saves the current version in case of later downgrade, and offers to restart.

Upgrade Jenkins from Manage Jenkins

Upgrading the agent

The Jenkins inbound agent is not upgraded automatically or from a Jenkins user interface. The agent administrator downloads the most recent agent.jar from their Jenkins controller and replaces the installed agent.jar with the downloaded version.

WAR (file) on Windows

Jenkins allows users to run the Jenkins web archive (WAR) file from a command line and then install it as a service from within Jenkins. This installation technique uses the Jenkins WAR file but does not use a Windows MSI package. The Jenkins WAR file includes the necessary components to install and configure Jenkins as a service.

Install controller as a service

When the Jenkins war file is started from a Windows command prompt, "Manage Jenkins" includes "Install as a service". An administrator selects that entry and Jenkins will configure itself to run as a service/ The installer configures the Jenkins controller to run as the SYSTEM user.

Install Jenkins as a service from Manage Jenkins

Jenkins agent

Jenkins agents on Windows are often configured to "Launch agent by connecting it to the master". The Jenkins agent configuration correctly warns that the controller must open the TCP port for inbound agents in the "Configure Global Security" page. It is easiest to allow Jenkins to choose the port (a "Random" port). Jenkins selects a random available port number and shares that port number with agents during their initial connection to the Jenkins http port.

TCP port for inbound agents

Configure the agent

After opening the Jenkins TCP port for inbound agents, we configured a new agent from the "Nodes" menu This created an "inbound Jenkins agent" that uses the Jenkins agent.jar to initiate the connection to the Jenkins controller.

Inbound agent configuration

Download the agent

The agent was started the first time by clicking the "Launch" button on the agent configuration page (only available with Java 8). That downloads the "slave-agent.jnlp" file from the web browser.

Launch inbound agent from Jenkins

Start the agent with IcedTea-Web

Recent versions of Java 8 and all versions of Java 11 have removed the javaws command. Jenkins agents for Java 8 can still be started with the javaws command, but it needs to be downloaded separately from the JVM. Open "slave-agent.jnlp" from a command prompt using the javaws command that is available from AdoptOpenJDK IcedTea-Web:

C:\> C:\icedtea-web-1.8.3.win.bin\icedtea-web-image\bin\javaws.exe -wait slave-agent.jnlp

Java web start (javaws.exe) prompts for permission to run the program with this dialog:

Java Web Start prompt for remoting agent

Install the agent as a service

The agent runs and displays a window on the desktop with a single menu entry, "Install as a service".

Install agent as a service

When the "Install as a service" menu item is clicked, the agent is installed and configured to run as a Windows service using the SYSTEM account.

Conclusion

Jenkins controller installation is best done with the new 64 bit MSI package. Previous controller installations can be upgraded to the most recent Jenkins release from within Jenkins.

Jenkins inbound agent installation is more complicated now that the javaws.exe program is not included in the JDK. The AdoptOpenJDK IcedTea-Web project allows administrators to install and configure Jenkins inbound agents with most of the ease that was available in prior Java releases.


Jenkins at DevOps World 2020

$
0
0

The annual DevOps World, formerly known as DevOps World | Jenkins World is next week - Sept 22-24, with workshops on Sept 25. Just like other events this year, DevOps World pivoted to a virtual event but that doesn’t mean there is a shortage of sessions or networking opportunities. There will be over 50 Jenkins/open source sessions and opportunities to virtually connect with over 20,000+ attendees on the event platform. Below are just a few sessions, the full agenda can be found HERE:

Jenkins: Where It Is and Where It is Going

Date: Tuesday, September 22, 7:00 a.m.-7:30 a.m (PDT)

Speaker: Oleg Nenashev

Jenkins keeps evolving to address demands from its users and contributors: configuration as code, better support of cloud-native technologies, etc. Recently, we have introduced a public roadmap for the project, and there are many key initiatives in development and preview phases. This session will cover the current state of Jenkins and what’s next for the project.

Managing DevSecOps Pipelines at Scale with Jenkins Templating Engine

Date: Tuesday, September 22, 11:30 a.m.-12:00 p.m. (PDT)

Are you currently helping build or maintain a Jenkins pipeline for more than one application or team? Are you tired of copying and pasting Jenkinsfiles and tweaking them to fit each team’s specific needs? This session will feature a live demonstration of getting up and running with the Jenkins Templating Engine (JTE). Attendees will learn how to stop creating bespoke pipelines on a per-application basis and, instead, create tool-agnostic pipeline templates that multiple teams can inherit - regardless of tech stack.

eBay’s Journey Building CI at Scale

Date: Tuesday, September 22, 12:30 p.m.-1:00 p.m.(PDT)

Speakers: Ravi Kiran Rao Bukka & Vasumathy Seenuvasan

A scalable CI platform with 6,000+ Jenkins instances serving around 43,000 builds per day on multi-cluster Kubernetes. A system built with metrics, key resource tuning, remediation’s and security in place. Join this session to hear from eBay on their journey of best practices and learnings about open source.

Machine Learning Plugins for Data Science in Jenkins

Date: Wednesday, September 23, 11:00 a.m.-11:15 a.m.(PDT)

Speaker: Loghi Perinpanayagam

Machine Learning has evolved rapidly in the software industry for recent years. Jenkins CI/CD can be a good practice to deliver a high reliable product in the end. We have done an initial startup on this plugin that can be used to build Jupyter Notebooks, Python files and JSON files in Zeppelin format. In addition, the build wrappers could be used to convert Jupyter Notebooks to Python/JSON and/or copy the files to the workspace for more actions. This Machine Learning plugin will endeavor to satisfy the data science community together with the help of other plugins. Success of this plugin will definitely serve much benefits to the community and Jenkins.

Jenkins UI Gets a Makeover

Date: Thursday, September 24, 7:30 a.m.-8:00 a.m.(PDT)

Speakers: Felix Queiruga& Jeremy Hartley

An overview of the Jenkins UI overhaul. We are taking an iterative approach to gradually refresh the Jenkins UI. This approach will make Jenkins look fresh and modern, without changing the way users are accustomed to working with Jenkins or require plugins to be rewritten to render properly in the new Jenkins UI. Join this session to learn the changes we’ve made and how you can help to improve the Jenkins UI.

The event is free to everyone and recordings will be available on-demand. Registration is required to access the on-demand recordings. And don’t forget to visit the CDF booth in the expo hall for one on one Q&A’s with Jenkins experts.

2020 Jenkins Board and Officer elections. Nominations and voter registration are open!

$
0
0
Jenkins 2020 Elections are over, thanks to all participants! Please see the results announcement.

We are happy to announce the 2020 elections in the Jenkins project! Nominations are open for two governance board and for all five officer positions, namely: Security, Events, Release, Infrastructure, and Documentation. The board positions and officer roles are an essential part of Jenkins' community governance and well-being. We invite Jenkins contributors and community members to sign-up for elections and to nominate contributors for the elected roles. Deadline for nominations is Oct 15, voter registration ends on Nov 02.

These are the second elections held by the Jenkins project. During the 2019 elections, we elected 3 board members and 5 officers. You can find the voting results here. This year, we decided to make a few changes in the election process based on the 2019 elections feedback.

register button

Key dates

  • Sep 24 - Nominations open, voting sign-up begins.

  • Oct 15 - Board and officer nominations deadline.

  • Oct 26 (or later) - List of candidates is published, including personal statements.

  • Nov 10 - Voting begins. Condorcet Internet Voting Service will be used for voting.

  • Nov 24 - Voting sign-up is over.

  • Nov 27 - Voting ends, 11PM UTC.

  • Dec 03 - Election results are announced and take effect.

Signing up for voting

Any Jenkins individual contributor is eligible to vote in the election if there was a contribution made before September 01, 2020.Contribution does not mean a code contribution, all contributions count: documentation patches, code reviews, substantial issue reports, issues and mailing list responses, social media posts, testing, etc. Such a contribution should be public.

You can register to vote in one of two ways:

  1. Fill out this Google Form. This way requires logging into your Google Account to verify authenticity.

  2. Send an email to jenkins-2020-elections@googlegroups.com. You will need to provide the information specified here.

During the registration period, the election committee will process the form submissions and prepare a list of the registered voters. In the case of rejection, one of the election committee members will send a rejection email. Every individual contributor is expected to vote only once.

Deadline for the voter registration is November 24.

Nominating contributors

Suggestions from the community members are highly valued, and the board welcomes additional nominations. If you feel that a particular person is well suited to help guide Jenkins, please submit a name and the reason for your nomination to jenkinsci-board@googlegroups.com. Self nominations are also welcome.

Deadline for nominations is October 15.

Terms

The terms of office for these elected positions are:

  • Officer positions (1 year): December 03, 2020 to December 2, 2021

  • Governing board member (2 years): December 03, 2020 to December 2, 2022

Elections committee

The 2020 elections are coordinated by the Jenkins Governance Board members who are not up for re-election this year:Alex Earl,Ullrich Hafner, andOleg Nenashev. These contributors are responsible for managing the process, preparing the nominee list for elections, forming and verifying the voter list, processing the votes, and announcing the results.

You can contact the election committee via jenkins-2020-elections@googlegroups.com. Please use this email for any queries and feedback regarding the elections.

Documenting Jenkins on Kubernetes Introduction

$
0
0

I’m thrilled to announce that I will be participating in Google Season of Docs (GSoD) 2020 with the Jenkins project. I started contributing to Jenkins documentation during the technical writer exploration phase for Google Season of Docs 2020 and I must say, my journey so far has been nothing short of amazing majorly because of the supportive community behind this project. I chose the Jenkins project because I understood this project from a user point of view as I had been exposed to setting up, configuring, and using Jenkins to automate CI/CD processes. I piqued interest in two of Jenkins project ideas,Plugin documentation migration and update and Document Jenkins on Kubernetes, submitted proposals for these two projects and to my utmost joy, the latter was selected.

In this article, I’m going to be explaining what my selected project is about and why this project is important to the Jenkins community and its users.

Introduction

Kubernetes is a platform-agnostic container orchestration tool created by Google and heavily supported by the open-source community as a project of the Cloud Native Computing Foundation. It allows you to use container instances and manage them for scaling and fault tolerance. It also handles a wide range of management activities that would otherwise require separate solutions or custom code, including request routing, container discovery, health checks, and rolling updates.

Kubernetes is compatible with the majority of CI/CD tools which allow developers to run tests, deploy builds in Kubernetes and update applications with no downtime. One of the most popular CI/CD tools now is Jenkins for the following reasons:

  1. It is open-source and free.

  2. it is user-friendly, easy to install and does not require additional installations or components.

  3. Jenkins is also quite easy to configure, modify and extend.

  4. It deploys code and generates test reports.

  5. It also boasts a rich plugin ecosystem. The extensive pool of plugins makes Jenkins flexible and allows building, deploying and automating across various platforms.

  6. Jenkins can be configured according to the requirements for continuous integrations and continuous delivery.

  7. Jenkins is available for all platforms and different operating systems, whether it is OS X, Windows or Linux.

  8. Most of the integration work is automated. Hence fewer integration issues. This saves both time and money over the lifespan of a project.

The following reasons have made Jenkins on Kubernetes a popular theme for Jenkins users, however, there’s currently no central location for documentation describing Jenkins on Kubernetes, thereby making it difficult for Jenkins on Kubernetes users to navigate and find information. This project would create a new Kubernetes Volume on Jenkins.io which would describe the concepts, techniques, and choices for Kubernetes users running Jenkins.

Current State

There are a lot of presentations and articles about running Jenkins on Kubernetes, however, there’s no central location for describing Jenkins on Kubernetes. This makes it difficult for:

  • Jenkins on Kubernetes users to navigate and find information

  • Track, update and maintain information on Jenkins on Kubernetes

Project Improvements

To solve the existing issue with Jenkins on Kubernetes documentation, a new Kubernetes volume will be created on Jenkins.io. This Volume is going to aggregate user guides, information on cloud providers and demos on Jenkins on Kubernetes. You can find the proposed contents for the new volume here. Feel free to comment on any suggestions you might have in the proposed content doc.

This project will also provide the following advantages:

  • Improve the user experience of Jenkins on Kubernetes users by giving them a one-stop-shop for information on Jenkins on Kubernetes.

  • Make it easy to track, update and maintain information on Jenkins on Kubernetes using the Solutions page

  • Reference the existing community documentation for Jenkins on K8s (plugins and tools/integrations).

  • How to guides, tutorials and explanations of concepts and techniques in Jenkins on Kubernetes.

  • Just-In-Time documentation which means that rather than documenting every feature comprehensively, we will produce and release documentation in bits but continuously based on popular questions, feedback and area of interests gathered from the community and users.

Project Timeline

Find below a summary of the project timeline.

Community bonding (August 17 - September 13)

  • Set up a communication channel and time (due to time difference).

  • Refine my goals and set expectations on both sides.

  • Learn more about the community and Jenkins.

  • Gather and thoroughly study existing resources that will be useful and helpful to the project.

  • Pre-planning of the project

  • Contacting Stakeholders and onboarding contributors

Documentation Period

This period is going to be focused on creating contents which include user guides, tutorials, demos, etc. for Jenkins on Kubernetes. Some of the topics to be covered include Installing Jenkins on Kubernetes, Administering Jenkins on Kubernetes, Cloud providers and much more.

Documentation Timeline

1st Month (September - October)

Some basic prerequisites for installing jenkins on kubernetes include docker, a kubernetes cluster, and optionally Helm or the Jenkins Operator for Kubernetes.

Helm is a package manager which automates the process of installing, configuring, upgrading, and removing complex Kubernetes application. A Helm chart defines several Kubernetes resources as a set. Helm can make deployments easier and repeatable because all resources for an application are deployed by running one command.

Helm has two elements, a client (helm) and a server (Tiller). The server element runs inside a Kubernetes cluster and manages the installation of charts. With Helm, configuration settings are kept in values.yaml file separate from the manifest formats. The configuration values can be changed according to application need without touching the rest of the manifest.

On the other hand, the Jenkins operator is a Kubernetes native operator which fully manages Jenkins on Kubernetes. It is easy to install with just a few manifests and allows users to configure and manage Jenkins on Kubernetes. To run jenkins-operator, you need to have a running Kubernetes cluster and kubectl installed.

The Jenkins Operator provides out of the box:

  • Integration with Kubernetes — preconfigured kubernetes-plugin for provisioning dynamic Jenkins Slaves as Pods

  • Pipelines as Code — declarative way to version your pipelines in VCS

  • Extensibility via Groovy scripts or Configuration as Code plugin-customize your Jenkins, configure OAuth authorization and more

  • Security and Hardening — an initial security hardening of Jenkins instance via Groovy scripts to prevent security vulnerabilities

In the first month, the focus will be on documenting an introductory section. This section will include but is not limited to Setting up Kubernetes cluster, Installing Jenkins on Kubernetes, exploring the various approaches by which this can be achieved such as using helm package manager or the Jenkins Operator as explained above and Administering Jenkins on Kubernetes.

2nd Month (October - November)

In the second month, the focus will be on documenting how to setup up CI/CD pipelines using Jenkins and Kubernetes on different cloud providers. Some of the cloud providers we will be looking at include but are not limited to:

  • Amazon Web Service (AWS)

  • Azure Kubernetes Service

  • Google Cloud

3rd Month (November - December)

In the final month, the focus will be on creating demos and tutorials, submitting project report, evaluation of mentors and finally, publishing a report of my experience as a participant in Season of Docs.

Conclusion

Jenkins community is actively working towards improving its documentation to create a better experience for Jenkins users and invites technical writers to join the community and contribute to the Jenkins on Kubernetes project.

To contribute to the Jenkins on Kubernetes project, simply join the Jenkins documentation Gitter channel and drop a message, you can also find the Google season of docs office hour notes and recordings for Jenkins on Kubernetes here. GSOD office hours take place twice a week on Mondays and Thursdays between 6pm GMT+1 and 7pm GMT+1, if you would like to be part of these meetings, you can indicate interest in the Jenkins DocumentationGitter channel and we would be happy to have you.

If you are also a newcomer and would like to contribute to Jenkins, documentation is a great place to contribute. A lot of small patches can be done from the GitHub web interface even without cloning repositories locally. You can find some good first issues to get started with here.

Find more information on contributing to Jenkins documentation here. If you have further questions about the Jenkins on Kubernetes project or contributing to Jenkins, you can reach out on the Jenkins documentation Gitter channel.

Additional Resources

Cross-Industry DevOps: 3 Firms Get It Right with Jenkins

$
0
0

Some months ago, we took a significant step in helping the Jenkins community share their stories of how they improved workflows, sped up testing, and saw better quality results after implementing Jenkins into their software development processes.

By the end of the year, we’ll have over 50 Jenkins user stories published with many more in the pipeline. We invite you to explore them all but wanted to share three inspiring examples highlighting how various organizations approach — and implement — Jenkins in the workplace. Enjoy!

Story 1: Jenkins is the way to tackle any challenge

Enterprise-wide CI/CD solution caters to the complex problems that project teams face each day, as told by Jenkins user Mark Baumann:

“Our development teams work in a wide range of projects and domains. We have a very diverse tooling landscape since the projects work with all kinds of different software tools. Of course, projects in the embedded domain will have different toolsets than those working in the automotive domain.

Each project team created its own CI Toolchain, which caused a lot of work for the developers and the IT department. Each project needed to set up their own virtual machine, install and manage their own CI Server, Version Management, and whatever they needed. Creating such a toolchain could easily take up weeks until it was running because there was no standard solution and each team had to start from scratch.”

Discover how ITK-Engineering GmbH developed a company-wide, common, internal CI/CD toolchain and increased the number of builds for each project and how nearly all departments are now practicing CI/CD. The full Jenkins / ITK Engineering story is here!

Story 2: Jenkins is the way to add spicy flavors to agency processes

A creative agency start-up simplifies the build, test, and deploy steps, allowing the small team to focus more on the deliverables and less on the process. As told by Jenkins user Erik Woitschig:

“It was quite a challenge to streamline and combine all the services to build an artifact to deploy. Because of our micro service-oriented and distributed architecture, the most challenging part of rethinking our build, test, and deploy process was to figure out how best to sync the deployment of all services. We also had to retest builds properly to go live or initiate a rollback.

With Jenkins and some pipelines, it was relatively simple to create a local and distributed artifact of our application to quickly share and deploy across the team, locally and globally.”

Because Jenkins is simple to install and easy to maintain, Muzkat has increased productivity far beyond that of a 3-person team. Read on to learn how this bootstrapped Berlin-based agency is making a go of it with Jenkins. The full Jenkins / Muzkat story is here!

Story 3: Jenkins is the way to focus on your code

As demands for the Wright Medical’s services grew, they required an agile DevOps environment that would grow and scale along with the tech team, as told by Jenkins user Christophe Carpentier:

“What was critical to our success was the stability of Jenkins and a significant number of reliable plugins! We could take a few plugins, set up our workflow, and add GitLab and SonarQube integration without ever stopping or losing data in over a year. We found that all of the problems we encountered were our own, and that is why it was critical to make Jenkins an essential part of our workflow.

With this implementation, Jenkins allows more than would be manually possible. It flawlessly updates our staging environments, blocks commits based on the SonarQube analysis, and provides us with near-instant feedback on merge requests.”

Learn how Wright Medical supports a growing dev team by switching to an agile DevOps process that allows for automatic daily releases — versus weekly manual builds. Best of all, it’s letting the developers focus on building great code rather than infrastructure. The full Jenkins / Wright Medical story is here!

What are you building?

Hope you enjoy these Jenkins user stories. You’ll find that “Jenkins Is The Way” website is a global showcase of how developers and engineers build, deploy, and automate great stuff with Jenkins. If you want to share your story, we’ll send you a free Jenkins Is The Way T-Shirt in return. Hope to hear from you soon!

A sustainable pattern with shared library

$
0
0

This post will describe how I use a shared library in Jenkins. Typically when using multibranch pipeline.

If possible (if not forced to) I implement the pipelines without multibranch. I previously wrote about how I do that with my Generic Webhook Trigger Plugin in a previous post. But this will be my second choice, If I am not allowed to remove the Jenkinsfile:s from the repositories entirely.

Context

Within an organization, you typically have a few different kinds of repositories. Each repository versioning one application. You may use different techniques for different kinds of applications. The Jenkins organization on GitHub is an example with 2300 repositories.

The Problems

Large Jenkinsfiles in every repository containing duplicated code. It seems common that the Jenkinsfile:s in every repository contains much more than just the things that are unique for that repository. The shared libraries feature may not be used, or it is used but not with an optimal pattern.

Installation specific Jenkinsfile:s that only work with one specific Jenkins installation. Sometimes I see multiple Jenkinsfile:s, one for each purpose or Jenkins installation.

No documentation and/or no natural place to write documentation.

Development is slow. Adding new features to repositories is a time consuming task. I want to be able to push features to 1000+ repositories without having to update their Jenkinsfile:s.

No flexible way of doing feature toggling. When maintaining a large number of repositories it is sometimes nice to introduce a feature to a subset of those repositories. If that works well, the feature is introduced to all repositories.

The Solution

My solution is a pattern that is inspired by how the Jenkins organization on GitHub does it with its buildPlugin(). But it is not exactly the same.

Shared Library

Here is how I organize my shared libraries.

Jenkinsfile

I put this in the Jenkinsfile:s:

buildRepo()

Default Configuration

I provide a default configuration that any repository will get, if no other configuration is given in buildRepo().

I create a vars/getConfig.groovy with:

defcall(givenConfig = [:]) {def defaultConfig = [/**
      * The Jenkins node, or label, that will be allocated for this build.
      */"jenkinsNode": "BUILD",/**
      * All config specific to NPM repo type.
      */"npm": [/**
        * Whether or not to run Cypress tests, if there are any.
        */"cypress": true
    ],"maven": [/**
        * Whether or not to run integration tests, if there are any.
        */"integTest": true
    ]
  ]// https://e.printstacktrace.blog/how-to-merge-two-maps-in-groovy/def effectiveConfig merge(defaultConfig, givenConfig)
  println "Configuration is documented here: https://whereverYouHos/getConfig.groovy"
  println "Default config: " + defaultConfig
  println "Given config: " + givenConfig
  println "Effective config: " + effectiveConfigreturn effectiveConfig
}

Build Plan

I construct a build plan as early as possible. Taking decisions on what will be done in this build. So that the rest of the code becomes more streamlined.

I try to rely as much as possible on conventions. I may provide configuration that lets users turn off features, but they are otherwise turned on if they are detected.

I create a vars/getBuildPlan.groovy with:

defcall(effectiveConfig = [:]) {def derivedBuildPlan = ["repoType": "NOT DETECTED""npm": [],"maven": []
  ]

  node {
    deleteDir()
    checkout([$class: 'GitSCM',branches: [[name: '*/branchName']],extensions: [
          [$class: 'SparseCheckoutPaths',sparseCheckoutPaths:
            [[$class:'SparseCheckoutPath', path:'package.json,pom.xml']]
          ]
      ],userRemoteConfigs: [[credentialsId: 'someID',url: 'git@link.git']]
    ])if (fileExists('package.json')) {def packageJSON = readJSON file: 'package.json'
      derivedBuildPlan.repoType = "NPM"
      derivedBuildPlan.npm.cypress = effectiveConfig.npm.cypress && packageJSON.devDependencies.cypress
      derivedBuildPlan.npm.eslint = packageJSON.devDependencies.eslint
      derivedBuildPlan.npm.tslint = packageJSON.devDependencies.tslint
    } elseif (fileExists('pom.xml')) {
      derivedBuildPlan.repoType = "MAVEN"
      derivedBuildPlan.maven.integTest = effectiveConfig.maven.integTest && fileExists('src/integtest')
    } else {throwRuntimeException('Unable to detect repoType')
    }

    println "Build plan: " + derivedBuildPlan
    deleteDir()
  }return derivedBuildPlan
}

Public API

This is the public API, this is what I want the users of this library to actually invoke.

I implement a buildRepo() method that will use that default configuration. It can also be called with a subset of the default configuration to tweak it.

I create a vars/buildRepo.groovy with:

defcall(givenConfig = [:]) {def effectiveConfig = getConfig(givenConfig)def buildPlan = getBuildPlan(effectiveConfig)if (effectiveConfig.repoType == 'MAVEN')
    buildRepoMaven(buildPlan);
  } elseif (effectiveConfig.repoType == 'NPM')
    buildRepoNpm(buildPlan);
  }
}

A user can get all the default behavior with:

buildRepo()

A user can also choose not to run Cypress, even if it exists in the repository:

buildRepo(["npm": ["cypress": false
  ]
])

Supporting Methods

This is usually much more complex, but I put some code here just to have a complete implementation.

I create a vars/buildRepoNpm.groovy with:

defcall(buildPlan = [:]) {
  node(buildPlan.jenkinsNode) {
    stage("Install") {
      sh "npm install"
    }
    stage("Build") {
      sh "npm run build"
    }if (buildPlan.npm.tslint) {
      stage("TSlint") {
        sh "npm run tslint"
      }
    }if (buildPlan.npm.eslint) {
      stage("ESlint") {
        sh "npm run eslint"
      }
    }if (buildPlan.npm.cypress) {
      stage("Cypress") {
        sh "npm run e2e:cypress"
      }
    }
  }
}

I create a vars/buildRepoMaven.groovy with:

defcall(buildPlan = [:]) {
  node(buildPlan.jenkinsNode) {if (buildPlan.maven.integTest) {
      stage("Verify") {
        sh "mvn verify"
      }
    } else {
      stage("Package") {
        sh "mvn package"
      }
    }
  }
}

Duplication

The Jenkinsfile:s are kept extremely small. It is only when they, for some reason, diverge from the default config that they need to be changed.

Documentation

There is one single point where documentation is written, the getConfig.groovy-file. It can be referred to whenever someone asks for documentation.

Scalability

This is a highly scalable pattern. Both with regards to performance and maintainability in code.

It scales in performance because the Jenkinsfile:s can be used by any Jenkins installation. So that you can scale by adding several completely separate Jenkins installations, not only nodes.

It scales in code because it adds just a tiny Jenkinsfile to repositories. It relies on conventions instead, like the existence of attributes in package.json and location of integration tests in src/integtest.

Installation Agnostic

The Jenkinsfile:s does not point at any implementation of this API. It just invokes it and it is up to the Jenkins installation to implement it, with a shared libraries.

It can even be used by something that is not Jenkins. Perhaps you decide to do something in a Docker container, you can still parse the Jenkinsfile with Groovy or (with some magic) with any language.

Feature Toggling

The shared library can do feature toggling by:

  • Letting some feature be enabled by default for every repository with name starting with x.

  • Or, adding some default config saying "feature-x-enabled": false, while some repos change their Jenkinsfile:s to buildRepo(["feature-x-enabled": true]).

Whenever the feature feels stable, it can be enabled for everyone by changing only the shared library.

Viewing all 1088 articles
Browse latest View live