Quantcast
Channel: Jenkins Blog
Viewing all 1088 articles
Browse latest View live

Upcoming June Jenkins Events

$
0
0

Jenkins revolution

It is hard to believe that the first half of 2016 is almost over and summer is just around the corner. As usual, there are plenty of educational Jenkins events planned for this month. Below lists what’s happening in your neck of the woods:

Online JAM

North America JAMs

Europe JAM


GSoC Project Intro: Support Core Plugin Improvements

$
0
0

About me

I am Minudika Malshan, an undergraduate student in Computer Science and Engineering from University of Moratuwa, Sri Lanka.

As a person who is passionate in open source software development and seeking for new knowledge and experience, I am willing to give my contribution for this project.

Abstract

The Support-Core Plugin provides the basic infrastructure for generating "bundles" of support information with Jenkins. There are two kinds of bundles.

  • Automatic bundles: Bundles which are generated and get saved in $JENKINS_HOME/support once per hour starting 15 seconds after Jenkins starts the plugin. The automatic bundles are retained using an exponential aging strategy. Therefore it’s possible to have a bunch of them over the entire lifetime after the plugin installing the plugin.

  • On demand bundles: These bundles are generated from the root "Support" action.

However current support-core plugin is not much user friendly. The object of this project is to make it more user friendly by adding some features which make a sophisticated environment for the user who use support plugin.

In this project scope, there are three features and improvements we are going to consider.

  1. Ease the bundles management by the administrator (JENKINS-33090)

  2. Adding an option to anonymize customer labels (strings created by the user such as name of a job, folder, view, slave, and template etc). (JENKINS-33091)

  3. Allowing user to create an issue and submit a bundle into the OSS tracker using the support-core plugin. (JENKINS-21670)

Arnaud Héritier and Steven Christou are guiding me through the project as my mentors.

Popup window

Tasks and Deliverables

Ease the bundles management by the administrator.

Under this task, the following functions are going to be implemented.

  1. Listing bundles stored on the jenkins instance with their details.

  2. Allowing user to download each bundle.

  3. Allowing user to delete each bundle or all bundles.

  4. Allowing user to browse the content of each bundle.

  5. Automatically purging old bundles.

Popup windowPopup window

Enabling user to create an issue and submit a bundle into the OSS tracker

When a Jenkins user sees an issue, he/she commonly contacts his support contacts (Jenkins instance admins) and then Jenkins admins troubleshoot the issue. The objective of this task is to implement a feature which enables the user to report an issue to a admin through support core plugin.

When creating bundles to attach with the ticket, it is important to protect the privacy of the user who creates the ticket. When considering doing that, anonymizing user created labels (texts) comes to the front.

Adding an option to anonymize customer labels

The following functions will be implemented under this taks.

  1. Creating randomized tokens for labels created by users.

  2. Producing a mapping for those labels.

  3. Substituting encoded labels into all the files included in the support bundle.

When creating randomized tokens, it would be much useful and effective if we can create those tokens in a way they make sense to humans. (i.e. readable to humans). For that, I am hoping to use a suitable java library to create human friendly random tokens. One of such libraries is wordnet-random-name.

However in order to substitute randomized tokens, all files included in the bundle should be read. This can become inefficient when bundle consists of large number of files. Therefore it’s important to follow an optimized method for this task.

Jenkins World Agenda is Live!

$
0
0

Jenkins World

Join us in Santa Clara, California on September 13-15, 2016!

We are excited to announce the Jenkins World agenda is now live. There will be 50+ sessions, keynotes, training, certifications and workshops. Here are a few highlights of what you can expect:

High level topics

  • Continuous delivery

  • DevOps

  • Microservices architectures

  • Testing

  • Automation tools

  • Plugin development

  • Pipeline

  • Best practices

  • And much more

Additionally, Jenkins World offers great opportunities for hands-on learning, exploring and networking:

Plugin Development Workshop

Due to its popularity in previous years, we are bringing back the plugin development workshop. This workshop will introduce developers to the Jenkins plugin ecosystem and terminology. The goal is to provide a cursory overview of the resources available to Jenkins plugin developers. Armed with this information, Jenkins developers can learn how to navigate the project and codebase to find answers to their questions.

Birds of a Feather Sessions

BoFs, as they are usually known, will be a new addition to Jenkins World this year. Sessions will be curated on various technical topics from DevOps to how enterprises are integrating Jenkins in their environment. Discussions will be lead by the industry’s brightest minds who have an influence in shaping the future of Jenkins.

Ask the Experts

Got a Jenkins question that’s been keeping you up at night? Need to bounce ideas off somebody? Or you just need someone to fix your Jenkins issue? This is your chance to get connected with the Jenkins Experts. Experts will be on hand to help with all your Jenkins needs on Sept 14th & 15th.

Prepare for Jenkins Certification

The objective of this session is to help you assess your level of readiness for the certification exam - either the Certified Jenkins Engineer (CJE/open source) certification or the Certified CloudBees Jenkins Platform Engineer (CCJPE/CloudBees-specific) certification. After an overview about the certification program, a Jenkins expert from CloudBees will walk you through the various sections of the exam, highlighting the important things to master ahead of time, not only from a pure knowledge perspective but also in terms of practical experience. This will be an interactive session.

Hope to see you at Jenkins World 2016!

Don’t miss out on Super Early Bird Rate $399. Price goes up after July 1.

Jenkins Pipeline Scalability in the Enterprise

$
0
0
This is a guest post by Damien Coraboeuf, Jenkins project contributor and Continuous Delivery consultant.

Implementing a CI/CD solution based on Jenkins has become very easy. Dealing with hundreds of jobs? Not so much. Having to scale to thousands of jobs? Now this is a real challenge.

This is the story of a journey to get out of the jungle of jobs…​

Journey out of the jungle of jobs

Start of the journey

At the beginning of the journey there were several projects using roughly the same technologies. Those projects had several branches, for maintenance of releases, for new features.

In turn, each of those branches had to be carefully built, deployed on different platforms and versions, promoted so they could be tested for functionalities, performances and security, and then promoted again for actual delivery.

Additionally, we had to offer the test teams the means to deploy any version of their choice on any supported platform in order to carry out some manual tests.

This represented, for each branch, around 20 jobs. Multiply this by the number of branches and projects, and there you are: more than two years after the start of the story, we had more than 3500 jobs.

3500 jobs. Half a dozen people to manage them all…​

Thousands of jobs for a small team

Preparing the journey

How did we deal with this load?

We were lucky enough to have several assets:

  • time - we had time to design a solution before the scaling went really out of control

  • forecast - we knew that the scaling would occur and we were not taken by surprise

  • tooling - the Jenkins Job DSL was available, efficient and well documented

We also knew that, in order to scale, we’d have to provide a solution with the following characteristics:

  • self-service - we could not have a team of 6 people become a bottleneck for enabling CI/CD in projects

  • security - the solution had to be secure enough in order for it to be used by remote developers we never met and didn’t know

  • simplicity - enabling CI/CD had to be simple so that people having never heard of it could still use it

  • extensibility - no solution is a one-size-fits-all and must be flexible enough to allow for corner cases

All the mechanisms described in this article are available through theJenkins Seed plugin.

Creating pipelines using the Job DSL and embedding the scripts in the code was simple enough. But what about branching? We needed a mechanism to allow the creation of pipelines per branch, by downloading the associated DSL and to run it in a dedicated folder.

But then, all those projects, all those branches, they were mostly using the same pipelines, give or take a few configurable items. Going this way would have lead to a terrible duplication of code, transforming a job maintenance nightmare into a code maintenance nightmare.

Pipeline as configuration

Our trick was to transform this vision of "pipeline as code" into a "pipeline as configuration":

  • by maintaining well documented and tested "pipeline libraries"

  • by asking projects to describe their pipeline not as code, but as property files which would:

    • define the name and version of the DSL pipeline library to use

    • use the rest of the property file to configure the pipeline library, using as many sensible default values as possible

Property file

Piloting the pipeline from the SCM

Once this was done, the only remaining trick was to automate the creation, update, start and deletion of the pipelines using SCM events. By enabling SCM hooks (in GitHub, BitBucket or even in Subversion), we could:

  • automatically create a pipeline for a new branch

  • regenerate a pipeline when the branch’s pipeline description was modified

  • start the pipeline on any other commit on the branch

  • remove the pipeline when the branch was deleted

Hooks

Once a project wants to go in our ecosystem, the Jenkins team "seeds" the project into Jenkins, by running a job and giving a few parameters.

It will create a folder for the project and grant proper authorisations, using Active Directory group names based on the project name.

The hook for the project must be registered into the SCM and you’re up and running.

Jobs

Configuration and code

Mixing the use of strong pipeline libraries configured by properties and the direct use of the Jenkins Job DSL is still possible. The Seed plugin supports all kinds of combinations:

  • use of pipeline libraries only - this can even be enforced

  • use a DSL script which can in turn use some classes and methods defined in a pipeline library

  • use of a Job DSL script only

Usually, we tried to have a maximum reuse, through only pipeline libraries, for most of our projects, but in other circumstances, we were less strict and allowed some teams to develop their own pipeline script.

Mixed modes

End of the journey

In the end, what did we achieve?

Self service✔︎

  • Pipeline automation from SCM - no intervention from the Jenkins team but for the initial bootstrapping

  • Getting a project on board of this system can be done in a few minutes only

Security✔︎

  • Project level authorisations

  • No code execution on the master

Simplicity✔︎

  • Property files

Extensibility✔︎

  • Pipeline libraries

  • Direct job DSL still possible

Responsibilities

Seed and Pipeline plugin

Now, what about the Pipeline plugin? Both this plugin and the Seed plugin have common functionalities:

Seed now

What we have found in our journey is that having a "pipeline as configuration" was the easiest and most secure way to get a lot of projects on board, with developers not knowing Jenkins and even less the DSL.

The outcome of the two plugins is different:

  • one pipeline job for the Pipeline plugin

  • a list of orchestrated jobs for the Seed plugin

If time allows, it would be probably a good idea to find a way to integrate the functionalities of the Seed plugin into the pipeline framework, and to keep what makes the strength of the Seed plugin:

  • pipeline as configuration

  • reuseable pipeline libraries, versioned and tested

Seed and Pipeline

You can find additional information about the Seed plugin and its usage at the following links:

Faster Pipelines with the Parallel Test Executor Plugin

$
0
0
This is a guest post by Liam Newman, Technical Evangelist at Cloudbees.

In this blog post, I’ll show you how to speed up your pipeline by using the Parallel Test Executor Plugin.

So much to do, so little time…​

Every time I’ve moved a team to continuous integration and delivery, one problem we always encounter is how to run all the tests needed to ensure high-quality changes while still keeping pipeline times reasonable and changes flowing smoothly. More tests mean greater confidence, but also longer wait times. Build systems may or may not support running tests in parallel but only on one machine even while other lab machines sit idle. In these cases, parallelizing test execution across multiple machines is a great way to speed up pipelines. The Parallel Test Executor plugin lets us leverage Jenkins do just that with no disruption to the rest of the build system.

Serial Test Execution

For this post, I’ll be running a pipeline based on the Jenkins Git Plugin. I’ve modified the Jenkinsfile from that project to allow us to compare execution times to our later changes, and I’ve truncated the "mvn" utility method since it remains unchanged. You can find the original file here.

node {
  stage 'Checkout'
  checkout scm

  stage 'Build'/* Call the Maven build without tests. */
  mvn "clean install -DskipTests"

  stage 'Test'
  runTests()/* Save Results. */
  stage 'Results'/* Archive the build artifacts */
  step([$class: 'ArtifactArchiver', artifacts: 'target/*.hpi,target/*.jpi'])
}void runTests(def args) {/* Call the Maven build with tests. */
  mvn "install -Dmaven.test.failure.ignore=true"/* Archive the test results */
  step([$class: 'JUnitResultArchiver', testResults: '**/target/surefire-reports/TEST-*.xml'])
}/* Run Maven */void mvn(def args) { /* ... */ }

It’s a Maven project, so the Jenkinsfile is pretty simple. As noted above, I’ve split the Maven build into separate “Build” and “Test” stages. Maven doesn’t support this split very well, it wants to run its all the steps of the lifecycle in order every time. So, I have to call Maven twice: first using the “skipTests” property to do only build steps in the first call, and then a second time with out that property to run tests.

On my quad-core machine, executing this pipeline takes about 13 minutes and 30 seconds. Of that time, it takes 13 minutes to run about 2.7 thousand tests in serial.

Serial Test Pipeline

Parallel Test Execution

This looks like an ideal project for parallel test execution. A short build followed by a large number of serially executed tests that consume the most of the pipeline time. There are a number of things I could try to optimize this. For example, I could modify test harness to look for ways to parallelize the test execution on this single machine. Or I could try speed up the tests themselves. Both of those can be time-consuming and both risk destablizing the tests. I’d need to know more about the project to do it well.

I’ll avoid that risk by using Jenkins and the Parallel Test Executor Plugin to parallelize the tests across multiple nodes instead. This will isolate the tests from each other, while still giving us speed gains from parallel execution.

The plugin will read the list of tests from the results archived in the previous execution of this job and splits that list into the specified number of sublists. I can then use those sublists to execute the tests in parallel, passing a different sublist to each node.

Let’s look at how this changes the pipeline:

node { /* ...unchanged... */ }void runTests(def args) {/* Request the test groupings.  Based on previous test results. *//* see https://wiki.jenkins-ci.org/display/JENKINS/Parallel+Test+Executor+Plugin and demo on github
  /* Using arbitrary parallelism of 4 and "generateInclusions" feature added in v1.8. */def splits = splitTests parallelism: [$class: 'CountDrivenParallelism', size: 4], generateInclusions: true/* Create dictionary to hold set of parallel test executions. */def testGroups = [:]for (int i = 0; i < splits.size(); i++) {def split = splits[i]/* Loop over each record in splits to prepare the testGroups that we'll run in parallel. *//* Split records returned from splitTests contain { includes: boolean, list: List<String> }. *//*     includes = whether list specifies tests to include (true) or tests to exclude (false). *//*     list = list of tests for inclusion or exclusion. *//* The list of inclusions is constructed based on results gathered from *//* the previous successfully completed job. One additional record will exclude *//* all known tests to run any tests not seen during the previous run.  */
    testGroups["split-${i}"] = {  // example, "split3"
      node {
        checkout scm/* Clean each test node to start. */
        mvn 'clean'def mavenInstall = 'install -DMaven.test.failure.ignore=true'/* Write includesFile or excludesFile for tests.  Split record provided by splitTests. *//* Tell Maven to read the appropriate file. */if (split.includes) {
          writeFile file: "target/parallel-test-includes-${i}.txt", text: split.list.join("\n")
          mavenInstall += " -Dsurefire.includesFile=target/parallel-test-includes-${i}.txt"
        } else {
          writeFile file: "target/parallel-test-excludes-${i}.txt", text: split.list.join("\n")
          mavenInstall += " -Dsurefire.excludesFile=target/parallel-test-excludes-${i}.txt"
        }/* Call the Maven build with tests. */
        mvn mavenInstall/* Archive the test results */
        step([$class: 'JUnitResultArchiver', testResults: '**/target/surefire-reports/TEST-*.xml'])
      }
    }
  }
  parallel testGroups
}/* Run Maven */void mvn(def args) { /* ... */ }

That’s it! The change is significant but it is all encapsulated in this one method in the Jenkinsfile.

Great (ish) Success!

Here’s the results for the new pipeline with parallel test execution:

Pipeline Duration Comparison

The tests ran almost twice as fast, without changes outside pipeline. Great!

However, I used 4 test executors, so why am I not seeing a 4x? improvement. A quick review of the logs shows problem: A small number of tests are taking up to 5 minutes each to complete! This is actually good news. It means that I should be able to see further improvement in pipeline throughput just by refactoring those few long running tests into smaller parts.

Conclusion

While I would like to have seen closer to a 4x improvement to match to number of executors, 2x is still perfectly respectable. If I were working on a group of projects with similar pipelines, I’d be completely comfortable reusing these same changes on my other project and I’d expect to similar improvement without any disruption to other tools or processes.

GSoC: Mid-term presentations by students on June 23 and 24

$
0
0

As you probably know, on this year Jenkins projects participates inGoogle Summer of Code 2016. You can find more information about the accepted projects on the GSoC subproject page and in theJenkins Developer mailing list.

On this week GSoC students are going to present their projects as a part of mid-term evaluation, which covers one month of community bonding and one month of coding.

We would like to invite Jenkins developers to attend these meetings. There are two additional months of coding ahead for successful students, so any feedback from Jenkins contributors and users will be appreciated.

Meeting #1 - June 23, 7:00 PM UTC - 9:00 PM UTC

Meeting #2 - June 24, 8AM UTC - 9 AM UTC

Both meetings will be conducted and recorded via Hangouts on Air. The recorded sessions will be made public after the meetup. The agenda may change a bit.

Migrating from chained Freestyle jobs to Pipelines

$
0
0

This is a guest post by R. Tyler Croy, who is a long-time contributor to Jenkins and the primary contact for Jenkins project infrastructure. He is also a Jenkins Evangelist atCloudBees, Inc.

For ages I have used the "Build After" feature in Jenkins to cobble together what one might refer to as a "pipeline" of sorts. The Jenkins project itself, a major consumer of Jenkins, has used these daisy-chained Freestyle jobs to drive a myriad of delivery pipelines in our infrastructure.

One such "pipeline" helped drive the complex process of generating the pretty blue charts onstats.jenkins-ci.org. This statistics generation process primarily performs two major tasks, on rather large sets of data:

  1. Generate aggregate monthly "census data."

  2. Process the census data and create trend charts

The chained jobs allowed us to resume the independent stages of the pipeline, and allowed us to run different stages on different hardware (different capabilities) as needed. Below is a diagram of what this looked like:

freestyle pipeline

The infra_generate_monthly_json would run periodically creating the aggregated census data, which would then be picked up by infra_census_push whose sole responsibility was to take census data and publish it to the necessary hosts inside the project’s infrastructure.

The second, semi-independent, "pipeline" would also run periodically. Theinfra_statistics job’s responsibility was to use the census data, pushed earlier by infra_census_push, to generate the myriad of pretty blue charts before triggering theinfra_checkout_stats job which would make sure stats.jenkins-ci.org was properly updated.

Suffice it to say, this "pipeline" had grown organically over a period time whenmore advanced tools weren’t quite available.


When we migrated to newer infrastructure forci.jenkins.io earlier this year I took the opportunity to do some cleaning up. Instead of migrating jobs verbatim, I pruned stale jobs and refactored a number of others into properPipelines, statistics generation being an obvious target!

Our requirements for statistics generation, in their most basic form, are:

  • Enable a sequence of dependent tasks to be executed as a logical group (a pipeline)

  • Enable executing those dependent tasks on various pieces of infrastructure which support different requirements

  • Actually generate those pretty blue charts

If you wish to skip ahead, you can jump straight to theJenkinsfile which implements our new Pipeline.

The first iteration of the Jenkinsfile simply defined the conceptual stages we would need:

node {
    stage 'Sync raw data and census files'

    stage 'Process raw logs'

    stage 'Generate census data'

    stage 'Generate stats'

    stage 'Publish census'

    stage 'Publish stats'
}

How exciting! Although not terrifically useful. When I began actually implementing the first couple stages, I noticed that the Pipeline might syncdozens of gigabytes of data every time it ran on a new agent in the cluster. While this problem will soon be solved by theExternal Workspace Manager plugin, which is currently being developed. Until it’s ready, I chose to mitigate the issue by pinning the execution to a consistent agent.

/* `census` is a node label for a single machine, ideally, which will be
 * consistently used for processing usage statistics and generating census data
 */
node('census && docker') {/* .. */
}

Restricting a workload which previously used multiple agents to a single one introduced the next challenge. As an infrastructure administrator, technically speaking, I could just install all the system dependencies that I want on this one special Jenkins agent. But what kind of example would that be setting!

The statistics generation process requires:

Fortunately, with Pipeline we have a couple of useful features at our disposal: tool auto-installers and theCloudBees Docker Pipeline plugin.

Tool Auto-Installers

Tool Auto-Installers are exposed in Pipeline through the tool step and onci.jenkins.io we already had JDK8 and Groovy available. This meant that the Jenkinsfile would invoke tool and Pipeline would automatically install the desired tool on the agent executing the current Pipeline steps.

The tool step does not modify the PATH environment variable, so it’s usually used in conjunction with the withEnv step, for example:

node('census && docker') {/* .. */def javaHome = tool(name: 'jdk8')def groovyHome = tool(name: 'groovy')/* Set up environment variables for re-using our auto-installed tools */def customEnv = ["PATH+JDK=${javaHome}/bin","PATH+GROOVY=${groovyHome}/bin","JAVA_HOME=${javaHome}",
    ]/* use our auto-installed tools */
    withEnv(customEnv) {
        sh 'java --version'
    }/* .. */
}

CloudBees Docker Pipeline plugin

Satisfying the MongoDB dependency would still be tricky. If I caved in and installed MongoDB on a single unicorn agent in the cluster, what could I say the next time somebody asked for a special, one-off, piece of software installed on our Jenkins build agents?

After doing my usual complaining and whining, I discovered that the CloudBees Docker Pipeline plugin provides the ability to run containers inside of aJenkinsfile. To make things even better, there areofficial MongoDB docker images readily available on DockerHub!

This feature requires that the machine has a running Docker daemon which is accessible to the user running the Jenkins agent. After that, running a container in the background is easy, for example:

node('census && docker') {/* .. *//* Run MongoDB in the background, mapping its port 27017 to our host's port
     * 27017 so our script can talk to it, then execute our Groovy script with
     * tools from our `customEnv`
     */
    docker.image('mongo:2').withRun('-p 27017:27017') { container ->
        withEnv(customEnv) {
            sh "groovy parseUsage.groovy --logs ${usagestats_dir} --output ${census_dir} --incremental"
        }
    }/* .. */
}

The beauty, to me, of this example is that you can pass aclosure to withRun which will execute while the container is running. When the closure is finished executin, just the sh step in this case, the container is destroyed.

With that system requirement satisfied, the rest of the stages of the Pipeline fell into place. We now have a single source of truth, theJenkinsfile, for the sequence of dependent tasks which need to be executed, accounting for variations in systems requirements, and it actually generatesthose pretty blue charts!

Of course, a nice added bonus is the beautiful visualization of ournew Pipeline!

The New and Improved Statistics Pipeline

GSoC: External Workspace Manager Plugin alpha version

$
0
0

Currently it’s quite difficult to share and reuse the same workspace between multiple jobs and across nodes. There are some possible workarounds for achieving this, but each of them has its own drawback, e.g. stash/unstash pre-made artifacts, Copy Artifacts plugin or advanced job settings. A viable solution for this problem is the External Workspace Manager plugin, which facilitates workspace share and reuse across multiple Jenkins jobs and nodes. It also eliminates the need to copy, archive or move files. You can learn more about the design and goals of the External Workspace Manager project in this introductory blog post.

I’d like to announce that an alpha version of the External Manager Plugin has been released! It’s now public available for testing. To be able to install this plugin, you must follow the steps from the Experimental Plugins Update Center blog post.

Please be aware that it’s not recommended to use the Experimental Update Center in production installations of Jenkins, since it may break it.

The plugin’s wiki page may be accessed here. The documentation that helps you get started with this plugin may be found on theREADME page. To get an idea of what this plugin does, which are the features implemented so far and to see a working demo of it, you can watch my mid-term presentation that is available here. The slides for the presentation are shared onGoogle Slides.

My mentors, Martin and Oleg, and I have set up public meetings related to this plugin. You are invited to join our discussions if you’d like to get more insight about the project. The meetings are taking place twice a week on the Jenkins hangout, every Monday at12 PM UTC and every Thursday at5 PM UTC.

If you have any issues in setting up or using the plugin, please feel free to ask me on the plugin’s Gitter chat. The plugin is open-source, having the repository onGitHub, and you may contribute to it. Any feedback is welcome, and you may provide it either on the Gitter chat, or onJira by using the external-workspace-manager-plugin component.


Publishing HTML Reports in Pipeline

$
0
0
This is a guest post by Liam Newman, Technical Evangelist at Cloudbees.

Most projects need more that just JUnit result reporting. Rather than writing a custom plugin for each type of report, we can use theHTML Publisher Plugin.

Let’s Make This Quick

I’ve found a Ruby project, hermann, I’d like to build using Jenkins Pipeline. I’d also like to have the code coverage results published with each build job. I could write a plugin to publish this data, but I’m in a bit of hurry and the build already creates an HTML report file using SimpleCov when the unit tests run.

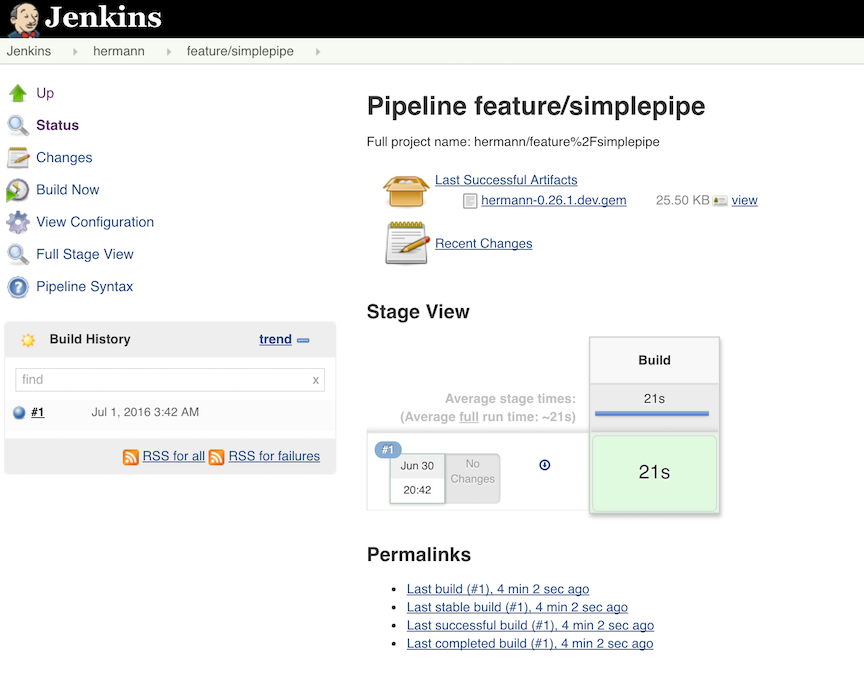
Simple Build

I’m going to use the HTML Publisher Plugin to add the HTML-formatted code coverage report to my builds. Here’s a simple pipeline for building the hermann project.

stage 'Build'

node {
  // Checkout
  checkout scm// install required bundles
  sh 'bundle install'// build and run tests with coverage
  sh 'bundle exec rake build spec'// Archive the built artifacts
  archive (includes: 'pkg/*.gem')
}

Simple enough, it builds, runs tests, and archives the package.


Job Run Without Report Link

Now I just need to add the step to publish the code coverage report. I know that rake spec creates an index.html file in the coverage directory. I’ve already installed the HTML Publisher Plugin. How do I add the HTML publishing step to the pipeline? The plugin page doesn’t say anything about it.

Snippet Generator to the Rescue

Documentation is hard to maintain and easy to miss, even more so in a system like Jenkins with hundreds of plugins the each potential have one or more groovy fixtures to add to the Pipeline. The "Snippet Generator" helps users navigate this jungle by providing a way to generate a code snippet for any step using provided inputs.

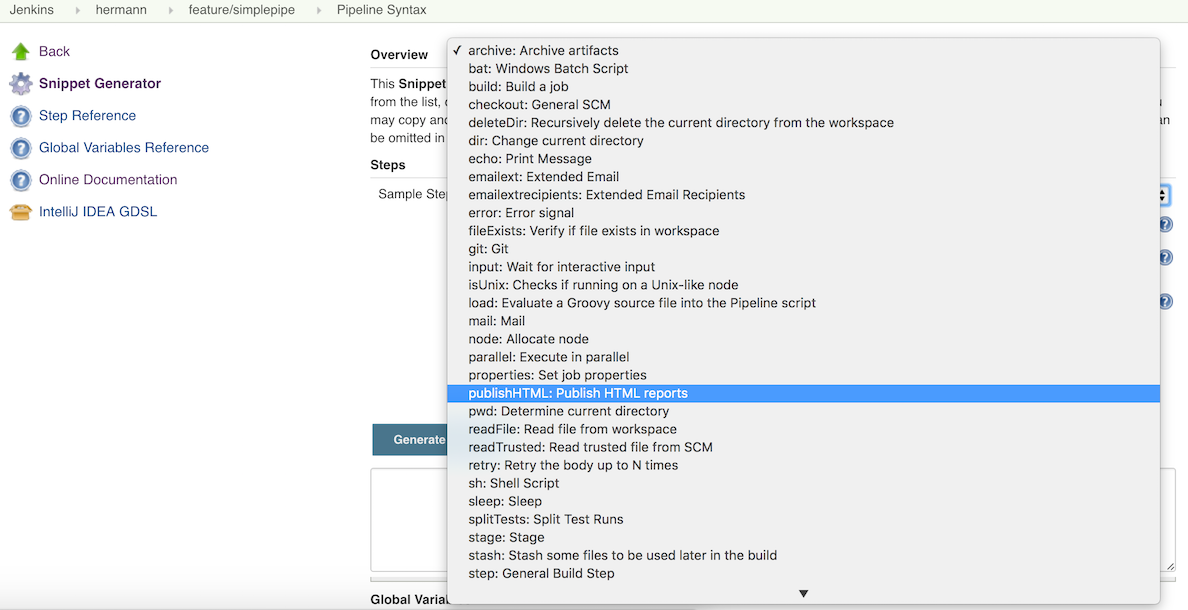
It offers a dynamically generated list of steps, based on the installed plugins. From that list I select the publishHTML step:


Snippet Generator Menu

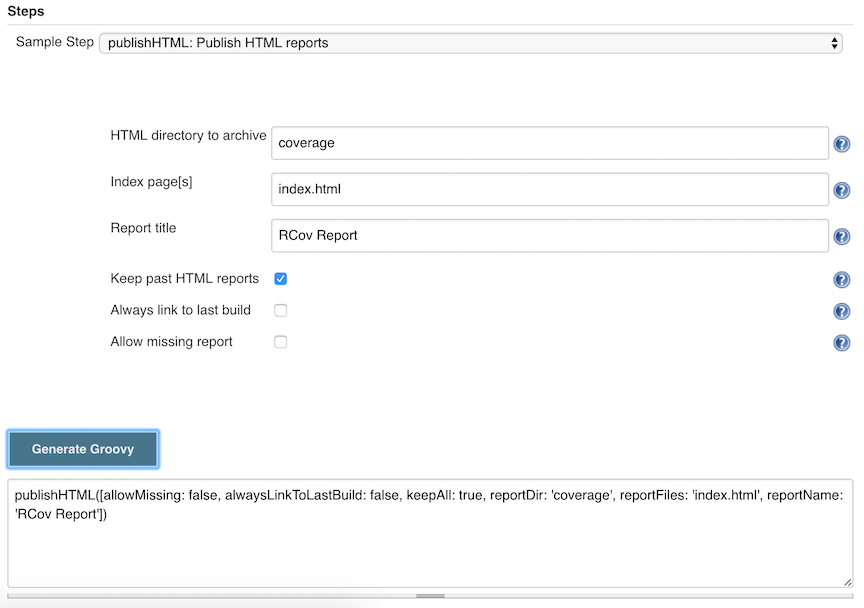
Then it shows me a UI similar to the one used in job configuration. I fill in the fields, click "generate", and it shows me snippet of groovy generated from that input.


Snippet Generator Output

HTML Published

I can use that snippet directly or as a template for further customization. In this case, I’ll just reformat and copy it in at the end of my pipeline. (I ran into a minor bug in the snippet generated for this plugin step. Typing error string in my search bar immediately found the bug and a workaround.)

/* ...unchanged... */// Archive the built artifacts
  archive (includes: 'pkg/*.gem')// publish html// snippet generator doesn't include "target:"// https://issues.jenkins-ci.org/browse/JENKINS-29711.
  publishHTML (target: [allowMissing: false,alwaysLinkToLastBuild: false,keepAll: true,reportDir: 'coverage',reportFiles: 'index.html',reportName: "RCov Report"
    ])

}

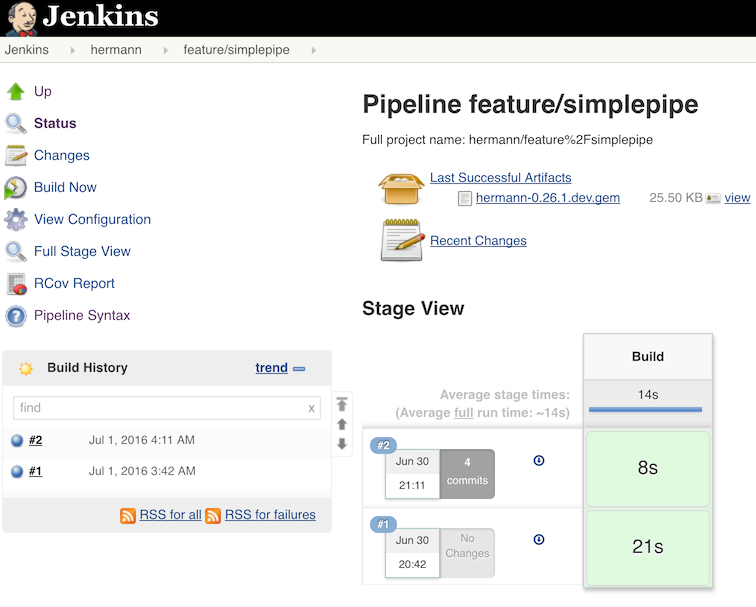
When I run this new pipeline I am rewarded with an RCov Report link on left side, which I can follow to show the HTML report.


Job Run With Report Link

RCov Report

I even added the keepAll setting to let I can also go back an look at reports on old jobs as more come in. As I said to to begin with, this is not as slick as what I could do with a custom plugin, but it is much easier and works with any static HTML.

Jenkins 2 hits LTS

$
0
0

It’s been almost three months since we’ve released Jenkins 2.0, the first ever major version upgrade for this 10 year old project. The 2.x versions since then has been adopted by more than 20% of the users, but one segment of users who haven’t seen the benefits of Jenkins 2 is those who has been running LTS releases.

But that is no more! The new version of Jenkins LTS release we just released is 2.7.1, and now LTS users get to finally enjoy Jenkins 2.

This release also officially marks the end-of-life for Jenkins 1.x. There won’t be any future release of Jenkins 1.x beyond this point. If you are worried about the upgrade, don’t be! The core of Jenkins is still the same, and all the plugins & existing configuration will just work.

New packages for Jenkins 2.7.1

$
0
0

We created new native packages for Jenkins 2.7.1 today. These replace the existing packages. Due to a release process issue, the packaging (RPM, etc.) was created the same way as Jenkins 1.x LTS, resulting in problems starting Jenkins on some platforms: While we dropped support for AJP in Jenkins 2.0, some 1.x packages had it enabled by default, resulting in an exception during startup.

These new packages for Jenkins 2.7.1, dated July 14, have the same scripts and parameters as Jenkins 2.x and should allow starting up Jenkins without problems. If you notice any further problems with the packaging, please report them in the packaging component.

Sending Notifications in Pipeline

$
0
0
This is a guest post by Liam Newman, Technical Evangelist at Cloudbees.

Rather than sitting and watching Jenkins for job status, I want Jenkins to send notifications when events occur. There are Jenkins plugins forSlack,HipChat, or even email among others.

Note: Something is happening!

I thing we can all agree getting notified when events occur is preferable to having to constantly monitor them just in case. I’m going to continue from where I left off in my previous post with thehermann project. I added a Jenkins Pipeline with an HTML publisher for code coverage. This week, I’d like to make Jenkins to notify me when builds start and when they succeed or fail.

Setup and Configuration

First, I select targets for my notifications. For this blog post, I’ll use sample targets that I control. I’ve created Slack and HipChat organizations called "bitwiseman", each with one member - me. And for email I’m running a Ruby SMTP server called mailcatcher, that is perfect for local testing such as this. Aside for these concessions, configuration would be much the same in a non-demo situation.

Next, I install and add server-wide configuration for theSlack,HipChat, and Email-ext plugins. Slack and HipChat use API tokens - both products have integration points on their side that make generate tokens which I copy into my Jenkins configuration. Mailcatcher SMTP runs locally. I just point Jenkins at it.

Here’s what the Jenkins configuration section for each of these looks like:

Slack Configuration
HipChat Configuration
Email Configuration

Original Pipeline

Now I can start adding notification steps. The same aslast week, I’ll use the Jenkins Pipeline Snippet Generator to explore the step syntax for the notification plugins.

Here’s the base pipeline before I start making changes:

stage 'Build'

node {
  // Checkout
  checkout scm// install required bundles
  sh 'bundle install'// build and run tests with coverage
  sh 'bundle exec rake build spec'// Archive the built artifacts
  archive (includes: 'pkg/*.gem')// publish html// snippet generator doesn't include "target:"// https://issues.jenkins-ci.org/browse/JENKINS-29711.
  publishHTML (target: [allowMissing: false,alwaysLinkToLastBuild: false,keepAll: true,reportDir: 'coverage',reportFiles: 'index.html',reportName: "RCov Report"
    ])
}

Job Started Notification

For the first change, I decide to add a "Job Started" notification. The snippet generator and then reformatting makes this straightforward:

node {

  notifyStarted()

  /* ... existing build steps ... */
}defnotifyStarted() {// send to Slack
  slackSend (color: '#FFFF00', message: "STARTED: Job '${env.JOB_NAME} [${env.BUILD_NUMBER}]' (${env.BUILD_URL})")// send to HipChat
  hipchatSend (color: 'YELLOW', notify: true,message: "STARTED: Job '${env.JOB_NAME} [${env.BUILD_NUMBER}]' (${env.BUILD_URL})"
    )// send to email
  emailext (subject: "STARTED: Job '${env.JOB_NAME} [${env.BUILD_NUMBER}]'",body: """<p>STARTED: Job '${env.JOB_NAME} [${env.BUILD_NUMBER}]':</p><p>Check console output at &QUOT;<a href='${env.BUILD_URL}'>${env.JOB_NAME} [${env.BUILD_NUMBER}]</a>&QUOT;</p>""",recipientProviders: [[$class: 'DevelopersRecipientProvider']]
    )
}

Since Pipeline is a Groovy-based DSL, I can usestring interpolation and variables to add exactly the details I want in my notification messages. When I run this I get the following notifications:

Started Notifications
Started Email Notification

Job Successful Notification

The next logical choice is to get notifications when a job succeeds. I’ll copy and paste based on the notifyStarted method for now and do some refactoring later.

node {

  notifyStarted()

  /* ... existing build steps ... */

  notifySuccessful()
}

defnotifyStarted() { /* .. */ }defnotifySuccessful() {
  slackSend (color: '#00FF00', message: "SUCCESSFUL: Job '${env.JOB_NAME} [${env.BUILD_NUMBER}]' (${env.BUILD_URL})")

  hipchatSend (color: 'GREEN', notify: true,message: "SUCCESSFUL: Job '${env.JOB_NAME} [${env.BUILD_NUMBER}]' (${env.BUILD_URL})"
    )

  emailext (
      subject: "SUCCESSFUL: Job '${env.JOB_NAME} [${env.BUILD_NUMBER}]'",body: """<p>SUCCESSFUL: Job '${env.JOB_NAME} [${env.BUILD_NUMBER}]':</p><p>Check console output at &QUOT;<a href='${env.BUILD_URL}'>${env.JOB_NAME} [${env.BUILD_NUMBER}]</a>&QUOT;</p>""",recipientProviders: [[$class: 'DevelopersRecipientProvider']]
    )
}

Again, I get notifications, as expected. This build is fast enough, some of them are even on the screen at the same time:

Multiple Notifications

Job Failed Notification

Next I want to add failure notification. Here’s where we really start to see the power and expressiveness of Jenkins pipeline. A Pipeline is a Groovy script, so as we’d expect in any Groovy script, we can handle errors using try-catch blocks.

node {try {
    notifyStarted()/* ... existing build steps ... */

    notifySuccessful()
  } catch (e) {
    currentBuild.result = "FAILED"
    notifyFailed()throw e
  }
}defnotifyStarted() { /* .. */ }defnotifySuccessful() { /* .. */ }defnotifyFailed() {
  slackSend (color: '#FF0000', message: "FAILED: Job '${env.JOB_NAME} [${env.BUILD_NUMBER}]' (${env.BUILD_URL})")

  hipchatSend (color: 'RED', notify: true,message: "FAILED: Job '${env.JOB_NAME} [${env.BUILD_NUMBER}]' (${env.BUILD_URL})"
    )

  emailext (
      subject: "FAILED: Job '${env.JOB_NAME} [${env.BUILD_NUMBER}]'",body: """<p>FAILED: Job '${env.JOB_NAME} [${env.BUILD_NUMBER}]':</p><p>Check console output at &QUOT;<a href='${env.BUILD_URL}'>${env.JOB_NAME} [${env.BUILD_NUMBER}]</a>&QUOT;</p>""",recipientProviders: [[$class: 'DevelopersRecipientProvider']]
    )
}
Failed Notifications

Code Cleanup

Lastly, now that I have it all working, I’ll do some refactoring. I’ll unify all the notifications in one method and move the final success/failure notification into a finally block.

stage 'Build'

node {
  try {
    notifyBuild('STARTED')/* ... existing build steps ... */

  } catch (e) {// If there was an exception thrown, the build failed
    currentBuild.result = "FAILED"throw e
  } finally {// Success or failure, always send notifications
    notifyBuild(currentBuild.result)
  }
}defnotifyBuild(String buildStatus = 'STARTED') {// build status of null means successful
  buildStatus =  buildStatus ?: 'SUCCESSFUL'// Default valuesdef colorName = 'RED'def colorCode = '#FF0000'def subject = "${buildStatus}: Job '${env.JOB_NAME} [${env.BUILD_NUMBER}]'"def summary = "${subject} (${env.BUILD_URL})"def details = """<p>STARTED: Job '${env.JOB_NAME} [${env.BUILD_NUMBER}]':</p><p>Check console output at &QUOT;<a href='${env.BUILD_URL}'>${env.JOB_NAME} [${env.BUILD_NUMBER}]</a>&QUOT;</p>"""// Override default values based on build statusif (buildStatus == 'STARTED') {
    color = 'YELLOW'
    colorCode = '#FFFF00'
  } elseif (buildStatus == 'SUCCESSFUL') {
    color = 'GREEN'
    colorCode = '#00FF00'
  } else {
    color = 'RED'
    colorCode = '#FF0000'
  }// Send notifications
  slackSend (color: colorCode, message: summary)

  hipchatSend (color: color, notify: true, message: summary)

  emailext (
      subject: subject,body: details,recipientProviders: [[$class: 'DevelopersRecipientProvider']]
    )
}

You have been notified!

I now get notified twice per build on three different channels. I’m not sure I need to get notified this much for such a short build. However, for a longer or complex CD pipeline, I might want exactly that. If needed, I could even improve this to handle other status strings and call it as needed throughout my pipeline.

Final View of Notifications

Blue Ocean July development update

$
0
0

The team have been hard at work moving the needle forward on the Blue Ocean 1.0 features. Many of the features we have been working on have come a long way in the past few months but here’s a few highlights:

Goodbye page refreshes, Hello Real Time updates!

Building uponTom's great work onServer Sent Events (SSE) bothCliff andTom worked on making the all the screens in Blue Ocean update without manual refreshes.

SSE is a great technology choice for new web apps as it only pushes out events to the client when things have changed on the server. That means there’s a lot less traffic going between your browser and the Jenkins server when compared to the continuous AJAX polling method that has been typical of Jenkins in the past.

New Test Reporting UI

Keith has been working with Vivek to drive out a new set of extension points that allow us to build a new rest reporting UI in Blue Ocean. Today this works for JUnit test reports but can be easily extended to work with other kinds of reports.

Pipeline logs are split into steps and update live

Thorsten andJosh have been hard at work breaking down the log into steps and making the live log tailing follow the pipeline execution - which we’ve lovingly nicknamed the “karaoke mode”

Pipelines can be triggered from the UI

Tom has been on allowing users to trigger jobs from Blue Ocean, which is one less reason to go back to the Classic UI :)

Blue Ocean has been released to the experimental update center

Many of you have asked us questions about how you can try Blue Ocean today and have resorted to building the plugin yourself or running our Docker image.

We wanted to make the process of trying Blue Ocean in its unfinished state by publishing the plugin to the experimental update center - it’s available today!

So what is the Experimental Update Center? It is a mechanism for the Jenkins developer community to share early previews of new plugins with the broader user community. Plugins in this update center are experimental and we strongly advise not running them on production or Jenkins systems that you rely on for your work.

That means any plugin in this update center could eat your Jenkins data, cause slowdowns, degrade security or have their behavior change at no notice.

Stay tuned for more updates!

Join me for Jenkins World 2016

$
0
0

Jenkins World, September 13-15 at the Santa Clara Convention Center (SCCC), takes our 6th annual community user conference to a whole new level. It will be one big party for everything Jenkins, from users to developers, from the community to vendors. There will be more of what people always loved in past user conferences, such as technical sessions from users and developers, the Ask the Experts booth and plugin development workshop, and even more has been added, such as Jenkins training pre-conference, workshops and the opportunity to get certified for free. Jenkins World is a not-to-be-missed.

Jenkins World 125x125

For me, the best part of Jenkins World is the opportunity to meet other Jenkins users and developers face-to-face. We all interact on IRC, Google Groups or GitHub, but when you have a chance to meet in person, the person behind the GitHub ID or IRC name, whose plugin you use every day, becomes a real person. Your motivation might be a little different from mine, but we have the breath in the agenda to cover everyone from new users to senior plugin developers.

This year, you’ll have more opportunities than ever before to learn about Jenkins and continuous delivery/DevOps practices, and explore what Jenkins has to offer.

  • If you are travelling from somewhere, you might as well get a two-day Jenkins training course to be held onsite, starting Monday.

  • On Tuesday, you can attend your choice of workshops, which gives you more hands-on time to go deeper, including:

    • The DevOps Toolkit 2.0 Workshop

    • Let’s Build a Jenkins Pipeline

    • Preparing for Jenkins Certification

    • Intro to Plugin Development

    • CD and DevOps Maturity for Managers

  • On Wednesday, the formal conference kicks off. Throughout Wednesday and Thursday, you can choose from sessions spread across five tracks and covering a diverse range of topics like infrastructure as code, security, containers, pipeline automation, best practices, scaling Jenkins and new community development initiatives.

At Jenkins World, you’ll be exposed to projects going on in the community such as Blue Ocean, a new Jenkins UX project. You can learn more about Jenkins 2 - a major release for the project, and based on the huge number of downloads we saw in the weeks following its introduction at the end of April, it was a big +1. At Jenkins World, you will be immersed in Jenkins and community, and leave knowing that you are part of a meaningful open source project that, with your involvement, can do anything!

This year there will only be one Jenkins World conference, so that everyone involved in Jenkins can get together in one place at one time and actually see each other. I understand that it might be a bit more difficult for Jenkins users outside of the US to make it to Jenkins World, but hopefully we made the event worth your visit. As the final push on the back, CloudBees has created a special international program for those who are coming from outside the United States. You’ll have time to talk with all of the other Jenkins users who have made the journey from across the globe, you’ll be able to attend exclusive networking events and more.

I hope to see you September 13th through 15th in Santa Clara atJenkins World in Santa Clara!

St. Petersburg Jenkins Meetup #3 and #4 Reports

$
0
0

I would like to write about two last Jenkins Meetups in Saint Petersburg, Russia.

stpetersburg butler 0

Meetup #3. Jenkins Administration (May 20, 2016)

In May we had a meetup about Jenkins administration techniques. At this meetup we were talking about common Jenkins ecosystem components like custom update centers, tool repositories and generic jobs.

Talks:

Meetup #4. IT Global Meetup (July 23, 2016)

In Saint Petersburg there is a regular gathering of local IT communities. This IT Global Meetup is a full-day event, which provides an opportunity to dozens of communities and hundreds of visitors to meet at a single place.

On July 23rd our local Jenkins community participated in the eight’s global meetup. We conduced 2 talks in main tracks and also had a round table in the evening.

Talks:

  • Oleg Nenashev, CloudBees, "About Jenkins 2 and future plans"

    • Oleg provided a top-level overview about changes in Jenkins, shared insights about upgrading to the new Jenkins 2.7.1 LTS and talked about Jenkins plans

    • Presentation (rus)

  • Aleksandr Tarasov, Alfa-Laboratory, "Continuous Delivery with Jenkins: Lessons learned"

After the talks we had a roundtable about Jenkins (~10 Jenkins experts). Oleg provided an overview of Docker and Configuration-as-Code features available in Jenkins, and then we talked about common use-cases in Jenkins installations. We hope to finally organize a "Jenkins & Docker" meetup at some point.

Q&A

If you have any questions, all speakers can be contacted viaJenkins RU Gitter Chat.

Acknowledgments

The events have been organized with help fromCloudBees, EMC and organizers of the St. Petersburg IT Global Meetup.


Don't install software, define your environment with Docker and Pipeline

$
0
0

This is a guest post by Michael Neale, long time open source developer and contributor to the Blue Ocean project.

If you are running parts of your pipeline on Linux, possibly the easiest way to get a clean reusable environment is to use:CloudBees Docker Pipeline plugin.

In this short post I wanted to show how you can avoid installing stuff on the agents, and have per project, or even per branch, customized build environments. Your environment, as well as your pipeline is defined and versioned alongside your code.

I wanted to use the Blue Ocean project as anexample of a project that uses the CloudBees Docker Pipeline plugin.

Environment and Pipeline for JavaScript components

The Blue Ocean project has a few moving parts, one of which is called the "Jenkins Design Language". This is a grab bag of re-usable CSS, HTML, style rules, icons and JavaScript components (using React.js) that provide the look and feel for Blue Ocean.

JavaScript and Web Development being what it is in 2016, many utilities are need to assemble a web app. This includes npm and all that it needs, less.js to convert Less to CSS, Babel to "transpile" versions of JavaScript to other types of JavaScript (don’t ask) and more.

We could spend time installling nodejs/npm on the agents, but why not just use the official off the shelf docker image from Docker Hub?

The only thing that has to be installed and run on the build agents is the Jenkins agent, and a docker daemon.

A simple pipeline using this approach would be:

node {
        stage "Prepare environment"
          checkout scm
          docker.image('node').inside {
            stage "Checkout and build deps"
                sh "npm install"

            stage "Test and validate"
                sh "npm install gulp-cli && ./node_modules/.bin/gulp"
          }
}

This uses the stock "official" Node.js image from the Docker Hub, but doesn’t let us customize much about the environment.

Customising the environment, without installing bits on the agent

Being the forward looking and lazy person that I am, I didn’t want to have to go and fish around for a Docker image every time a developer wanted something special installed.

Instead, I put a Dockerfile in the root of the repo, alongside the Jenkinsfile:

Environment

The contents of the Dockerfile can then define the exact environment needed to build the project. Sure enough, shortly after this, someone came along saying they wanted to use Flow from Facebook (A typechecker for JavaScript). This required an additional native component to work (via apt-get install).

This was achieved via apull request to both the Jenkinsfile and the Dockerfile at the same time.

So now our environment is defined by a Dockerfile with the following contents:

# Lets not just use any old version but pick one
FROM node:5.11.1

# This is needed for flow, and the weirdos that built it in ocaml:
RUN apt-get update && apt-get install -y libelf1

RUN useradd jenkins --shell /bin/bash --create-home
USER jenkins

The Jenkinsfile pipeline now has the following contents:

node {
    stage "Prepare environment"
        checkout scmdef environment  = docker.build 'cloudbees-node'

        environment.inside {
            stage "Checkout and build deps"
                sh "npm install"

            stage "Validate types"
                sh "./node_modules/.bin/flow"

            stage "Test and validate"
                sh "npm install gulp-cli && ./node_modules/.bin/gulp"
                junit 'reports/**/*.xml'
        }

    stage "Cleanup"
        deleteDir()
}
Even hip JavaScript tools can emit that weird XML format that test reporters can use, e.g. the junit result archiver.

The main change is that we have docker.build being called to produce theenvironment which is then used. Running docker build is essentially a "no-op" if the image has already been built on the agent before.

What’s it like to drive?

Well, using Blue Ocean, to build Blue Ocean, yields a pipeline that visually looks like this (a recent run I screen capped):

Pipeline

This creates a pipeline that developers can tweak on a pull-request basis, along with any changes to the environment needed to support it, without having to install any packages on the agent.

Why not use docker commands directly?

You could of course just use shell commands to do things with Docker directly, however, Jenkins Pipeline keeps track of Docker images used in a Dockerfile via the "Docker Fingerprints" link (which is good, should that image need to change due to a security patch).

GSoC: External Workspace Manager for Pipeline. Beta release is available

$
0
0

This blog post is a continuation of the External Workspace Manager Plugin related posts, starting withthe introductory blog post, and followed bythe alpha version release announcement.

As the title suggests, the beta version of the External Workspace Manager Plugin was launched! This means that it’s available only in the Experimental Plugins Update Center.

Take care when installing plugins from the Experimental Update Center, since they may change in backward-incompatible ways. It’s advisable not to use it for Jenkins production environments.

The plugin’s repository is on GitHub. The complete plugin’s documentation can be accessed here.

What’s new

Bellow is a summary of the features added so far, since the alpha version.

Multiple upstream run selection strategies

It has support for theRun Selector Plugin (which is still in beta), so you can provide different run selection strategies when allocating a disk from the upstream job.

Let’s suppose that we have an upstream job that clones the repository and builds the project:

def extWorkspace = exwsAllocate 'diskpool1'

node ('linux') {
    exws (extWorkspace) {
        checkout scm
        sh 'mvn clean install -DskipTests'
    }
}

In the downstream job, we run the tests on a different node, but we reuse the same workspace as the previous job:

def run = selectRun 'upstream'def extWorkspace = exwsAllocate selectedRun: run

node ('test') {
    exws (extWorkspace) {
        sh 'mvn test'
    }
}

The selectRun in this example selects the last stable build from the upstream job. But, we can be more explicit, and select a specific build number from the upstream job.

def run = selectRun 'upstream',selector: [$class: 'SpecificRunSelector', buildNumber: UPSTREAM_BUILD_NUMBER]def extWorkspace = exwsAllocate selectedRun: run// ...

When the selectedRun parameter is given to the exwsAllocate step, it will allocate the same workspace that was used by that run.

The Run Selector Plugin has several run selection strategies that are briefly explainedhere.

Automatic workspace cleanup

Provides an automatic workspace cleanup by integrating theWorkspace Cleanup Plugin. For example, if we need to delete the workspace only if the build has failed, we can do the following:

def extWorkspace = exwsAllocate diskPoolId: 'diskpool1'

node ('linux') {
    exws (extWorkspace) {try {
            checkout scm
            sh 'mvn clean install'
        } catch (e) {
            currentBuild.result = 'FAILURE'throw e
        } finally {
            step ([$class: 'WsCleanup', cleanWhenFailure: false])
        }
    }
}

More workspace cleanup examples can be found at thislink.

Custom workspace path

Allows the user to specify a custom workspace path to be used when allocating workspace on the disk. The plugin offers two alternatives for doing this:

  • by defining a global workspace template for each Disk Pool

This can be defined in the Jenkins global config, External Workspace Definitions section.

global custom workspace path

  • by defining a custom workspace path in the Pipeline script

We can use the Pipeline DSL to compute the workspace path. Then we pass this path as input parameter to the exwsAllocate step.

def customPath = "${env.JOB_NAME}/${PULL_REQUEST_NUMBER}/${env.BUILD_NUMBER}"def extWorkspace = exwsAllocate diskPoolId: 'diskpool1', path: customPath// ...

For more details see the afferentdocumentation page.

Disk Pool restrictions

The plugin comes with Disk Pool restriction strategies. It does this by using the restriction capabilities provided by theJob Restrictions Plugin.

For example, we can restrict a Disk Pool to be allocated only if the Jenkins job in which it’s allocated was triggered by a specific user:

restriction by user

Or, we can restrict the Disk Pool to be allocated only for those jobs whose name matches a well defined pattern:

restriction by job name

What’s next

Currently there is ongoing work for providing flexible disk allocation strategies. The user will be able to define a default disk allocation strategy in the Jenkins global config. So for example, we want to select the disk with the most usable space as default allocation strategy:

global disk allocation strategy

If needed, this allocation strategy may be overridden in the Pipeline code. Let’s suppose that for a specific job, we want to allocate the disk with the highest read speed.

def extWorkspace = exwsAllocate diskPoolId: 'diskpool1', strategy: fastestRead()// ...

When this feature is completed, the plugin will enter a final testing phase. If all goes to plan, a stable version should be released in about two weeks.

If you have any issues in setting up or using the plugin, please feel free to ask me on the plugin’s Gitter chat. Any feedback is welcome, and you may provide it either on the Gitter chat, or onJira by using the external-workspace-manager-plugin component.

Continuous Security for Rails apps with Pipeline and Brakeman

$
0
0

This is a guest post by R. Tyler Croy, who is a long-time contributor to Jenkins and the primary contact for Jenkins project infrastructure. He is also a Jenkins Evangelist atCloudBees, Inc.

When the Ruby on Rails framework debuted it changed the industry in two noteworthy ways: it created a trend of opinionated web application frameworks (Django,Play, Grails) and it also strongly encouraged thousands of developers to embrace test-driven development along with many other modern best practices (source control, dependency management, etc). Because Ruby, the language underneath Rails, is interpreted instead of compiled there isn’t a "build" per se but rather tens, if not hundreds, of tests, linters and scans which are run to ensure the application’s quality. With the rise in popularity of Rails, the popularity of application hosting services with easy-to-use deployment tools like Heroku orEngine Yard rose too.

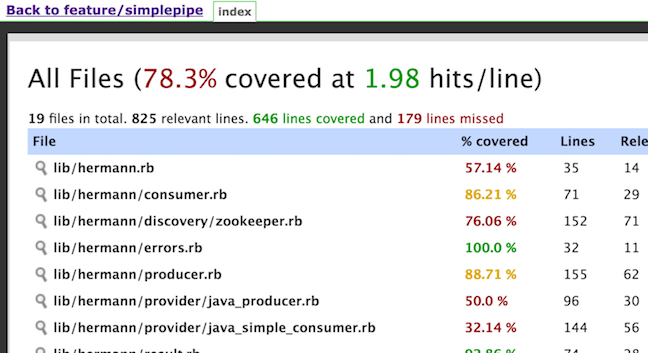
This combination of good test coverage and easily automated deployments makes Rails easy to continuously deliver with Jenkins. In this post we’ll cover testing non-trivial Rails applications with Jenkins Pipeline and, as an added bonus, we will add security scanning viaBrakeman and theBrakeman plugin.

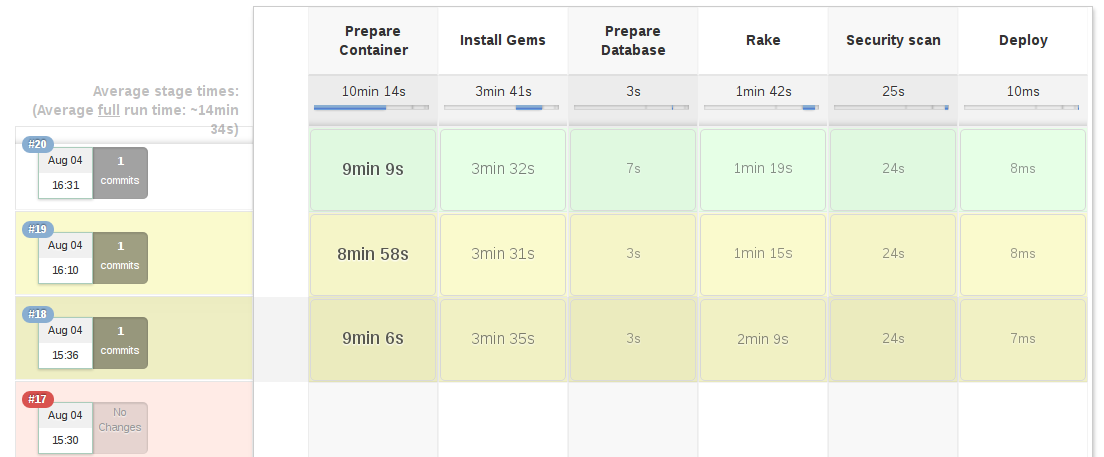
cfpapp stage view

Topics

For this demonstration, I used Ruby Central'scfp-app:

A Ruby on Rails application that lets you manage your conference’s call for proposal (CFP), program and schedule. It was written by Ruby Central to run the CFPs for RailsConf and RubyConf.

I chose this Rails app, not only because it’s a sizable application with lots of tests, but it’s actually the application we used to collect talk proposals for the "Community Tracks" at this year’s Jenkins World. For the most part, cfp-app is a standard Rails application. It usesPostgreSQL for its database,RSpec for its tests andRuby 2.3.x as its runtime.

If you prefer to just to look at the code, skip straight to theJenkinsfile.

Preparing the app

For most Rails applications there are few, if any, changes needed to enable continuous delivery with Jenkins. In the case ofcfp-app, I added two gems to get the most optimal integration into Jenkins:

  1. ci_reporter, for test report integration

  2. brakeman, for security scanning.

Adding these was simple, I just needed to update the Gemfile and theRakefile in the root of the repository to contain:

Gemfile
# .. snip ..
group :testdo# RSpec, etc
  gem 'ci_reporter'
  gem 'ci_reporter_rspec'
  gem "brakeman", :require => falseend
Rakefile
# .. snip ..
require 'ci/reporter/rake/rspec'# Make sure we setup ci_reporter before executing our RSpec examples
task :spec => 'ci:setup:rspec'

Preparing Jenkins

With the cfp-app project set up, next on the list is to ensure that Jenkins itself is ready. Generally I suggest running the latest LTS of Jenkins; for this demonstration I used Jenkins 2.7.1 with the following plugins:

I also used theGitHub Organization Folder plugin to automatically create pipeline items in my Jenkins instance; that isn’t required for the demo, but it’s pretty cool to see repositories and branches with a Jenkinsfile automatically show up in Jenkins, so I recommend it!

In addition to the plugins listed above, I also needed at least one Jenkins agent with the Docker daemon installed and running on it. I label these agents with "docker" to make it easier to assign Docker-based workloads to them in the future.

Any Linux-based machine with Docker installed will work, in my case I was provisioning on-demand agents with theAzure plugin which, like theEC2 plugin, helps keep my test costs down.

If you’re using Amazon Web Services, you might also be interested in this blog post from earlier this year unveiling theEC2 Fleet plugin for working with EC2 Spot Fleets.

Writing the Pipeline

To make sense of the various things that the Jenkinsfile needs to do, I find it easier to start by simply defining the stages of my pipeline. This helps me think of, in broad terms, what order of operations my pipeline should have. For example:

/* Assign our work to an agent labelled 'docker' */
node('docker') {
    stage 'Prepare Container'
    stage 'Install Gems'
    stage 'Prepare Database'
    stage 'Invoke Rake'
    stage 'Security scan'
    stage 'Deploy'
}

As mentioned previously, this Jenkinsfile is going to rely heavily on theCloudBees Docker Pipeline plugin. The plugin provides two very important features:

  1. Ability to execute steps inside of a running Docker container

  2. Ability to run a container in the "background."

Like most Rails applications, one can effectively test the application with two commands: bundle install followed by bundle exec rake. I already had some Docker images prepared with RVM and Ruby 2.3.0 installed, which ensures a common and consistent starting point:

node('docker') {// .. 'stage' steps removed
    docker.image('rtyler/rvm:2.3.0').inside { (1)
        rvm 'bundle install'(2)
        rvm 'bundle exec rake'
    } (3)
}
1Run the named container. The inside method can take optional additional flags for the docker run command.
2Execute our shell commands using our tiny sh step wrapperrvm. This ensures that the shell code is executed in the correct RVM environment.
3When the closure completes, the container will be destroyed.

Unfortunately, with this application, the bundle exec rake command will fail if PostgreSQL isn’t available when the process starts. This is where the second important feature of the CloudBees Docker Pipeline plugin comes into effect: the ability to run a container in the "background."

node('docker') {// .. 'stage' steps removed/* Pull the latest `postgres` container and run it in the background */
    docker.image('postgres').withRun { container -> (1)
        echo "PostgreSQL running in container ${container.id}"(2)
    } (3)
}
1Run the container, effectively docker run postgres
2Any number of steps can go inside the closure
3When the closure completes, the container will be destroyed.

Running the tests

Combining these two snippets of Jenkins Pipeline is, in my opinion, where the power of the DSL shines:

node('docker') {
    docker.image('postgres').withRun { container ->
        docker.image('rtyler/rvm:2.3.0').inside("--link=${container.id}:postgres") { (1)
            stage 'Install Gems'
            rvm "bundle install"

            stage 'Invoke Rake'
            withEnv(['DATABASE_URL=postgres://postgres@postgres:5432/']) { (2)
                rvm "bundle exec rake"
            }
            junit 'spec/reports/*.xml'(3)
        }
    }
}
1By passing the --link argument, the Docker daemon will allow the RVM container to talk to the PostgreSQL container under the host name postgres.
2Use the withEnv step to set environment variables for everything that is in the closure. In this case, the cfp-app DB scaffolding will look for the DATABASE_URL variable to override the DB host/user/dbname defaults.
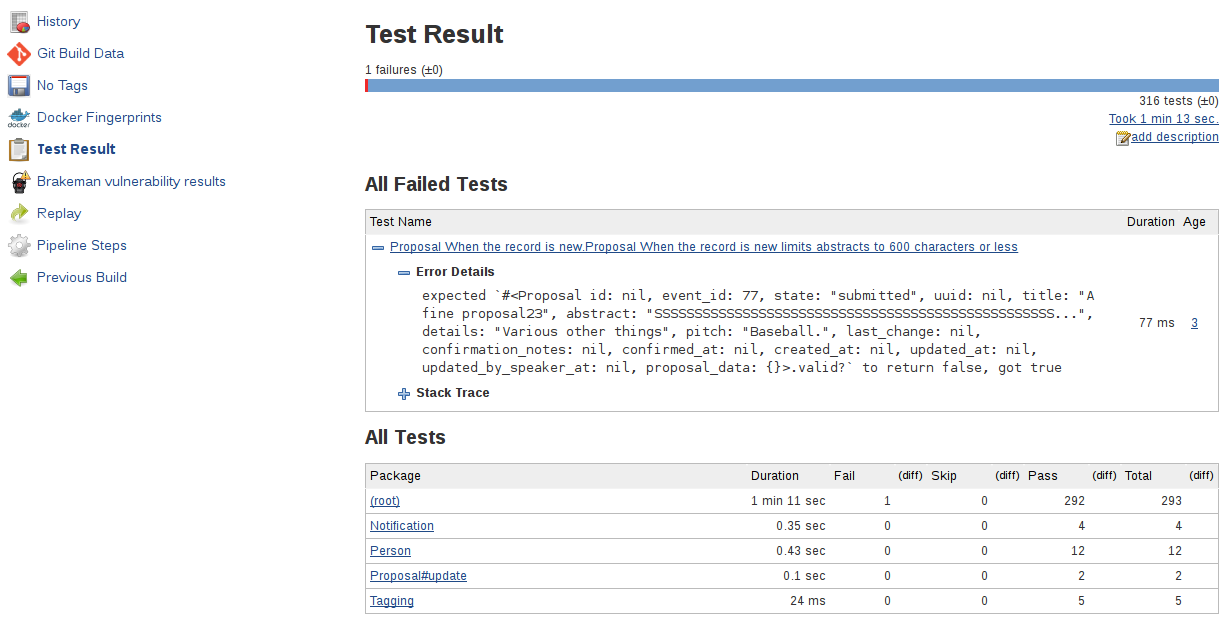
3Archive the test reports generated by ci_reporter so that Jenkins can display test reports and trend analysis.
cfpapp tests

With this done, the basics are in place to consistently run the tests for cfp-app in fresh Docker containers for each execution of the pipeline.

Security scanning

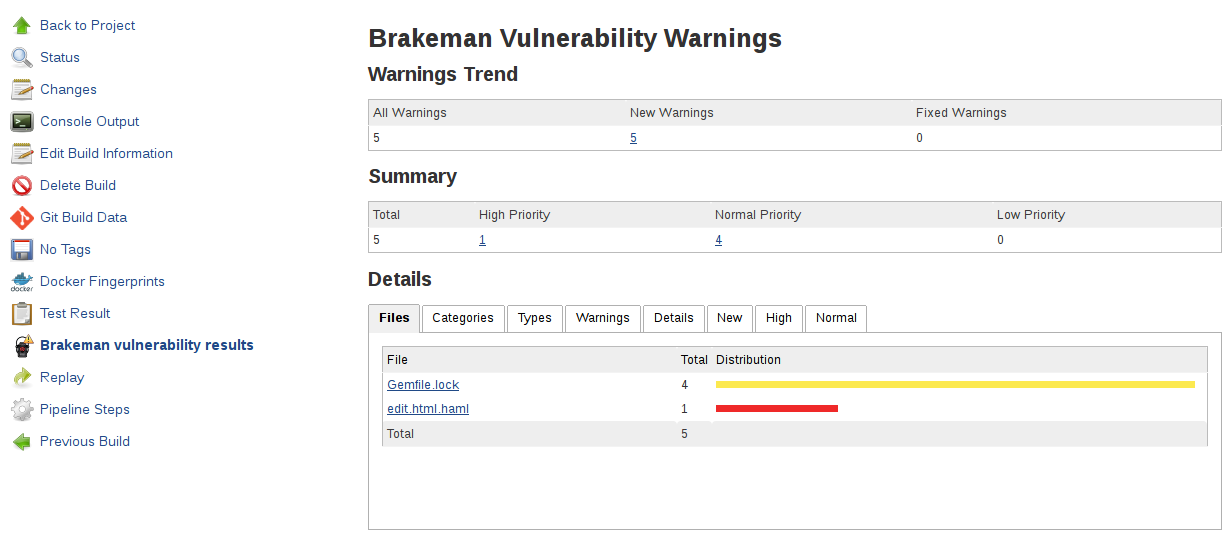
Using Brakeman, the security scanner for Ruby on Rails, is almost trivially easy inside of Jenkins Pipeline, thanks to theBrakeman plugin which implements the publishBrakeman step.

Building off our example above, we can implement the "Security scan" stage:

node('docker') {/* --8<--8<-- snipsnip --8<--8<-- */
    stage 'Security scan'
    rvm 'brakeman -o brakeman-output.tabs --no-progress --separate-models'(1)
    publishBrakeman 'brakeman-output.tabs'(2)/* --8<--8<-- snipsnip --8<--8<-- */
}
1Run the Brakeman security scanner for Rails and store the output for later in brakeman-output.tabs
2Archive the reports generated by Brakeman so that Jenkins can display detailed reports with trend analysis.
cfpapp brakeman

As of this writing, there is work in progress (JENKINS-31202) to render trend graphs from plugins like Brakeman on a pipeline project’s main page.

Deploying the good stuff

Once the tests and security scanning are all working properly, we can start to set up the deployment stage. Jenkins Pipeline provides the variablecurrentBuild which we can use to determine whether our pipeline has been successful thus far or not. This allows us to add the logic to only deploy when everything is passing, as we would expect:

node('docker') {/* --8<--8<-- snipsnip --8<--8<-- */
    stage 'Deploy'if (currentBuild.result == 'SUCCESS') { (1)
        sh './deploy.sh'(2)
    }else {
        mail subject: "Something is wrong with ${env.JOB_NAME}${env.BUILD_ID}",to: 'nobody@example.com',body: 'You should fix it'
    }/* --8<--8<-- snipsnip --8<--8<-- */
}
1currentBuild has the result property which would be 'SUCCESS', 'FAILED', 'UNSTABLE', 'ABORTED'
2Only if currentBuild.result is successful should we bother invoking our deployment script (e.g. git push heroku master)

Wrap up

I have gratuitously commented the fullJenkinsfile which I hope is a useful summation of the work outlined above. Having worked on a number of Rails applications in the past, the consistency provided by Docker and Jenkins Pipeline above would have definitely improved those projects' delivery times. There is still room for improvement however, which is left as an exercise for the reader. Such as: preparing new containers with all theirdependencies built-in instead of installing them at run-time. Or utilizing the parallel step for executing RSpec across multiple Jenkins agents simultaneously.

The beautiful thing about defining your continuous delivery, and continuous security, pipeline in code is that you can continue to iterate on it!

cfpapp stage view

Using Jenkins for Disparate Feedback on GitHub

$
0
0
This is a guest post by Ben Patterson, Engineering Manager atedX.

Picking a pear from a basket is straightforward when you can hold it in your hand, feel its weight, perhaps give a gentle squeeze, observe its color and look more closely at any bruises. If the only information we had was a photograph from one angle, we’d have to do some educated guessing. 1pear

As developers, we don’t get a photograph; we get a green checkmark or a red x. We use that to decide whether or not we need to switch gears and go back to a pull request we submitted recently. At edX, we take advantage of some Jenkins features that could give us more granularity on GitHub pull requests, and make that decision less of a guessing game.

5pears

Multiple contexts reporting back when they’re available

Pull requests on our platform are evaluated from several angles: static code analysis including linting and security audits, javascript unit tests, python unit tests, acceptance tests and accessibility tests. Using an elixir of plugins, including the GitHub Pull Request Builder Plugin, we put more direct feedback into the hands of the contributor so s/he can quickly decide how much digging is going to be needed.

For example, if I made adjustments to my branch and know more requirements are coming, then I may not be as worried about passing the linter; however, if my unit tests have failed, I likely have a problem I need to address regardless of when the new requirements arrive. Timing is important as well. Splitting out the contexts means we can run tests in parallel and report results faster.

Developers can re-run specific contexts

jenkins run python

Occasionally the feedback mechanism fails. It is oftentimes a flaky condition in a test or in test setup. (Solving flakiness is a different discussion I’m sidestepping. Accept the fact that the system fails for purposes of this blog entry.) Engineers are armed with the power of re-running specific contexts, also available through the PR plugin. A developer can say “jenkins run bokchoy” to re-run the acceptance tests, for example. A developer can also re-run everything with “jenkins run all”. These phrases are set through the GitHub Pull Request Builder configuration.

More granular data is easier to find for our Tools team

Splitting the contexts has also given us important data points for our Tools team to help in highlighting things like flaky tests, time to feedback and other metrics that help the org prioritize what’s important. We use this with a log aggregator (in our case, Splunk) to produce valuable reports such as this one.

95th percentile

I could go on! The short answer here is we have an intuitive way of divvying up our tests, not only for optimizing the overall amount of time it takes to get build results, but also to make the experience more user-friendly to developers.

I’ll be presenting more of this concept and expanding on the edX configuration details at Jenkins World in September.

Continuously Delivering Continuous Delivery Pipelines

$
0
0
This is a guest post by Jenkins World speaker Neil Hunt, Senior DevOps Architect at Aquilent.

In smaller companies with a handful of apps and fewer silos, implementing CD pipelines to support these apps is fairly straightforward using one of the many delivery orchestration tools available today. There is likely a constrained tool set to support - not an abundance of flavors of applications and security practices - and generally fewer cooks in the kitchen. But in a larger organization, I have found that in the past, there were seemingly endless unique requirements and mountains to climb to reach this level of automation on each new project.

Enter the Jenkins Pipeline plugin. My recently departed former company, a large financial services organization with a 600+ person IT organization and 150+ application portfolio, set out to implement continuous delivery enterprise-wide. After considering several pipeline orchestration tools, we determined the Pipeline plugin (at the time called Workflow) to be the superior solution for our company. Pipeline has continued Jenkins' legacy of presenting an extensible platform with just the right set of features to allow organizations to scale its capabilities as they see fit, and do so rapidly. As early adopters of Pipeline with a protracted set of requirements, we used it both to accelerate the pace of onboarding new projects and to reduce the ongoing feature delivery time of our applications.

In my presentation at Jenkins World, I will demonstrate the methods we used to enable this. A few examples:

  • We leveraged the Pipeline Remote File Loader plugin to write shared common code and sought and received community enhancements to these functions.

jw speaker blog aquilent 1 1

Jenkinsfile, loading a shared AWS utilities function library

jw speaker blog aquilent 2

awsUtils.groovy, snippets of some AWS functions

  • We migrated from EC2 agents to Docker-based agents running on Amazon’s Elastic Container Service, allowing us to spin up new executors in seconds and for teams to own their own executor definitions.

jw speaker blog aquilent 3

Pipeline run #1 using standard EC2 executors, spinning up EC2 instance for each node; Pipeline run #2 using shared ECS cluster with near-instant instantiation of a Docker slave in the cluster for each node.

  • We also created a Pipeline Library of common pipelines, enabling projects that fit certain models to use ready-made end-to-end pipelines. Some examples:

    • Maven JAR Pipeline: Pipeline that clones git repository, builds JAR file from pom.xml, deploys to Artifactory, and runs maven release plugin to increment next version

    • Anuglar.JS Pipeline: Pipeline that executes a grunt and bower build, then runs S3 sync to Amazon S3 bucket in Dev, then Stage, then Prod buckets.

    • Pentaho Reports Pipeline: Pipeline that clones git repository, constructs zip file, and executes Pentaho Business Intelligence Platform CLI to import new set of reports in Dev, Stage, then Prod servers.

Perhaps most critically, a shout-out to the saving grace of this quest for our security and ops teams: the manual input step! While the ambition of continuous delivery is to have as few of these as possible, this was the single-most pivotal feature in convincing others of Pipeline’s viability, since now any step of the delivery process could be gate-checked by an LDAP-enabled permission group. Were it not for the availability of this step, we may still be living in the world of: "This seems like a great tool for development, but we will have a segregated process for production deployments." Instead, we had a pipeline full of many input steps at first, and then used the data we collected around the longest delays to bring management focus to them and unite everyone around the goal of strategically removing them, one by one.

jw speaker blog aquilent 4

Going forward, having recently joined Aquilent’s Cloud Solutions Architecture team, I’ll be working with our project teams here to further mature the use of these Pipeline plugin features as we move towards continuous delivery. Already, we have migrated several components of our healthcare.gov project to Pipeline. The team has been able to consolidate several Jenkins jobs into a single, visible delivery pipeline, to maintain the lifecycle of the pipeline with our application code base in our SCM, and to more easily integrate with our external tools.

Jenkins World 125x125

Due to functional shortcomings in the early adoption stages of the Pipeline plugin and the ever-present political challenges of shifting organizational policy, this has been and continues to be far from a bruise-free journey. But we plodded through many of these issues to bring this to fruition and ultimately reduced the number of manual steps in some pipelines from 12 down to 1 and brought our 20+ Jenkins-minute pipelines to only six minutes after months of iteration. I hope you’ll join this session at Jenkins World and learn about our challenges and successes in achieving the promise of continuous delivery at enterprise scale.

Neil will be presenting more of this concept at Jenkins World in September. Register with the code JWHINMAN for 20% off your full conference pass.

Viewing all 1088 articles
Browse latest View live