Quantcast
Channel: Jenkins Blog
Viewing all 1088 articles
Browse latest View live

Declarative Pipeline for Maven Projects

$
0
0
This is a guest post by Liam Newman, Technical Evangelist at CloudBees.

Declare Your Pipelines!Declarative Pipeline 1.0 is here! This is first in a series of blog posts that will show some of the cool features ofDeclarative Pipeline. For several of these posts, I’ll be revisiting some of my previous posts on using various plugins with (Scripted) Pipeline, and seeing how those are implemented in Declarative Pipeline.

To start though, let’s get familiar with the basic structure of a Declarative Pipeline by creating a simple Pipeline for a Maven-based Java project - the Jenkins JUnit plugin. We’ll create a minimal Declarative Pipeline, add the settings needed to install Maven and the JDK, and finally we’ll actually run Maven to build the plugin.

Set up

With Declarative, it is still possible to run Pipelines edited directly in the Jenkins web UI, but one of the key features of "Pipeline as Code" is checking-in and being able to track changes. For this post, I’m going to use the blog/add-declarative-pipeline branch ofmy fork of the JUnit plugin. I’m going to set up a Multi-branch Pipeline and point it at my repository.
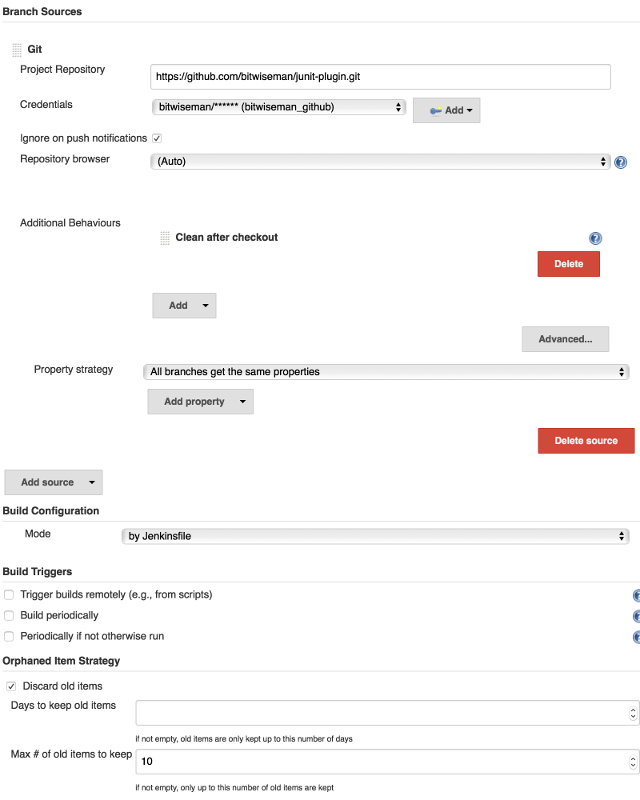
JUnit Multi-branch Pipeline Configuration

I’ve also set this Pipeline’s Git configuration to automatically "clean after checkout" and to only keep the ten most recent runs.

Writing a Minimal Pipeline

As has been said before, Declarative Pipeline provides a more structured, "opinionated" way to create Pipelines. I’m going to start by creating a minimal Declarative Pipeline and adding it to my branch. Below is a minimal Pipeline (with annotations) that just prints a message:

Jenkinsfile (Declarative Pipeline)
pipeline { // <1>
    agent any // <2> <3>
    stages { // <4>
        stage('Build') { // <5>
            steps { // <6>
               echo 'This is a minimal pipeline.'// <7>
            }
        }
    }
}
1All Declarative Pipelines start with a pipeline section.
2Select where to run this Pipeline, in this case "any" agent, regardless of label.
3Declarative automatically performs a checkout of source code on the agent, whereas Scripted Pipeline users must explicitly call checkout scm,
4A Declarative Pipeline is defined as a series of stages.
5Run the "Build" stage.
6Each stage in a Declarative Pipeline runs a series of steps.
7Run the echo step to print a message in the Console Output.
If you are familiar with Scripted Pipeline, you can toggle the above Declarative code sample to show the Scripted equivalent.

Once I add the Pipeline above to my Jenkinsfile and run "Branch Indexing", my Jenkins will pick it up and run run it. We see that the Declarative Pipeline has added stage called "Declarative: Checkout SCM":
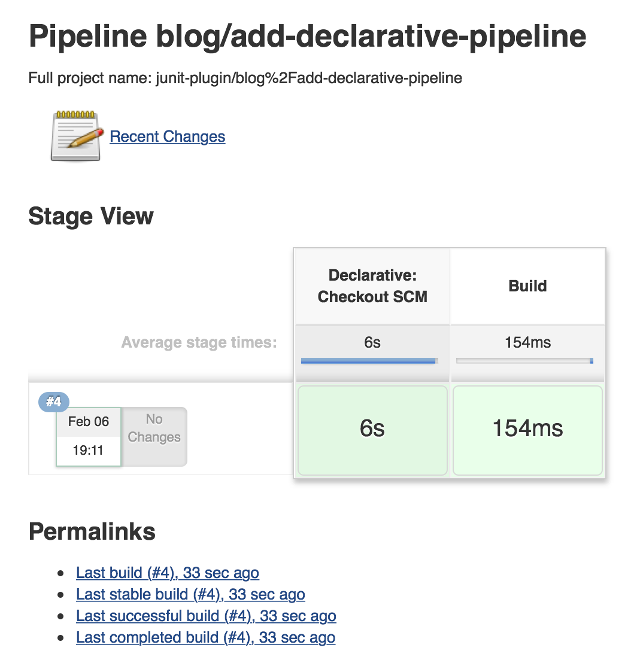
Minimal Declarative Pipeline

This a "dynamic stage", one of several the kinds that Declarative Pipeline adds as needed for clearer reporting. In this case, it is a stage in which the Declarative Pipeline automatically checkouts out source code on the agent.

As you can see above, we didn’t have to tell it do any of this,

Console Output
[Pipeline] node
Running on osx_mbp in /Users/bitwiseman/jenkins/agents/osx_mbp/workspace/blog_add-declarative-pipeline
[Pipeline] {
[Pipeline] stage
[Pipeline] { (Declarative: Checkout SCM)
[Pipeline] checkout
Cloning the remote Git repository
{ ... truncated 20 lines ... }
[Pipeline] }
[Pipeline] // stage
[Pipeline] stage
[Pipeline] { (Build)
[Pipeline] echo
This is a minimal pipeline
[Pipeline] }
[Pipeline] // stage
[Pipeline] }
[Pipeline] // node
[Pipeline] End of Pipeline
Finished: SUCCESS

Declarative Pipeline syntax is a little more verbose than the equivalent Scripted Pipeline, but the added detail gives a clearer, more consistent view of what the Pipeline is supposed to to do. It also gives us a structure into which we can add more configuration details about this Pipeline.

Adding Tools to Pipeline

The next thing we’ll add in this Pipeline is a tools section to let us use Maven. The tools section is one of several sections we can add underpipeline, which affect the configuration of the rest of the Pipeline. (We’ll look at the others, including agent, in later posts.) Each tool entry will make whatever settings changes, such as updating PATH or other environment variables, to make the named tool available in the current pipeline. It will also automatically install the named tool if that tool is configured to do so under "Managing Jenkins" → "Global Tool Configuration".

Jenkinsfile (Declarative Pipeline)
pipeline {
    agent any
    tools { // <1>
        maven 'Maven 3.3.9'// <2>
        jdk 'jdk8'// <3>
    }
    stages {
        stage ('Initialize') {
            steps {
                sh '''
                    echo "PATH = ${PATH}"
                    echo "M2_HOME = ${M2_HOME}"'''// <4>
            }
        }

        stage ('Build') {
            steps {
                echo 'This is a minimal pipeline.'
            }
        }
    }
}
1tools section for adding tool settings.
2Configure this Pipeline to use the Maven version matching "Maven 3.3.9" (configured in "Managing Jenkins" → "Global Tool Configuration").
3Configure this Pipeline to use the Maven version matching "jdk8" (configured in "Managing Jenkins" → "Global Tool Configuration").
4These will show the values of PATH and M2_HOME environment variables.

When we run this updated Pipeline the same way we ran the first, we see that the Declarative Pipeline has added another stage called "Declarative: Tool Install": In the console output, we see that during this particular stage "Maven 3.3.9" gets installed, and the PATH and M2_HOME environment variables are set:
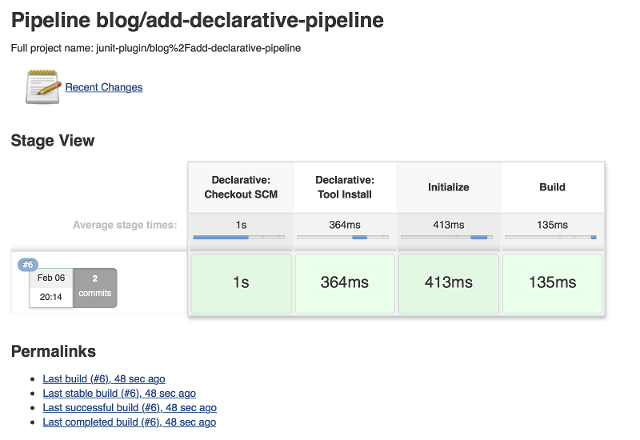
Declarative Pipeline with Tools Section
Console Output
{ ... truncated lines ... }
[Pipeline] // stage
[Pipeline] stage
[Pipeline] { (Declarative: Tool Install)
[Pipeline] tool
Unpacking https://repo.maven.apache.org/maven2/org/apache/maven/apache-maven/3.3.9/apache-maven-3.3.9-bin.zip
to /Users/bitwiseman/jenkins/agents/osx_mbp/tools/hudson.tasks.Maven_MavenInstallation/Maven_3.3.9
on osx_mbp
[Pipeline] envVarsForTool
[Pipeline] tool
[Pipeline] envVarsForTool
[Pipeline] }
[Pipeline] // stage
{ ... }
PATH = /Library/Java/JavaVirtualMachines/jdk1.8.0_92.jdk/Contents/Home/bin:/Users/bitwiseman/jenkins/agents/osx_mbp/tools/hudson.tasks.Maven_MavenInstallation/Maven_3.3.9/bin:...
M2_HOME = /Users/bitwiseman/jenkins/agents/osx_mbp/tools/hudson.tasks.Maven_MavenInstallation/Maven_3.3.9
{ ... }

Running a Maven Build

Finally, running a Maven build is trivial. The tools section already added Maven and JDK8 to the PATH, all we need to do is call mvn install. It would be nice if I could split the build and the tests into separate stages, but Maven is famous for not liking when people do that, so I’ll leave it alone for now.

Instead, let’s load up the results of the build using the JUnit plugin, however the version that was just built, sorry.

Jenkinsfile (Declarative Pipeline)
pipeline {
    agent any
    tools {
        maven 'Maven 3.3.9'
        jdk 'jdk8'
    }
    stages {
        stage ('Initialize') {
            steps {
                sh '''
                    echo "PATH = ${PATH}"
                    echo "M2_HOME = ${M2_HOME}"'''
            }
        }

        stage ('Build') {
            steps {
                sh 'mvn -Dmaven.test.failure.ignore=true install'// <1>
            }
            post {
                success {
                    junit 'target/surefire-reports/**/*.xml'// <2>
                }
            }
        }
    }
}
1Call mvn, the version configured by the tools section will be first on the path.
2If the maven build succeeded, archive the JUnit test reports for display in the Jenkins web UI. We’ll discuss the post section in detail in the next blog post.
If you are familiar with Scripted Pipeline, you can toggle the above Declarative code sample to show the Scripted equivalent.

Below is the console output for this last revision:

Console Output
{ ... truncated lines ... }
+ mvn install
[INFO] Scanning for projects...
[WARNING] The POM for org.jenkins-ci.tools:maven-hpi-plugin:jar:1.119 is missing, no dependency information available
[WARNING] Failed to build parent project for org.jenkins-ci.plugins:junit:hpi:1.20-SNAPSHOT
[INFO]
[INFO] ------------------------------------------------------------------------
[INFO] Building JUnit Plugin 1.20-SNAPSHOT
[INFO] ------------------------------------------------------------------------
[INFO]
[INFO] --- maven-hpi-plugin:1.119:validate (default-validate) @ junit ---
[INFO]
[INFO] --- maven-enforcer-plugin:1.3.1:display-info (display-info) @ junit ---
[INFO] Maven Version: 3.3.9
[INFO] JDK Version: 1.8.0_92 normalized as: 1.8.0-92
[INFO] OS Info: Arch: x86_64 Family: mac Name: mac os x Version: 10.12.3
[INFO]
{ ... }
[INFO] ------------------------------------------------------------------------
[INFO] BUILD SUCCESS
[INFO] ------------------------------------------------------------------------
[INFO] Total time: 03:25 min
[INFO] Finished at: 2017-02-06T22:43:41-08:00
[INFO] Final Memory: 84M/1265M
[INFO] ------------------------------------------------------------------------

Conclusion

The new Declarative syntax is a significant step forward for Jenkins Pipeline. It trades some verbosity and constraints for much greater clarity and maintainability. In the coming weeks, I’ll be adding new blog posts demonstrating various features of the Declarative syntax along with some recent Jenkins Pipeline improvements.
Monitor Jenkins jobs with the Datadog plugin

$
0
0

This is a guest post by Emily Chang, Technical Author at Datadog. A modified version of this article was originally posted on theDatadog blog.

If you’re using Jenkins to continuously integrate changes into your projects, it’s helpful to be able to quickly identify build failures and assess their impact on other components of your stack.

Datadog’s plugin helps users monitor and alert on the performance of their Jenkins builds, right alongside the rest of their infrastructure and applications.

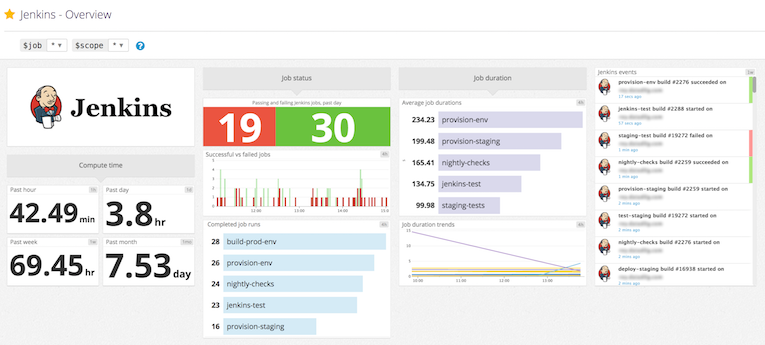
As shown in the out-of-the-box dashboard below, the Datadog plugin provides a bird’s-eye view of job history and trends. You can use Datadog to:

  • Set alerts for important build failures

  • Identify trends in build durations

  • Correlate Jenkins events with performance metrics from other parts of your infrastructure in order to identify and resolve issues

Jenkins default dashboard in Datadog

Track Jenkins build status in real-time

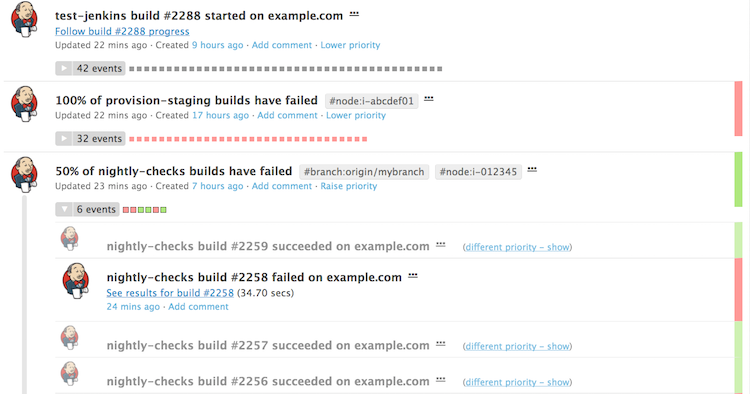
Once you install the Datadog plugin, Jenkins activities (when a build starts, fails, or succeeds) will start appearing in your Datadog event stream. You will also see what percentage of builds failed within the same job, so that you can quickly spot which jobs are experiencing a higher rate of failure than others.

Jenkins events in Datadog event stream

Remember to blacklist any jobs you don’t want to track by indicating them in your plugin configuration.

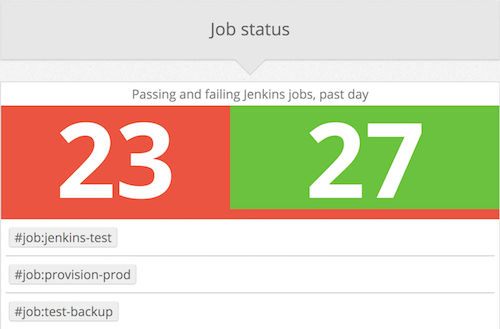
Datadog’s out-of-the-box Jenkins dashboard includes a status widget that displays the count of all jobs that have run in the past day, grouped by success or failure. To explore further, you can also click on the widget to view the individual jobs that have failed or succeeded in the past day.

Jenkins jobs tagged by result success or failure

The dashboard also displays the proportion of successful vs. failed builds, along with the total number of job runs completed over the past four hours.

Datadog enables you to correlate Jenkins events with application performance metrics to investigate the root cause of an issue. For example, the screenshot below shows that average CPU on the app servers increased sharply after a Jenkins build was completed and deployed (indicated by the pink bar). Your team can use this information as a starting point to investigate if code changes in the corresponding release may be causing issues.

Jenkins build affects CPU graph

Visualize job duration metrics

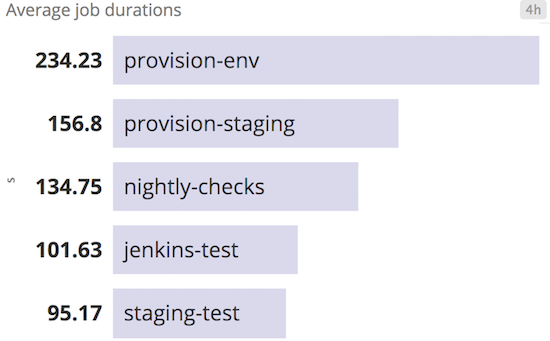
Every time a build is completed, the plugin collects the build duration as a metric that you can aggregate by job name or any other tag, and graph over time. In the screenshot below, we can view the average job durations in the past four hours, sorted in decreasing order:

Jenkins job durations ranked in Datadog

You can also graph and visualize trends in build durations for each job by using Datadog’s robust_trend() linear regression function, as shown in the screenshot below. This graph indicates which jobs' durations are trending longer over time, so that you can investigate if there appears to be a problem. If you’re experimenting with changes to your CI pipeline, consulting this graph can help you track the effects of those changes over time.

Jenkins build duration trends graph

Use tags to monitor your Jenkins jobs

Tags add custom dimensions to your monitoring, so you can focus on what’s important to you right now.

Every Jenkins event, metric, and service check is auto-tagged with job, result, and branch (if applicable). You can also enable the optional node tag in the plugin settings.

As of version 0.5.0, the plugin supports custom tags. This update was developed by one of our open source contributors, Mads Nielsen. Many thanks to Mads for helping us implement this feature!

You can create custom tags for the name of the application you’re building, your particular team name (e.g. team=licorice), or any other info that matters to you. For example, if you have multiple jobs that perform nightly builds, you might want to create a descriptive tag that distinguishes them from other types of jobs.

add tags to jenkins datadog plugin

As shown in the configuration settings above, you can add custom tags, formatted as key=value, in two ways:

  • in a text file (saved in the workspace for the job)

  • in a list of properties in the text box

Set up the Datadog plugin

The Datadog plugin requires Jenkins 1.580.1 or newer.

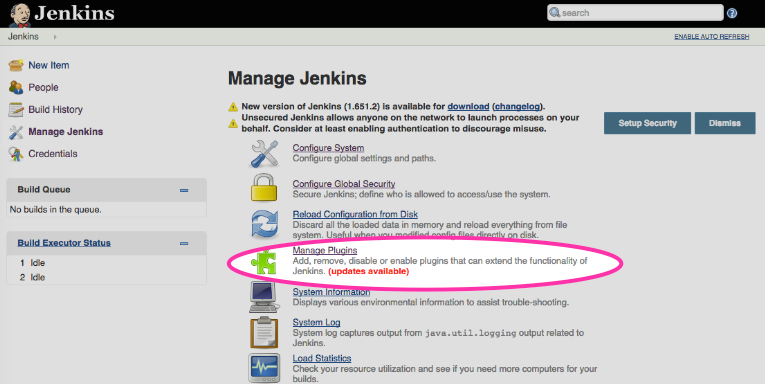
In Jenkins, navigate to Manage Jenkins > Manage Plugins.

signup step 1

Search for Datadog Plugin and check the box to install it.

signup step 2

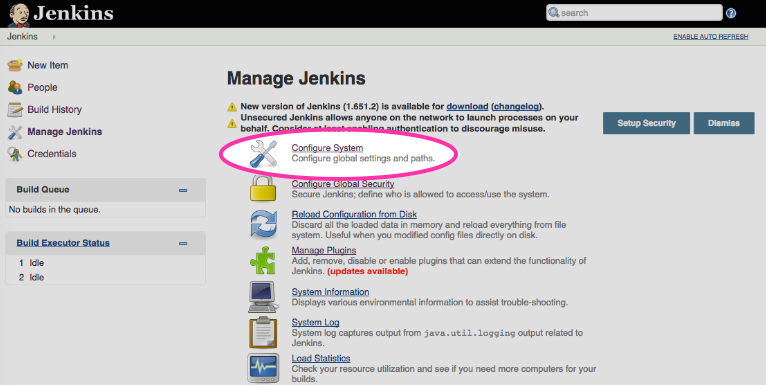
In Jenkins, go to Manage Jenkins > Configure System.

signup step 3

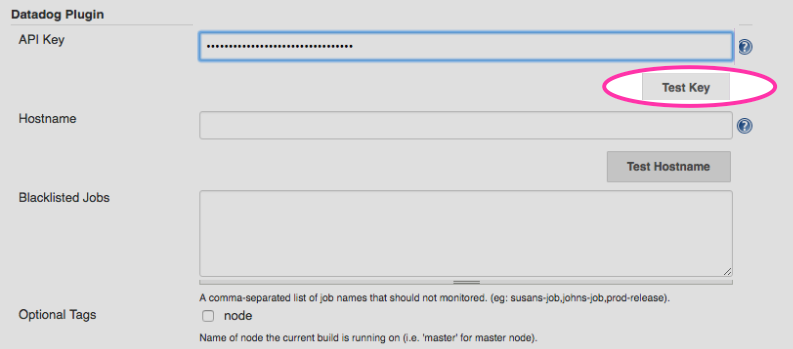
Scroll down to the Datadog Plugin section, and paste your API key in the text box. You can copy this from the API Keys page of your Datadog account. Click Test Key to confirm that the plugin recognizes your API key.

signup step 4

Save your changes, and you’re all set!

Get started

If you’re already using Datadog, you can start monitoring Jenkins jobs by following the instructions here to download the Datadog plugin. If you’re not using Datadog yet, here’s a 14-day free trial.

Blue Ocean Dev Log: February Week #2

$
0
0

We’re counting down the weeks until Blue Ocean 1.0, which is planned for the end of March. If you hadn’t picked up on the hint in my previous post, most of the Blue Ocean development team is in Australia, where it is currently the middle of summer. As I write this it is about 1000 degrees outside. Emergency measures such as air-conditioning and beer have been deployed in order to continue Blue Ocean development.

This week featured a new beta with theSCM API changes; many bug fixes, and some version bumps went out in beta 22. We also got some fresh new designs coming soon, though not in time for beta 22.

Overview

Some development highlights:

  • Beta 22 went out featuring the newSCM API with better use of GitHub API rate limits.

  • A fix for publishing ofServer Side Events that made one CPU spin up to 100% was fixed (not good unless you want to heat up your room)

  • Some new refinements to the design merged to the master branch (see images below).

  • Beta 22 featured the 1.0 version ofDeclarative Pipeline

  • AnAustralian translation was added; really critical stuff, I know..

  • The Acceptance Test Harness (ATH) was stabilised a bit and it now covers creating Pipelines from Git, which we talked about inlate January.

  • The Visual Pipeline Editor was released to the main Update Center as a preview release, ready to play with!

  • Some small performance improvements

I’m looking forward to those fancy new designs making their way into an upcoming release too.

Successful Pipeline

Failing Pioeline

Lovely! Hopefully you see more green than I do…​

Anyways, up next for Blue Ocean:

  • Creation of Pipelines from GitHub, including auto-discovery of new Pipelines.

  • Closer to a "release candidate"

  • Working on filtering the activity view for "per branch" views

  • Better reporting of durations of stages, steps, and runs

Enjoy!


If you’re interested in helping to make Blue Ocean a great user experience for Jenkins, please join the Blue Ocean development team on Gitter!

Declarative Pipeline: Publishing HTML Reports

$
0
0
This is a guest post by Liam Newman, Technical Evangelist at CloudBees.

Declare Your Pipelines!Declarative Pipeline 1.0 is here! This is the second post in a series showing some of the cool features ofDeclarative Pipeline.

In theprevious blog post, we created a simple Declarative Pipeline. In this blog post, we’ll go back and look at the Scripted Pipeline for the Publishing HTML Reports in Pipeline blog post. We’ll convert that Pipeline to Declarative syntax (including properties), go into more detail on the post section, and then we’ll use the agent directive to switch our Pipeline to run in Docker.

Setup

For this post, I’m going to use the blog/add-declarative/html branch ofmy fork of thehermann project. I’ve set up a Multibranch Pipeline and pointed it at my repository the same as did it previous post. Also the same as before, I’ve set this Pipeline’s Git configuration to automatically "Clean after checkout".

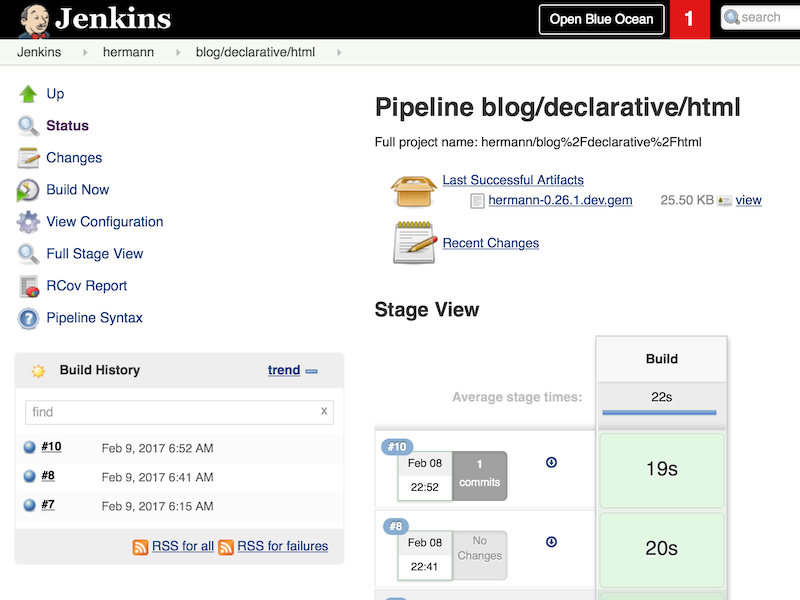
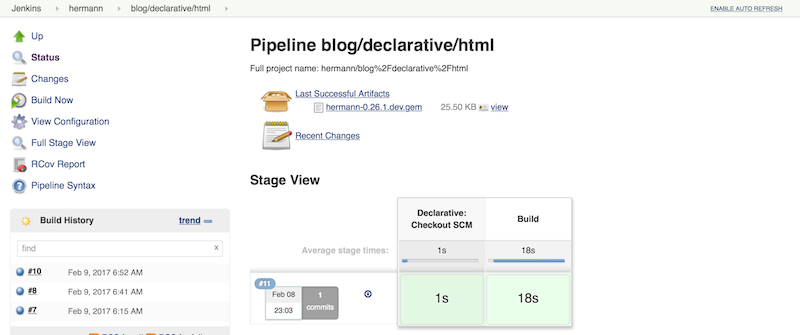
This time we already have a Pipeline checked in. I’ll run it a few times to get a baseline.

Stage view
RCov Report

Converting to Declarative

Let’s start by converting the Scripted Pipeline straight to Declarative.

Jenkinsfile (Declarative Pipeline)
pipeline {
  agent any (1)(2)
  options {// Keep the 10 most recent builds
    buildDiscarder(logRotator(numToKeepStr:'10')) (3)
  }
  stages {
    stage ('Build') { (4)
      steps {// install required gems
        sh 'bundle install'// build and run tests with coverage
        sh 'bundle exec rake build spec'// Archive the built artifacts
        archive includes: 'pkg/*.gem'// publish html
        publishHTML target: [allowMissing: false,alwaysLinkToLastBuild: false,keepAll: true,reportDir: 'coverage',reportFiles: 'index.html',reportName: 'RCov Report'
          ]
      }
    }
  }
}
1Select where to run this Pipeline, in this case "any" agent, regardless of label.
2Declarative automatically performs a checkout of source code on the agent, whereas Scripted Pipeline users must explicitly call checkout scm.
3Set the Pipeline option to preserve the ten most recent runs. This overrides the default behavior from the Multibranch parent of this Pipeline.
4Run the "Build" stage.
Stage view

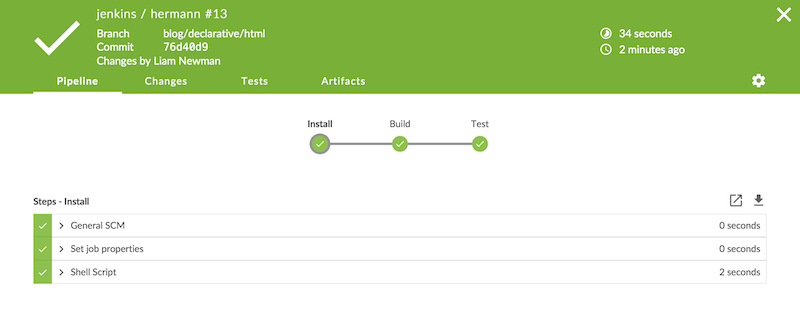
Now that we have this Pipeline in Declarative form, let’s take a minute to do a little clean up. We’ll split out the bundle actions a little more and move steps into logically grouped stages. Rather than having one monolithic "Build" stage, we’ll have details for each stage. As long as we’re prettying things up, let’s switch to using Blue Ocean to view our builds, as well.

Jenkinsfile (Declarative Pipeline)
pipeline {
  agent any
  options {// Keep the 10 most recent builds
    buildDiscarder(logRotator(numToKeepStr:'10'))
  }
  stages {
    stage ('Install') {
      steps {// install required gems
        sh 'bundle install'
      }
    }
    stage ('Build') {
      steps {// build
        sh 'bundle exec rake build'// Archive the built artifacts
        archive includes: 'pkg/*.gem'
      }
    }
    stage ('Test') {
      steps {// run tests with coverage
        sh 'bundle exec rake spec'// publish html
        publishHTML target: [allowMissing: false,alwaysLinkToLastBuild: false,keepAll: true,reportDir: 'coverage',reportFiles: 'index.html',reportName: 'RCov Report'
          ]
      }
    }
  }
}
Blue Ocean View

Using post sections

This looks pretty good, but if we think about it the archive and publishHTML steps are really post-stage actions. They should only occur when the rest of their stage succeeds. As our Pipeline gets more complex we might need to add actions that always happen even if a stage or the Pipeline as a whole fail.

In Scripted Pipeline, we would use try-catch-finally, but we cannot do that in Declarative. One of the defining features of the Declarative Pipeline is that it does not allow script-based control structures such as for loops, if-then-else blocks, or try-catch-finally blocks. Of course, internally Step implementations can still contain whatever conditional logic they want, but the Declarative Pipeline cannot.

Instead of free-form conditional logic, Declarative Pipeline provides a set of Pipeline-specific controls:when directives, which we’ll look at in a later blog post in this series, control whether to execute the steps in a stage, and post sections control which actions to take based on result of a single stage or a whole Pipeline. post supports a number ofrun conditions, including always (execute no matter what) and changed (execute when the result differs from previous run). We’ll use success to run archive and publishHTML when their respective stages complete. We’ll also use an always block with a placeholder for sending notifications, which I’ll implement in the next blog post.

Jenkinsfile (Declarative Pipeline)
pipeline {
  agent any
  options {// Only keep the 10 most recent builds
    buildDiscarder(logRotator(numToKeepStr:'10'))
  }
  stages {
    stage ('Install') {
      steps {// install required gems
        sh 'bundle install'
      }
    }
    stage ('Build') {
      steps {// build
        sh 'bundle exec rake build'
      }

      post {
        success {
          // Archive the built artifacts
          archive includes: 'pkg/*.gem'
        }
      }
    }
    stage ('Test') {
      steps {// run tests with coverage
        sh 'bundle exec rake spec'
      }

      post {
        success {
          // publish html
          publishHTML target: [allowMissing: false,alwaysLinkToLastBuild: false,keepAll: true,reportDir: 'coverage',reportFiles: 'index.html',reportName: 'RCov Report'
            ]
        }
      }
    }
  }
  post {
    always {
      echo "Send notifications for result: ${currentBuild.result}"
    }
  }
}

Switching agent to run in Docker

agent can actually acceptseveral other parameters instead of any. We could filter on label "some-label", for example, which would be the equivalent of node ('some-label') in Scripted Pipeline. However, agent also lets us just as easily switch to using a Docker container, which replaces a more complicated set of changes in Scripted Pipeline:

pipeline {
  agent {// Use docker container
    docker {
      image 'ruby:2.3'
    }
  }/* ... unchanged ... */
}

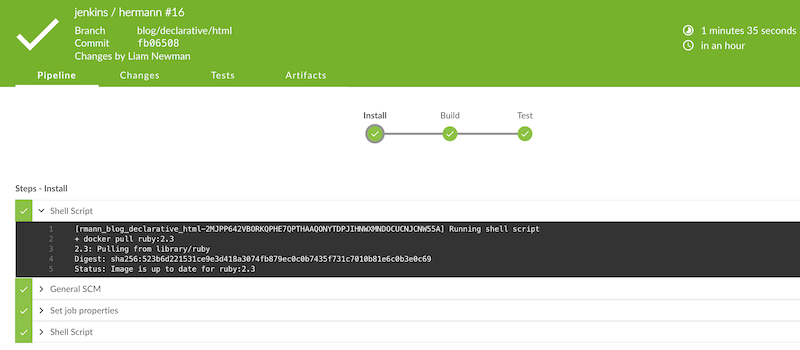
If I needed to, I could add a label filter under docker to select a node to host the Docker container. I already have Docker available on all my agents, so I don’t need label - this works as is. As you can see below, the Docker container spins up at the start of the run and the pipeline runs inside it. Simple!

Docker Container Started

Conclusion

At first glance, the Declarative Pipeline’s removal of control structures seems like it would be too constrictive. However, it replaces those structures with facilities like the post section, that give us reasonable control over the flow our our Pipeline while still improving readability and maintainability. In the next blog post, we’ll add notifications to this pipeline and look at how to use Shared Libraries with Declarative Pipeline to share code and keep Pipelines easy to understand.

Declarative Pipeline: Notifications and Shared Libraries

$
0
0
This is a guest post by Liam Newman, Technical Evangelist at CloudBees.

Declare Your Pipelines!Declarative Pipeline 1.0 is here! This is the third post in a series showing some of the cool features ofDeclarative Pipeline.

In theprevious post, we converted a Scripted Pipeline to a Declarative Pipeline, adding descriptive stages and post sections. In one of those post blocks, we included a placeholder for sending notifications.

In this blog post, we’ll repeat what I did in "Sending Notifications in Pipeline but this time in Declarative Pipeline. First we’ll integrate calls to notification services Slack, HipChat, and Email into our Pipeline. Then we’ll refactor those calls into a single Step in a Shared Library, which we’ll reuse as needed, keeping our Jenkinsfile concise and understandable.

Setup

The setup for this post is almost the same asmy previous Declarative Pipeline post. I’ve used a new branch in my fork of theHermann project:blog/declarative/notifications. I’d already set up a Multibranch Pipeline and pointed it at my repository, so the new branch will be picked up and built automatically.

I still have my notification targets (where we’ll send notifications) that I created for the "Sending Notifications in Pipeline" blog post. Take a look at that post to review how I setup theSlack,HipChat, and Email-ext plugins to use those channels.

Adding Notifications

We’ll start from the same Pipeline we had at the end of the previous post.

This Pipeline works quite well, except it doesn’t print anything at the start of the run, and that final always directive only prints a message to the console log. Let’s start by getting the notifications working like we did in the original post. We’ll just copy-and-paste the three notification steps (with different parameters) to get the notifications working for started, success, and failure.

pipeline {/* ... unchanged ... */
  stages {
    stage ('Start') {
      steps {// send build started notifications
        slackSend (color: '#FFFF00', message: "STARTED: Job '${env.JOB_NAME} [${env.BUILD_NUMBER}]' (${env.BUILD_URL})")// send to HipChat
        hipchatSend (color: 'YELLOW', notify: true,message: "STARTED: Job '${env.JOB_NAME} [${env.BUILD_NUMBER}]' (${env.BUILD_URL})"
          )// send to email
        emailext (subject: "STARTED: Job '${env.JOB_NAME} [${env.BUILD_NUMBER}]'",body: """<p>STARTED: Job '${env.JOB_NAME} [${env.BUILD_NUMBER}]':</p><p>Check console output at &QUOT;<a href='${env.BUILD_URL}'>${env.JOB_NAME} [${env.BUILD_NUMBER}]</a>&QUOT;</p>""",recipientProviders: [[$class: 'DevelopersRecipientProvider']]
          )
      }
    }/* ... unchanged ... */
  }post {
    success {
      slackSend (color: '#00FF00', message: "SUCCESSFUL: Job '${env.JOB_NAME} [${env.BUILD_NUMBER}]' (${env.BUILD_URL})")

      hipchatSend (color: 'GREEN', notify: true,message: "SUCCESSFUL: Job '${env.JOB_NAME} [${env.BUILD_NUMBER}]' (${env.BUILD_URL})"
        )

      emailext (
          subject: "SUCCESSFUL: Job '${env.JOB_NAME} [${env.BUILD_NUMBER}]'",body: """<p>SUCCESSFUL: Job '${env.JOB_NAME} [${env.BUILD_NUMBER}]':</p><p>Check console output at &QUOT;<a href='${env.BUILD_URL}'>${env.JOB_NAME} [${env.BUILD_NUMBER}]</a>&QUOT;</p>""",recipientProviders: [[$class: 'DevelopersRecipientProvider']]
        )
    }failure {
      slackSend (color: '#FF0000', message: "FAILED: Job '${env.JOB_NAME} [${env.BUILD_NUMBER}]' (${env.BUILD_URL})")

      hipchatSend (color: 'RED', notify: true,message: "FAILED: Job '${env.JOB_NAME} [${env.BUILD_NUMBER}]' (${env.BUILD_URL})"
        )

      emailext (
          subject: "FAILED: Job '${env.JOB_NAME} [${env.BUILD_NUMBER}]'",body: """<p>FAILED: Job '${env.JOB_NAME} [${env.BUILD_NUMBER}]':</p><p>Check console output at &QUOT;<a href='${env.BUILD_URL}'>${env.JOB_NAME} [${env.BUILD_NUMBER}]</a>&QUOT;</p>""",recipientProviders: [[$class: 'DevelopersRecipientProvider']]
        )
    }
  }
}
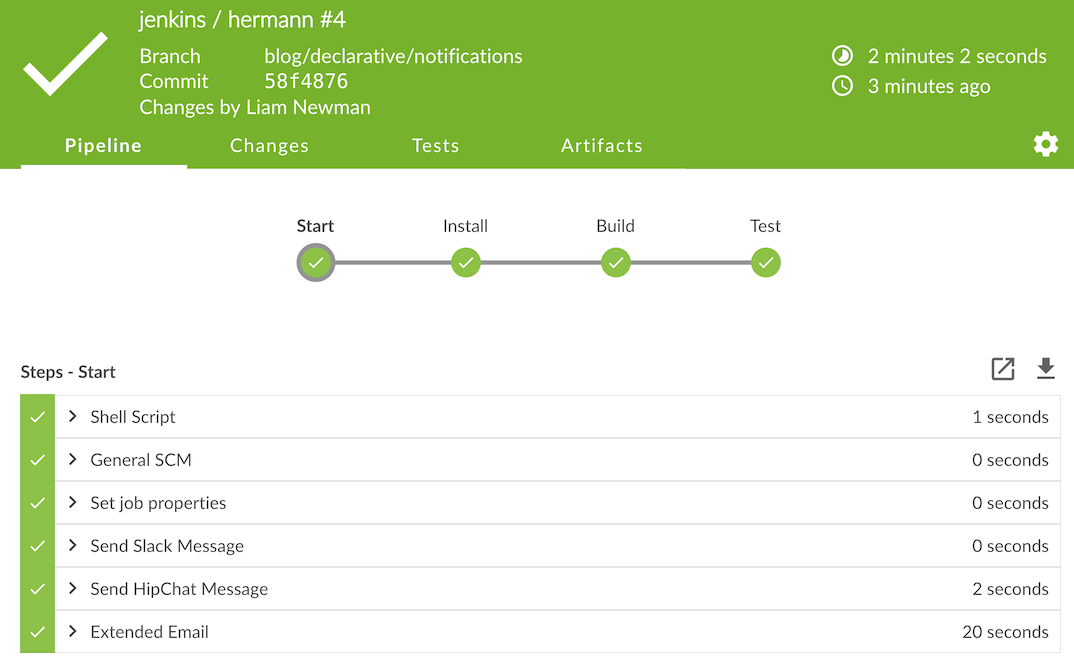
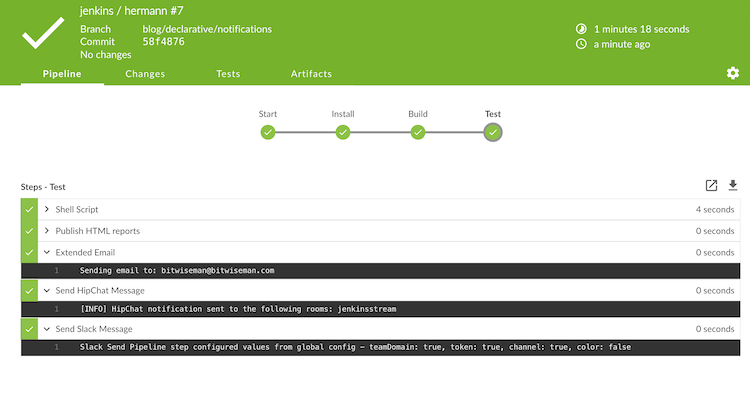
Blue Ocean Run with Notifications

Moving Notifications to Shared Library

This new Pipeline works and our Declarative Pipeline sends notifications; however, it is extremely ugly. In the original post using Scripted Pipeline, I defined a single method that I called at both the start and end of the pipeline. I’d like to do that here as well, but Declarative doesn’t support creating methods that are accessible to multiple stages. For this, we’ll need to turn to Shared Libraries.

Shared Libraries, as the name suggests, let Jenkins Pipelines share code instead of copying it to each new project. Shared Libraries are not specific to Declarative; they were released in their current form several months ago and were useful in Scripted Pipeline. Due to Declarative Pipeline’s lack of support for defining methods, Shared Libraries take on a vital role. They are the only supported way within Declarative Pipeline to define methods or classes that we want to use in more than one stage.

The lack of support for defining methods that are accessible in multiple stages, is a known issue, with at least two JIRA tickets:JENKINS-41335 andJENKINS-41396. For this series, I chose to stick to using features that are fully supported in Declarative Pipeline at this time. The internet has plenty of hacked together solutions that happen to work today, but I wanted to highlight current best practices and dependable solutions.

Setting up a Shared Library

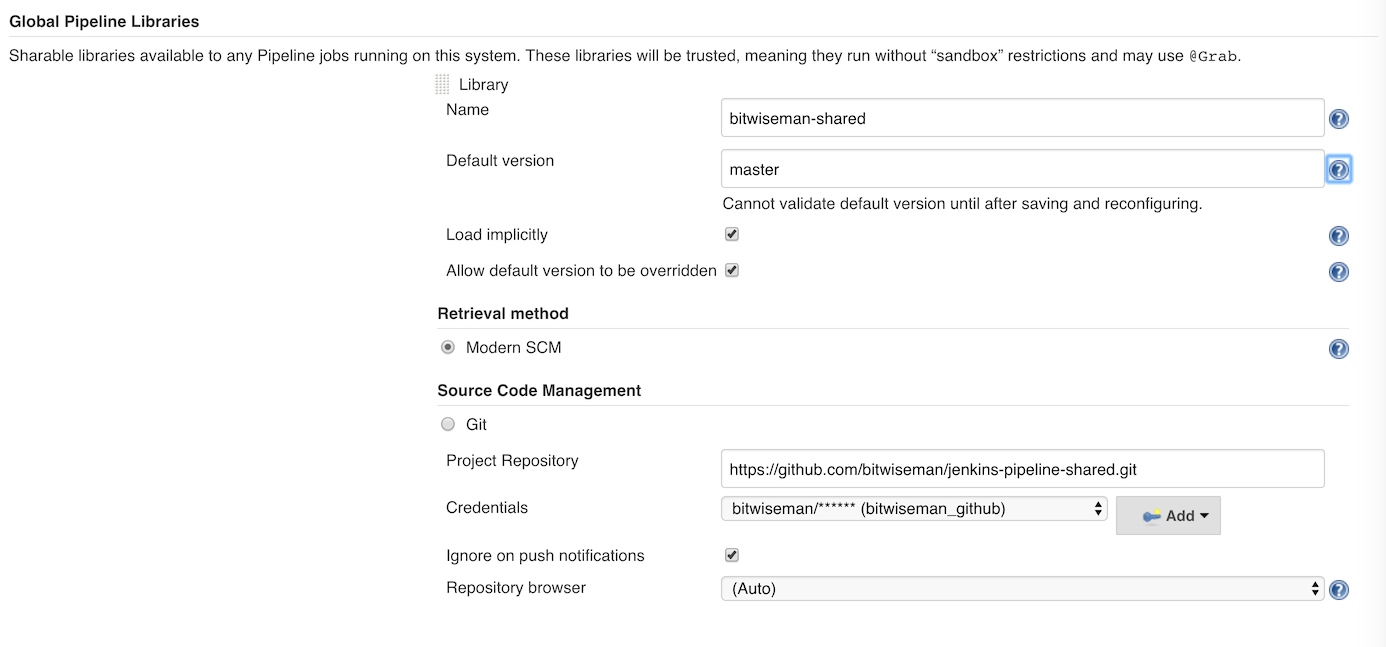
I’ve created a simple shared library repository for this series of posts, called jenkins-pipeline-shared. The shared library functionality has too many configuration options to cover in one post. I’ve chosen to configure this library as a "Global Pipeline Library," accessible from any project on my Jenkins master. To setup a "Global Pipeline Library," I navigated to "Manage Jenkins" → "Configure System" in the Jenkins web UI. Once there, under "Global Pipeline Libraries", I added a new library. I then set the name to bitwiseman-shared, pointed it at my repository, and set the default branch for the library to master, but I’ll override that in my Jenkinsfile.

Global Pipeline Library

Moving the Code to the Library

Adding a Step to a library involves creating a file with the name of our Step, adding our code to a call() method inside that file, and replacing the appropriate code in our Jenkinsfile with the new Step calls. Libraries can be set to load "implicitly," making their default branch automatically available to all Pipelines, or they can be loaded manually using a @Library annotation. The branch for implicitly loaded libraries can also be overridden using the @Library annotation.

The minimal set of dependencies for sendNotifications means we can basically copy-and-paste the code from the original blog post. We’ll check this change into a branch in the library named blog/declarative/notifications, the same as my branch in the hermann repository. This will let us make changes on the master branch later without breaking this example. We’ll then use the @Library directive to tell Jenkins to use that branch’s version of the library with this Pipeline.

Jenkinsfile (Declarative Pipeline)
#!groovy@Library('bitwiseman-shared@blog/declarative/notifications') _ (1)

pipeline {
  agent {
    // Use docker container
    docker {
      image 'ruby:2.3'
    }
  }
  options {// Only keep the 10 most recent builds
    buildDiscarder(logRotator(numToKeepStr:'10'))
  }
  stages {
    stage ('Start') {
      steps {// send build started notifications
        sendNotifications 'STARTED'
      }
    }
    stage ('Install') {
      steps {// install required bundles
        sh 'bundle install'
      }
    }
    stage ('Build') {
      steps {// build
        sh 'bundle exec rake build'
      }

      post {
        success {
          // Archive the built artifacts
          archive includes: 'pkg/*.gem'
        }
      }
    }
    stage ('Test') {
      steps {// run tests with coverage
        sh 'bundle exec rake spec'
      }

      post {
        success {
          // publish html
          publishHTML target: [allowMissing: false,alwaysLinkToLastBuild: false,keepAll: true,reportDir: 'coverage',reportFiles: 'index.html',reportName: 'RCov Report'
            ]
        }
      }
    }
  }
  post {
    always {
      sendNotifications currentBuild.result
    }
  }
}
1The _ here is intentional.Java/Groovy Annotations such as @Library must be applied to an element. That is often a using statement, but that isn’t needed here so by convention we use an _.
vars/sendNotifications.groovy
#!/usr/bin/env groovy/**
 * Send notifications based on build status string
 */defcall(String buildStatus = 'STARTED') {// build status of null means successful
  buildStatus =  buildStatus ?: 'SUCCESSFUL'// Default valuesdef colorName = 'RED'def colorCode = '#FF0000'def subject = "${buildStatus}: Job '${env.JOB_NAME} [${env.BUILD_NUMBER}]'"def summary = "${subject} (${env.BUILD_URL})"def details = """<p>${buildStatus}: Job '${env.JOB_NAME} [${env.BUILD_NUMBER}]':</p><p>Check console output at &QUOT;<a href='${env.BUILD_URL}'>${env.JOB_NAME} [${env.BUILD_NUMBER}]</a>&QUOT;</p>"""// Override default values based on build statusif (buildStatus == 'STARTED') {
    color = 'YELLOW'
    colorCode = '#FFFF00'
  } elseif (buildStatus == 'SUCCESSFUL') {
    color = 'GREEN'
    colorCode = '#00FF00'
  } else {
    color = 'RED'
    colorCode = '#FF0000'
  }// Send notifications
  slackSend (color: colorCode, message: summary)

  hipchatSend (color: color, notify: true, message: summary)

  emailext (
      to: 'bitwiseman@bitwiseman.com',subject: subject,body: details,recipientProviders: [[$class: 'DevelopersRecipientProvider']]
    )
}
Global Pipeline Library
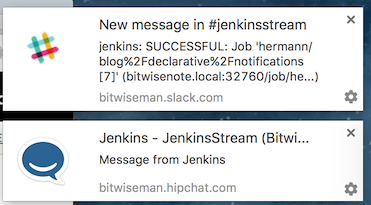
HipChat and Slack Popups
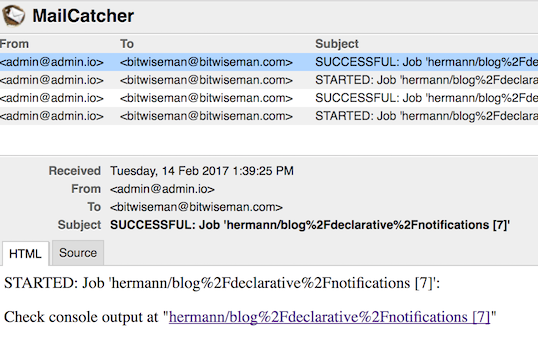
MailCatcher List

Conclusion

In this post we added notifications to our Declarative Pipeline. We wanted to move our repetitive notification code into a method; however, Declarative Pipeline prevented us from defining a method in our Jenkinsfile. Instead, with the help of the Shared Library feature, we were able to define a sendNotifications Step that we could call from our Jenkinsfile. This maintained the clarity of our Pipeline and will let us easily reuse this Step in other projects. I was pleased to see how little the resulting Pipeline differed from where we started. The changes were restricted to the start and end of the file with no reformatting elsewhere.

In the next post, we’ll cover more about shared libraries and how to run Sauce OnDemand with xUnit Reporting in Declarative Pipeline.

Say Hello to the Blue Ocean Pipeline Editor

$
0
0

Back in September 2016 we announced the availability of the Blue Ocean beta and the forthcoming Visual Pipeline Editor. We are happy to announce that you can try the Pipeline Editor preview release today.

What is it?

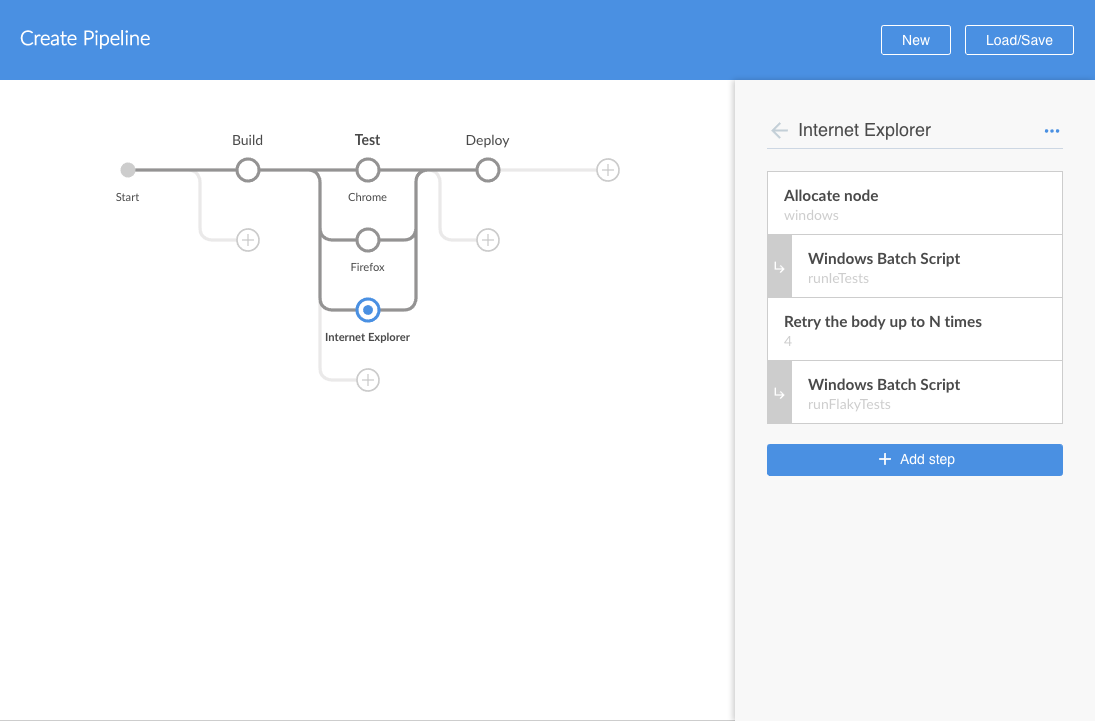
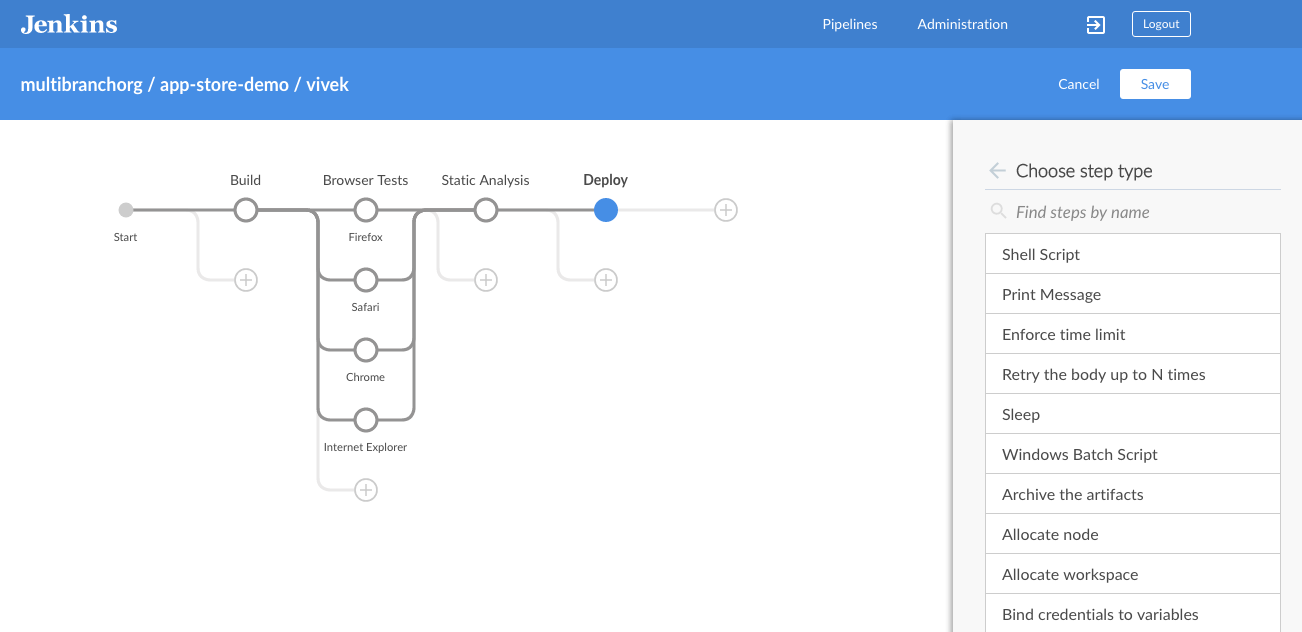
The Visual Pipeline Editor is the simplest way for anyone wanting to get started with creating Pipelines in Jenkins. It’s also a great way for advanced Jenkins users to start adopting pipeline. It allows developers to break up their pipeline into different stages and parallelize tasks that can occur at the same time - graphically. The rest is up to you.

A pipeline you create visually will produce a Declarative Pipeline Jenkinsfile for you and the Jenkinsfile is stored within a Git repository where it is versioned with your application code.

If you are not sure what a Jenkins Pipeline or a Jenkinsfile is, why not check out the new guided tour to learn more about it?

The Editor

What are we doing next?

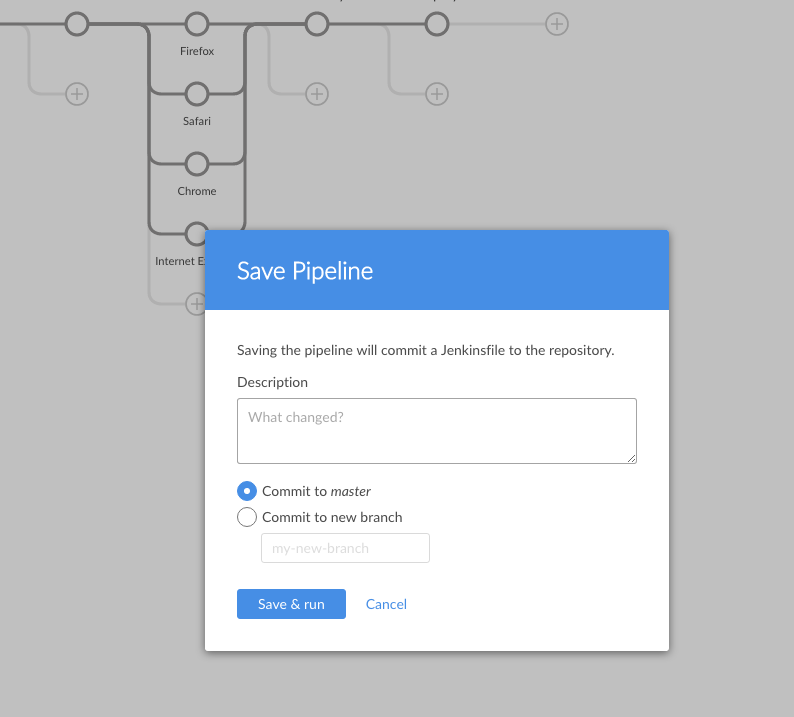
We are working hard to provide feature parity between the Declarative Pipeline syntax and the visual editor. The next phase is to integrate the editor into Blue Ocean so that you don’t have to leave the UI and commit the Jenkinsfile to your repository to complete authoring your pipeline.

In Blue Ocean, you will be able to edit a Jenkinsfile for a branch directly from within the user interface using the Visual Pipeline Editor. When you are done authoring your pipeline, the pipeline definition will be saved back to your repository as a Jenkinsfile. You can edit the Pipeline again using the Visual Editor or from your favorite text editor.

We are hoping to deliver this level of integration into Blue Ocean and the Visual Pipeline Editor over the next few months, so be sure to check regularly for updates in the Jenkins plugin manager.

Get the Preview

The Visual Pipeline Editor is available in preview today.

To try it out today:

  1. Install the Blue Ocean beta and Blue Ocean Pipeline Editor from the Jenkins plugin manager

  2. Click on the Open Blue Ocean button and then the Pipeline Editor in the main navigation

We are looking forward to your feedback to help make the Visual Pipeline Editor the easiest way to get started with Jenkins Pipeline. To report bugs or to request features please follow the instructions on the project page.

And don’t forget to join us on our Gitter community chat blueocean plugin - drop by and say hello!

Browser testing and conditional logic in Declarative Pipeline

$
0
0
This is a guest post by Liam Newman, Technical Evangelist at CloudBees.

Declare Your Pipelines!Declarative Pipeline 1.0 is here! This is the fourth post in a series showing some of the cool features ofDeclarative Pipeline.

In theprevious post, we integrated several notification services into a Declarative Pipeline. We kept our Pipeline clean and easy to understand by using a shared library to make a custom step called sendNotifications that we called at the start and end of our Pipeline.

In this blog post, we’ll start by translating the Scripted Pipeline in the sample project I worked with in "Browser-testing with Sauce OnDemand and Pipeline" and "xUnit and Pipeline" to Declarative. We’ll make our Pipeline clearer by adding an environment directive to define some environment variables, and then moving some code to a shared library. Finally, we’ll look at using the when directive to add simple conditional behavior to our Pipeline.

Setup

The setup for this post uses the same repository as the two posts above,my fork of theJS-Nightwatch.js sample project. I’ve once again created a branch specifically for this blog post, this time called blog/declarative/sauce.

Like the two posts above, this Pipeline will use thexUnit andSauce OnDemand plugins. The xUnit plugin only needs to be installed, the Sauce OnDemand needs additional configuration. FollowSauce Labs' configuration instructions to create an account with Sauce Labs and add your Sauce Labs credentials to Jenkins. The Sauce OnDemand plugin will automatically installSauce Connect for us when we call it from our Pipeline.

Be sure to you have the latest version of theSauce OnDemand plugin (1.160 or newer). It has several fixes required for this post.

For a shared library, I’ve still got the one from the previous post. To set up this "Global Pipeline Library," navigate to "Manage Jenkins" → "Configure System" in the Jenkins web UI. Once there, under "Global Pipeline Libraries", add a new library. Then set the name to bitwiseman-shared, point it at my repository, and set the default branch for the library to master.

Global Pipeline Library

Reducing Complexity with Declarative

If you’ve been following along through this series, this first step will be quite familiar by now. We’ll start from the Pipeline we had at the end of the xUnit post and translate it to Declarative.

Jenkinsfile (Declarative Pipeline)
pipeline {
    agent any
    options {// Nightwatch.js supports color ouput, so wrap add his option
        ansiColor colorMapName: 'XTerm'
    }
    stages {
        stage ("Build") {
            steps {// Install dependencies
                sh 'npm install'
            }
        }
        stage ("Test") {
            steps {// Add sauce credentials
                sauce('f0a6b8ad-ce30-4cba-bf9a-95afbc470a8a') {// Start sauce connect
                    sauceconnect() {// Run selenium tests using Nightwatch.js// Ignore error codes. The junit publisher will cover setting build status.
                        sh "./node_modules/.bin/nightwatch -e chrome,firefox,ie,edge --test tests/guineaPig.js || true"
                    }
                }
            }
            post {
                always {
                    step([$class: 'XUnitBuilder',thresholds: [
                            [$class: 'SkippedThreshold', failureThreshold: '0'],// Allow for a significant number of failures// Keeping this threshold so that overwhelming failures are guaranteed//     to still fail the build
                            [$class: 'FailedThreshold', failureThreshold: '10']],tools: [[$class: 'JUnitType', pattern: 'reports/**']]])

                    saucePublisher()
                }
            }
        }
    }
Blue Ocean Run
SauceLabs Test Report
Blue Ocean doesn’t support displaying SauceLabs test reports yet (see JENKINS-42242). To view the report above, I had to switch back to the stage view of this run.

Elevating Settings using environment

Each time we’ve moved a project from Scripted Pipeline to Declarative, we’ve found the cleaner format of Declarative Pipeline highlights the less clear parts of the existing Pipeline. In this case, the first thing that jumps out at me is that the parameters of the Saucelabs and Nightwatch execution are hardcoded and buried down in the middle of our Pipeline. This is a relatively short Pipeline, so it isn’t terribly hard to find them, but as this pipeline grows and changes it would be better if those values were kept separate. In Scripted, we’d have defined some variables, but Declarative doesn’t allow us to define variables in the usual Groovy sense.

The environment directive let’s us set some environment variables and use them later in our pipeline. As you’d expect, the environment directive is just a set of name-value pairs. Environment variables are accessible in Pipeline via env.variableName (or just variableName) and in shell scripts as standard environment variables, typically $variableName.

Let’s move the list of browsers, the test filter, and the sauce credential string to environment variables.

Jenkinsfile
    environment {
        saucelabsCredentialId = 'f0a6b8ad-ce30-4cba-bf9a-95afbc470a8a'
        sauceTestFilter = 'tests/guineaPig.js'
        platformConfigs = 'chrome,firefox,ie,edge'
    }
    stages {/* ... unchanged ... */
        stage ("Test") {
            steps {// Add sauce credentials
                sauce(saucelabsCredentialId) {// Start sauce connect
                    sauceconnect() {// Run selenium tests using Nightwatch.js// Ignore error codes. The junit publisher will cover setting build status.
                        sh "./node_modules/.bin/nightwatch -e ${env.platformConfigs} --test ${env.sauceTestFilter} || true"(1)
                    }
                }
            }
            post { /* ... unchanged ... */ }
        }
    }
}
1This double-quoted string causes Groovy to replace the variables with their literal values before passing to sh. This could also be written using singe-quotes:sh './node_modules/.bin/nightwatch -e $platformConfigs --test $sauceTestFilter || true'. With a single quoted string, the string is passed as written to the shell, and then the shell does the variable substitution.

Moving Complex Code to Shared Libraries

Now that we have settings separated from the code, we can do some code clean up. Unlike the previous post, we don’t have any repeating code, but we do have some distractions. The nesting of sauce, sauceconnect, and sh nightwatch seems excessive, and that xUnit step is a bit ugly as well. Let’s move those into our shared library as custom steps with parameters. We’ll change the Jenkinsfile in our main project, and add the custom steps to a branch namedblog/declarative/sauce in our library repository.

Jenkinsfile
@Library('bitwiseman-shared@blog/declarative/sauce') _/* ... unchanged ... */

stage ("Test") {
    steps {
        sauceNightwatch saucelabsCredentialId,
            platformConfigs,
            sauceTestFilter
    }
    post {
        always {
            xUnitPublishResults 'reports/**',/* failWhenSkippedExceeds */0,/* failWhenFailedExceeds */10

            saucePublisher()
        }
    }
}
vars/sauceNightwatch.groovy
defcall(String sauceCredential, String platforms = null, String testFilter = null) {
    platforms = platforms ? "-e '" + platforms + "'" : ''
    testFilter = testFilter ? "--test '" + testFilter + "'" : ''// Add sauce credentials
    sauce(sauceCredential) {// Start sauce connect
        sauceconnect() {// Run selenium tests using Nightwatch.js// Ignore error codes. The junit publisher will cover setting build status.
            sh "./node_modules/.bin/nightwatch ${platforms}${testFilter} || true"(1)
        }
    }
}
1In this form, this could not be written using a literal single-quoted string. Here, platforms and testFilter are groovy variables, not environment variables.
vars/xUnitPublishResults.groovy
defcall(String pattern, Integer failWhenSkippedExceeds,Integer failWhenFailedExceeds) {
    step([$class: 'XUnitBuilder',thresholds: [
            [$class: 'SkippedThreshold', failureThreshold: failWhenSkippedExceeds.toString()],// Allow for a significant number of failures// Keeping this threshold so that overwhelming failures are guaranteed//     to still fail the build
            [$class: 'FailedThreshold', failureThreshold: failWhenFailedExceeds.toString()]],tools: [[$class: 'JUnitType', pattern: pattern]]])
}

Running Conditional Stages using when

This is a sample web testing project. We probably wouldn’t deploy it like we would production code, but we might still want to deploy somewhere, by publishing it to an artifact repository, for example. This project is hosted on GitHub and uses feature branches and pull requests to make changes. I’d like to use the same Pipeline for feature branches, pull requests, and the master branch, but I only want to deploy from master.

In Scripted, we’d wrap a stage in an if-then and check if the branch for the current run is named "master". Declarative doesn’t support that kind of general conditional behavior. Instead, it provides a when directive that can be added to stage sections. The when directive supports several types of conditions, including a branch condition, where the stage will run when the branch name matches the specified pattern. That is exactly what we need here.

Jenkinsfile
stages {/* ... unchanged ... */
    stage ('Deploy') {
        when {
            branch 'master'
        }
        steps {
             echo 'Placeholder for deploy steps.'
        }
    }
}

When we run our Pipeline with this new stage, we get the following outputs:

Log output for feature/test branch
...
Finished Sauce Labs test publisher
[Pipeline] }
[Pipeline] // stage
[Pipeline] stage
[Pipeline] { (Deploy)
Stage 'Deploy' skipped due to when conditional
[Pipeline] }
[Pipeline] // stage
[Pipeline] }
...
Log output for master branch
...
Finished Sauce Labs test publisher
[Pipeline] }
[Pipeline] // stage
[Pipeline] stage
[Pipeline] { (Deploy)
[Pipeline] echo
Placeholder for deploy steps.
[Pipeline] }
[Pipeline] // stage
[Pipeline] }
...

Conclusion

I have to say, our latest Declarative Pipeline turned out extremely well. I think someone coming from Freestyle jobs, with little to no experience with Pipeline or Groovy, would still be able to look at this Declarative Pipeline and make sense of what it is doing. We’ve added new functionality to our Pipeline while making it easier to understand and maintain.

I hope you’ve learned as much as I have during this blog series. I’m excited to see that even in the the short time since Declarative 1.0 was released, teams are already using it in make improvements similar to what those we’ve covered in this series. Thanks for reading!

Blue Ocean Dev Log: February Week #4

$
0
0

We’re counting down the weeks until Blue Ocean 1.0.In all the excitement I forgot to post a dev log last week, so I will make up for it this week.

In the last 10 days, 2 betas went out: b22 and b23, and a preview release of the editor. We expect the next release will be named a release candidate (we know there is still more to go in, but want to signal that things are getting into the final stages!). TheGitter chat room is getting busier, so join in!

Also last week, the Blue Ocean Pipeline Editor was presented at theJenkins Online Meetup, embedded below.

Feature Highlights

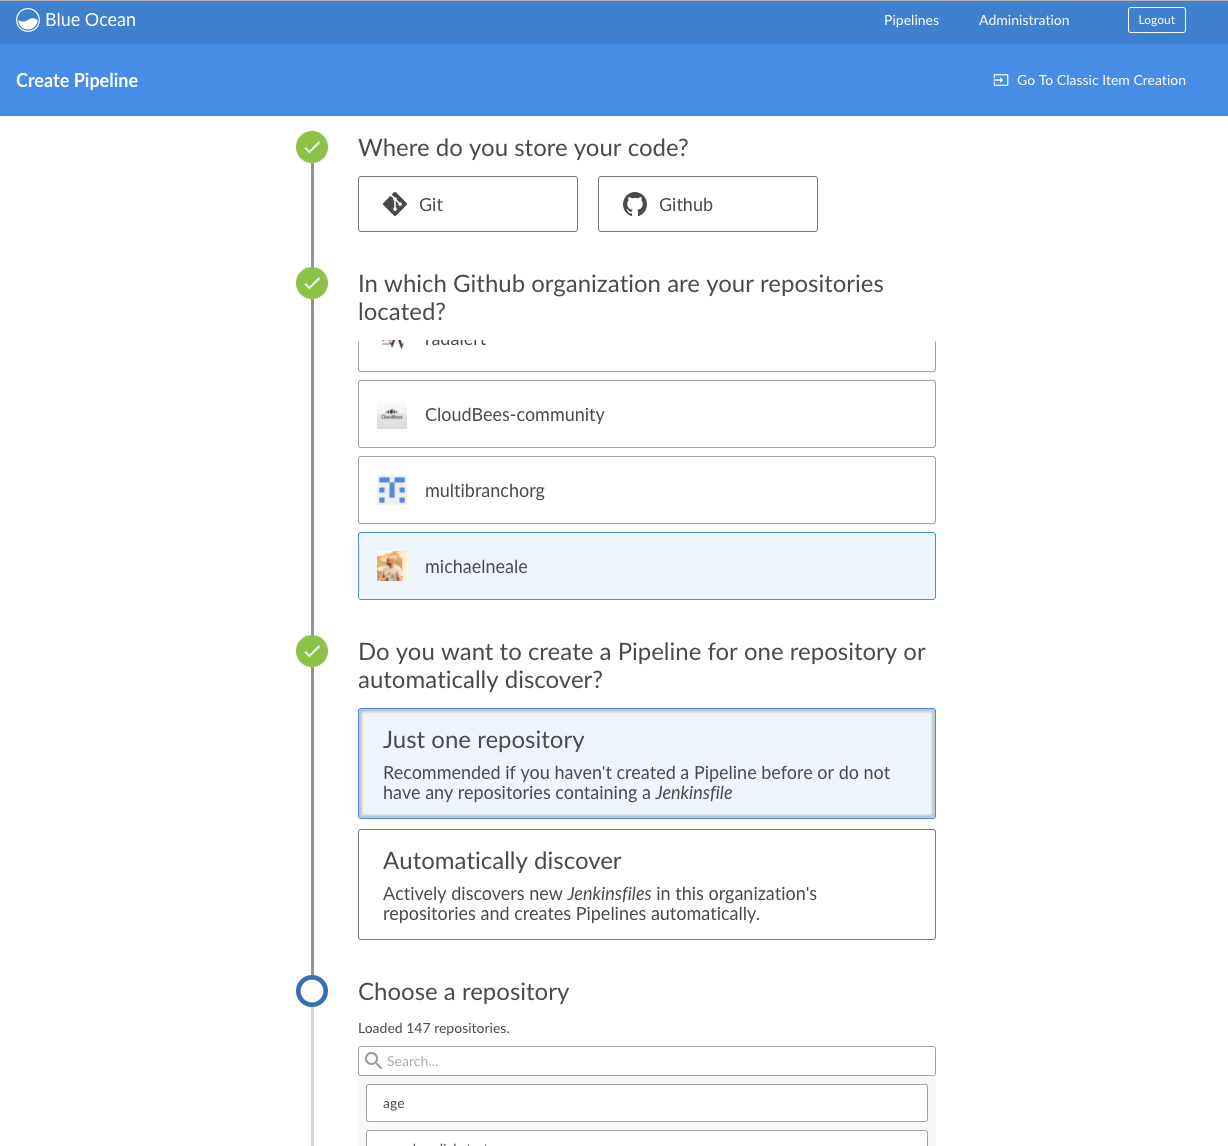
  • You can now create Pipelines from GitHub in Blue Ocean. Either one Pipeline at a time, or let it discover all your Pipelines for a GitHub Organization.

Creating a Pipeline from GitHub

  • When you press the "Create" button, it will open the new creation flow by default now; the feature was previously hidden behind a feature switch.

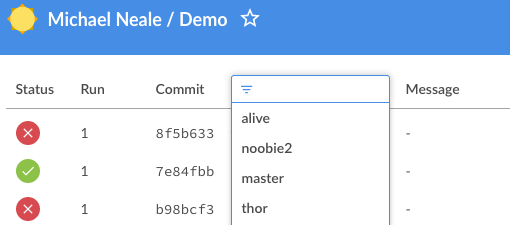
  • You can filter the activity screen by branch! That way you can see a history of Pipeline runs for just one branch.

Filtering a branch
  • If you like long names for stages - it now won’t pollute the screen when space is at a premium (truncated names on screen).

  • Blue Ocean events (SSE) should now work on Microsoft Edge again

  • You can see durations when you hover the mouse over indicators

Up next:

  • A release candidate is expected soon

  • Integration work with the Editor to save to branches

  • Some updates to the design around tables

  • Bundling of the Editor with Blue Ocean

Don’t forget, there is also a Blue Ocean Docker image published weekly with usually the latest released version. If you have Docker installed, this can be as simple as:

docker run -p 8080:8080 jenkinsci/blueocean*

Then browse to localhost:8080/blue - possibly the quickest way to try things.

Enjoy!


If you’re interested in helping to make Blue Ocean a great user experience for Jenkins, please join the Blue Ocean development team on Gitter!


Blue Ocean Dev Log: March Week #1

$
0
0

We’re counting down the weeks until Blue Ocean 1.0. This week was relatively quiet with a few people away for a few days, and mostly about consolidation. There was a beta late last week, so this week we thought we would let people have a rest from the upgrade treadmill for once.

One notable feature that has recently landed is "escaping to Classic" When you see the exit symbol (door with arrow) it will take you to an equivalent page in classic Jenkins (if one exists). You will notice this in a few places in the app now.

Escaping to Classic

Some other things that made it to master branch which have not yet been released in a beta:

  • An API to save/branch to GitHub was finished, and tested with "round tripping" with the Editor in some form

  • New compact form of duration reporting (old style was too verbose for most screens)

  • Fixed a bug with input submissions with concurrent browser sessions which was quite a tricky bug to chase down!

  • Only show Admin link when appropriate.

  • Many many bug fixes and polishing.

There has also been an uptick in activity on theGitter channel with an increased number of questions about usage and Pipelines. But also questions from people starting to extend, or add features, to Blue Ocean, which is very nice to see.

Gavin Mogan has been looking at integrating the Sauce OnDemand plugin into Blue Ocean for better browser-test reporting. Tangentially related, we also are planning to improve browser-testing in Blue Ocean as well. What is perhaps more exciting is that more people, like Paul Dragoonis andother folks, are starting to contribute some fixes which have been lingering around for a while.

Up Next:

  • Round trip Blue Ocean Pipeline Editor changes with load/save

  • Bundling the Blue Ocean Pipeline Editor with the "aggregator" Blue Ocean plugin.

  • Some release candidates!

Enjoy!


If you’re interested in helping to make Blue Ocean a great user experience for Jenkins, please join the Blue Ocean development team on Gitter!

Blue Ocean Dev Log: March Week #2

$
0
0

We’re counting down the weeks until Blue Ocean 1.0. This week was one of continuing consolidation and polish. We also released b25 (beta #25), a collectors edition. The next version we will likely release will be a release candidate (RC). The b25 release however contained a number of fixes and features, such as branch filtering.

Editing a Pipeline

Some other updates of note from this past week:

  • Updated a bunch of dependencies around Pipeline and fixed a whole lot of long standing bugs.

  • Some work went on to make acceptance tests run on varied browsers viaSauce Labs thanks to@halkeye!

  • The Blue Ocean Pipeline Editor had itsSave to SCM/GitHub functionality merged to master branch. It won’t be released to the Update Center until the next Blue Ocean release, there are a few more things to iron out.

  • As the Blue Ocean Pipeline Editor is now considered to be part of Blue Ocean now, more people are kicking the tires, and starting tocontribute fixes to improve it!

  • The swishy "Blue Ocean" logo is gone, Jenkins branding is back (mixed feelings!)

  • Fixes for concurrent users of input

  • Fixes for handling errors around favoriting of Pipelines and more.

  • Speeding up creation of Multibranch Pipelines via the new "Creation" flow.

And of course, a nice pretty screenshot of editing and saving a Multibranch Pipeline with the Blue Ocean Pipeline Editor:

Editing and saving a Pipeline

Up next for the Blue Ocean project:

  • More consolidation and polish.

  • A first release candidate out the door (!)

  • New, sleeker, favorite card design, possibly a table design too.

Also note that there are changelogs maintained and visible on theBlue Ocean plugin page.

Enjoy!


If you’re interested in helping to make Blue Ocean a great user experience for Jenkins, please join the Blue Ocean development team on Gitter!

FOSDEM 2017 Wrap-up

$
0
0

In early February numerous free and open source developers from around the world traveled to Brussels, Belgium, for arguably the largest event of its kind:FOSDEM. Among the thousands of hackers in attendance were a dozen or so Jenkins contributors. We have attended the event in the past, but this year we had a blizzard of activity spanning four days around the FOSDEM weekend.

Brussels City Hall
Figure 1. City Hall, photo by Kohsuke Kawaguchi

One of our "accidental traditions" has become ahappy hour the Friday night before FOSDEM truly begins at Cafe Le Roy d’Espagne on Grand Place right in the middle of Brussels. Conveniently located a few hundred meters away from the FOSDEM Beer Event at Delirium Cafe, each year we are inevitably joined by friends from other open source projects who know they’re welcome to join us for a few drinks.

Happy hour at Cafe Le Roy
Figure 2. Cafe Le Roy, photo by Kohsuke Kawaguchi

After dinner and drinks, a few of us decided it would be a good idea (it wasn’t) to walk over to check out the FOSDEM Beer Event and maybe have just one more beer. For the uninitiated, Belgian beers tend to be strong, as the FOSDEM organizers warn:

Unlike some other beers, Belgian beer is not just coloured water. Some beers contain significant quantities of alcohol and will give you a pounding hangover.

Unfortunately, some of us seem to re-learn this lesson each year at FOSDEM!


Bright and early the following day, FOSDEM really kicked off with keynotes and the project tables lining a number of corridors.

Busy FOSDEM hall
Figure 3. A busy hall at FOSDEM, photo by Kohsuke Kawaguchi

At the Jenkins project’s table we typically spend two full days answering questions, showing off the latest and greatest Jenkins features, and of course handing out Jenkins stickers. The table is where many contributors, myself included, have a rare opportunity to talk with dozens of enthusiastic Jenkins users from across the broader open source community. This year we were very fortunate to have a tremendous number of contributors available at the table to answer hundreds of questions throughout the two days of FOSDEM.

I would like to thank everybody by name, but the entire weekend was such a blur that I’m not sure I would be able to remember everybody who helped! We couldn’t have had a successful event without their support, so many thanks to all the contributors who helped!

In addition to the Jenkins project table, we had two contributors present in theTesting and Automation devroom, which I helped organize in between answering Jenkins questions.

Declarative Pipelines in Jenkins

The first presentation was a stellar introduction toDeclarative Pipelines in Jenkins, by long-time contributor and primary developer of Declarative Pipeline support,Andrew Bayer.

Using Containers for Building and Testing

Later in the day,Carlos Sanchez, another long-time contributor, maintainer of theKubernetes plugin and a number of Jenkins- and Maven-related Docker containers, provided a great overview of the current state of using containers for building and testing in Jenkins.


After a very busy two days at FOSDEM, a few contributors remained in Brussels for a day-longPost-FOSDEM Contributor Hackathon sponsored by CloudBees, Inc. andBetacowork Brussels. Trying to cram lots of hacking into a single day is challenging, so the day was mostly filled with discussions, some light prototyping, and a bit of recovery from the hectic weekend at FOSDEM. :)

Daniel presented at the hackathon
Figure 4. Daniel Beck presenting on CLI prototyping, photo by Kohsuke Kawaguchi

Thanks

Of course I would like to extend many thanks to all the contributors who participated in the various FOSDEM related events, but I would call special attention to the logistics and planning work done by contributors Alyssa Tong, Damien Duportal, and Olivier Vernin. Thanks to their work coordinating all the plans, reservations, and schedules, we had a flawless weekend of high-intensity Jenkins discussion, advocacy, and hacking.

I hope to see everybody back in Brussels next year for FOSDEM 2018!

Blue Ocean Dev Log: March Week #3

$
0
0

We’re counting down the weeks until Blue Ocean 1.0, and we’re getting close! In this past week, the first release candidate has gone out to the Update Center, along with a newPipeline Editor plugin. The Blue Ocean Pipeline Editor is its own plugin which integrates into Blue Ocean, so this was a coordinated release with Blue Ocean 1.0 rc1.

Editing a Pipeline

Noteworthy this week:

  • RC1 includes the Blue Ocean Pipeline Editor, which is integrates support for branch editing and saving the Pipeline back to GitHub (also referred to as "round-tripping").

  • Many dependencies have been upgraded

  • Per-stage raw logs can be downloaded, this will be included in the next release.

  • Editor design improvements

  • Fixes for overflowing text

  • The new sleeker favorite card design has been released, so you can fit more favorites on your screen!

Pipeline Favorites


The Blue Ocean Pipeline Editor is better integrated into a few different screens in Blue Ocean. For example, you can open the editor from the results screen (top right):

Editing a Pipeline

Or open the editor from branch listings:

Editing a Pipeline

Up next:

  • More bug-bashing! Please join us in testing the release candidate. Instructions for trying Blue Ocean can be found onour project page.

  • Another release candidate

Enjoy!


If you’re interested in helping to make Blue Ocean a great user experience for Jenkins, please join the Blue Ocean development team on Gitter!

Security updates for multiple Jenkins plugins

$
0
0

Multiple Jenkins plugins received updates today that fix several security vulnerabilities:

For an overview of what was fixed, see the security advisory.

Additionally, we also published a security notice for the following plugin and recommend that users disable and uninstall it:

This plugin is not part of the Pipeline suite of plugins, despite its name. It’s installed on just several hundred instances.

Subscribe to the jenkinsci-advisories mailing list to receive important notifications related to Jenkins security.

Pipeline Workshop & Hackergarten @ ToulouseJAM Feedback

$
0
0

Earlier this month, a full-day event about Jenkins Pipeline was organized in Toulouse, France with the Toulouse JAM.

After a warm-up on the previous Tuesday where Michaël Pailloncy had given a talk at the local Toulouse Devops user group about Jenkins Pipeline ecosystem, we were ready for more digging :-).

workshop overview 1workshop overview 2workshop overview 3

The agenda

We had planned the day in two parts:

  • Morning would be a more driven workshop with slides & exercises to be completed

  • Pizzas & beverages to split the day :-)

  • Afternoon would be somehow like an Unconference, where people basically decide by themselves what they want to work on.

We planned to have 30 attendees. We ended up having 25. We considered having more people, but finally decided that for a first time it would be better to start not too big.

Infrastructure

Infrastructure was sponsored by DigitalOcean.

For each attendee, we provisioned:

  • One Master, preconfigured to be able to dynamically provision agents.

  • One staging environment

  • One production environment[1]

  • One SonarQube instance

Workshop content & infrastructure

It is composed of 3 parts, which are readable here[2], but very few people were able to start the part 3.

Hackergarten / Unconference

So we let people decide what they wanted to work on during the afternoon.

subdividing per interest We decided to use post-its: each attendee would write down what they wanted to work on, one idea per post-it (max 2 per person). Then, we dropped those onto a white-board and tried grouping those by theme.

In the end, overall, the following themes went out:

  • Hack on Jenkins development & Contribute to Jenkins

  • Complete the workshops

  • Work on use-case oriented things

  • Work on Docker & Pipeline join usages

Hackergarten

hackergarten

Many Jenkins accounts were created, and many JIRA and pull requests were filed. It was nice to see people asking questions like: "so, should I create a JIRA issue for this?" or "how do I interact with people". Pretty generic "how do I work on open source software" questions sometimes, but important because you felt like people were genuinely interested and needed not much to start contributing.

Here are the pull requests filed during this afternoon:

You can see that though most of the PRs were typo-related, the one that got merged first was the one about code :-).

bobblehead So, Jeremie Violas wins the Bobble Head as promised!

Simply because people were somehow encouraged to find some to get used to the round trip of: fixing an issue and filing the associated pull request, rinse & repeat.

I do think this is also a pretty nice and simple first step to understand how to build Jenkins and start interacting with the community.

The result

People seemed pretty happy and we got some nice comments like "now I have a clearer vision of what this Pipeline thing is about". Some attendees also dropped nice comments on the meetup page. So it’s cool because when you’re doing such things on your free time, it’s the main reward you can get.

If you’re an attendee to such events, don’t forget to thank people organizing those, and more importantly to provide constructive feedback. We are generally eager to know what could be done better for next time.

Conclusion

Overall we are very happy with the energy of that day, and we definitely plan to set up a new session in the next few months, probably with a bit more people.

Some thoughts:

  • Infrastructure: when you plan to have many VM per attendee, double-check the limits your Cloud Provider may have by default. I had bumped it to 250 the day before the workshop, and asked for another one to 500 during the workshop (though in the end, 250 was probably enough, but this’ll give room for the next time with more people :-)).

  • Logistics: warning, secret ahead: this is very time consuming. Not necessarily the amount of work itself, more that it implies very big latency. For instance, give it 2 to 3 weeks minimum to have answers about sponsoring in general. Pinging again in case of no answer after 2 days would probably be seen as rude, and possibly lead to make things worse for obvious reasons, so plan ahead.

Thank you

  • DigitalOcean for sponsoring the Infrastructure

    • We got way more than 100 VMs running at the same time during the day thanks to their help!

  • HarryCow Coworking for hosting the event

  • To CloudBees for sponsoring the food for all the participants

    • Also for providing a bunch of goodies: stickers and T-Shirts for everybody

  • GitHub for providing stickers


1. For the sake of the simplicity of the workshop, those environments were actually a single VM: the goal was here to illustrate what we could do using Jenkins Pipeline, discussing scalability or more involved deployment techniques was obviously out of scope.
2. in French only for now, but translating it into English to make it possibly shared and reusable among JAMs is being discussed

The State of Jenkins - 2016 Community Survey

$
0
0

This is a guest post by Bhavani Rao, Marketing Manager at CloudBees

Last fall, prior to Jenkins World, CloudBees conducted aCommunity Survey. We received over 1200 responses, and thanks to this input, we have some interesting insights into how Jenkins users and their use of Jenkins are evolving.

Based on the survey’s results, Jenkins is increasingly being used to support continuous delivery (CD). Adoption of Jenkins 2, which featured "Pipeline as code" and encouraged users to adopt Jenkins Pipeline, has skyrocketed to more than half of all Jenkins installations. Other data remained consistent with findings year-to-year, for example, the number of Jenkins users continues to increase and 90% of survey respondents still consider Jenkins mission-critical.

90% consider Jenkins mission-critical

Here are some of the key findings:

  • 85% of respondants indicated that Jenkins usage had increased

  • 30% of organizations with more than 50 software projects used Jenkins in 2016 as compared to 16% in 2015

  • An impressive 46% of respondents were running Jenkins 2.x, eight months after its release.

  • Adoption of Jenkins Pipeline for continuous delivery (CD) is accelerating, 54% of respondents who have adopted CD are using Pipeline.

  • 61% of respondents are deploying changes to production at least once per week

  • Linux is the platform of choice for builds, favored by 85% of respondents

  • 85% of respondants use Git as the source code repository

  • Half of respondents are deploying applications directly to the cloud, with Amazon Web Services as the favored platform

We want to thank everyone for completing the survey, and congratulations to Iker Garcia for winning a free pass toJenkins World 2017 and to Dave Leifer for winning the Amazon gift card.

We’re looking forward to creating a 2017 Community Survey later this year and hearing more from users at Jenkins World 2017 in San Francisco, we hope to see you there!


Say hello to Blue Ocean 1.0

$
0
0

Back in May 2016 we announced our intent to rethink the Jenkins User experience with the Blue Ocean project and today the Jenkins project are pleased to announce the general availability of Blue Ocean 1.0.

Blue Ocean is an entirely new, modern and fun way for developers to use Jenkins that has been built from the ground up to help teams of any size approach Continuous Delivery. Easily installed as a plugin for Jenkins and integrated with Jenkins Pipeline, it is available from today for production use.

Since the start of the beta at Jenkins World 2016 in September there are now over 7400+ installations making use of Blue Ocean. This wouldn’t be possible without the support of the entire Jenkins developer and user community - so thank you for your support!

Blue Ocean is available today from the update center and also as a Docker image - why not give it a try?


Visual Pipeline Editing - Team members of any skill level can create continuous delivery pipelines from start to finish, with just several clicks, using the intuitive, visual pipeline editor. Any pipeline created with the visual editor can also be edited in your favorite text editor bringing all the benefits of Pipeline as Code.

Editor

Pipeline Visualization - Developers can visually represent pipelines in a way that anyone on the team can understand - even your boss’s boss - improving clarity into the continuous delivery process for the whole organization. The visualization helps you focus on what the pipeline does, not how it does it.

Pipeline visualization

Pinpoint Troubleshooting - Blue Ocean enables developers to locate automation problems instantly, without endlessly scanning through logs or navigating through many screens, so you can get back to building the next big thing.

Pinpoint Troubleshooting

GitHub and Git Integration - Pipelines are created for all feature branches and pull requests, with their status reported back to GitHub. The whole team has visibility into whether changes need work or are good to go.

Github integration

Personalization– Every team member can make Jenkins their own by customizing the dashboard so that they only see those pipelines that matter to them. Favoriting any pipeline or branch in Blue Ocean will show a favourite card on the dashboard so you can see its status at a glance.

Personalized dashboard

Just one more thing – I’d like to pay special thanks to:

  • The Core team– to Keith Zantow, Thorsten Scherler, Tom Fennelly, Ivan Meredith, Josh McDonald, Vivek Pandey, Brody Maclean and Cliff Meyers. Each of and everyone of you have brought your own passion, expertise and flair to the project – and it shows. It’s been crazy fun and I hope working on Blue Ocean is something you look back on fondly.

  • Jenkins Developers past and present – we recognise that we are standing on the shoulders of giants and none of this wouldn’t be possible without your hard work and dedication to free & open source software and Jenkins. Here’s to the next 10 years 🍻 !

  • CloudBees– in particular, Sacha Labourey (CEO), Harpreet Singh (VP of Product) and Spike Washburn (VP of Engineering) whose dedication to Jenkins, Open Source and continued faith in the vision and team made all of this possible, and of course Bob Bickel (Advisor) who dared us to dream big.

  • Michael Neale– who drank all the kool-aide and is just as obsessed with and dedicated to Blue Ocean as I am. This project would never have shipped without his hand steady at the tiller. I couldn’t ask for a better friend and partner-in-crime.

  • Tyler Croy– for guiding the project and myself on how to do open source The Right Way™. Tyler works tirelessly behind the scenes to to make Jenkins awesome and it wouldn’t be possible to keep this show running without his help and sage-like advice.

  • Kohsuke Kawaguchi– For creating Jenkins, getting Blue Ocean off of the ground, his tour of Tokyo and above all, his trust.

  • Jenkins Users– your enthusiasm for better development tools which kept our spirits and momentum up when the days grew long and things looked tough. We couldn’t ask for a better, more appreciative or passionate group of people. Hopefully we’ve done our job and you can get back to building your next big thing!

Next stop, some well needed rest & recovery then back to to making Jenkins one of the experiences for software developers worldwide!

If you’re interested in joining us to make Blue Ocean a great user experience for Jenkins, please join the Blue Ocean development team on Gitter!

Getting Started with Blue Ocean

$
0
0
This is a guest post by Liam Newman, Technical Evangelist at CloudBees.

Welcome to Blue Ocean 1.0!

In case you’ve been heads down on other projects for the past 10 months, Blue Ocean is a new user experience for Jenkins, and version 1.0 was released today! Blue Ocean makes Jenkins, and continuous delivery, approachable to all team members. I’ve been working with it for the past several months, and I can tell you it is amazing. I wish all the interactions with Jenkins were as easy as this:

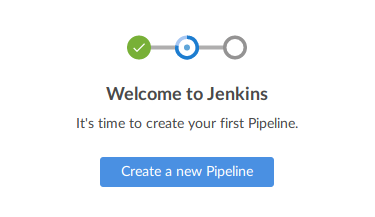
It's time to create your first Pipeline!

10 minutes to Blue Ocean

Blue Ocean is simple to install and will work on basically any Jenkins 2 instance (version 2.7 or later). Even better, it runs side-by-side with the existing Jenkins web UI - you can switch back and forth between them whenever you like. There’s really no risk. If you have a Jenkins instance and a good network connection, in 10 minutes you could be using Blue Ocean.

  1. Login to your Jenkins server

  2. Click Manage Jenkins in the sidebar then Manage Plugins

  3. Choose the Available tab and use the search bar to find Blue Ocean

  4. Click the checkbox in the Install column

  5. Click either Install without restart or Download now and install after restart

Installing Blue Ocean

After you install Blue Ocean, you can start using it by clicking on Open Blue Ocean in the top navigation bar of the Jenkins web UI, or you can navigate directly to Blue Ocean by adding/blue to your Jenkins URL, for example https://ci.jenkins.io/blue.

Opening Blue Ocean

If you have to go back to the "classic" Jenkins UI, there’s an "exit" icon located at the top of every page in Blue Ocean.

Returning to the

Dive in!

That’s it! You now have a working Blue Ocean installation. Take a look around at your Pipelines and activity, or try creating a new Pipeline. I think you’ll be pleasantly surprised at how intuitive and helpful Blue Ocean can be. Blue Ocean is so cool, I never want to leave it. Over the next few days, I’ll be publishing a series of videos, showing some common Jenkins use cases and how Blue Ocean makes them clearer and easier than ever before.

Stay Tuned!

Getting Started with Blue Ocean's Visual Pipeline Editor

$
0
0
This is a guest post by Liam Newman, Technical Evangelist at CloudBees.

Blue Ocean is a new user experience for Jenkins, and version 1.0 is now live! Blue Ocean makes Jenkins, and continuous delivery, approachable to all team members. In my previous post, I explained how to install Blue Ocean on your local Jenkins instance and switch to using Blue Ocean. As promised, here’s a screencast that picks up where that post left off. Starting from a clean Jenkins install, the video below will guide you through creating and running your first Pipeline in Blue Ocean with the Pipeline Visual Editor.

Please Enjoy! And look for my next video soon - where I’ll go over the Blue Ocean Pipeline Activity View.

Important Scripting-related Security Advisory

$
0
0
These are not security fixes you can apply blindly. We strongly recommend you read this post, as well as the security advisory to understand what the vulnerabilities are, whether and how they affect you, and what to expect when upgrading plugins.

Multiple Jenkins plugins received updates today that fix several security vulnerabilities or other security-related issues:

We also included some plugins that received security fixes in the past that haven’t been mentioned in a security advisory before:

Additionally, we included other plugins in the advisory that are not getting updated today, but whose vulnerabilities are similar to those of plugins getting fixed. In total, over 30 plugins are part of the advisory.

While there are fixes for other vulnerabilities as well, the majority of the advisory (and the rest of this blog post) is about arbitrary code execution vulnerabilities in Jenkins plugins.

Background

Jenkins administrators have long been able to use the Groovy script console and related functionality to execute arbitrary code in Jenkins for diagnostic or otherwise administrative purposes. Rather than having to rely on plugins implementing the desired functionality, experienced Jenkins admins were able to run a number of scripts as needed to implement various administrative features.

This bled over into plugins: It’s just easy for a plugin developer to build on top of Groovy and let the users figure out exactly what they want to do. Unfortunately, for a long time, there was no technology in Jenkins to limit what could be done in Groovy scripts, so anywhere Groovy would be executed, arbitrary code could be executed.

We were treating this as a security issue for the first time in the fix for SECURITY-125, about two years ago, something that first required splitting off the Matrix Project type from core into a plugin, and making use of Script Security Plugin.

Unfortunately, other plugins weren’t integrating with Script Security plugin. And even diligent administrators who understand the problem of arbitrary code execution via Groovy scripts may not be able to tell whether a given plugin is affected: In some cases, you’d need to dive into the source code to see whether, and how, it uses Groovy in a way that can be exploited by regular users to perform actions they otherwise wouldn’t be allowed to do.

About the advisory

Broadly speaking, there are three levels of severity for scripting related vulnerabilities in Jenkins:

  • The lowest severity ones are those that confuse Overall/Administer and Overall/Run Scripts permissions. These are irrelevant for most Jenkins instances. More on that later.

  • The next level up are vulnerabilities that effectively grant the ability to run arbitrary scripts to users who are able to configure jobs. While these users aren’t administrators, they have a nontrivial level of permissions, so are somewhat trusted. This is often a difficult configuration to adequately secure, but it’s a supported configuration, and any plugin that undermines the security of this configuration will be treated as having a vulnerability.

  • The most severe ones are those that require little or no access to Jenkins to successfully exploit. This typically does require the Overall/Read permission to access certain endpoints, but Pipeline as Code may allow people with SCM commit access to exploit scripting related weaknesses as well.

Arbitrary code execution is a serious enough issue that publishing a security advisory for just a few plugins would actually be detrimental to overall security: Malicious users would be able to review the fixes we do publish, and try to find other plugins affected by a similar vulnerability.

The advisory issued today lists all plugins we could find that implement any arbitrary code execution vulnerability (i.e. all three levels described above). As this affects over 30 plugins, many of them not actively maintained, the problem exceeds the capacity of the Jenkins security team to address them all.

For that reason, the Jenkins security team decided that we would fix as many of the plugins as we can handle, and leaving the others to their maintainers.

How to proceed

We strongly advise administrators to review the list of affected plugins in the advisory, and look for any plugins that are installed on their instances. It is very likely there’s at least one plugin installed that is affected by this. If you’re on Jenkins 2.40 or newer, or Jenkins LTS 2.32.2 or newer, a warning will appear that informs you about vulnerable plugins you currently have installed.

Once you’ve determined which plugins you use are included in the advisory, you need to determine whether it is something that affects your particular setup.

  • If the vulnerability confuses Overall/Administer and Overall/Run Scripts, but all administrators of your Jenkins instance are able to run scripts anyway, this vulnerability is not a problem for you. This is the case in the vast majority of Jenkins instances. Only custom setups, typically to allow for hosted Jenkins services, don’t grant Overall/Run Scripts permission to administrators.

  • If the vulnerability allows users with the permission to e.g. configure jobs to execute arbitrary code, it is only a problem if there are users that have the lower permission (e.g. Item/Configure) but not the higher (Overall/Run Scripts). Simple authorization strategies like Logged in users can do anything are therefore not affected by this issue.

  • Even vulnerabilities that require no notable permissions in Jenkins may have prerequisites to be exploitable. For example, Overall/Read access may be required, but only granted to users who are also administrators, or in Pipeline as Code setups, everyone with SCM commit access may also be a Jenkins administrator.

The above should guide your decision how urgently you should upgrade affected plugins with a fix, or disable affected plugins without a fix. Remember that you may decide in the future to reconfigure Jenkins in a way that makes previously irrelevant permission distinctions a huge problem, so it is not a good idea to continue using vulnerable plugin versions indefinitely.

After deciding to upgrade a plugin, review the advisory and the plugin documentation for information about the migration. The scripts provided in this GitHub repository may help you in determining whether you’re using affected features. If you’re not using any of the affected features, it’s likely that there won’t be any problems and you can just upgrade. If you are using affected features, you should carefully read the documentation on how the upgrade works: Affected plugin features may effectively be disabled until an administrator approves the scripts in use, potentially resulting in build failures.

Distributing vulnerable plugins

Finally, there’s the issue of distribution: The Jenkins project historically has performed little to no oversight over the plugins that are being published. This is a direct consequence of the governance document, which gives plugin maintainers a lot of control over their plugins.

That said, in exceptional circumstances, the Jenkins project can, and should, protect its users: If a plugin maintainer were to upload a clearly malicious plugin, we wouldn’t stand by the side and continue distributing it. In the case of plugins with known (unintended) vulnerabilities, this obviously becomes more difficult. This has been discussed in the abstract a while back on the jenkinsci-dev mailing list, and the majority of participants in that discussion agreed that we should suspend distribution of vulnerable plugins if the security team doesn’t have the capacity to address the problem, and the vulnerability would remain unfixed otherwise.

We decided to temporarily suspend distribution of plugins via the Jenkins project update sites if they allow users with lower privileges (no Overall/Administer) to execute arbitrary code. Users who really need to download these plugins can do so via our Artifactory Maven repository. Once an affected plugin receives a fix, we’d of course resume distribution via the update sites.

Plugins that mistake Overall/Administer and Overall/Run Scripts continue being distributed, albeit with a warning shown to Jenkins administrators, as the setup required for this to make a difference is pretty rare.

Unfortunately, we were unable to adequately inform all plugin maintainers before publication of the advisory, so there are several plugins with fewer than 500 installations that are actively maintained but whose maintainers we didn’t contact prior to this advisory. For that, I am really sorry, and can only ask for understanding from the maintainers of affected plugins. The number of affected plugins and the coordination and review required simply exceeded our capabilities.


Subscribe to the jenkinsci-advisories mailing list to receive important notifications related to Jenkins security.

Starting with 2.54, Jenkins now requires Java 8

$
0
0

We announced in January that Jenkins would be upgrading its Java runtime dependency to Java 8 this year. After a sizable amount of preparation, this week’s release of Jenkins 2.54 is the first weekly release to require a Java 8 runtime.

For users of the weekly release, this means that Jenkins 2.54 must have a Java 8 runtime installed on the system in order to run. Those using thejenkinsci/jenkins:latest Docker container won’t need to take any action, as the Java runtime environment is already bundled in the container.

In addition to upgrading the Java Runtime Environment for the master, any connected agents must upgrade to a Java 8 runtime environment.

The Long-Term Support (LTS) release line however, has not yet been updated to require Java 8. We are expecting the first LTS release to require Java 8 in June.

Compatibility Notes

Using the Maven project type with Java 7

Users with jobs configured with the "Maven project" type may not be able to use Java 7 for their Maven jobs. The correct behavior is not guaranteed so proceed at your own risk. The Maven Project uses Jenkins Remoting to establish "interceptors" within the Maven executable. Because of this, Maven uses Remoting and other Jenkins core classes, and this behavior may break an update.

See also:JENKINS-40990.

Java 9 compatibility

At this point, Jenkins does not yet support Java 9 development releases.


As always, if you have questions please ask on thejenkinsci-users@ mailing list orreport an issue in JIRA.

Viewing all 1088 articles
Browse latest View live