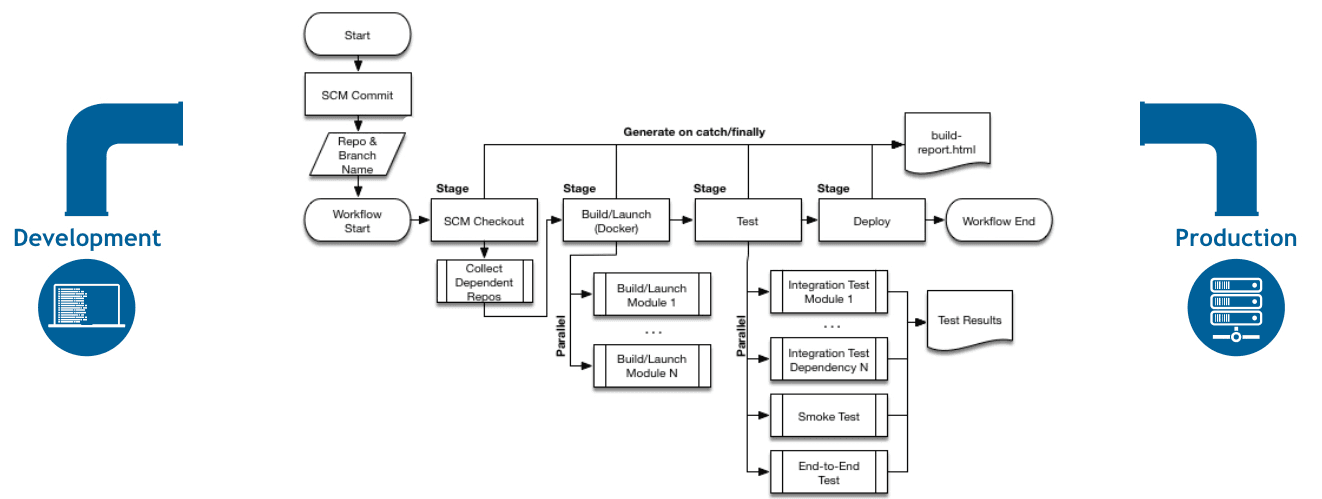
Quantcast
Channel: Jenkins Blog
Viewing all 1087 articles
Browse latest View live

Triggering builds with webhooks behind a secure firewall

$
0
0

In this post I wanted to show how you can run Jenkins behind a firewall (which could be a corporate firewall, a NAT’ed network like you have at home) but still receive webhooks in real time from GitHub.com. You can generalise this to other services too - such as BitBucket or DockerHub, or anything really that emits webhooks, but the instructions will be for GitHub projects hosted on github.com.

What are webhooks

Just a very quick refresher on what webhooks are: Messages (often JSON, but not always) typically posted by HTTP(S) from a server to a client that is listening for events.

webhook diagram

The events flow left to right, Jenkins sits there happily listing on paths like /github-webhook/ or /dockerhub-webhook/ etc for some HTTP request to tell it to wake up and do some work.

GitHub/BitBucket may be reporting a new commit or PR, or DockerHub reporting an upstream image has changed. What all these things have in common is that they push to Jenkins, and expect to be able to push to it (ie that Jenkins is visible to them). This works great when the network is open - say GitHub Enterprise, or Jenkins is listening on the web.

Not on the web

The trick is when something gets in the middle, say a firewall:

firewall diagram

(As is industry standard, all firewalls have to be a wall on fire. Please don’t somehow set bricks on fire in your organisation)

This is just the same when you fire up Jenkins on your laptop, and want to receive webhooks from github.com (a legitimate thing, perhaps to test out your setup, perhaps to run builds for iOS on a mac, or some corner of a network that is not exposed to the web). Unless your laptop is addressable to the whole web that is (not likely), or your network is configured just right, the webhooks won’t be able to flow.

This is fine - we can fall back to polling for changes. Except this is terrible. You burn through API quotas, and you don’t get changes in real time, and really no one is happy.

Some problems are opportunities

We can both solve this problem, but also, view this is an opportunity. Having things not addressable on the web, or locked down in some default way is a feature, not a bug. You massively reduce your attack surface, and can have defence in depth:

exposed on web

A Webhook forwarding service

Enter the memorably named Smee. This is an OSS project provided by GitHub and also helpfully hosted as a service by GitHub. This can capture and forward webhooks for you. I’ll try to explain it with a diagram:

forwarding

GitHub pushes an event (via HTTPS/json in this case) to Smee.io (the funny thing with circles, which is on the public web and accessible from GitHub.com) - and Jenkins in turn subscribes to Smee with an outgoing connection from a client. Note the direction of the arrows: Jenkins only makes an outbound connection.

This is the important point: this will work as long as the firewall is one way (like a NAT typically is, and many networks). If the Jenkins side can’t connect to anything on the outside world - well, this won’t help with that of course (but that is not often the case).

Setting it up

Step 1: Firstly - go to https://smee.io/ and click “Start a new channel”:
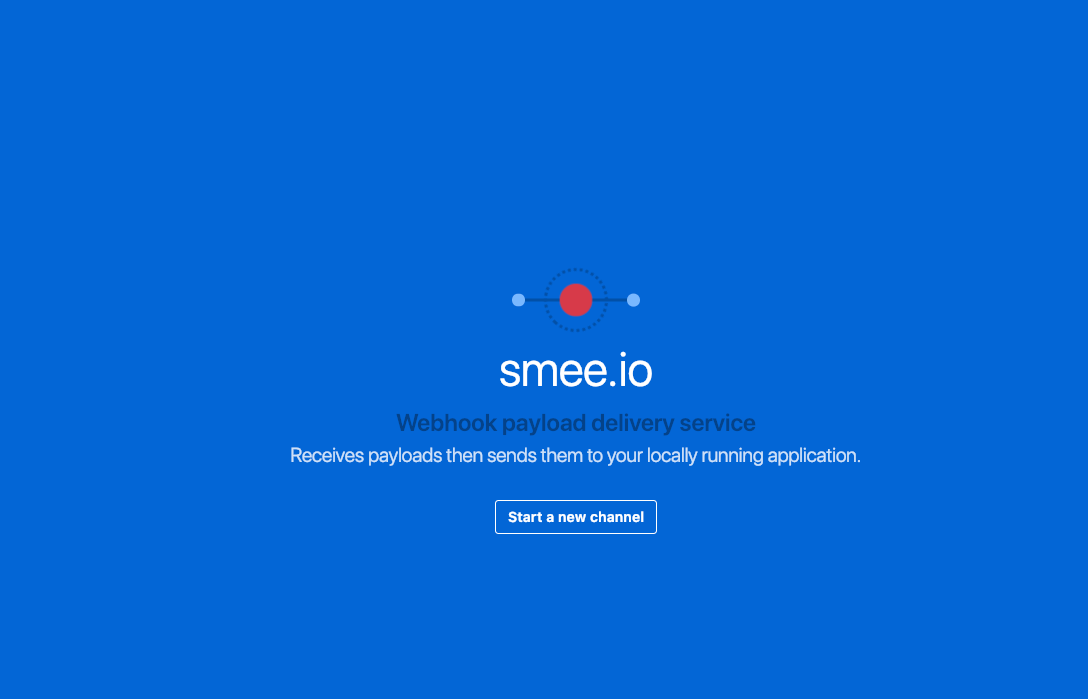
smee website

This will give you a unique URL (which you should copy for later use):

smee config

Next you should install the smee client next to where you have the Jenkins server running:

npm install --global smee-client

(This will make the smee client/command available to receive and forward webhooks).

Now start the smee client and point it to your Jenkins server. In this case I have it running on port 8080 (the default if you fire it up on your laptop, change both the port and the smee URL as needed):

smee --url https://smee.io/GSm1B40sRfBvSjYS --path /github-webhook/ --port 8080

This says to connect to the smee service, and forward webhooks to /github-webhook/ (that trailing slash is important, don’t miss it). Once this is running, you will see it log that it is connected and forwarding webhooks. Leave this command running for as long as you want to receive webhooks.

Next, you need to configure a pipeline that makes use of github. In this case I set up one from scratch. You can skip this if you already have a pipeline setup:
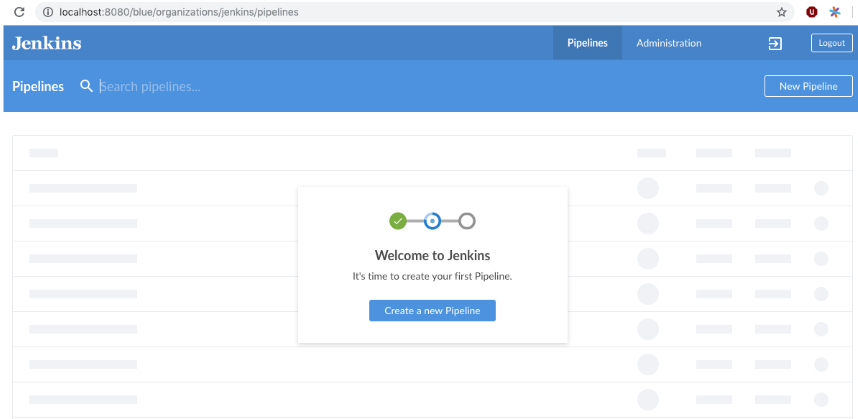
new pipeline

I then chose “GitHub” as the where the code is:
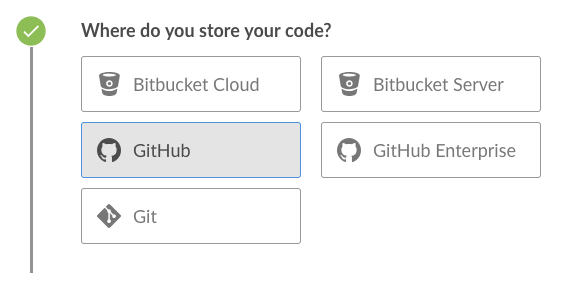
choose github

Then choose your repository. This will set things up ready to receive webhooks from GitHub. (also if you have an existing pipeline setup, and it is using GitHub as the SCM source, that is also fine).

The final step is to tell GitHub to post webhook events for that repository (or organization, you can do that too) to Smee (which ultimately means Jenkins will receive them).

Go to the settings tab for your GitHub repository, and then click “add webhook”:

add webhook

Next, configure the webhook:

  • Paste in the “smee” URL you copied from the step above.

  • Choose application/json as the content type

  • Tell it to send everything (you can pick and choose what events, but I just did that as simpler).

  • Press Add Webhook (or update)

It should look something like this:

config webhook

OK - webhooks should be flowing now. You can make a change to your repository, and check that a build starts soon after:

running pipeline

Good luck!

MPL - Modular Pipeline Library

$
0
0
This is a guest post by Sergei Parshev from Grid Dynamics, orignally posted on theGrid Dynamics Blog.

Despite speeding up development with deployment automation, one of our clients was experiencing slow time-to-market due to a lack of collaboration in DevOps. While they had invested in DevOps, every production pipeline was set up individually, forcing teams to remake the wheel for each project. Making matters worse, there was no cross-team collaboration, so any bug in the platform was present in each new pipeline. Many of our clients have similar issues, so we decided that we should develop a common tool which would both help current clients, and be adaptable for use in the future. While the most obvious option was standardizing the CI/CD platform with a common framework, this led to a monolithic structure, which was inflexible and ultimately unworkable. Since each team needed to work on their own pipelines, we developed a solution that would store each reusable part of the DevOps pipeline for later use: a Jenkins-powered modular pipeline library.

Solution: a modular pipeline library

The modular pipeline library (MPL) we created is a highly-flexible shared library for a Jenkins Pipeline that enables easy sharing of best practices across the entire company. It has a clear modular structure, an advanced testing framework, multi-level nesting, a pipeline configuration system, improved error handling, and many other useful components.

We will take a look under the hood and explain how our solution works in several parts:

  1. Explore the technologies and tools we used to build the MPL

  2. Review the MPL, and illustrate why it’s effective

  3. Follow a step-by-step guide to operate the MPL on a sample pipeline

  4. Dive into some of the more important components of the solution, such as the test framework and nested libraries

So now let’s jump right into an explanation of the crucial features we used to build our solution.

Building the MPL with shared libraries and Jenkins pipelines

Jenkins, our main automation platform, recently received some updates toJenkins Pipeline. These updates allow us to create one Jenkinsfile that describes the entire pipeline, and the steps that need to be executed with a series of self-explanatory scripts. This increases the visibility of CI/CD automation processes for end users, and improves supportability by DevOps teams.

However, there’s a large issue with Pipeline: it’s hard to support multiple Jenkinsfiles (and therefore multiple projects) with unique pipelines. We need to store the common logic somewhere, which is where Jenkins Shared Libraries come in. They are included in the Jenkinsfile, and allow the use of prepared interfaces to simplify automation and store common pieces.

While shared libraries allow you to store logic and manipulate Jenkins, they don’t provide a good way to utilize all the common information. Therefore, the MPL optimizes the pipeline and shared libraries by allowing users to create easy-to-follow descriptions for processes, which are then stored for later use by other teams.

The MPL works to create collaborative DevOps processes across teams

With the MPL, we are now able to collaborate and share our DevOps practices across teams, easily adopt existing pipelines for specific projects, and debug and test features before we actually integrate them into the library. Each team can create a nested library, add a number of pipelines and modules inside, and use it with pipeline automation to create great visibility of the processes for the end user. The MPL can also work on any project to prepare a Jenkinsfile, and manage it as flexibly as the project team wants.

At its core, the MPL provides a simple way to:

  1. Separate pipelines and steps by introducing modules

  2. Describe steps in the modules with an easy configuration interface

  3. Test the described modules and share the results with other pipelines and projects

There are a lot of other features in the MPL, but it’s essentially a platform to solve general DevOps collaboration issues. To simplify development and manual testing, the MPL provides modules overriding and an inheritance model, allowing users to test specific fixes in the project without affecting anything else. In Jenkins, a module is a file with scripted steps and logic to reach a simple goal (build an artifact, run tests, create an image, etc.). These modules are combined in the pipeline stages, and are easily readable for anyone who knows the Jenkins Pipeline syntax.

The MPL allows users to use the core features of the library (structure, modules, pipelines) and create nested libraries for specific DevOps team needs. A DevOps team can prepare complete pipelines with any custom logic and use it for their projects. They can also override and inherit the core MPL modules in a number of ways, or prepare custom modules which are easy to share with other teams. Check out the infographic below to see how modules fit in:

Fig 1. Layers of the MPL

You can also specify certain pipeline required poststeps in a module. For example, a dynamic deployment module creates the test environment, which needs to be destroyed when the pipeline ends. To take a closer look at the MPL calling process, check out the infographic below:

Fig 2. The MPL process

This infographic shows how calls are executed in the MPL. First, you need a job on your Jenkins, which will call a Jenkinsfile (for example, when the source code is changed), after which the Jenkinsfile will call a pipeline. The pipeline could be described on the MPL side, in the pipeline script in the job, in the nested library, or in the project Jenkinsfile. Finally, the stages of the pipeline will call the modules, and these modules will use features, which could be groovy logic, pipeline steps, or steps in the shared libraries.

Now that we’ve done an overview of the solution, let’s take a look at a simple pipeline execution to see how the MPL works in action.

An example of a pipeline execution in the MPL

For example, let’s say you have a common Java Maven project. You are creating a Jenkinsfile in the repo, and want to use the default pipeline prepared by your DevOps team. The MPL already has a simple pipeline: the core MPLPipeline. It’s a really simple pipeline, but it’s a good start for anyone who wants to try the MPL. Let’s look at a simple Jenkinsfile:

@Library('mpl') _
MPLPipeline {}

This Jenkinsfile contains a single line to load the MPL, and another line to run the pipeline. Most of the shared libraries implement an interface like this, calling one step and providing some parameters. MPLPipeline is merely a custom Pipeline step, as it lies in the vars directory, and its structure is very simple, following these steps:

  1. Initialize the MPL
    The MPL uses the MPLManager singleton object to control the pipeline

  2. Merge configuration with default and store it
    A default configuration needed to specify stages and predefine some useful configs

  3. Define a declarative pipeline with 4 stages and poststeps:

    1. Checkout - Getting the project sources

    2. Build - Compiling, validation of static, unit tests

    3. Deploy - Uploading artifacts to the dynamic environment and running the app

    4. Test - Checking integration with other components

    5. Poststeps - Cleaning dynamic environment, sending notifications, etc.

  4. Running the defined pipeline
    This is where the MPL starts to work its magic and actually runs

Stages of the main MPL usually have just one step, the MPLModule. This step contains the core functionality of the MPL: executing the modules which contain the pipeline logic. You can find default modules in the MPL repository, which are placed in resources/com/griddynamics/devops/mpl/modules. Some of the folders include: Checkout, Build, Deploy, and Test, and in each of them we can find Groovy files with the actual logic for the stages. This infographic is a good example of a simplified MPL repository structure:

Fig 3. A simplified MPL repository structure

When the Checkout stage starts, MPLModule loads the module by name (by default a stage name), and runs the Checkout/Checkout.groovy logic:

if( CFG.'git.url' )
  MPLModule('Git Checkout', CFG)else
  MPLModule('Default Checkout', CFG)

If the configuration contains the git.url option, it will load a Git Checkout module; otherwise, it will run the Default Checkout module. All the called modules use the same configuration as the parent module, which is why CFG was passed to the MPLModule call. In this case, we have no specific configuration, so it will run theCheckout/DefaultCheckout.groovy logic. The space in the name is a separator to place the module into a specific folder.

In the Default Checkout module, there is just one line with checkout scm execution, which clones the repository specified in the Jenkins job. That’s all the Checkout stage does, as the MPL functionality is excessive for such a small stage, and we only need to talk about it here to show how the MPL works in modules.

The same process applies to the Build stage, as the pipeline runs theMaven Build module:

withEnv(["PATH+MAVEN=${tool(CFG.'maven.tool_version' ?: 'Maven 3')}/bin"]) {def settings = CFG.'maven.settings_path' ? "-s '${CFG.'maven.settings_path'}'" : ''
  sh """mvn -B ${settings} -DargLine='-Xmx1024m -XX:MaxPermSize=1024m' clean install"""
}

This stage is a little bit more complicated, but the action is simple: we take the tool with the default name Maven 3, and use it to run mvn clean install. The modules are scripted pipelines, so you can do the same steps usually available in the Jenkins Pipeline. The files don’t need any specific and complicated syntax, just a plain file with steps and CFG as a predefined variable with a stage configuration. The MPL modules inherited the sandbox from the parent, so your scripts will be safe and survive the Jenkins restart, just like a plain Jenkins pipeline.

In the Deploy folder, we find the sample structure of the Openshift Deploy module. Its main purpose here is to show how to use poststep definitions in the modules:

MPLPostStep('always') {
  echo "OpenShift Deploy Decommission poststep"
}
echo 'Executing Openshift Deploy process'

First, we define the always poststep. It is stored in the MPLManager, and is called when poststeps are executed. We can call MPLPostStep with always as many times as we want: all the poststeps will be stored and executed in FILO order. Therefore, we can store poststep logic for actions that need to be done, and then undone, in the same module, such as the decommission of the dynamic environment. This ensures that the actions will be executed when the pipeline is complete.

After the deploy stage, the pipeline executes the Test stage, but nothing too interesting happens there. However, there is an aspect of testing which is very important, and that’s the testing framework of the MPL itself.

Testing of the MPL

The testing framework of the MPL is based on theJenkinsPipelineUnit from LesFurets, with the one small difference being its ability to test the MPL modules. Testing the whole pipeline doesn’t work, as pipelines can be really complicated, and writing tests for such monsters is a Sisyphean task. It is much easier to test a black box with a small amount of steps, ensuring that this particular task is working correctly.

In the MPL, you can find Build module testing examples: all the tests are stored in thetest/groovy/com/griddynamics/devops/mpl/modules directory, and you can find theBuild/BuildTest.groovy file with a number of test cases there. Tests are executed during the MPL build process, allowing users to see traces like this:

Loading shared library mpl with version snapshot
  MPLModule.call(Build, {maven={tool_version=Maven 2}})
    Build.run()
      Build.MPLModule(Maven Build, {maven.tool_version=Maven 2})
        MavenBuild.run()
          MavenBuild.tool(Maven 2)
          MavenBuild.withEnv([PATH+MAVEN=Maven 2_HOME/bin], groovy.lang.Closure)
            MavenBuild.sh(mvn -B  -DargLine='-Xmx1024m -XX:MaxPermSize=1024m' clean install)
      Build.fileExists(openshift)

The test runs the MPLModule with custom configuration and mocked steps to check that, during execution, the tool was changed to Maven 2 according to the provided configuration. We cover all test cases with such tests, ensuring that the modules are working as expected, and that the pipeline will work properly. You can test the whole pipeline if you want, but testing by modules is just an additional way to simplify the testing process.

Now that we’ve looked at how to test the MPL modules, it’s time to look at one of the key features of the MPL, which is nested libraries.

The benefits of nested libraries

When working with a large company, supporting one big library makes no sense. Each department requires multiple configuration options and tuning for a somewhat standard pipeline, which creates extra work. The MPL solves such problems by introducing nested libraries. This infographic displays how a nested library compares to just using the main library:

Fig 4. Ways to use the MPL

A nested library is the same as a shared library that imports the MPL and uses its functionality, modules, and pipelines. Also, it allows the separation of some team-related logic from the company common logic. Here is the structure of the MPL with nested libraries:

Fig 5. Example of company’s libraries tree structure

You can import the MPL in the overridden pipeline, specify the path of some additional modules, override module logic, and use Jenkins power moves: there are no limitations. When another team needs your unique module, you can just create a change request to the basic company MPL repo, and share your functional module with the others.

With nested libraries, it’s possible to debug and modify MPL-provided steps (MPLModule for example) and pipelines. This is because nested libraries can override low-level functionalities of the MPL or the Jenkins Pipeline. There are no limitations to what you can or can’t change, as these overrides only affect your own pipeline. This enables experimentation to be done, and then discussed with other teams to see if it will work in other nested libraries as well.

There are also no limits to the number of nesting levels created, but we recommend using just two (MPL and nested), because additional levels make configuration and testing of the nested libraries on lower levels very complicated.

The power of module overriding

Further into the nested libraries or project-side modules, it’s possible to store a module with the same name as one in the upper-level library. This is a good way to override the logic - you can just replace Build/Build.groovy with your own - as the functional module will be executed instead of the upper-level module. For example, this infographic shows module overriding:

Fig 6. MPL modules overriding

Even better, one of the strengths of the MPL is that you still can use the upper-level module! The MPL has mechanisms to prevent loops, so the same module can’t be executed in the same executing branch again. However, you can easily call the original module a name from another module to use the upper-level logic.

Fig 7. Petclinic-Selenium example pipeline structure

The Petclinic-Selenium example above uses the default MPLPipeline (you can find it on the MPL Wiki-page), and contains project-side modules in a .jenkins directory. These modules will be called before the library modules. For example, the Checkout module is not placed on the project side, so it will be called from the MPL, but the Build module exists in a .jenkins directory on the project side, and it will be called:

MPLPostStep('always') {
  junit 'target/surefire-reports/*.xml'
}

MPLModule('Build', CFG)if( fileExists('Dockerfile') ) {
  MPLModule('Docker Build', CFG)
}

As you can see, the Build module from the project registers the poststep, calls the original Build module from the MPL, and then calls the additionalDocker Build module. The following stages of the pipeline are more complicated, but all module overriding essentially works like this. Some projects can be tricky, and need some small tunings for the existing modules. However, you can easily implement those changes on the project level, and think about how to move the functionality to the nested library or MPL later.

Conclusion: what the MPL brings to DevOps

Many DevOps teams and companies work with bloated, restrictive, and buggy CI/CD automation platforms. These increase the learning curve for users, cause teams to work slower, and raise production costs. DevOps teams frequently run into similar issues on different projects, but a lack of collaboration means that they have to be individually fixed each time.

However, with the MPL, DevOps teams have a shared, simple, and flexible CI/CD platform to improve user support, collaboration, and overall project source code to the production process. By utilizing the MPL, your company can find an automation consensus, reach cross-company collaboration goals, and reuse the best practices from a large community, all with open source tools. If you’re interested in building an MPL, please contact us to learn more!

Jenkins User Conference China - Shenzhen Update

$
0
0

On November 3rd, 2018 the Jenkins User Conference China (JUCC) met Jenkins users in Shenzhen which is the most burgeoning city in China. It was the first time to hold JUCC in Shenzhen. We held JUCC along with DevOps International Summit, which is the biggest DevOps event in China. More than 200 attendees gathered at JUCC Shenzhen to share and discuss Jenkins, DevOps, Continuous Delivery, Pipeline, and Agile.

Below, I am sharing pictures and some of the topics discussed at the event:

image1

Yu Gu from Accenture presented New challenges for DevOps in Cloud Native.

image2

Peng Wang from Meituan which is the biggest group-buying website in China much like Groupon presentedThe continuous delivery toolchains based on Jenkins for ten thousand times build per day.

image3

Guangming Zhou from Ctrip who is a Jenkins expert in China presented CD system in Ctrip.

image4

Jiaqi Guo Jiaqi Guo from Kingston presented DevOps practices in large manufacturing industry.

image5

Yaxing Li from Tencent presented How to support the CI CD requirements for thousands of products in Tencent based on Jenkins.

image6

Mei Xiao from ZTE presented Fast integration practice for Android.

image7

John Willis presented Next Generation Infrastructure which included Kubernetes and Istio practices.

image8

BC Shi from JD.com who is also a Jenkins Ambassador and the co-organizer of JUCC presented Pipeline 3.0 for DevOps toolchains. He introduced the practices based on Jenkins and Jenkins X to build an end to end pipeline for DevOps from requirement to online service.

image9

We’ve also released a DevOps tool map to recommend an excellent tool to the community.

image10

Lastly, myself, Forest Jing co-organizer of JUCC and also am a Jenkins Ambassador interacted with the attendees.

image11

We also organized the Jenkins workshop and Open space for the attendees. Ruddy Li ,Yunhua Li , Yu Gu and Dingan Liang have worked together to run an open space to lead the attendees to discuss problems they met in DevOps and CD.

image12

Huaqiang Li who is a Certified Jenkins Engineer and CCJE has led the attendees to practice Jenkins functions for a whole afternoon.

Here are more photos from our event, it was a fantastic JUCC in Shenzhen. There were so much interest and appetite to learn about Jenkins and DevOps. We are looking forward to doing this again next year.

image13

Slides from the event can be downloaded at PPT Download Address, password: sepe (the website is in Chinese).

Thank you to Alyssa and Maxwell’s help to organize this event. Jenkins User Conference China continues and we hope to see many of you next year in China for our next JUCC. Let’s be Kung fu Jenkins!

FOSDEM 2019!

$
0
0

FOSDEM 2019 (February 2 & 3) is a free event for software developers to meet, share ideas and collaborate. It is an annual event that brings open source contributors from around the world for two days of presentations, discussions, and learning. While the Jenkins project won’t have a table at FOSDEM 2019, we will be well represented before, during, and after the event.

FOSDEM 2019

Friday Day - Workshops and Jenkins Office Hours

On Friday, February 1, we’ll start off with a couple workshops:

  • Jenkins Pipeline Fundamentals
    (9:00 AM – 5:00 PM)
    Learn to create and run Declarative Pipelines! You’ll learn the structure of Declarative Pipeline, how to control the flow of execution, how to save artifacts of the build, and get practice using some of the features that give fit and finish to your Pipeline.
    Registration required - see theevent page for details

  • Jenkins X, Kubernetes, and Friends
    Two sessions: (9:00 AM – 12:00 PM) and (1:00pm to 4:00pm)
    By combining the power of Jenkins, its community and the power of Kubernetes, the Jenkins X project provides a path to the future of continuous delivery for microservices and cloud-native applications. Come explore some of the features of Jenkins X through this hands-on workshop.
    Registration required - see theevent page for details

Aside from the workshops, from 9am to 5pm a bunch of people will be working out of Hilton Brussels Grand Place, hanging out as travelers come in. It’ll be a casual, unstructured day. Sign up on this meetup page to be notified what meeting room we’re in.

Friday Evening - Happy Hour

After the office hours and workshops, we’ll have a happy hour Friday evening before FOSDEM at Cafe Le Roy d’Espagne. See the meetup page for details.

Jenkins Hackfest after FOSDEM

Finally, a Jenkins Hackfest will be held the day after FOSDEM 2019 on Monday (February 4). Those who would like to join us for the hackfest should register for the meetup.

Meals, snacks, and beverages will be provided for the hackfest. Come join us, and let’s write some code!

Questions? feel free to contactAlyssa Tong orBaptiste Mathus or join us on theadvocacy-and-outreach gitter channel.

Windows Installer Updates

$
0
0

The Windows Installer for Jenkins has been around for many years as a way for users to install a Jenkins Master on Windows as a service. Since it’s initial development, it has not received a lot of updates or features, but that is about to change.

First, let’s take a look at the current installer experience.

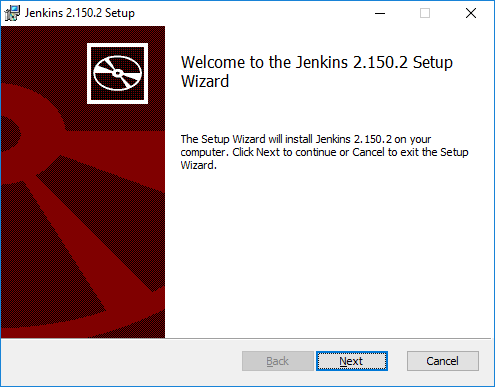
Step 1

Installer Startup

This is the default look and feel for a Windows Installer using the WiX Toolset, not very pretty and doesn’t give much branding information as to what the installer is for.

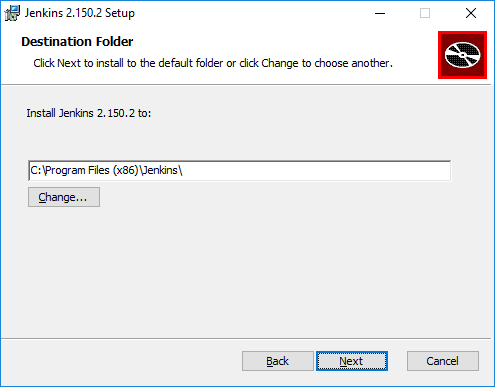
Step 2

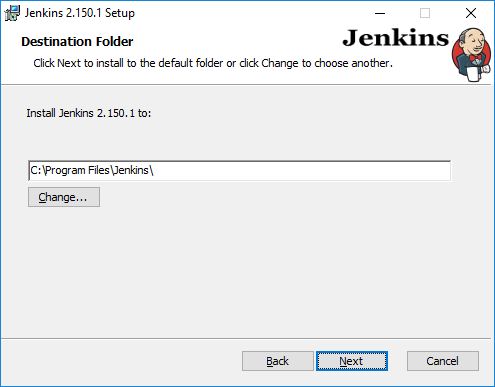
Installation Directory

Again, not much branding information.

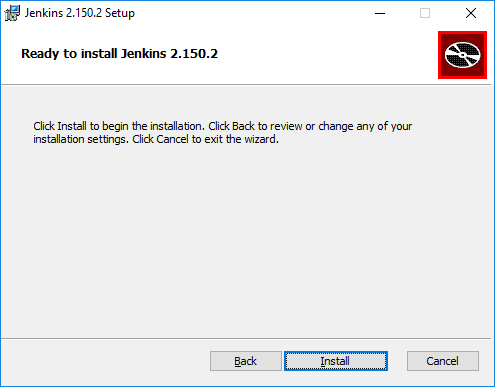
Step 3

Install It

The installer in general does not give many options for installing Jenkins, other than selecting the installation location.

Issues

The current installer has a few issues that the Platform SIG wanted to fix in a new install experience for users.

  1. The installer only supports 32-bit installations.

  2. The user could not select ports or user accounts to run the service on.

  3. The installer bundled a 32-bit version of the Java runtime instead of using a pre-existing JRE

  4. The installer did not support the experimental support in Jenkins for Java 11

  5. The JENKINS_HOME directory was not placed in a good spot for modern Windows

  6. There is no branding in the installer.

Road Forward

With the experimental Jenkins Windows Installer, most of these issues have been resolved!

  1. The installer will only support 64-bit systems going forward. This is the vast majority of Windows systems these days, so this will help more users install Jenkins using the installer package.

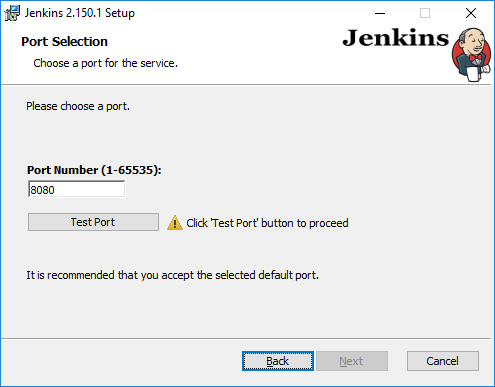
  2. The user is now able to enter user information for the service and select the port that Jenkins will use and verify that the port is available.

  3. The installer no longer bundles a JRE, but will search for a compatible JRE on the system. If the user wants to use a different JRE, they can specify during install.

  4. The installer has support for running with a Java 11 JRE, including the components listed on the Java 11 Preview Page.

  5. the JENKINS_HOME directory is placed in the LocalAppData directory for the user that the service will run as, this aligns with modern Windows file system layouts.

  6. The installer has been updated with branding to make it look nicer and provide a better user experience.

Screenshots

Below are screenshots of the new installer sequence:

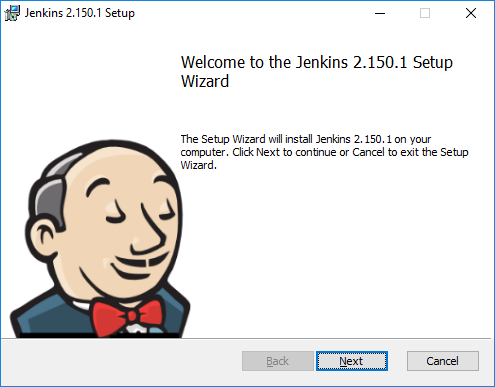
Step 1

Installer Startup

The Jenkins logo is now a prominent part of the UI for the installer.

Step 2

Installation Directory

The Jenkins logo and name are now in the header during all phases of the installer.

Step 3

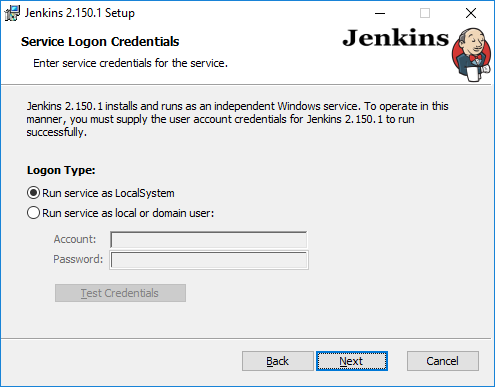
Account Selection

The installer now allows you to specify the username/password for the account to run as and checks that the account has LogonAsService rights.

Step 4

Port Selection

The installer also allows you to specify the port that Jenkins should run on and will not continue until a valid port is entered and tested.

Step 5

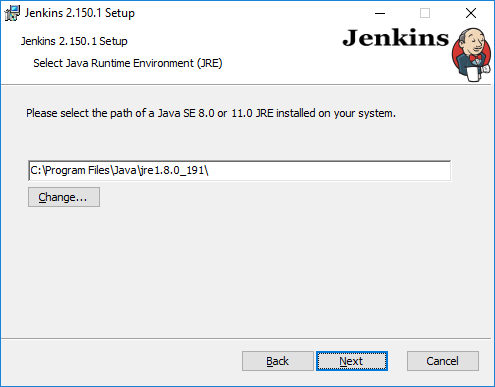
JRE Selection

Instead of bundling a JRE, the installer now searches for a compatible JRE on the system (JRE 8 is the current search). If you want to use a different JRE on the system than the one found by the installer, you can browse and specify it. Only JRE 8 and JRE 11 runtimes are supported. The installer will automatically add the necessary arguments and additional jar files for running under Java 11 if the selected JRE is found to be version 11.

Step 6

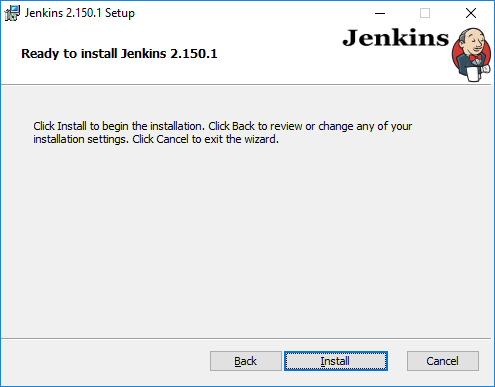
Install It

All of the items that users can enter in the installer should be overridable on the command line for automated deployment as well. The full list of properties that can be overridden will be available soon.

Next Steps

The new installer is under review by the members of the Platform SIG, but we need people to test the installer and give feedback. If you are interested in testing the new installer, please join the Platform SIG gitter room for more information.

There are still some things that are being researched and implemented in the new installer (e.g., keeping port and other selections when doing an upgrade), but it is getting close to release.

In addition to updates to the MSI based Windows installer, the Platform SIG is working on taking over the Chocolatey Jenkins package and releasing a version for each update.

Jenkins new year in China

$
0
0

Spring Festival 2019

At the time of the Spring Festival. I want to make a summary of some activities in the last year. You might already notice that more and more Chinese contributors emerge in the Jenkins community. We have a GSoC champion who is Shenyu Zheng. He is a great example for other students. With the effort of three skilled engineers, many Jenkins users could learn the edge technologies and useful use cases. They co-orgnaized several Jenkins Meetups in a couple of cities in China.

There are two workshops about Jenkins and Jenkins X in the DevOps International Summit. James Rawlings gave us a wonderful view of the Jenkins X. Many people start to know this project. The Chinese website of jx would be helpful to those people.

On November 3rd, 2018 the Jenkins User Conference China(JUCC) was hosted in Shenzhen. More than 200 attendees gathered at JUCC to share and discuss Jenkins, DevOps, Continuous Delivery, Pipeline, and Agile.

There was a Jenkins workshop to teach users to develop a plugin in October. It was during the Hacktoberfest 2018. So some people got a beautiful T-shirt at this meetup. We’ll keep this event in 2019. I hope more users and developers could join us.

Thank you all folks. And other friendly contributors.

Chinese KongFu

Chinese is our main communication language. A large number of the Jenkins users are not a proficient English speaker. So letting most of Chinese Jenkins users could easily use Jenkins as their CI/CD platform is the final mission of Chinese Localization SIG. You can find three participants on the page. But that’s not the full list. More exciting thing is that Alauda giving a big support which as a startup company.

WeChat is the greatest media social channel in China. WeChat has one billion users. Almost everyone has its own account. It must be a perfect place to publish articles and events. There are over 1k people subscribed the Jenkins official WeChat Subscription Account in the last three months.

In the new year, I’m looking forward to growing up with you all!

SSH Steps for Jenkins Pipeline

$
0
0
This guest post was originally published on Cerner’s Engineering blog here.

Pipeline-as-code or defining the deployment pipeline through code rather than manual job creation through UI, provides tremendous benefits for teams automating builds and deployment infrastructure across their environments.

Pipeline Flow

Jenkins Pipelines

Jenkins is a well-known open source continuous integration and continuous deployment automation tool. With the latest 2.0 release, Jenkins introduced the Pipeline plugin that implements Pipeline-as-code. This plugin lets you define delivery pipelines using concise scripts which deal elegantly with jobs involving persistence and asynchrony.

The Pipeline-as-code’s script is also known as a Jenkinsfile.

Jenkinsfiles uses a domain specific language syntax based on the Groovy programming language. They are persistent files which can be checked in and version-controlled along with the rest of their project source code. This file can contain the complete set of encoded steps (steps, nodes, and stages) necessary to define the entire application life-cycle, becoming the intersecting point between development and operations.

Missing piece of the puzzle

One of the most common steps defined in a basic pipeline job is the Deploy step. The deployment stage encompasses everything from publishing build artifacts to pushing code into pre-production and production environments. This deployment stage usually involves both development and operations teams logging onto various remote nodes to run commands and/or scripts to deploy code and configuration. While there are a couple of existing ssh plugins for Jenkins, they currently don’t support the functionality such as logging into nodes for pipelines. Thus, there was a need for a plugin that supports these steps.

Introducing SSH Steps

SSH Steps

Recently, our team at Cerner started working on a project to automate deployments through Jenkins pipelines to help facilitate running commands on over one thousand nodes. We looked at several options including existing plugins, internal shared Jenkins libraries, and others. In the end, we felt it was best to create and open source a plugin to fill this gap so that it can be used across Cerner and beyond.

The initial version of this new plugin SSH Steps supports the following:

  • sshCommand: Executes the given command on a remote node.

  • sshScript: Executes the given shell script on a remote node.

  • sshGet: Gets a file/directory from the remote node to current workspace.

  • sshPut: Puts a file/directory from the current workspace to remote node.

  • sshRemove: Removes a file/directory from the remote node.

Usage

Below is a simple demonstration on how to use above steps. More documentation can be found on GitHub.

def remote = [:]
remote.name = "node"
remote.host = "node.abc.com"
remote.allowAnyHosts = true

node {
    withCredentials([usernamePassword(credentialsId: 'sshUserAcct', passwordVariable: 'password', usernameVariable: 'userName')]) {
        remote.user = userName
        remote.password = password

        stage("SSH Steps Rocks!") {
            writeFile file: 'test.sh', text: 'ls'
            sshCommand remote: remote, command: 'for i in {1..5}; do echo -n \"Loop \$i \"; date ; sleep 1; done'
            sshScript remote: remote, script: 'test.sh'
            sshPut remote: remote, from: 'test.sh', into: '.'
            sshGet remote: remote, from: 'test.sh', into: 'test_new.sh', override: true
            sshRemove remote: remote, path: 'test.sh'
        }
    }
}

Configuring via YAML

At Cerner, we always strive to have simple configuration files for CI/CD pipelines whenever possible. With that in mind, my team built a wrapper on top of these steps from this plugin. After some design and analysis, we came up with the following YAML structure to run commands across various remote groups:

config:credentials_id: sshUserAcctremote_groups:r_group_1:
    - name: node01host: node01.abc.net
    - name: node02host: node02.abc.netr_group_2:
    - name: node03host: node03.abc.netcommand_groups:c_group_1:
    - commands:
        - 'ls -lrt'
        - 'whoami'
    - scripts:
        - 'test.sh'c_group_2:
    - gets:
        - from: 'test.sh'to: 'test_new.sh'
    - puts:
        - from: 'test.sh'to: '.'
    - removes:
        - 'test.sh'steps:deploy:
    - remote_groups:
        - r_group_1command_groups:
        - c_group_1
    - remote_groups:
        - r_group_2command_groups:
        - c_group_2

The above example runs commands from c_group_1 on remote nodes within r_group_1 in parallel before it moves on to the next group using sshUserAcct (from the Jenkins Credentials store) to logon to nodes.

Shared Pipeline Library

We have created a shared pipeline library that contains a sshDeploy step to support the above mentioned YAML syntax. Below is the code snippet for the sshDeploy step from the library. The full version can be found here on Github.

#!/usr/bin/groovydefcall(String yamlName) {def yaml = readYaml file: yamlName
    withCredentials([usernamePassword(credentialsId: yaml.config.credentials_id, passwordVariable: 'password', usernameVariable: 'userName')]) {
        yaml.steps.each { stageName, step ->
            step.each {def remoteGroups = [:]def allRemotes = []it.remote_groups.each {
                    remoteGroups[it] = yaml.remotes."$it"
                }def commandGroups = [:]it.command_groups.each {
                    commandGroups[it] = yaml.commands."$it"
                }def isSudo = false
                remoteGroups.each { remoteGroupName, remotes ->
                    allRemotes += remotes.collect { remote ->if(!remote.name)
                            remote.name = remote.host
                        remote.user = userName
                        remote.password = password
                        remote.allowAnyHosts = true
                        remote.groupName = remoteGroupName
                        remote
                    }
                }if(allRemotes) {if(allRemotes.size() > 1) {def stepsForParallel = allRemotes.collectEntries { remote ->
                            ["${remote.groupName}-${remote.name}" : transformIntoStep(stageName, remote.groupName, remote, commandGroups)]
                        }
                        stage(stageName) {
                            parallel stepsForParallel
                        }
                    } else {def remote = allRemotes.first()
                        stage(stageName + "\n" + remote.groupName + "-" + remote.name) {
                            transformIntoStep(stageName, remote.groupName, remote, commandGroups).call()
                        }
                    }
                }
            }
        }
    }
}

By using the step (as described in the snippet above) from this shared pipeline library, a Jenkinsfile can be reduced to:

@Library('ssh_deploy') _

node {
  checkout scm
  sshDeploy('dev/deploy.yml');
}

An example execution of the above pipeline code in Blue Ocean looks like this:

SSH Deploy BlueOcean View

Wrapping up

Steps from the SSH Steps Plugin are deliberately generic enough that they can be used for various other use-cases as well, not just for deploying code. Using SSH Steps has significantly reduced the time we spend on deployments and has given us the possibility of easily scaling our deployment workflows to various environments.

Help us make this plugin better by contributing. Whether it is adding or suggesting a new feature, bug fixes, or simply improving documentation, contributions are always welcome.

Remoting-based CLI removed from Jenkins

$
0
0

Close to two years ago, we announced inNew, safer CLI in 2.54 that the traditional “Remoting” operation mode of the Jenkins command-line interface was being deprecated for a variety of reasons, especially its very poor security record. Today in Jenkins 2.165 support for this mode is finally being removed altogether, in both the server and bundled jenkins-cli.jar client. The projected June 5th LTS release will reflect this removal, at which point the Jenkins project will no longer maintain this feature nor investigate security vulnerabilities in it.

This change makes the code in Jenkins core related to the CLI considerably simpler and more maintainable. (There are still two transports—HTTP(S) and SSH—but they have similar capabilities and behavior.) It also reduces the “attack surface” the Jenkins security team must consider. Among other issues, a compromised server could freely attack a developer’s laptop if -remoting were used.

The2.46.x upgrade guide already urged administrators to disable Remoting mode on the server. Those Jenkins users who rely on the CLI for remote scripting (as opposed to the HTTP(S) REST APIs) would be affected only if they were still using the -remoting CLI flag, since the default has long been to use HTTP(S) mode.

Most CLI features have long worked fine without -remoting, in some cases using slightly different syntax such as requiring shell redirects to access local files. As part of this change, some CLI commands, options, and option types in Jenkins core have been removed, other than -remoting itself:

  • The login and logout commands, and the --username and --password options.

  • The -p option to select a proxy. (The CLI in default -http mode accesses Jenkins no differently than any other HTTP client.)

  • The install-tool, set-build-parameter, and set-build-result commands relied on a fundamentally insecure idiom that is no longer supportable.

  • Command options or arguments which took either a local file or = for standard input/output (e.g., install-plugin, build -p, support) now only accept the latter.

  • Some features of relatively little-used plugins will no longer work, such as:


Limitations of Credentials Masking

$
0
0

In the Jenkins project, we ask that people report security issues to our private issue tracker. This allows us to review issues and prepare fixes in private, often resulting in better, safer security fixes.

As a side effect of that, we also learn about common misconceptions and usability problems related to security in Jenkins. This post is intended to address one of those: The goal and limitations of credentials masking.

The Problem

One very common example of that is the role of credentials masking in Jenkins, typically involving a pipeline snippet that looks like this:

Jenkinsfile (Scripted Pipeline)
withCredentials([usernamePassword(credentialsId: 'topSecretCredentials', passwordVariable: 'PWD', usernameVariable: 'USR')])
  sh './deploy.sh'// requires PWD and USR to be set
}

Credentials that are in scope are made available to the pipeline without limitation. To prevent accidental exposure in the build log, credentials are masked from regular output, so an invocation of env (Linux) or set (Windows), or programs printing their environment or parameters would not reveal them in the build log to users who would not otherwise have access to the credentials.

The misconception here is that Jenkins will prevent other, perhaps deliberate ways to reveal the password. Some examples:

Jenkinsfile (Scripted Pipeline)
withCredentials([usernamePassword(credentialsId: 'topSecretCredentials', passwordVariable: 'PWD', usernameVariable: 'USR')])
  sh 'echo $PWD | base64'// will print e.g. dDBwczNjcjN0Cg= which is trivially converted back to the top secret password
}
Jenkinsfile (Scripted Pipeline)
withCredentials([usernamePassword(credentialsId: 'topSecretCredentials', passwordVariable: 'PWD', usernameVariable: 'USR')])
  sh 'echo $PWD > myfile'
  archiveArtifacts 'myfile'// then browse archived artifacts from the Jenkins UI
}

Both of these snippets circumvent credentials masking in the build log, and show that people with control over the build script can use credentials in ways not necessarily intended or approved by admins.

Obviously these are just the most straightforward examples illustrating the problem. Others could involve the proc file system, sending it to an HTTP server in response to a 401 authentication challenge, embedding it in the (otherwise legitimate) build result, etc.

It would be great if Jenkins could allow the flexible use of credentials with no risk of exposing them through straightforward build script modifications, but realistically, it is impossible for Jenkins to police use of the credential by a build script without the support of a very specific environment setup (e.g. restrictive network configuration).

It should also be noted that credentials aren’t just at risk from users able to control the pipeline, typically by editing the Jenkinsfile. Actual build scripts invoked by pipelines, either shell scripts as in the example above, or more standard build tools such as Maven (controlled by pom.xml) are just as much of a risk if they are run inside a withCredentials block, or executing on the same agent as another block that passed such credentials.

Disclosure of secrets can also happen inadvertently: Jenkins will prevent exact matches of the password or other secret to appear in the log file. Consider that the secret may contain shell metacharacters that bash +x would escape by adding a \ before those characters. The sequence of characters to be printed is no longer identical to the secret, so would not be masked.

The Solution

Credentials can be defined in different scopes: Credentials defined on the root Jenkins store (the default) will be available to all jobs on the instance. The only exception are credentials with System scope, intended for the global configuration only, for example, to connect to agents. Credentials defined in a folder are only available within that folder (transitively, i.e. also in folders inside this folder).

This allows defining sensitive credentials, such as deployment credentials, on specific folders whose contents only users trusted with those credentials are allowed to configure: Directly in Jenkins using Matrix Authorization Plugin and by limiting write access to repositories defining pipelines as code.

Pipelines inside this folder can use the (e.g. deployment) credentials without limitation, while they’re inaccessible to pipelines outside the folder. Those would need to use the build step or similar approaches to invoke the pipelines inside the folder to deploy their output.

Caveats

While the previous section outlines a solution to the problem of restricting access to credentials, care needs to be taken so that credentials are not captured anyway. For example, a deployment pipeline that allows its users to define where to deploy to as a build parameter might still be used to send credentials to a maliciously set up host to capture them.A blog post explaining the design of some Jenkins project infrastructure discusses some of these concerns around trust.

It should also be noted that credential domains are a UI hint only — defining a credential to only be valid for github.com does not actually prevent its use elsewhere.

Jenkins + Alexa: Say Hello to Voice Controlled CI/CD

$
0
0
This is a guest post by Kesha Williams.

Integrating Jenkins with Alexa to launch your pipelines and obtain results about your deployments through voice is easier than you think. Learn how Alexa Champion, Kesha Williams', latest side project teaches Alexa to deploy code to the cloud.

Jenkins with Amazon Alexa

Alexa (named after the ancient library of Alexandria) is Amazon’s Artificial Intelligence (AI) powered intelligent voice assistant that runs in the cloud. Software engineers make Alexa smarter by creating apps, called skills. From the time that I developed my first Alexa skill, I dreamed of deploying my Java projects to the cloud via voice. For me, telling Alexa to deploy my code is the ultimate level of cool! I recently made my dream a reality when I devoted a weekend to developing my newest Alexa skill, DevOps Pal. In this blog, I will show you how I developed DevOps Pal and hopefully inspire you to build your own version.

Why Choose Voice to Deploy Code

Voice-first technology is revolutionizing how we interact with technology because the interaction is simple, frictionless, and time-saving. For me, voice is an easier way to control Jenkins and retrieve results about my deployments without having to touch a keyboard. In this use case, voice is another access point for data and is a way to further automate the process of building, testing, and deploying a Java project to the cloud, improving efficiency.

Continuous Integration and Continuous Delivery (CI/CD)

If you’re working with DevOps, you understand the need for Continuous Integration and Continuous Delivery (CI/CD) to automate the software delivery pipeline in a reproducible way. CI/CD is the practice of continuously building, testing, and deploying code once it’s committed to version control. DevOps and CI/CD provides software engineering teams with confidence in the code being pushed to production and shorter development lifecycles, which in the end produces happier users, clients, and customers.

DevOps Pal Overview

DevOps Pal is a private Alexa for Business skill that is used to kick off a Jenkins pipeline job. Alexa for Business was the perfect way for me to distribute DevOps Pal since I have the ability to enable the skill on an organization-by-organization basis, which gives me complete control over who has access. Once DevOps Pal invokes the job, the pipeline status displays in real-time via the Blue Ocean Pipeline Run Details View Page.

DevOps Pal Architecture

I used several components and tools to create DevOps Pal. Let’s review the architecture in detail.

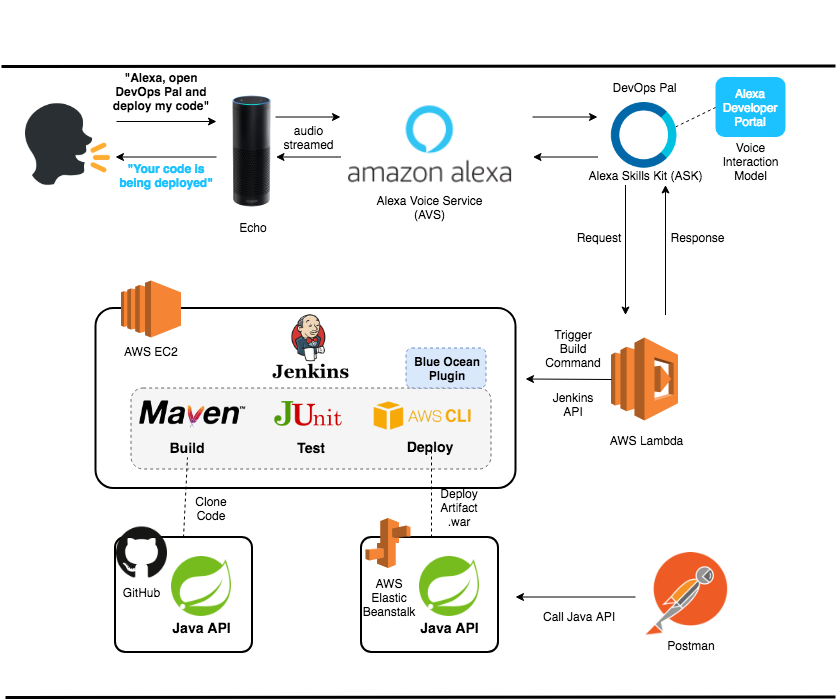
DevOps Pal Skill Architecture

The flow begins by saying, "Alexa, open DevOps Pal and deploy my code", to the Echo device.

The Echo device listens for the wake word (e.g. Alexa, Echo, Computer, or Amazon), which employs deep learning technology running on the device to recognize the wake word the user has chosen. Once the wake word is detected, what I say is recorded and sent to the Alexa Voice Service (AVS), which uses speech to text and natural language understanding (NLU) to identify my intent. My intent is sent to DevOps Pal; the skill acts accordingly by kicking off the Jenkins job and sending a response back using text-to-speech synthesis (TTS), which makes the response natural sounding.

Let’s explore each component in more detail:

  • Alexa Voice Service (AVS) - I often refer to the Alexa Voice Service as the "Alexa brain that runs in the cloud". The AVS is a suite of services built around a voice-controlled AI assistant. The AVS is flexible enough to allow third parties to add intelligent voice control to any connected product that has a microphone and speaker, so Alexa is not limited to just Echo devices.

  • Alexa Skills Kit (ASK) - ASK is the "SDK" (Software Development Kit) that allows developers to build custom skills for Alexa.

  • Alexa Developer Portal - An Alexa skill includes a voice user interface, or VUI, to understand user intents, and a back-end cloud service to process intents by telling Alexa how to respond. The VUI and the integration with the back-end service is setup and configured through the Alexa Developer Portal.

  • AWS Lambda - A chunk of code that runs in the cloud. Developers can run their code without having to provision or manage servers. Applications created with AWS Lambda are considered to be serverless. Lambda supports several popular languages like Python, Java, Node.js, Go, C#, etc.

  • GitHub - A version control system for the Java project source code.

  • Jenkins on EC2 - I use Jenkins to build, test, and deploy my Java Application Programming Interface (API). Elastic Cloud Computer (EC2) is the virtual server where Jenkins is installed. Jenkins works alongside several other tools:

    1. Maven - A build automation tool for Java projects.

    2. Junit - A testing framework for Java projects.

    3. AWS Command Line Interface (CLI) - This is a command line tool that allows developers to access their Amazon Web Services (AWS) account.

    4. Blue Ocean - This is a plugin for Jenkins that provides an easy to use interface to create and monitor Jenkins pipelines.

  • AWS Elastic Beanstalk - This is an orchestration service that allows developers to deploy and manage web applications in the AWS cloud.

  • Postman - This is an HTTP client for testing APIs and web services.

Voice Interaction Model

The Voice User Interface (VUI) describes the overall conversational flow and is setup via the Alexa Developer Console.

Invocation Name Setup Via Alexa Developer Console

A few important components of the VUI are the Invocation Name (how users launch your skill) and the Intents (phrases a user says to "talk to" or interact with your skill).

Utterances for DeployCodeIntent Via Alexa Developer Console

Specifically, the "DeployCodeIntent" is invoked when a user says one of several phrases (e.g. run jenkins pipeline, run jenkins job, deploy the code, deploy code, or deploy ) or a variation of the phrase like, "deploy my code".

Backend Fulfillment Logic - Endpoint Via Alexa Developer Console

The endpoint is the destination where the skill requests are sent for fulfillment. In this case, the backend logic is an AWS Lambda authored in Python. The business logic in the Python Lambda uses the Jenkins remote access API to trigger the job remotely. The format of the URL to trigger the job is jenkins_url/job/job_name/build. The API call uses BASIC authentication and a Jenkins Crumb passed in the HTTP request header for CSRF protection. Alternatively, since Jenkins 2.96, you can use an API token instead of a Jenkins Crumb and password to authenticate your API call.

Jenkins Job

Jenkins Classic UI

The Jenkins job, 'alexa-cicd', is the job invoked from DevOps Pal. Although, the Jenkins Classic User Interface (UI) is functional, I prefer the Blue Ocean interface because it rethinks the user experience of Jenkins by making it visually intuitive. Blue Ocean is easily enabled via a plugin and leaves the option to continue using the Jenkins Classic UI should you so choose.

Jenkins Blue Ocean Pipeline Run Details View Page

After Alexa kicks off the 'alexa-cicd' job, I navigate to the Pipeline Run Details View Page, which allows me to watch the job status in realtime. This job has four stages: Initialize, Build, Test, and Deploy. The final stage, Deploy, uses the AWS Command Line Interface (CLI) on the Jenkins server to copy the artifact to Amazon Simple Storage Service (S3) and create a new Elastic Beanstalk application version based on the artifact located on S3.

Cool Features to Add

The ability to deploy code with voice is just the beginning. There are several cool features that can easily be added:

  • DevOps Pal can be updated to prompt the user for the specific Jenkins pipeline job name. This adds a level of flexibility that will really empower DevOps teams.

  • Alexa Notifications can be integrated with DevOps Pal to send a notification to the Echo device when the Jenkins job is finished or when it fails. If the job fails, more information about where the job failed and exactly why will be provided. This will prove useful for long running jobs or for getting timely updates regarding the job status.

  • DevOps Pal can be updated to answer direct questions about the real-time status of a specific job.

Want to Learn More

I hope you’ve enjoyed learning more about the architecture of DevOps Pal and deploying code to the cloud using Jenkins and voice. For more detailed steps, I’ve collaborated with Cloud Academy to author a course, AWS Alexa for CI/CD on the subject.

Run your Jenkins pipeline without operating a Jenkins instance

$
0
0
My job is to work on a Jenkins pipeline specific to SAP S/4HANA extensions running on SAP Cloud Platform. See the original blog post here.

Jenkins is a powerful tool for automation, and we heavily rely on the codified pipeline syntax introduced in Jenkins 2.

With regards to operations, we minimized the need for care with the cx-server life-cycle management greatly. Still, you need to run that Jenkins server. This means you’ll need to update the server and plugins (simplified by our life-cycle management), and scale as the number of builds grows. User administration and backups are also required in a productive setup.

Is this really required, or is there an alternative approach?

In this blog post, I’ll introduce a prototype I did to get rid of that long running pet Jenkins instance. Rather, we’ll have cattle Jenkins instances, created and destroyed on demand. “Serverless” Jenkins in the sense that we don’t have to provision the server for Jenkins to run.

The setup described in this post is highly experimental. I encourage you to try this out in a demo project, but be very cautious until further notice to use this on productive code. In this proof of concept, I’ll use a public GitHub repository and the free open-source offering by TravisCI. This setup is not suitable for commercial software.

The pets vs cattle metaphor describes how approaches in managing servers differ. While you care for pets and treat them when they are unwell, cattle can be easily replaced. Your traditional Jenkins server is a pet because it is often configured manually, and replacing it is a major effort. For more background on this metaphor, click here.

Before we’re getting into the technical details, let’s discuss why we would want to try this out in the first place. Running Jenkins on arbitrary CI/CD services, such as TravisCI seems very odd on first sight. On such services you’ll usually invoke your build tools like Maven or npm in a small script, and that will do your build. But in the enterprise world, both inside SAP and in the community, Jenkins has a huge market share. There are many shared libraries for Jenkins, providing pre-made build steps which would be expensive to re-implement for other platforms. Additionally, SAP S/4HANA Cloud SDK Pipeline is a ready to use pipeline based on Jenkins where you as the developer of an SAP S/4HANA extension application do not need to write and maintain the pipeline yourself. This means reduced costs and effort for you, while the quality of your application improves, for example due to the manycloud qualities which are checked out of the box.

image:/images/post-images/2019-02-22/green.png

Let me show you an experiment to see if we can get the best of both worlds. The goal is to get all the quality checks and the continuous delivery that the SAP S/4HANA Cloud SDK Pipeline provides us, without the need for a pet Jenkins server.

How do we do that? The Jenkins project has a project called Jenkinsfile runner. It is a command line tool that basically boots up a stripped-down Jenkins instance, creates and runs a single job, and throws away that instance once the job is done. As you might guess, there is some overhead in that process. This will add about 20 seconds to each build, which I found to be surprisingly fast, considering the usual startup time of a Jenkins server. For convenient consumption, we have packaged Jenkinsfile runner as a Docker image which includes the Jenkins plugins that are required for SAP S/4HANA Cloud SDK Pipeline.

We also utilize the quite new Configuration as Code plugin for Jenkins, which allows to codify the Jenkins configuration as YAML files. As you will see in a minute, both Jenkinsfile runner and Configuration as Code are a perfect match.

If you want to follow along, feel free to use our provided Address Manager example application. You may fork the repository, or create your own repository and activate it on TravisCI.

Based on the existing Address Manager, let’s add a small .travis.yml file to instruct the build:

language: minimal
services:
- docker
script: docker run -v /var/run/docker.sock:/var/run/docker.sock -v ${PWD}:/workspace -v /tmp -e CASC_JENKINS_CONFIG=/workspace/jenkins.yml -e CF_PW -e ERP_PW -e BRANCH_NAME=$TRAVIS_BRANCH ppiper/jenkinsfile-runner

The script line has quite a few things going on, let’s see what is there.

We run a Docker container based on the ppiper/jenkinsfile-runner image. We need to mount the Docker socket, so that our container can spawn sibling containers for tooling such as Maven or the CloudFoundry CLI. We also need to mount the current directory (root of our project) to /workspace, and tell the Jenkins Configuration as Code Plugin where to find the configuration file. We’ll come to that file in a minute. Also be sure to pass your secret variables here. Travis will mask them, so they are not in plain text in your build log. Take note to change the names of the variables according to your requirements. You might wonder that we need a BRANCH_NAME environment variable. This is required for the Pipeline to check if you’re working on the “productive branch”, where a productive deployment to SAP Cloud Platform is supposed to happen. If you omit passing this variable, the pipeline will still run but never in the productive mode, and hence not deploy to SAP Cloud Platform.

You might need some secrets in the build, for example in integration tests or for deployment to SAP Cloud Platform. You can make use of the travis command line tool to encrypt them on your local machine as documented here. Take care that this might add your secret in plain text to the shell history on your machine.

travis encrypt CF_PW=supersecret --add
travis encrypt ERP_PW=alsosupersecret --add

This command will add a line to your .travis.yml file with the encrypted secret value. Be sure to commit this change. Also take note of the name of your variable, which must match the environment parameter, and your Jenkins configuration. You should be aware of this TravisCI document on secrets.

We’ll also need to add a jenkins.yml file to our project. Here we need to configure two shared libraries which are required for the SAP S/4HANA Cloud SDK Pipeline, and the credentials that are required for our pipeline. Be sure not to put your secrets in plain text in here, but use the variables you used before via the travis cli tool. TravisCI will decrypt the password on the fly for you.

jenkins:
  numExecutors: 10
unclassified:
  globallibraries:
    libraries:
    - defaultVersion: "master"
      name: "s4sdk-pipeline-library"
      retriever:
        modernSCM:
          scm:
            git:
              remote: "https://github.com/SAP/cloud-s4-sdk-pipeline-lib.git"
    - defaultVersion: "master"
      name: "piper-library-os"
      retriever:
        modernSCM:
          scm:
            git:
              remote: "https://github.com/SAP/jenkins-library.git"
credentials:
  system:
    domainCredentials:
      - credentials:
          - usernamePassword:
              scope: GLOBAL
              id: "MY-ERP"
              username: MY_USER
              password: ${ERP_PW}
          - usernamePassword:
              scope: GLOBAL
              id: "cf"
              username: P12344223
              password: ${CF_PW}

You might add more configuration to this file as you need it.

Commit both files to your repo and push. If the travis build works, you’ll see the build integration on GitHub.

image:/images/post-images/2019-02-22/in-progress.png

On travis, you can follow the progress of your build live, and get the full text log of your Jenkins build. If all went well, you will be greeted with a green build after a few minutes.

image:/images/post-images/2019-02-22/log.png

Congratulations. You’re running a serverless Jenkins build with all the qualities checked by the SAP S/4HANA Cloud SDK Pipeline, without hosting your own Jenkins instance.

Keep in mind this is a proof of concept at this point. The serverless Jenkins ecosystem is currently evolving, and neither Jenkinsfile runner, nor Configuration as Code are in a mature state as of February 2019. One downside of this approach is that we lose the Jenkins user interface, so we can’t see our pipeline in blue ocean, and we don’t get the nice build summary. We can get the whole log output from TravisCI, so this can be mitigated, but this is arguable not the best user experience.

But on the contrary, we don’t have to care for our pet Jenkins, we don’t need to update plugins or backup the configuration or build logs.

DevOps World - Jenkins World 2019: Call for Papers is Open

$
0
0

This is a guest post by Skylar VanAlstine, who helps with the Jenkins Area Meetup program and assists with Marketing & Community Programs at CloudBees, Inc.

Jenkins World 2019

The Jenkins World shuttle is ready for lift off once again. As usual, the sign of festivities looming begins with the Call for Papers. Those who attended DevOps World | Jenkins World 2018 know that Jenkins World 2019 is coming back to San Francisco, and adding a stop in Europe - Lisbon, Portugal.

To encourage open collaboration and stimulate discussions that will help advance Jenkins adoption and drive it forward, we invite Jenkins users, developers and industry experts to submit a speaking proposal to DevOps World - Jenkins World San Francisco and or Lisbon. Submissions for both locations are being accepted now. The submission deadline for San Francisco, CA is March 10, 2019, @ 11:59 PM Pacific and the submission deadline for Lisbon, Portugal is June 9, 2019, @ 11:59 PM Pacific.

The below Q&A will help you breeze through the submission process.

Where do I go to submit my proposal?

Submissions for both DevOps World - Jenkins World USA and Europe are accepted at:

Can I make proposal(s) to both conferences?

Yes, you can! Once you’ve created an account on the CFP website you will be given the option to make submission(s) to one conference or both conferences.

When is the deadline for Jenkins World USA?

Saturday March 10, 2019 @ 11:59PM Pacific

When is the deadline for Jenkins World Europe?

Tuesday, June 9, 2019, @ 11:59 PM Pacific

San Francisco Important Dates:

January 9, 2019: Call for papers opensMarch 10, 2019: Call for papers closesApril 12, 2019: Submission decisions sentMay 1, 2019: Agenda published - San Francisco, CAMay 6, 2019: Speaker tasklist is sent outAugust 12-15, 2019: DevOps World | Jenkins World 2019 San Francisco

Lisbon Important Dates:

January 9, 2019: Call for papers opensJune 9, 2019: Call for papers closesJuly 19, 2019: Submission decisions sentAugust 19, 2019: Agenda publishedAugust 23, 2019: Speaker tasklist is sent outDecember 2-5, 2019: DevOps World | Jenkins World 2019 Lisbon, Portugal

*All Dates Are Subject To Change.

We look forward to receiving your inspiring stories!

Jenkins is accepted to Google Summer Of Code 2019!

$
0
0

Jenkins GSoC

On behalf of the Jenkins GSoC org team, I am happy to announce that the Jenkins project has been accepted toGoogle Summer of Code 2019. This year we invite students and mentors to join the Jenkins community and work together on enhancing the Jenkins ecosystem.

Just to provide some numbers, this is the biggest GSoC ever, 206 organizations will participate in GSoC this year. And it will be hopefully the biggest year for Jenkins as well. We have 25 project ideas and more than 30 potential mentors (and counting!). It is already more than in 2016 and 2018 combined. There are many plugins, SIGs and sub-projects which have already joined GSoC this year. And we have already received messages and first contributions from dozens of students, yey!

What’s next? GSoC is officially announced, and please expect more students to contact projects in ourGitter channels and mailing lists. Many communications will also happen in SIG and sub-project channels. We will be working hard in order to help students to find interesting projects, to explore the area, and to prepare their project proposals before the deadline on April 9th. Then we will process the applications, select projects and assign mentor teams.

All information about the Jenkins GSoC is available on its sub-project page.

I am a student. How do I apply?

See the Information for students page for full application guidelines.

We encourage interested students to reach out to the Jenkins community early and to start exploring project ideas. All project ideas have chats and mailing lists referenced on their pages. We will be also organizing office hours for students, and you can use these meetings to meet org admins and mentors and to ask questions. Also, join our Gitter channel and themailing list to receive information about such incoming events in the project.

The application period starts on March 25th, but you can prepare now! Use the time before the application period to discuss and improve your project proposals. We also recommend that you become familiar with Jenkins and start exploring your proposal areas. Project ideas include quick-start guidelines and reference newbie-friendly issues which may help with initial study. If you do not see anything interesting, you can propose your own project idea or check out ideas proposed by other organizations participating in GSoC.

I want to be a mentor. Is it too late?

It’s not! We are looking for more project ideas and for Jenkins contributors/users who are passionate about Jenkins and want to mentor students. No hardcore experience required, mentors can study the project internals together with students and technical advisors. We are especially interested in ideas beyond the Java stack, and in ideas focusing new technologies and areas (e.g. Kubernetes, IoT, Python, Go, whatever).

You can either propose a new project idea or join an existing one. See the Call for Mentors post and Information for mentors for details. If you want to propose a new project, please do so by March 11th so that students have time to explore them and to prepare their proposals.

This year mentorship does NOT require strong expertise in Jenkins development. The objective is to guide students and to get involved into the Jenkins community. GSoC org admins will help to find advisers if special expertise is required.

Important dates

  • Mar 11 - deadline for new GSoC project idea proposals

  • Apr 09 - deadline for student applications

  • May 06 - accepted projects announced, teams start community bonding and coding

  • Aug 26 - coding period ends

  • Sep 03 - Results announced

See the GSoC Timeline for more info. In the Jenkins project we will also organize special events during and after GSoC (e.g. at Jenkins world).

Let's celebrate Java 11 Support on Jenkins

$
0
0
This is a joint blog post prepared by the Java 11 Support Team: Adrien Lecharpentier, Ashton Treadway, Baptiste Mathus, Jenn Briden, Kevin Earls, María Isabel Vilacides, Mark Waite, Ramón León and Oleg Nenashev.

Jenkins Java

We have worked hard for this and it’s now here. We are thrilled to announce full support for Java 11 in Jenkins starting from Jenkins 2.164 (released on Feb 10, 2019) and LTS 2.164.1 (ETA: March 14th). This means you can now run your Jenkins masters and agents with a Java 11 JVM.

Starting in June 2018, many events were organized to improve Jenkins code base and add Java 11 support. Beyond these events, Core/Plugins maintainers and many other contributors have worked hard to make sure they discover and solve as many issues as possible related to Java 11 support.

The effort to support Java 11 led to the creation of the JEP-211: Java 10+ support in Jenkins. It also spurred the creation of the Platform Special Interest Group to coordinate the Java 11 work and other platform support efforts.

Celebration

We’d like to take a moment to thank everyone involved in these tasks: code contributors, issue reporters, testers, event planners and attendees and all those in the community who have generously lent their time and support to this effort. Thank you all!

Here are some of the contributors who helped with this task (alphabetical order):

Alex Earl, Alyssa Tong, Ashton Treadway, Baptiste Mathus, Carlos Sanchez, Daniel Beck, David Aldrich, Denis Digtyar, Devin Nusbaum, Emeric Vernat, Evaristo Gutierrez, Gavin Mogan, Gianpaolo Macario, Isabel Vilacides, James Howe, Jeff Pearce, Jeff Thompson, Jenn Briden, Jesse Glick, Jonah Graham, Kevin Earls, Ksenia Nenasheva, Kohsuke Kawaguchi, Liam Newman, Mandy Chung, Mark Waite, Nicolas De Loof, Oleg Nenashev, Oliver Gondža, Olivier Lamy, Olivier Vernin, Parker Ennis, Paul Sandoz, Ramón León, Sam Van Oort, Tobias Getrost, Tracy Miranda, Ulli Hafner, Vincent Latombe, Wadeck Follonier

(We are deeply sorry if we missed anyone in this list.)

Guidelines

In order to keep it simple, here is how you can start Jenkins on Java 11 using the Docker image. You can select a Java 11 based image by suffixing the tag of the image with -jdk11. If you are upgrading an existing instance please read the Upgrading Jenkins Java version from 8 to 11 page before upgrading.

So you can run Jenkins on Java 11 with:

docker run -p 50000:50000 -p 8080:8080 jenkins/jenkins:2.164-jdk11

However, and as always, you can still start Jenkins with other methods. Please see the more detailed documentation at Running Jenkins on Java 11.

Developer guidelines

For developers involved in Jenkins development, you can find details on developing and testing Jenkins to run on Java 11 on the Java 11 Developer Guidelines.

This resource regroups the modifications which might need to be done in order to validate the compatibility of plugins for Java 11.

What’s next

Even though this is a big achievement, we still have work to do.

Our first priority is adding Java 11 support to JenkinsFile Runner project. From there, we will move on to port Java 11 support to the Jenkins X project and the Evergreen project.

So, even if this is a big deal to us, this is not the end of the story. It is a major step that will benefit users, developers, and members of the Jenkins community.

Jenkins is joining the Continuous Delivery Foundation

$
0
0

CDF

Today Linux Foundation, along with CloudBees, Google, and a number of other companies, launched a new open-source software foundation called Continuous Delivery Foundation (CDF.) The CDF believes in the power of Continuous Delivery, and it aims to foster and sustain the ecosystem of open-source, vendor neutral projects.

Jenkins contributors have decided that our project should join this new foundation. This discussion happened over the time span of years, actually, but a relatively succinct summary of the motivations are here.

Now, as an user, what does this mean?

  • First, there will be no big disruption/discontinuity. The same people are still here, no URL is changing, releases will come out like they’ve always been. We make the decisions the same way we’ve been making, and pull requests land the same way. Changes will happen continuously over the period of time.

  • This is yet another testament to the maturity and the importance of the Jenkins project in this space. With a quarter million Jenkins running around the globe, it’s truly rocking the world of software development from IoT to games, cloud native webapps to machine learning projects. It makes Jenkins such an obvious, safe choice for anyone seeking open heterogeneous DevOps strategy.

  • The CDF creates a level playing field that is well-understood to organized contributors, which translate into more contributors, which results in a better Jenkins, faster. Over the past years, the Jenkins project has been steadily growing morestructures that provide this clarity, and this is the newest step on this trajectory.

  • Any serious dev teams are combining multiple tools and services to cover the whole software development spectrum. A lot of work gets reinvented in those teams to integrate those tools together. Jenkins will be working more closely with other projects under the umbrella of the CDF, which should result in better aligned software with less overlap.

  • Our users are practitioners trying to improve the software development process in their organizations. They get that CI/CD/automation unlocks the productivity that their organizations need, but that’s not always obvious to their organizations as a whole. So our users often struggle to get the necessary support. The CDF will advocate for the practice of Continuous Delivery, and because it’s not coming from a vendor or a project, it will reach the people who can lend that support.

So I hope you can see why we are so excited about this!

In fact, for us, this is an idea that we’ve been cooking for close to two years. I don’t think I’m exaggerating much to say the whole idea of the CDF started from the Jenkins project.

A lot of people have done a lot of work behind the scene to make this happen. But a few people played such instrumental roles that I have to personally thank them. Chris Aniszczyk for his patience and persistence, R. Tyler Croy for cooking and evolving the idea, and Tracy Miranda for making an idea into a reality.


Outreachy 2018-2019 In Review

$
0
0

Over the past three months, I have been mentoring two Outreachy interns, David and Latha, with my co-mentor, Jeff Thompson.Our project was to introduce a standardized way for creating an audit log of Jenkins and plugins using Apache Log4j Audit. While this type of feature is addressed by other existing plugins, there is no unifying way for plugins to contribute their own actions. This project provided ample opportunities for each of our interns to experience the community processes for starting a new Jenkins plugin, contributing changes to Jenkins itself in order to support more audit event types, using CICD principles, and developing a Jenkins Enhancement Proposal to begin the standardization process of audit logging throughout the ecosystem.

During this internship, David and Latha contributed several aspects of the project, much of which lays the foundation for easily instrumenting more subsystems and plugins with audit logs. A template log4j2.xml file is used for allowing more complex logging output configurations with a configuration UI.

Audit log configuration UI

New APIs have been introduced in Jenkins to allow for more authentication-related events to be audited by the plugin. Audit events have been defined for a few authorization scenarios and some build events. For example, here is a snippet of audit log output for a build execution in the JSON layout:

{
  "thread" : "Executor #0 for master : executing test #1",
  "level" : "OFF",
  "loggerName" : "AuditLogger",
  "marker" : {
    "name" : "Audit",
    "parents" : [ {
      "name" : "EVENT"
    } ]
  },
  "message" : "Audit [buildStart buildNumber=\"1\" cause=\"[Started by user anonymous]\" projectName=\"test\" timestamp=\"Mon Mar 25 13:48:09 CDT 2019\" userId=\"SYSTEM\"]",
  "endOfBatch" : false,
  "loggerFqcn" : "org.apache.logging.log4j.audit.AuditLogger",
  "instant" : {
    "epochSecond" : 1553539689,
    "nanoOfSecond" : 810000000
  },
  "contextMap" : { },
  "threadId" : 54,
  "threadPriority" : 5
}
{
  "thread" : "Executor #0 for master : executing test #1",
  "level" : "OFF",
  "loggerName" : "AuditLogger",
  "marker" : {
    "name" : "Audit",
    "parents" : [ {
      "name" : "EVENT"
    } ]
  },
  "message" : "Audit [buildFinish buildNumber=\"1\" cause=\"[Started by user anonymous]\" projectName=\"test\" timestamp=\"Mon Mar 25 13:48:10 CDT 2019\" userId=\"SYSTEM\"]",
  "endOfBatch" : false,
  "loggerFqcn" : "org.apache.logging.log4j.audit.AuditLogger",
  "instant" : {
    "epochSecond" : 1553539690,
    "nanoOfSecond" : 155000000
  },
  "contextMap" : { },
  "threadId" : 54,
  "threadPriority" : 5
}

Best of all, this project has helped instill important software engineering values such as automated testing and continuous delivery.

As we conclude this round, we look forward to participating in the next Outreachy internship to continue this project and grow the community. For more information about the next round, check out the Outreachy website.

The journey of becoming a Jenkins contributor: Introduction

$
0
0

As a software engineer, for many years I have used open source software (frameworks, libraries, tools…​) in the different companies I have worked at. However, I had never been able to engage in an open-source project as a contributor, until now.

Since I made my first—​ridiculously simple—​commit into Jenkins, six months ago (in September, 2018), I have been attempting to contribute more to the Jenkins project. However, contributing to open-source projects is, in general, challenging. Especially to long-lived projects, with a lot of history, legacy code and tribal knowledge. It is often difficult to know where to start and also difficult to come up with a plan to keep moving forward and contributing regularly, and in more meaningful ways over time.

When it comes to the Jenkins project, I have encountered challenges that others trying to get into the community are likely to encounter. For that reason, I have decided to go ahead and share my journey of becoming a more engaged Jenkins contributor.

I plan to publish roughly 1 post per month, describing this journey. I will attempt to start contributing to the pieces that are easier to start with, transitioning towards more complex contributions over time.

Where to start

jenkins.io

To become a Jenkins contributor, the most obvious place to start looking at is jenkins.io. In the top navbar there is a Community dropdown, with several links to different sections. The first entry,Overview, takes us to the “Participate and contribute” section.

In this section we get lots of information about the many ways in which we can engage with the Jenkins project and community. Even though the intention is to display all the possible options, allowing the reader to choose, it can feel a bit overwhelming.

jenkins participate page

The page is divided into two columns, the column on the left shows the different options to participate, while the column on the right shows the different options to contribute.

Suggestions to Participate

In the left column of the “Participate and contribute” page, there are several ideas on how to engage with the community, ranging from communicating to reviewing changes or providing feedback.

One of the pieces that got me confused at first in this area were the communication channels. There are many different channels for communication. There are several mailing lists and there are also IRC and Gitter channels.

During my first attempts to get involved, I subscribed to many of the mailing lists and several IRC and Gitter channels, but I quickly noticed that there is significant communication going on; and that most threads in the most active lists and channels are specific to issues users or developers have. So, unless your goal is to support other users right away (if you are an experienced Jenkins user already it might be the case) or you plan to ask questions that you already have in mind, I would advise against spending too much time on this at first.

Even though it is great to see how the community members support each other, the amount of communication might be overwhelming for a newcomer, and if you are also trying to contribute to the project (either with translations, documentation or code), following these conversations might not be the best way to start.

Suggestions to Contribute

In the right column of the “Participate and contribute” page there are several ideas on how to contribute, mostly grouped into: writing code, translating, documenting and testing.

In following posts, I will be going through all of these types of contributions, as well as through some of the suggestions to participate, which include reviewing Pull Requests (PRs) or providing feedback (either reporting new issues or replicating cases other users have already described, providing additional information to help the maintainer reproduce and fix them).

My first contribution in this journey

When looking at the “Participate and contribute” page, I noticed a couple of things in that page that I could help improve. And I was actually planning to pick one of those as the first example of a contribution for this post. But when I was reading the contributing guidelines of the repository, I found an even easier contribution I could make, which I thought would be a great example to illustrate how simple it could be to start contributing. So I decided to go ahead with it.

The website repository

In the ”Document” section there is a link to the contributing guidelines of the jenkins.io repository. The CONTRIBUTING file is a common file present in the root folder of most open-source-project repositories.

Following the link to that file, I reached the jenkins.io repository, which is the one that contains the sources for the corresponding website—​which also includes this blog. And, in fact, the contributing file was the first file I wanted to review, in order to learn more about how to contribute to the website.

When reading the contributing file, I learned about the Awestruct static site generator, which is the tool used to transform the AsciiDoc source files in the repo into a website. However, when I clicked the link to learn more about it, I noticed it was broken. The domain had expired.

awestruct site

Why not fix it?

This was the opportunity I chose to show other newcomers how easy it can be to start contributing.

Forking the repository

The first step, as usual, would be to fork the repository and clone it to my machine.

Applying the change

The next step would be to apply the change to the corresponding file. To do so, I created a new branch “alternative-awestruct-link” and applied the change there:

making change

Making sure everything builds correctly and tests pass

Even though in this case my contribution was not to the actual website, but to the contributing guidelines (and for that reason was unlikely to break anything), it is a best practice to get used to the regular process every contribution should follow, making sure everything builds correctly after any change.

As stated in the contributing guidelines themselves, in order to build this repository we just have to run the default “make” target, in the root of the repository.

executing make

Once the command execution finishes, if everything looks good, we are ready to go to the next step: creating the PR.

Creating the PR

Once my change had been committed and pushed to my repository, I just had to create the PR. We have an easy way to do so by just clicking the link that we get in our git logs once the push is completed, although we can create the PR directly through the GitHub UI, if we prefer so; or even use “hub”, the GitHub CLI, to do it.

In this case, I just clicked the link, which took me to the PR creation page on GitHub. Once there, I added a description and created the PR.

creating pr

When a PR to this repository is created, we notice there are some checks that start running. Jenkins repositories are configured to notify the “Jenkins on Jenkins”, which runs the corresponding CI pipelines for each repository, as described in the corresponding Jenkinsfile.

Once the checks are completed, we can see the result in the PR:

pr created passing

And if we want to see the details of the execution, we can follow the “Show all checks” link:

pr checks jenkins

PR Review

Now that the PR has been created and all automated checks are passing, we only have to wait for peer code reviews.

Once someone approves the PR and it is later merged, your contribution is integrated into the master branch of the repository, becoming part of the next release.

pr merged

I have contributed!

This contribution I made is a trivial one, with very little complexity and it might not be the most interesting one if you are trying to contribute code to the Jenkins project itself.

However, for me, as the contributor, it was a great way to get familiar with the repository, its contributing guidelines, the technology behind the jenkins.io website; and, above anything else, to start “losing the fear” of contributing to an open source project like Jenkins.

So, if you are in the same position I was, do not hesitate. Go ahead and find your own first contribution. Every little counts!

Security spring cleaning

$
0
0

Today we published a security advisory that mostly informs about issues in Jenkins plugins that have no fixes. What’s going on?

The Jenkins security team triages incoming reports both to Jira and our non-public mailing list. Once we’ve determined it is a plugin not maintained by any Jenkins security team members, we try to inform the plugin maintainer about the issue, offering our help in developing, reviewing, and publishing any fixes. Sometimes the affected plugin is unmaintained, or maintainers don’t respond to these notifications or the followup emails we send.

In such cases, we publish security advisories informing users about these issues, even if there’s no new release with a fix. Doing so allows administrators to make an informed decision about the continued use of plugins with unresolved security vulnerabilities. Today’s advisory is overwhelmingly such an advisory.

See a plugin you love on this list and want to help out? Learn about adopting plugins.

First successful use of Jenkins telemetry

$
0
0

Half a year ago we delivered a security fix for Jenkins that had the potential to break the entire Jenkins UI. We needed to change how Jenkins, through the Stapler web framework, handled HTTP requests, tightening the rules around what requests would be processed by Jenkins. In the six months since, we didn’t receive notable reports of problems resulting from this change, and it’s thanks to the telemetry we gathered beforehand.

The Problem

Jenkins uses the Stapler web framework for HTTP request handling. Stapler’s basic premise is that it uses reflective access to code elements matching its naming conventions. For example, any public method whose name starts with get, and that has a String, int, long, or no argument can be invoked this way on objects that are reachable through these means. As these naming conventions closely match common code patterns in Java, accessing crafted URLs could invoke methods never intended to be invoked this way.

A simple example of that is a URL every Jenkins user would be familiar with: /job/jobname. This ends up invoking a method called #getJob(String), with the argument being "jobname", on the root application object, and having it handle the rest of the URL, if any. Of course, this is a URL intended to be accessed this way. How about invoking Object#getClass(), followed by Class#getClassLoader(), by accessing the URL /class/classLoader? While this particular chain would not result in a useful response, this doesn’t change that the methods were invoked. We identified a number of URLs that could be abused to access otherwise inaccessible jobs, or even invoke internal methods in the web application server to invalidate all sessions. The security advisory provides an overview of the issues we’d identified by then.

The Idea

To solve this problem inherent in the Stapler framework’s design, we defined rules that restrict invocation beyond what would be allowed by Stapler. For example, the declared return type of getters now needed to be one defined in Jenkins core or a Jenkins plugin and have either clearly Stapler-related methods (with Stapler annotations, parameter types, etc.) or Stapler-related resource files associated with it. Otherwise, the type wouldn’t be aware of Stapler, and couldn’t produce a meaningful response anyway.

This meant that getters just declaring Object (or List, Map, etc.) would no longer be allowed by default. It was clear to the developers working on this problem that we needed the ability to be able to override the default rules for specific getters. But allowing plugin developers to adapt their plugins after we published the fix wasn’t going to cut it; Jenkins needed to ship with a comprehensive default whitelist for methods known to not conform to the new rules, so that updating would not result in problems for users.

The Solution

While there is tooling like Plugin Compatibility Tester and Acceptance Test Harness, many Jenkins plugins do not have comprehensive tests of their UI — the Jenkins UI is fairly stable after all. We did not expect to have sufficient test coverage to deliver a change like this with confidence. The only way we would be able to build such a comprehensive whitelist would be to add telemetry to Jenkins.

While Jenkins instances periodically report usage statistics to the Jenkins project, the information included is very bare bones and mostly useful to know the number of installations, the popularity of plugins, and the general size of Jenkins instances through number and types of jobs and agents. We also didn’t want to just collect data without a clear goal, so we set ourselves some limitations — collect as little data as possible, no personally identifiable information, have a specific purpose for each kind of information we would collect, and define an end date for the collection in advance. We defined all of this in JEP-214, created the Uplink service that would receive submissions, and added the basic client framework to Jenkins. The implementation is fairly basic — we just submit an arbitrary JSON object with some added metadata to a service. This system would inform tweaks to a security fix we were anxious to get out, after all.

Starting in mid October for weekly releases, and early November for LTS, tens of thousands of Jenkins instances would submit Stapler request dispatch telemetry daily, and we would keep identifying code incompatible with the new rules and amending the fix. Ultimately, the whitelist would include a few dozen entries, preventing serious regressions in popular plugins like Credentials Plugin, JUnit Plugin, or the Pipeline plugins suite, down to Google Health Check Plugin, a plugin with just 80 installations when we published the fix.

Learning what requests would result in problems also allowed us to write better developer documentation — we already knew what code patterns would break, and how popular each of them was in the plugin ecosystem.

The Overhaul

I wrote above:

For example, the declared return type of getters now needed to be one defined in Jenkins core or a Jenkins plugin and have either clearly Stapler-related methods (with Stapler annotations, parameter types, etc.) or Stapler-related resource files associated with it.

While this was true for the fix during most of development, it isn’t how the fix that we published actually works. About a month before the intended release date, internal design/code review feedback criticized the complicated and time-consuming implementation that at the time required scanning the class path of Jenkins and all plugins and looking for related resources, and suggested a different approach.

So we tried to require that the declared type or any of its ancestors be annotated with the new annotation @StaplerAccessibleType, annotated a bunch of types in Jenkins itself (ModelObject being the obvious first choice), and ran our scripts that check to see whether Stapler would be allowed to dispatch methods identified in telemetry. We’d long since automated the daily update of dispatch telemetry processing, so it was a simple matter of changing which Jenkins build we were working with.

After a few iterations of adding the annotation to more classes, the results were very positive: Very few additional types needed whitelisting, while many more were no longer (unnecessarily) allowed to be dispatched to. This experiment, late during development, ended up being essentially the fix we delivered. We didn’t need to perform costly scanning of the class path on startup — we didn’t need to scan the class path at all — , and the rules governing request dispatch in Stapler, while different from before, are still pretty easy to understand and independent of how components are packaged.

The Outcome

As usual when delivering a fix we expect could result in regressions in plugins, we created a wiki page that users could report problems on. Right now, there’s one entry on that wiki page. It is one we were aware of well before release, decided against whitelisting it, and the affected, undocumented feature in Git Plugin ended up being removed. The situation in our issue tracker is only slightly worse, with two apparently minor issues having been reported in Jira.

Without telemetry, delivering a fix like this one would have been difficult to begin with. Tinkering with the implementation just a few weeks before release and having any confidence in the result? Not causing any significant regressions? I think this would simply be impossible.

A Big Step of the Chinese Localization

$
0
0

Since 2017, I started to do some contributions to the Jenkins community. As a beginner, translation might be the easiest way to help the project. You don’t need to understand the whole context, even to create a ticket in the issue tracker system. Improvement of localization usually is minor. But some problems occurred soon, there isn’t a native speaker of Chinese that could review my PRs. So, sometimes my PRs are delayed from being merged into master.

Some contributors told me that I can start a thread at the mailing list. Normally, discussing at the mailing list is the open source community way. We got a lot of ideas for the localization from there. As a result, we achieved some goals that I’d like to share here.

JEP-216

Previously, language localization files were distributed in core and in each plugin. For this proposal, each language has a single localization plugin, such as Chinese Localization plugin. Finally, Localization Support Plugin andChinese Localization plugin are able to support all types of localization resource files. From the plugins website, you can see that there are already 13 000 installations. We removed all Chinese localization files at the PR-4008.

I really appreciate Daniel Beck for helping me to add localization support,Liam Newman helping me to review JEP-216, and many other community members.

Chinese Localization SIG

We believe that this SIG could help to improve Jenkins experience for Chinese users and gather more contributors from China. This SIG is responsible for maintaining the Chinese Jenkins website, promoting the Jenkins community in China in the social media with WeChat account. We publish translated blog articles, Jenkins release notes, JAM or other events at the WeChat account. For now, there are 1800 followers that can read our news from the last half a year.

Especially, I want to say thanks to Wang Donghui, Zhai Zhijun, and other contributors. They did a lot of contributions. I wish I could see more and more folks join us.

Viewing all 1087 articles
Browse latest View live