Quantcast
Channel: Jenkins Blog
Viewing all 1087 articles
Browse latest View live

Introducing the Jenkins Templating Engine!

$
0
0

This is a guest post by Steven Terrana, a Lead Technologist atBooz Allen Hamilton and principal engineer working on the Templating Engine Plugin. He participates in the Pipeline Authoring Special Interest Group.

Implementing DevSecOps practices at the enterprise scale is challenging. With multiple programming languages, automated testing frameworks, and security compliance tools being used by different applications within your organization, it becomes difficult to build and maintain pipelines for each team.

Most pipelines are going to follow the same generic workflow regardless of which specific tech stack is employed by an application. The Templating Engine Plugin (abbreviated as JTE for Jenkins Templating Engine) allows you to capture this efficiency by creating tool-agnostic, templated workflows to be reused by every team.

As technology consultants with clients in both the public and private sectors, at Booz Allen we found ourselves building DevSecOps pipelines from scratch for every new project. Through developing the Jenkins Templating Engine, we’ve seen pipeline development decrease from months to days now that we can reuse tool integrations while bringing a new level of governance to Jenkins pipelines.

Pipeline Templating

Organizations benefit from letting application developers focus on what they do best: building applications. Supporting this means building a centralized DevOps team responsible for maintaining platform infrastructure and creating CI/CD pipelines utilized by development teams.

With the rise of microservice-based architectures, a centralized DevOps teams can support many different development teams simultaneously; all of whom may be leveraging different programming languages and automated testing tools.

While the tools may differ between development teams, the workflow is often the same: unit test, static code analysis, build and publish an artifact, deploy it, and then perform different types of testing against the deployed application.

The Templating Engine Plugin allows you to remove the Jenkinsfile from each repository by defining a common workflow for teams to inherit. Instead of an entire pipeline definition in each repository, teams supply a configuration file specifying which tools to use for the workflow.

JTE in Action

Let’s walk through a bare bones example to demonstrate the reusability of templates:

Example Pipeline Template:
unit_test()
build()
static_code_analysis()

Templates leverage Steps contributed by Libraries to outline a workflow teams must implement. While a template does get executed just like any other Jenkinsfile (meaning that the standard scripted and declarative syntax is supported), the goal of a template should be to read like plain English and avoid any technical implementation.

Leveraging templates in this way lets you separate the business logic (what should happen when) of your pipeline from thetechnical implementation (what’s actually going to happen). The result of this is a CI/CD pipeline that’s proven to be significantly easier to manage when supporting multiple teams simultaneously.

The steps outlined by this template (unit_test, build, and static_code_analysis) have been named generically on purpose. This way teams can specify different libraries to use while sharing the same pipeline.

Implementing the Template

Implementing a shareable pipeline with the Templating Engine requires a few key components:

  1. Pipeline Template: Outline the workflow to be performed

  2. Libraries: Provide technical implementations of the steps of the workflow

  3. Configuration Files: Specify which libraries to use and their configuration

Step 1: Create a Pipeline Configuration Repository

A Pipeline Configuration Repository is used to store common configurations and pipeline templates inherited by teams.

This example Pipeline Configuration Repository will later be configured as part of a Governance Tier: the mechanism in JTE that allows you to build hierarchical configurations representing your organization.

A Governance Tier holds three things:

  1. Pipeline Templates

  2. A list of Library Sources

  3. The tier’s configuration file (pipeline_config.groovy)

The pipeline templates and the configuration file for a Governance Tier are stored in the pipeline configuration repository.

When configuring the Governance Tier in Jenkins, you will provide a source code management location for a repository that contains the above components as well as the base directory where these artifacts can be found.

Step 2: Create the Pipeline Template

Next, we’ll create a Jenkinsfile for the Governance Tier. In JTE, the Jenkinsfile is the default pipeline template that an execution will use.

Jenkinsfile
unit_test()
build()
static_code_analysis()

Step 3: Create the Libraries

The Templating Engine Plugin has implemented a version of Jenkins Shared Libraries to enhance the reusability of libraries. A library is a root directory within a source code repository that has been configured as a Library Source on a Governance Tier.

In our example, the pipeline template needs to perform unit testing, package an artifact, and run static code analysis.

Let’s assume that we have some teams using gradle and some teams using maven to build and test their application but they will both use SonarQube to perform static code analysis.

In this scenario, we should create gradle, maven, and sonarqube libraries.

|- gradle/
  \-- build.groovy
  \-- unit_test.groovy
|- maven/
  \-- build.groovy
  \-- unit_test.groovy
|- sonarqube/
  \-- static_code_analysis.groovy

Step 4: Implement the Steps

Implementing a library step is exactly the same as just writing regular global variables as part of the default Jenkins Shared Libraries.

For the purposes of this demonstration, we will just have each step print out the step name and contributing library.

gradle/build.groovy
void call(){
    println "gradle: build()"
}

Step 5: Create the Configuration Files

The configuration file for JTE is named pipeline_config.groovy.

In the Governance Tier we’ll create a configuration file specifying common configurations between the applications. In this case, both applications are using the sonarqube library:

pipeline_config.groovy
libraries{
  merge = true// allow individual apps to contribute additional libraries
  sonarqube
}

Next, we’ll create two more repositories representing the maven and gradle applications. Within those repositories all we’ll need is an application-specific pipeline_config.groovy file.

These repositories both contain an application pipeline_config.groovy configuration file.

maven app: pipeline_config.groovy
libraries{
    maven
}
gradle app: pipeline_config.groovy
libraries{
    gradle
}

Step 6: Configure the Governance Tier in Jenkins

Now that we have a Pipeline Configuration Repository and a Library Source Repository, we can configure a Governance Tier in Jenkins:

governance tier

This configuration shown in the image above can be found under Manage Jenkins >> Configure System
Through the Templating Engine, you can create a pipeline governance hierarchy matching your organization’s taxonomy by representing this structure via Folders in Jenkins.

Step 7: Create a Multibranch Pipeline for Both Applications

When creating Multibranch Pipeline Projects for each app, the Templating Engine plugin supplies a new Project Recognizer called Jenkins Templating Engine. This sets the project to use the Templating Engine framework for all branches within the repository.

project recognizer

You can also set the Jenkins Templating Engine project recognizer for a GitHub Organization project, enabling you to easily share the same pipeline across an entire Github Organization!

Step 8: Run the Pipelines

That’s it! Now, both applications will leverage the exact same pipeline template while having the flexibility to select which tools should be used during each phase of the workflow.

Below is sample output from the console log from both applications pipeline runs:

Gradle:
[JTE] Obtained Template Configuration File pipeline_config.groovy from git https://github.com/steven-terrana/example-jte-configuration
[JTE] Obtained Template Configuration File pipeline_config.groovy from git https://github.com/steven-terrana/example-jte-app-gradle.git
[JTE] Loading Library sonarqube from git https://github.com/steven-terrana/example-jte-libraries.git
[JTE] Loading Library gradle from git https://github.com/steven-terrana/example-jte-libraries.git
...
[JTE] Obtained Template Jenkinsfile from git https://github.com/steven-terrana/example-jte-configuration
[JTE][Step - gradle/unit_test]
[Pipeline] echo
gradle: unit_test()
[JTE][Step - gradle/build]
[Pipeline] echo
gradle: build()
[JTE][Step - sonarqube/static_code_analysis]
[Pipeline] echo
sonarqube: static_code_analysis()
[Pipeline] End of Pipeline
Maven:
[JTE] Obtained Template Configuration File pipeline_config.groovy from git https://github.com/steven-terrana/example-jte-configuration
[JTE] Obtained Template Configuration File pipeline_config.groovy from git https://github.com/steven-terrana/example-jte-app-maven.git
[JTE] Loading Library sonarqube from git https://github.com/steven-terrana/example-jte-libraries.git
[JTE] Loading Library maven from git https://github.com/steven-terrana/example-jte-libraries.git
...
[JTE] Obtained Template Jenkinsfile from git https://github.com/steven-terrana/example-jte-configuration
[JTE][Step - maven/unit_test]
[Pipeline] echo
maven: unit_test()
[JTE][Step - maven/build]
[Pipeline] echo
maven: build()
[JTE][Step - sonarqube/static_code_analysis]
[Pipeline] echo
sonarqube: static_code_analysis()
[Pipeline] End of Pipeline

Benefits of the Templating Engine

jte benefits

Apply Organizational Governance

Leveraging the Templating Engine Plugin will allow you to define enterprise-scale, approved workflows that can be used by teams regardless of what tools are being used. This top-down approach makes scaling and enforcing DevSecOps principles significantly easier within your organization.

Optimize Code Reuse

There’s really no need for every team in your organization to figure out how to do the same things over and over again. At Booz Allen, we have seen pipeline development time decrease from months to days as we have continuously reused and expanded upon our Templating Engine library portfolio as part of our Solutions Delivery Platform.

Simplify Pipeline Maintainability

Often DevOps engineers find themselves building and supporting pipelines for multiple development teams at the same time. By decoupling the workflow from the technical implementation and consolidating the pipeline definition to a centralized location, the Templating Engine plugin allows DevOps engineers to scale much faster.

Get Involved!

The Templating Engine Plugin has been open sourced and made available in the Jenkins Update Center.

We always appreciate feedback and contributions! If you have an interesting use case or would like to ask questions, try the templating-engine-plugin on Gitter.

Advanced Features

More Resources


Jenkins Documentation Special Interest Group

$
0
0

Jenkins

We’re pleased to announce the formation of the Jenkins Documentation Special Interest Group. The Docs SIG encourages contributors and external communities to create and review Jenkins documentation.

See the Special Interest Group Overview for more details and plans.

How can I help?

The Jenkins Documentation SIG would love to have your help with:

How can I fix a documentation bug?

Instructions for contributing to the Jenkins documentation are in the CONTRIBUTING file of the site repository. Follow the instructions in that file and submit pull requests for review.

Instructions for contributing to the Jenkins X documentation are on the Jenkins X documentation site. Follow the instructions in that file and submit pull requests for review.

How can I evaluate a pull request?

Pull requests for the Jenkins project are reviewed in the Jenkins documentation repository. Log in to GitHub with your credentials and add your review comments to pull requests.

Pull requests for the Jenkins X project are reviewed in the Jenkins X documentation repository. Login to GitHub with your credentials and add your review comments to pull requests.

Becoming a Jenkins contributor: Newbie-friendly tickets

$
0
0

Two months ago I published an introductory article on the journey of becoming a Jenkins contributor. In that first article, the jenkins.io site was reviewed, learning about the multiple ways in which we can participate and contribute. Then, a first—​basic—​contribution I made to the site repository was described.

Now, in this new article we will be exploring more advanced contributions, committing code to the actual Jenkins core.

Getting started with tickets and processes

Beginners guide to contributing and Jenkins Jira

Reviewing the developer section in jenkins.io is probably the best starting point, and a reference link to keep handy. The beginners guide to contributing to Jenkins can also be useful, since it points to different repositories, tools (such as the issue tracker) and governance documents. Besides, it describes best practices for commit messages, code style conventions, PR guidelines, etc.

Once we get a general understanding of the former and want to actually start coding, we may get stuck trying to come up with something to work on.

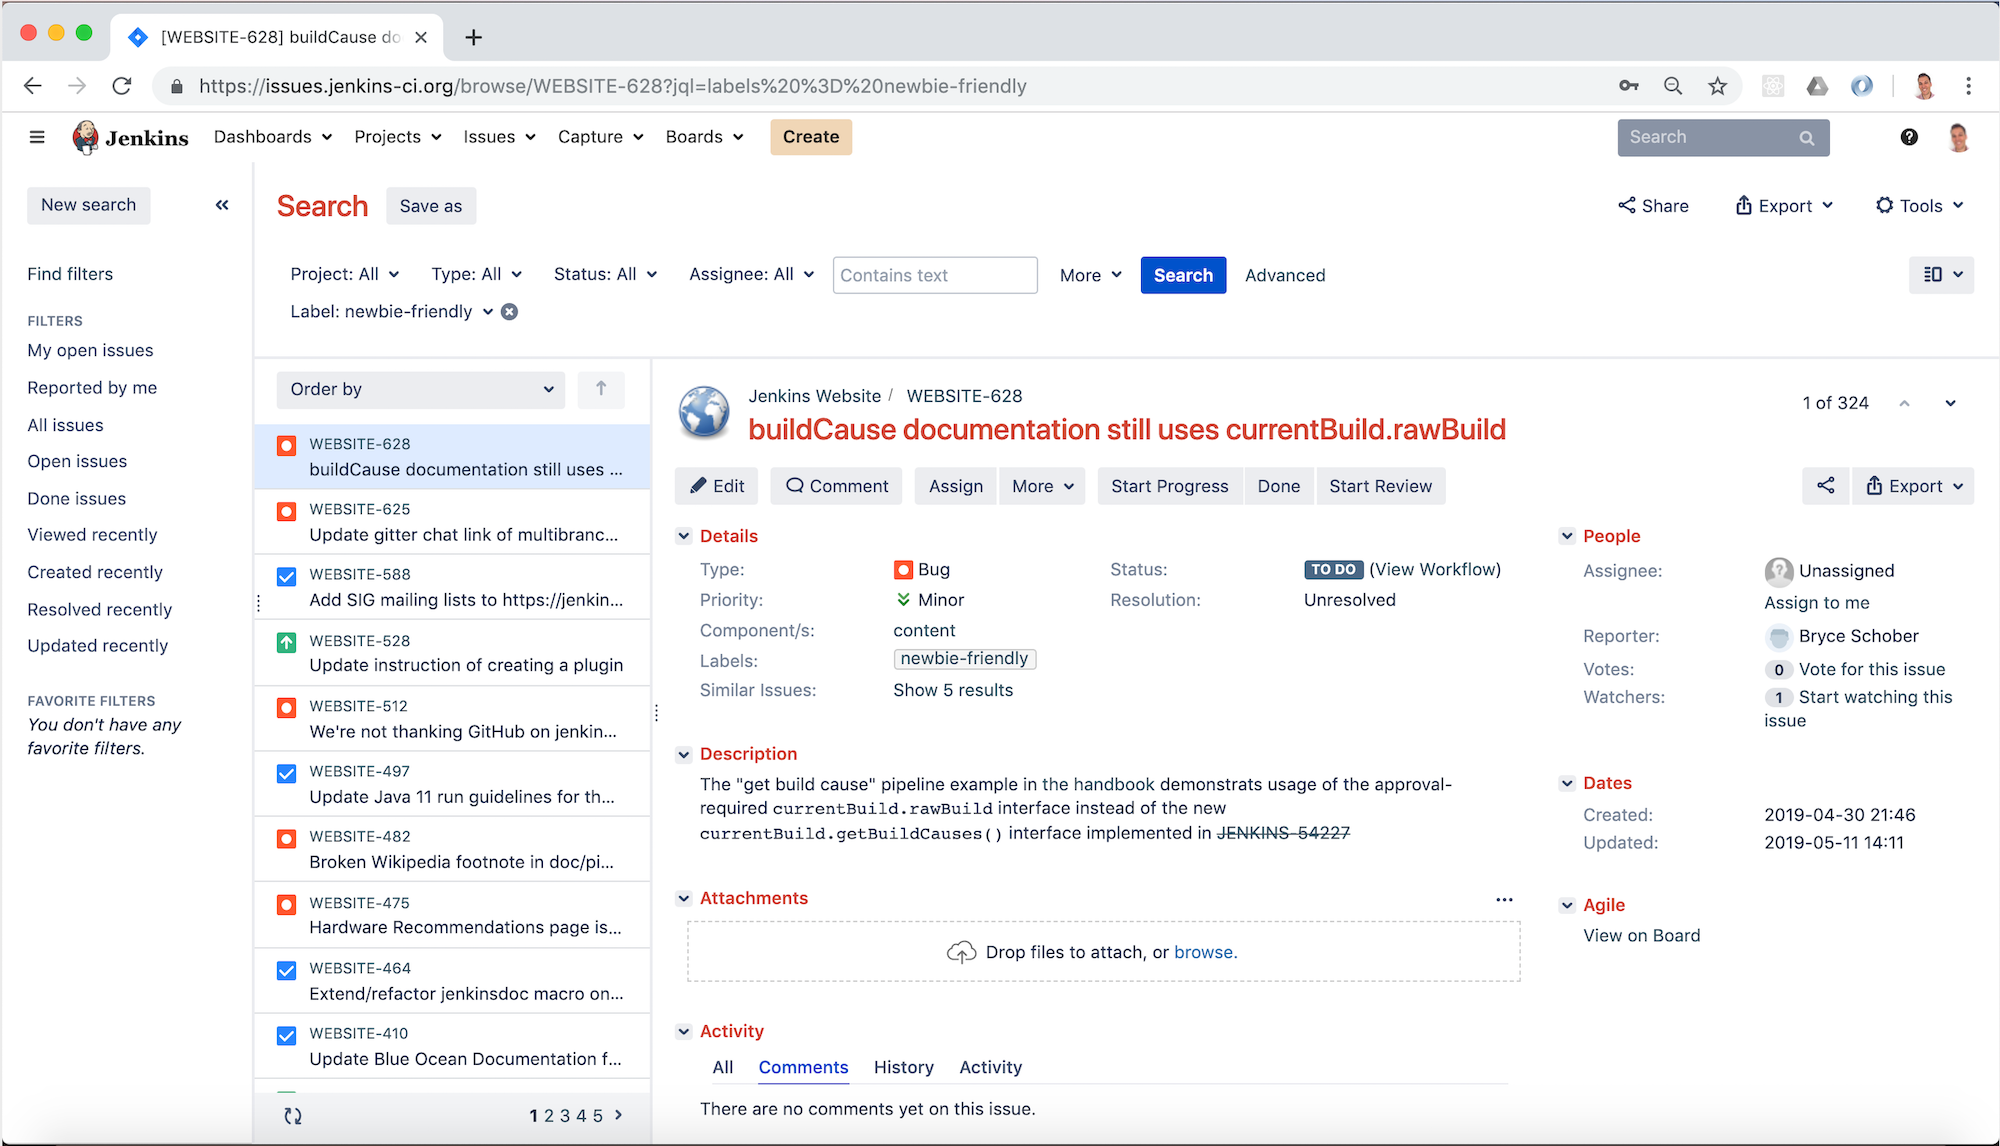
Visiting the Jenkins issue tracker, feels like the natural next step, since it is full of potential bugs and enhancements that have already been reported by the community. However, it is quite easy to feel overwhelmed by the possibilities listed there. Bear in mind that in a 10+-year-old project like this, most of the things that are reported are tricky for a newcomer to work on. For that reason, filtering bynewbie-friendly tickets is probably the best idea.

list newbie tickets
Figure 1. Screenshot displaying the list of newbie-friendly tickets in the Jenkins Jira

Selecting a ticket

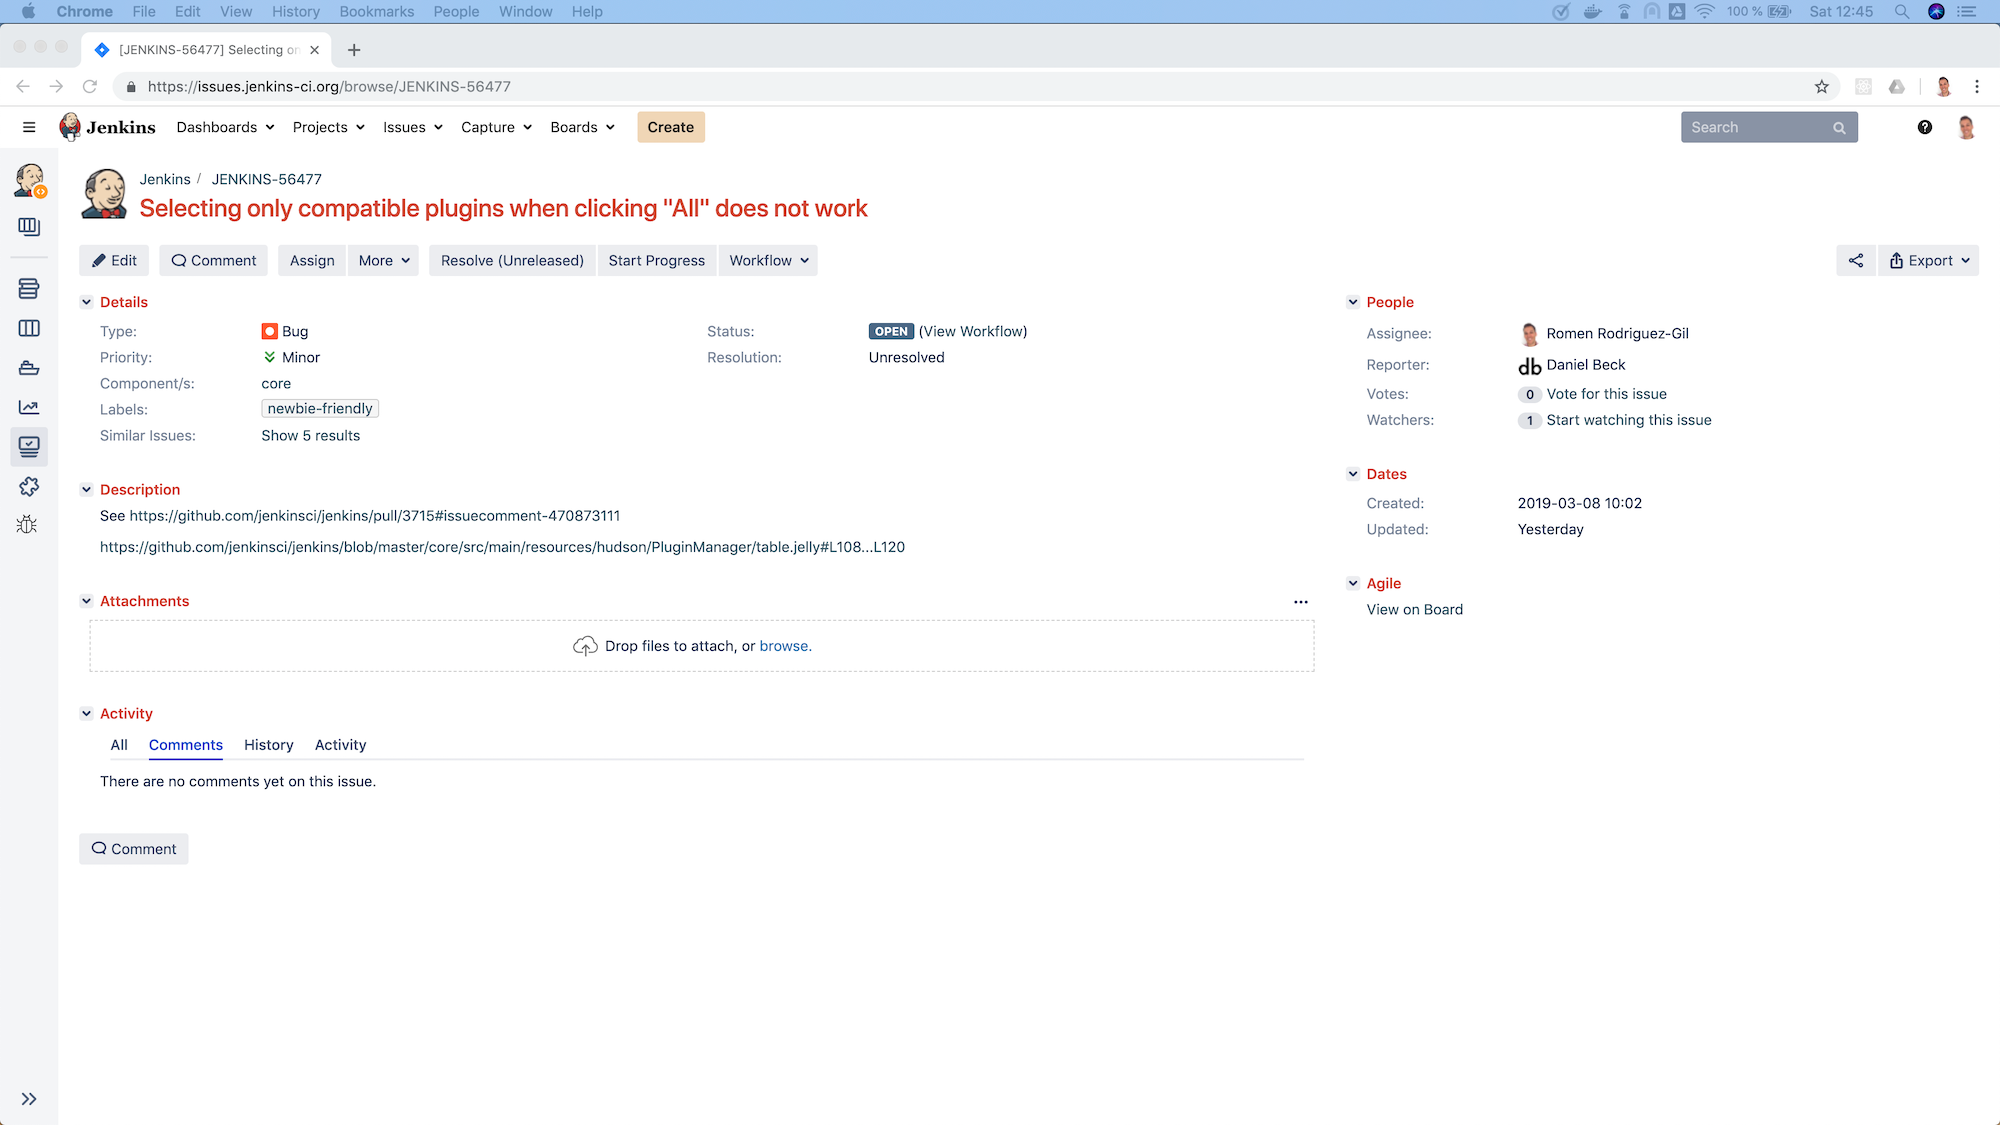
In my case, I spent some time reviewing the newbie-friendly tickets, until I found one that seemed interesting to me and also looked like something I would be able to fix:

jenkins newbie jira ticket selected
Figure 2. Screenshot of the ticket I decided to work on

Processes

At this stage, when we have decided to take ownership of a ticket, it’s a good practice to let the rest of the community know that we are planning to start working on it. We can do so easily, by assigning the ticket to ourselves (see the “Assign” button below the ticket summary).

Assigning the ticket to ourselves in the Jenkins Jira will allow any other contributors to know that we are planning to take care of the ticket; and in case they are also interested in contributing to it, they will know who to reach if they want to coordinate work or ask for status. That said, it is worth mentioning that assigning a ticket to yourself does not mean that other contributors cannot work on it from then onwards. Jenkins is an open-source project and anyone is welcome to create their own PRs, so anybody can propose their own solution to the ticket. But as you can guess, if the ticket is assigned to somebody, most people will probably reach the assignee before starting to work on it.

Related to the former, it is also important to bear in mind that we should not postpone work on the ticket for too long once we have assigned the ticket to ourselves. Other potential contributors might be ignoring the ticket because they see yourself assigned to it.

Once we are about to actually start working on the ticket, it is also a good practice to click the “Start Progress” button. This action will change the status to “In progress”, signaling to the community that we are currently working on this particular ticket.

Setting up the necessary stuff on our computer

Configuring, installing and testing

As described in the first article of this journey, the initial step to start contributing to a particular repository is to fork it to our GitHub account, and then clone it to our local computer.

As usual, in the Jenkins core repository the CONTRIBUTING file describes the necessary steps to get the repository working locally. This includes installing the necessary development tools: Java Development Kit (OpenJDK is the recommended choice), Maven and any IDE supporting Maven projects. Note that instructions to install JDK and Maven are linked in the contributing guidelines.

Once we have all the necessary tools installed and configured, we are ready to build Jenkins locally and also to run tests.

Getting down to business

Reviewing ticket details

Now that I was ready to start working on the ticket, I had to review it in more detail, to fully understand the problem.

The description of the ticket I was planning to work on included two links. The first one was toa screenshot that showed the actual bug. It showed how several non-compatible plugins were being selected when clicking “All”, even though the intended behavior was to only select the compatible plugins. The second link was a reference to a code fragment that showed other validations that had to be taken into account when checking if a plugin update was compatible or not with the current installation.

Reproducing the issue locally

Even though I had now understood the issue in better detail, I had not seen it myself live yet, so I seemed to me that the next logical step was to reproduce it locally.

To reproduce the issue locally in our computer, we can either use the local war file that we can generate bybuilding Jenkins from the source code or we can download the latest Jenkins version available and run it locally. When I worked on this ticket, the latest available version was 2.172` and, when I built if from the sources I saw version 2.173-SNAPSHOT, which was the next version, in which the community was already working on.

In general it is a good idea to reproduce bugs locally, not only to get a better understanding, but also to make sure they are actual issues. It could always be an issue happening only on the reporter’s end (e.g. some user misconfiguration). Or it could be a ticket referencing an old issue that has been fixed already. This latest possibility didn’t sound that strange to me, since the ticket was one month old. It could have been handled by someone else in the meantime, without noticing the ticket existed. Or the contributor might have forgotten to update the ticket in the issue tracker after the fix was committed.

So, for all the reasons above, I ran the latest Jenkins version locally. From a terminal, I went to the folder in which the war file was placed, and ran java -jar jenkins.war, which starts Jenkins locally on http://localhost:8080.

From the home page I navigated to the Plugin Manager (clicking the “Manage Jenkins” link in the left hand side and then selecting “Manage Plugins” in the list).

In the Manage Plugins page, the list of plugin updates appears. In my case, since I re-used an old JENKINS_HOME from an older installation, several plugins showed up in the list, requiring updates. That allowed me to test the behavior that was supposed to be failing.

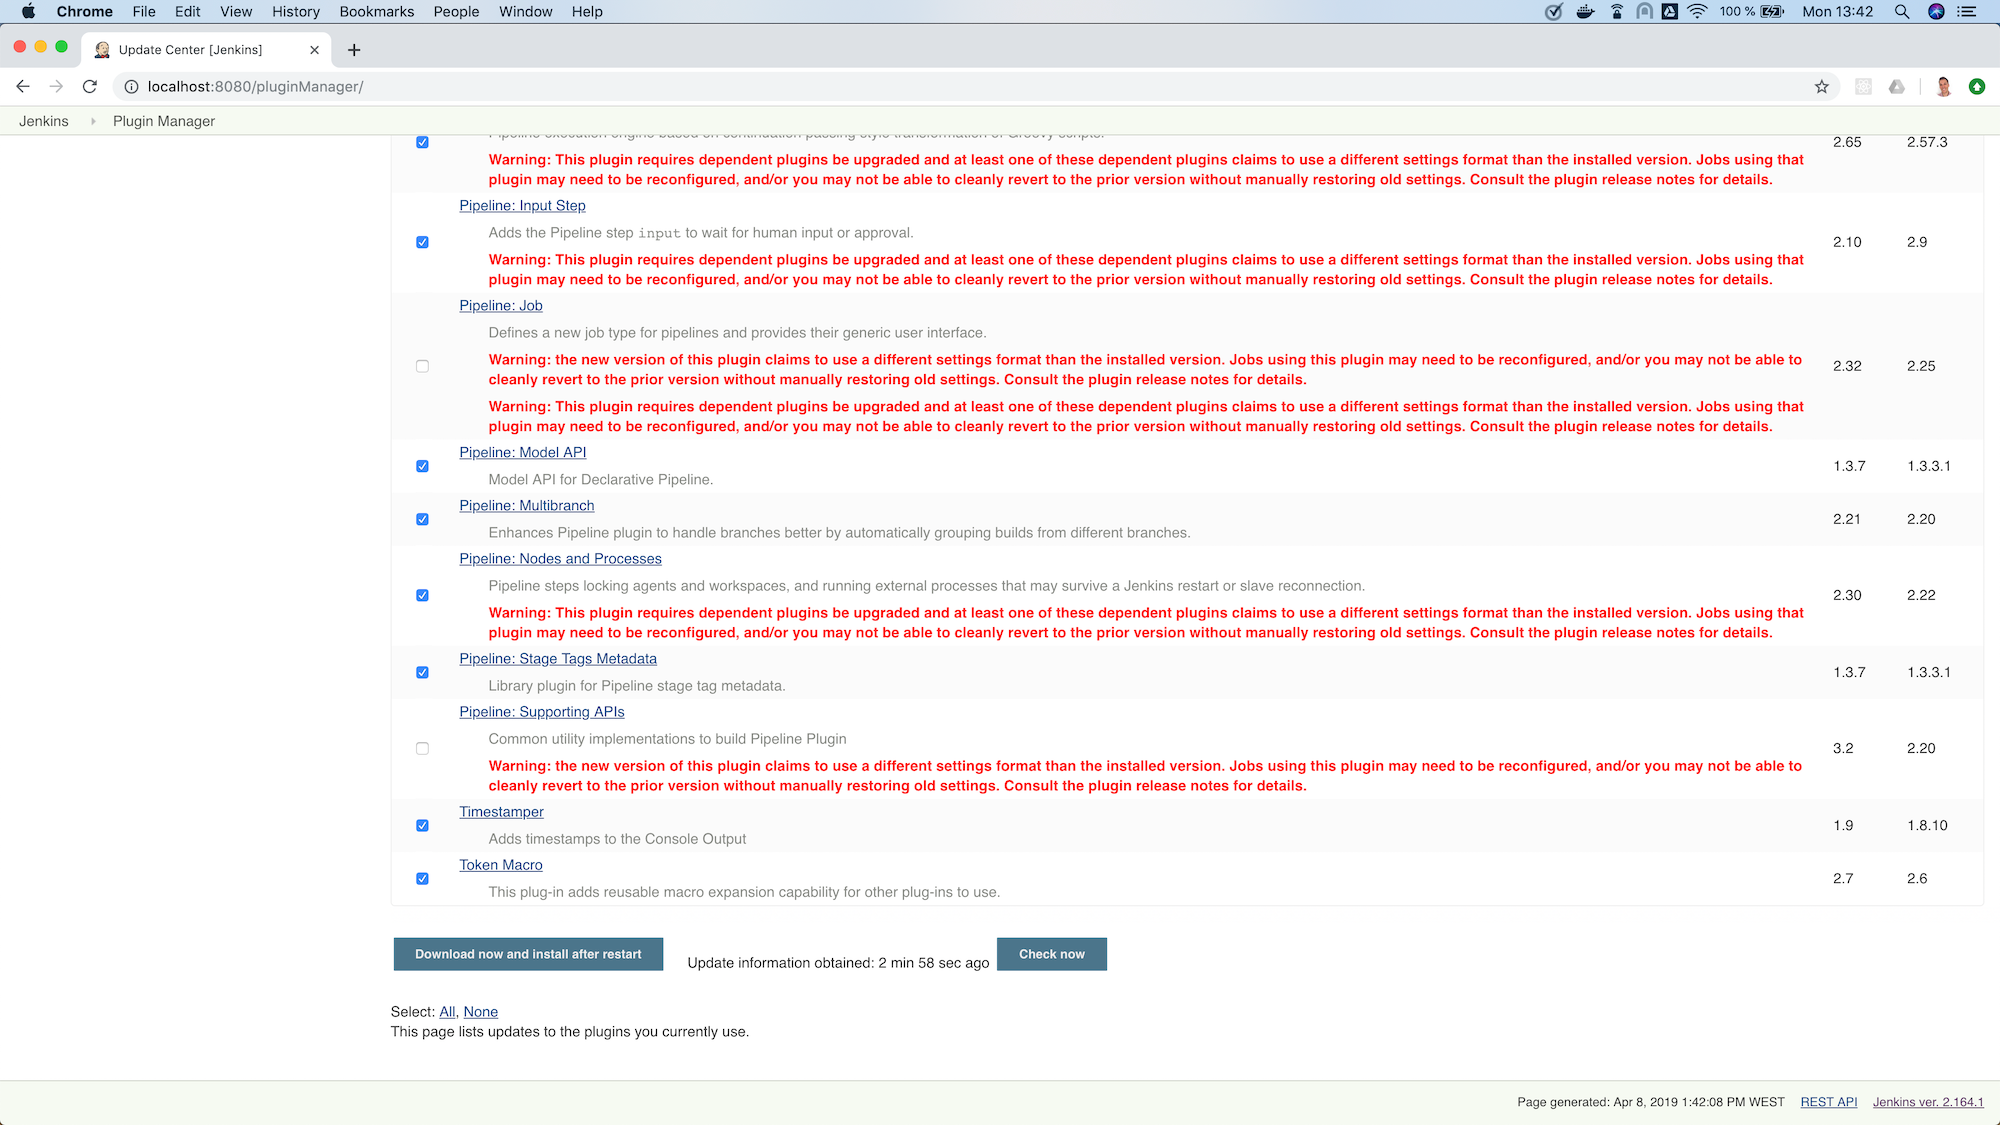
When I clicked on the “Select all” option at the bottom, this is what I got:

jenkins plugin manager updates selected bottom
Figure 3. Screenshot showing the error, reproduced locally, after clicking “Select All”

As it had been reported in the ticket, the behavior was inconsistent. In a previous version, the behavior of the “All” selector had been changed (with the best intent), aiming to only check the compatible plugins. However, as can be seen in the screenshot, the behavior was not the expected one. Now, neither “all” nor “only compatible” plugins were being selected, since some plugins with compatibility issues were also being checked, unintentionally.

Figuring out a fix

When reading the conversation in the original PR in which the behavior of the “All” selector had been changed, I saw a suggestion of having a separate “Compatible” selector, thus leaving the “All” selector with the traditional behavior. I liked the idea, so I decided to include it as part of my proposed change.

At this stage, I had a clear picture of the different things I needed to change. These included: 1) The UI, to add a new selector for “Compatible” plugins only, 2) the JS code that applied the changes to the interface when the selectors were clicked and 3) probably the back-end method that was determining if a plugin was compatible or not.

Applying the change

As usual, and as it is also recommended in the contributing guidelines, I created a separate feature branch to work on the ticket.

After reviewing the code, I spent some time figuring out which pieces I needed to change, both in the back-end and also in the front-end. For more details about the changes I had to make, you can take a look at the changes in my PR.

As a basic summary, I learned that the classic Jenkins UI was built using Jelly and, after understanding its basics, I modified the index.jelly file to include the new selector, assigning the function that checked the compatible plugins to this new selector, and re-using the existing “toggle” function to set all checkboxes to true in the case of “All”. I also had to modify the behavior of the checkPluginsWithoutWarnings JavaScript function, to un-check the incompatible ones, since there was now an actual “All” selector that was not there previously, and that un-check case was not being taken into account. Then, I created a new back-end Java method isCompatible, inside the UpdateSite.java class, which now calls all the different methods that check different compatibilities and returns the combined boolean result. For this change, I included an automated test to verify the correct behavior of the method, contributing to the test coverage of the project. Finally, I modified the table.jelly file to call the new back-end method from the UI, replacing the existing one that was not taking all cases into account.

As you can see, the change involved touching different technologies, but even if you face a similar situation in which you are not familiar with some of them, my advice would be carry on, don’t let that stop you. As software engineers, we should focus on our evergreen skills, rather than on knowing specific technologies; adapting to whatever framework we have to use at a given moment, learning whatever we need about the new technology to complete the task and applying cross-framework principles and best practices to provide a quality solution.

Result

After the changes described above, the resulting UI includes a new option, and the corresponding behaviors of the three selectors work as expected:

fixed select compatible
Figure 4. Screenshot of the new version, displaying the behavior achieved by clicking the new “Compatible” selector

Publishing the change

Submitting a Pull Request

In the contributing guidelines of the Jenkins core repository there is also a section about proposing changes, which describes the necessary steps that have to be followed in order to create a Pull Request (PR) with our change.

Furthermore, there is a PR template in the repository, which will be loaded automatically when creating a new PR and that will serve as a basis for us to provide the necessary information for the reviewers. We are expected to: include a link to the ticket, list the proposed changelog entries describing our changes, complete the submitter checklist and add mentions to the desired reviewers (if any).

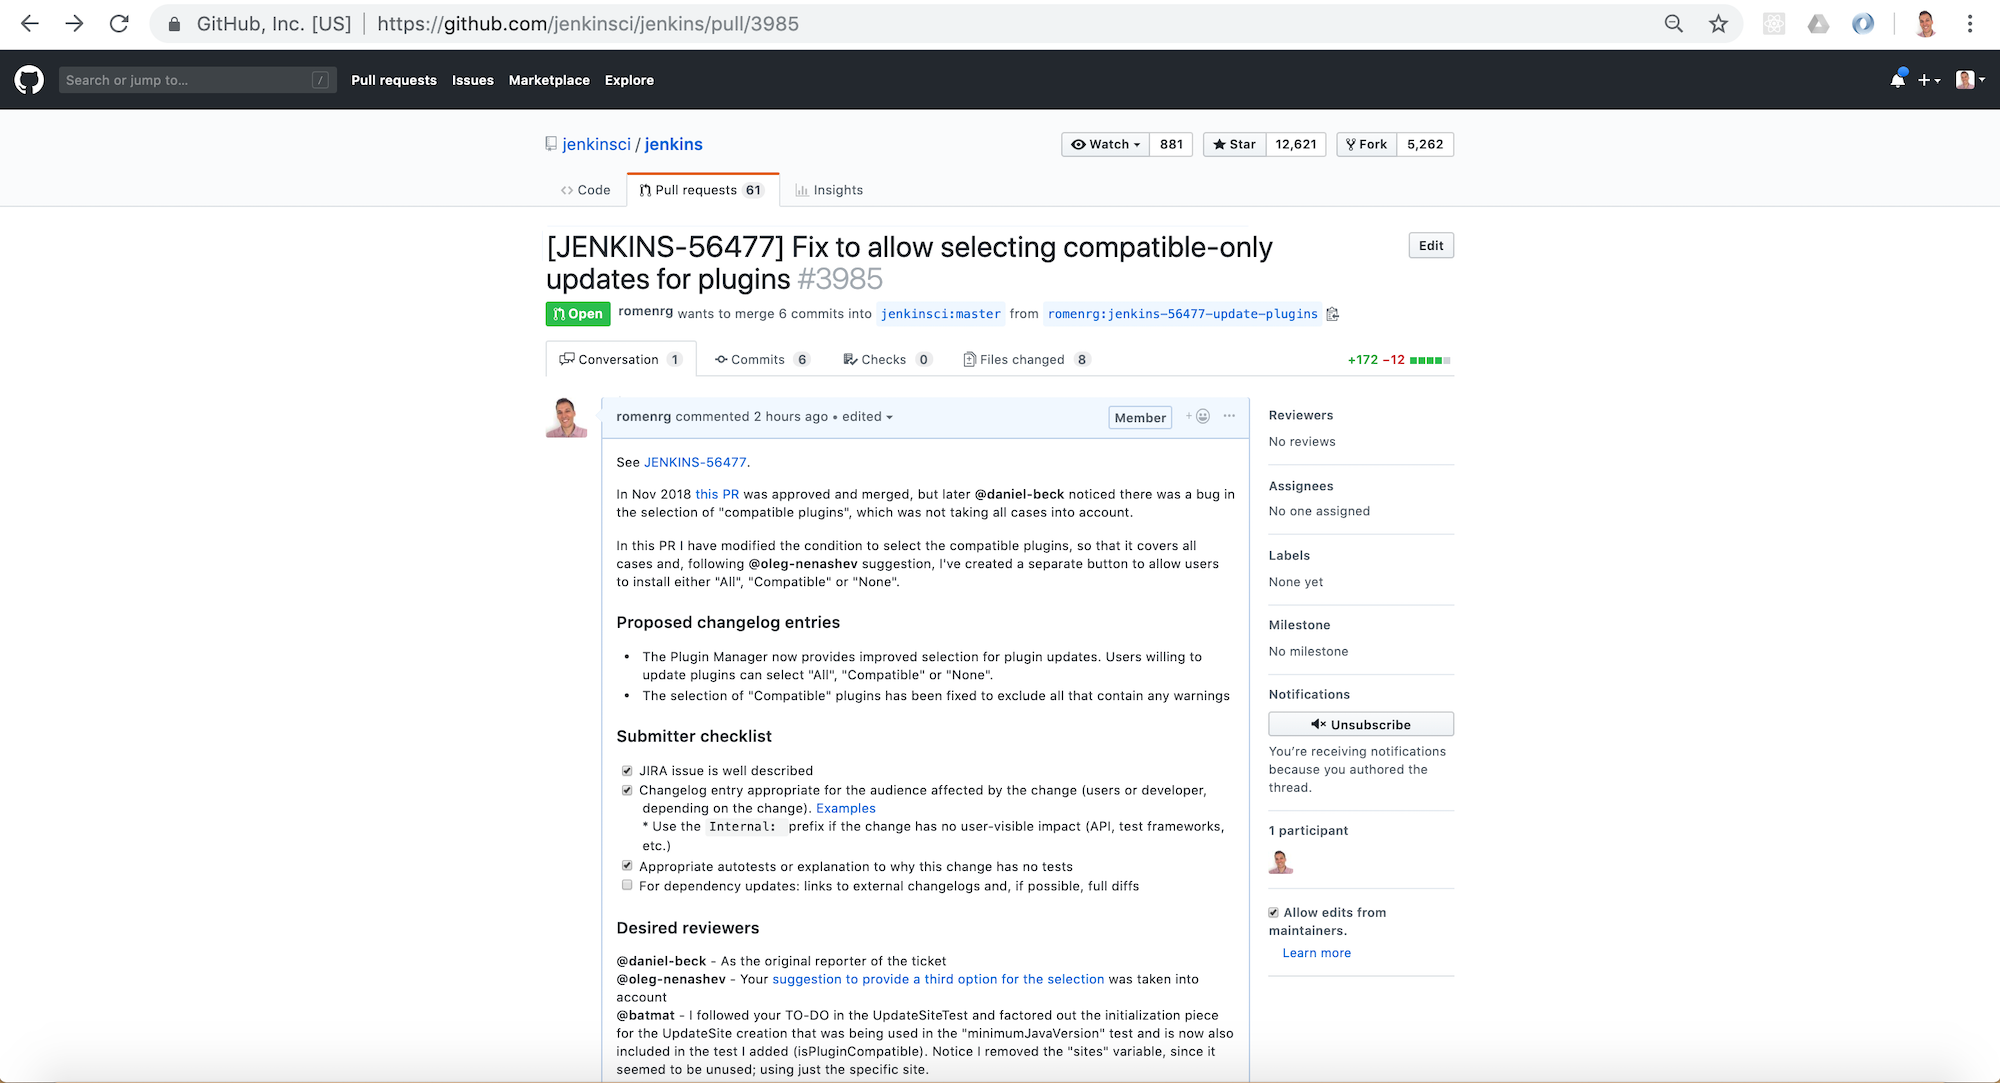
In my case, I followed the template when creating my PR, completing all sections. I linked the Jira ticket, provided two proposed changelog entries, completed the submitter checklist and added three desired reviewers (explaining why I thought their reviews would be valuable). I also linked the original PR that was referenced in the ticket, to provide further context.

pr created
Figure 5. Screenshot of the PR I submitted

The approve and merge process

As stated in the contributing guidelines, typically two approvals are needed for the PR to be merged; and it can take from a few days to a couple of weeks to get them. Sometimes, one approval from a reviewer and a 1-week delay without extra reviews is considered enough to set the PR as ready-for-merge. However, both the time-to-merge and the number of approvals necessary might vary, depending on the complexity of the change or the area of Jenkins core that it affects.

After the necessary approvals have been received, a Jenkins core maintainer will set the PR as ready-for-merge, which will lead to it being merged into the master branch when one of the following releases are being prepared.

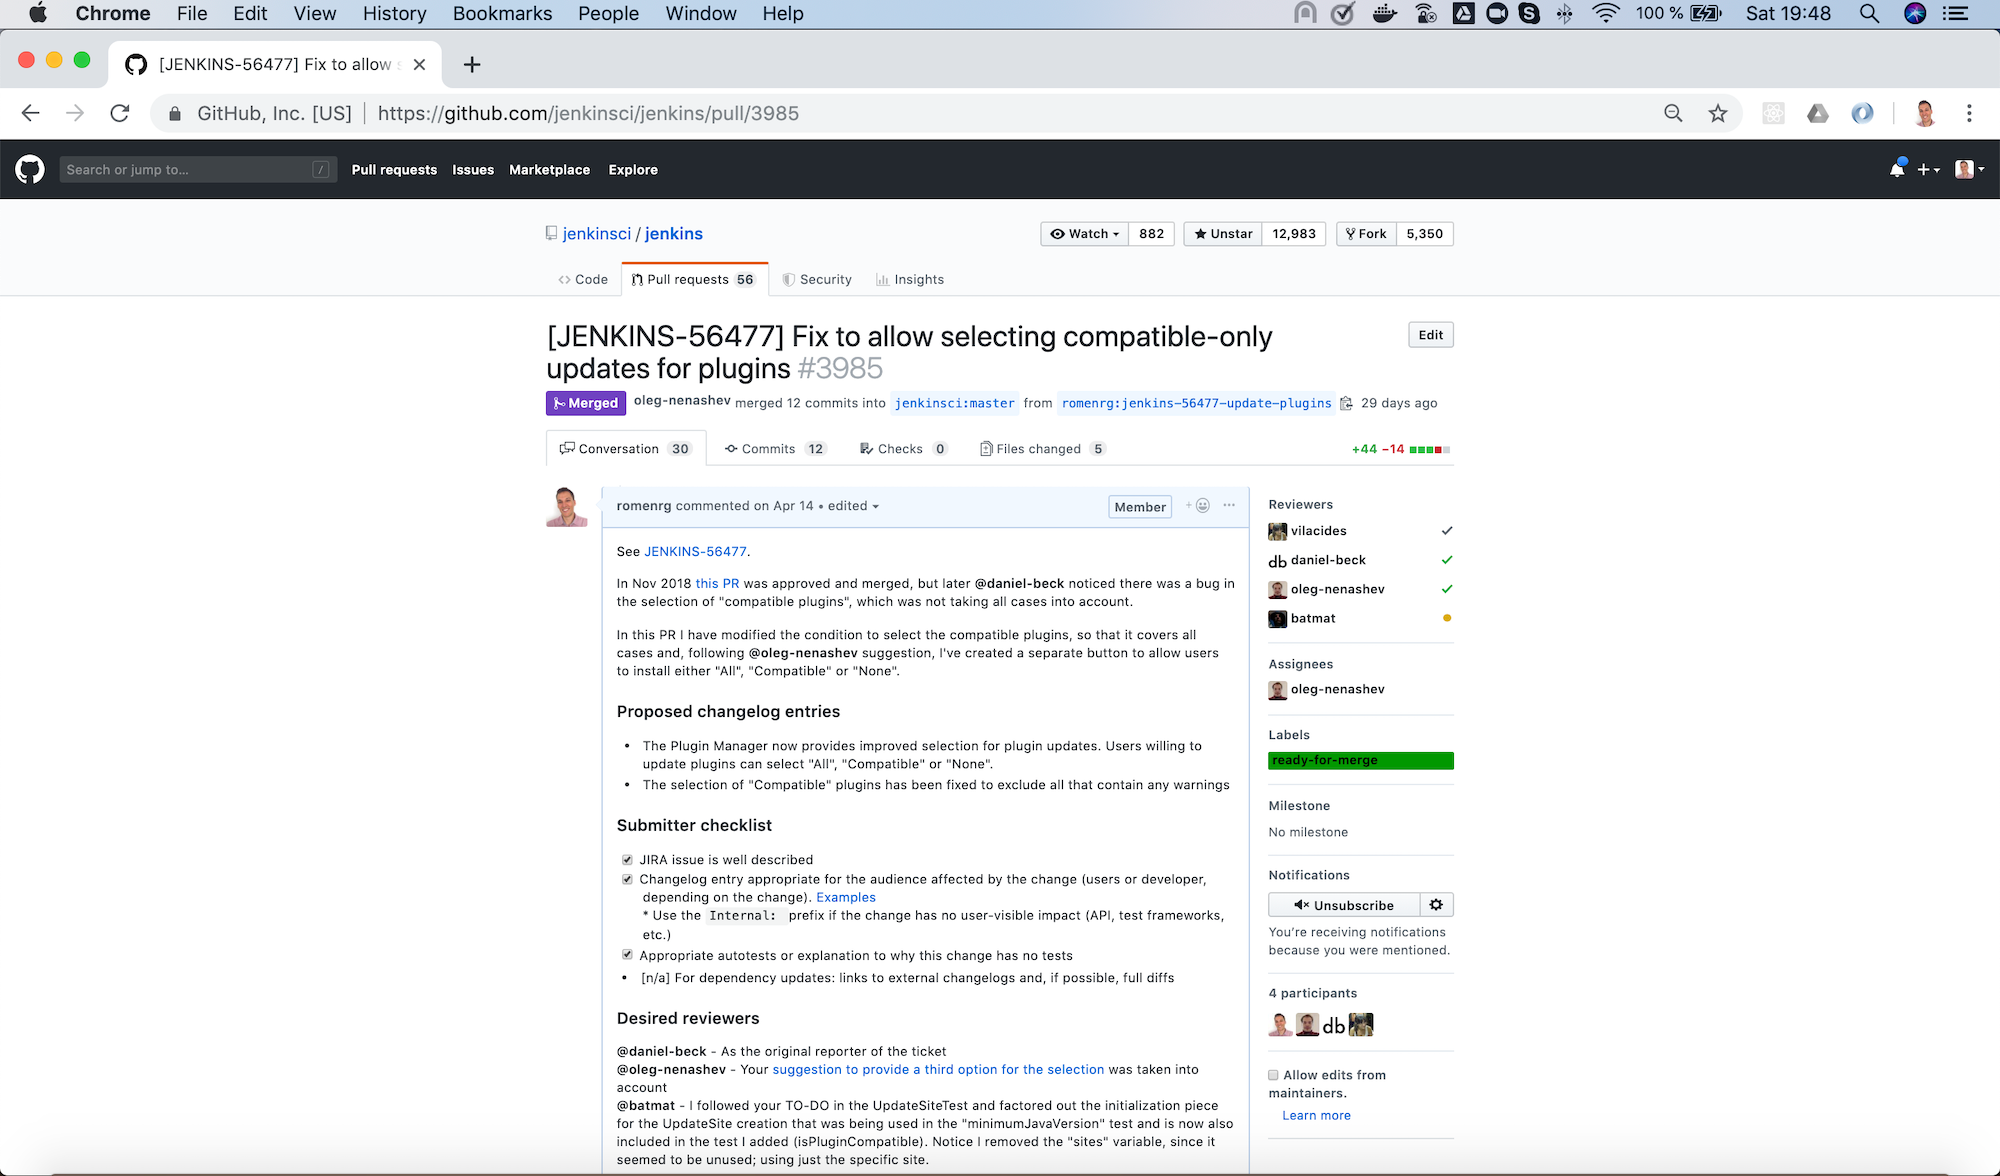
In my case, I received a review by Daniel (the reporter of the ticket and one of my “desired reviewers”) the very day I submitted the PR (April 14th). He made several very useful suggestions, which led to changes from my side. After those changes, Daniel made minor remarks and my PR got another review, which was its first approval. After a week had passed without further news, I added the remaining minor suggestions from Daniel and a few days later received another approval, to which Daniel’s final approval was added, leading the PR to be labeled ready-for-merge, being later merged the same day (April 26th).

pr merged
Figure 6. Screenshot of the final state of the PR, after being merged

Release

For every new release, repository maintainers will select a set of PRs that have already been labeled ready-for-merge, merge them to master, prepare changelogs (often using the suggestions included in the PRs by the authors) and proceed with the creation of the new release. There is no additional action required from Pull Request authors at this point.

Every week a new version of Jenkins is released, so when your PR is merged, your changes will—​most likely—​become part of the following weekly release of Jenkins.

Eventually, your changes will also reach the Long-term support (LTS) release, which is a different release line, aimed for more conservative users. This release line gets synced with the weekly release by picking, every 12 weeks, a relatively recent weekly release as baseline for the new LTS release. In between, intermediate LTS releases are created only to include important bug fixes, cherry-picked from the weekly releases. New features are typically delayed until the next baseline for the LTS release is defined.

Regarding the example described in this post, it was released in Jenkins 2.175 (weekly release), soon after being merged. And will probably be included in the next LTS, which should be released next month (June 2019).

Done!

And that’s it! We have now covered the whole lifecycle of a new proposed change to Jenkins core. We have reviewed the process from the very beginning, picking a ticket from the Jenkins issue tracker; all the way to the end, having our change released in a new Jekins version.

If you have never contributed but are willing to do so, I hope this article motivates you to go back to the list ofnewbie-friendly tickets, find one that looks interesting to you, and follow the steps described above, until you see your own change released in a new Jenkins version.

Remember, don’t try to solve a complicated issue as your first ticket, there are plenty of easier ways in which you can contribute, and every little helps!

DevOps World-Jenkins World 2019 San Francisco: Agenda is Live

$
0
0
2019 dwjw email san fran

We are a little over two months away from the largest Jenkins gathering of the year. From Jenkins users, to maintainers, contributors, mentors and those new to Jenkins this event will have something for everyone.

This year’s DevOps World - Jenkins World 2019 San Francisco has moved to a larger venue to facilitate the growth. From August 12 - 15, 2019 the event will take place at the Moscone West Center. The event boasts 100+ sessions, and will offer training, hands-on workshops, onsite certification, contributor summit and much more. Conference attendees can expect to be inspired while learning the latest innovations from industry leaders. Attendees will learn the value that digital transformation has in delivering software more efficiently, more quickly and with higher quality.

We are excited to announce most of the agenda for DevOps World Jenkins World San Francisco is now live. We will continue to fill out the agenda with more sessions, trainings/workshops, and activities. Below is a small sampling of sessions from some of our favorite Jenkins contributors:

Jenkins Configuration as Code: try it & start contributing! - Ewelina Wilkosz

Jenkins Configuration as Code is an open source Jenkins plugin that allows users to keep complete Jenkins configuration in a simple configuration file (yaml format). In the talk, I’ll briefly present the history of the plugin, the vision for the future and current status. Then I’ll move to the demo section where I’ll show how easy it is to configure and run Jenkins with the help of the plugin.

Thinking about Jenkins Security - Mark Waite & Wadeck Follonier

Jenkins security concepts, authorization, authentication and auditing, secure builds, agent security, configuration and administration security, auditing, and security best practices.

Docker and Jenkins [as Code] - Dr. Oleg Nenashev

The Configuration as Code plugin is a new milestone which enables managing Jenkins configurations via YAML. Together with Docker, this plugin offers many ways to produce ready-to-fly Jenkins images for any environments. In my talk, I will describe official master and agent images offered by the Jenkins project. What’s inside them? How do you configure images with JCasC and Groovy hooks? How do you use these approaches together? And, finally, how do you simplify packaging of custom Jenkins images and define the entire system [as code]?

Can Jenkins be the Engine of Mobile DevOps? - Shashikant Jagtap

In this talk, we will explore the following topics:

  • How mobile DevOps is different than web DevOps

  • Challenges in mobile DevOps ( iOS and Android)

  • How Jenkins fits in mobile DevOps and CI/CD pipelines

  • What Jenkins misses for mobile

  • How we can make Jenkins better for mobile apps

Creating a CI/CD Pipeline for Your Shared Libraries - Roderick Randolph

At Capital One we run tens of thousands of CI/CD pipelines on Jenkins, leveraging the Jenkins Pipeline shared libraries extension to enable code reuse and decrease time to market for dev teams. A code change to our shared library goes live immediately and is consumed the next time a team triggers their project’s pipeline. So, why do we have such high confidence that a code change to our library won’t break a team’s pipeline? The answer: we’ve developed a fully automated CI/CD pipeline for our shared library.

During this talk, you will learn how to create a fully automated pipeline for your shared libraries including how to develop tests, create canary releases, monitor for issues and quickly rollback changes to your shared library to achieve rapid delivery while minimizing any impact on dev teams.

How Jenkins Builds and Delivers Jenkins in the Cloud - Brian Benz& Tyler Croy

Want to know how Jenkins builds Jenkins? Catch this session to see the real-life implementation of Jenkins’ development (at ci.jenkins.io) and delivery infrastructure in the cloud as it evolved from a mix of platforms to multi-platform VMs, containers and Kubernetes on Microsoft Azure. Expect a frank discussion of issues that were encountered along the way, how the architecture has evolved and what’s on the roadmap. We’ll share important tips and tricks for implementing your own Jenkins infrastructure on any cloud, based on Jenkins’ own implementation experience.

Declarative Pipeline 2019: Tips, Tricks and What’s Next - Liam Newman

Are you using Declarative Pipeline? Are you considering using them? Are you just curious? Well, we’re going to help you get more out of Declarative Pipeline with less complexity and less effort. We’ll walk through some best practices, point out some tricks you might not have known, warn you off some common mistakes, review what’s changed in the last year and give you a preview of what we’re working on for Declarative Pipeline going forward.

Say Goodbye to Hello World, Say Hello to Real World Delivery Pipelines - Brian Benz& Jessica Deen

Are you tired of "Hello World" and hypothetical demos? So are we! In this code-heavy, deeply technical session, you’ll learn more than just tips and tricks. You’ll learn best practices and how to start from absolute zero. Whether you’re using Jenkins, Azure DevOps, a mixture of the two, or another CI/CD tool, you’ll learn how to create multiple build and release pipelines using real world code hosted on open source platforms such as GitHub.

Feel free to use discount code JWFOSS for a 30% discount off your pass.

Hope to see you there!

Audit Logging in Jenkins: An Outreachy Project

$
0
0

The Audit Log Plugin for Jenkins is an in development project to integrate standardized audit logging trails to various core actions in Jenkins. This project integrates the recently released Apache Log4j Audit library to allow for a vast array of possible audit logging destinations and configuration. We began this plugin not long after Log4j Audit 1.0.0 was released last year by partnering with Outreachy where we mentored two interns who laid the foundations of the project. This year, we applied to Outreachy again to continue the project, and we were able to accept two more Outreachy interns: Aarthi Rajaraman and Gayathri Rajendar. Both have already been adding new features and improving the plugin over the past couple months, and the internship officially began on 20 May.

This round has some ambitious goals of various features and documentation we wish to create. After having added audit log support for several built-in event listeners in Jenkins around the lifecycle of projects, builds, nodes, and authentication during both the previous internship and the applications to this one, we would like to accomplish the following:

  • Make a 1.0 release of the plugin for the Jenkins Update Center. #34

  • Add documentation on supported audit log types and configuration options. #40

  • Add audit logs for credential usage and lifecycle events. #35, #36

  • Add audit logs for user property lifecycle events. #37

  • Define or document an API for other plugins to use to define and log their own audit events. #30

  • Ensure audit log events use consistent vocabulary with the Jenkins UI. #33

  • Add an audit log event recorder/viewer comparable to the Jenkins logger recorder administrative UI. #32

  • Add support for configuring a syslog-compatible log server for writing audit logs. #29

  • Add support for configuring a relational database such as PostgreSQL for writing audit logs. #31

  • Improve unit test coverage and pay down technical debt. #38

  • Begin discovery on alternative ways to manage the underlying Log4j Core configuration such as via the upcoming integration with Spring Cloud Configuration. #39

In the future, we hope to participate with more projects and mentors. Going on concurrently with Outreachy right now is Google Summer of Code 2019 where we are mentoring several more projects and students. Please extend a warm welcome to all our new contributors and community members from Outreachy and GSoC!

Micro-benchmarking Framework for Jenkins Plugins

$
0
0

I have been working on improving the performance of the Role Strategy Plugin as a part of my Google Summer of Code project. Since there was no existing way to measure performance and do benchmarks on Jenkins Plugins, my work for the first phase of the project was to create a framework for running benchmarks in Jenkins plugins with a Jenkins instance available. To make our job a bit easier, we chose Java Microbenchmark Harness for running these benchmarks. This allows us to reliably measure performance of our time-critical functions and will help make Jenkins perform faster for everyone.

The micro-benchmarking framework was recently released in the Jenkins Unit Test Harness 2.50. The blog post below shows how to run benchmarks in your plugins.

Introduction

The framework runs works by starting a temporary Jenkins instance for each fork of the JMH benchmark, just like JenkinsRule from Jenkins Test Harness. Benchmarks are run directly from your JUnit Tests which allows you to fail builds on the fly and easily run benchmarks from your IDE, just like unit tests. You can easily configure your benchmarks by either using your Java methods, or by using Jenkins Configuration-as-Code plugin and passing the path to your YAML file.

To run benchmarks from your plugins, you need to do the following:

  • bump up the minimum required Jenkins version to 2.60.3 or above

  • bump Plugin-POM to a version ≥ 3.46 or manually upgrade to Jenkins Test Harness ≥ 2.51.

Now, to run the benchmarks, you need to have a benchmark runner that contains a @Test so it can run like a JUnit test. From inside a test method, you can use the OptionsBuilder provided by JMH to configure your benchmarks. For example:

publicclassBenchmarkRunner {@Testpublicvoid runJmhBenchmarks() throwsException {
        ChainedOptionsBuilder options = new OptionsBuilder()
                .mode(Mode.AverageTime)
                .forks(2)
                .result("jmh-report.json");// Automatically detect benchmark classes annotated with @JmhBenchmarknew BenchmarkFinder(getClass()).findBenchmarks(options);new Runner(options.build()).run();
    }
}

Sample benchmarks

Now, you can write your first benchmark:

Without any special setup

@JmhBenchmarkpublicclassJmhStateBenchmark {publicstaticclassMyStateextends JmhBenchmarkState {
    }@Benchmarkpublicvoid benchmark(MyState state) {// benchmark code goes here
        state.getJenkins().setSystemMessage("Hello world");
    }
}

Using Configuration as Code

To use configuration as code, apart from the dependencies above you also need to add the following to your pom.xml:

<dependency><groupId>io.jenkins</groupId><artifactId>configuration-as-code</artifactId><version>1.21</version><optional>true</optional></dependency><dependency><groupId>io.jenkins</groupId><artifactId>configuration-as-code</artifactId><version>1.21</version><classifier>tests</classifier><scope>test</scope></dependency>

Now configuring a benchmark is as simple as providing path to your YAML file and specifying the class containing the benchmark state.

@JmhBenchmarkpublicclassSampleBenchmark {publicstaticclassMyStateextends CascJmhBenchmarkState {@Nonnull@OverrideprotectedString getResourcePath() {return"config.yml";
        }@Nonnull@OverrideprotectedClass<?> getEnclosingClass() {return SampleBenchmark.class;
        }
    }@Benchmarkpublicvoid benchmark(MyState state) {
        Jenkins jenkins = state.getJenkins(); // jenkins is configured and ready to be benchmarked.// your benchmark code goes here...
    }
}

More Samples

As a part of this project, a few benchmarks have been created in the Role Strategy Plugin which show configuring the instances for various situations. You can find themhere.

Running Benchmarks

Running benchmarks from Maven

To easily run benchmarks from Maven, a Maven profile to run the benchmarks has been created and is available starting Plugin-POM version 3.45. You can then run your benchmarks from the command line using mvn test -Dbenchmark.

Running benchmarks on ci.jenkins.io

If you have your plugins hosted on ci.jenkins.io, you can easily run benchmarks directly from your Jenkinsfile by using the runBenchmarks() method after the buildPlugin() step in your which is now available inJenkins Pipeline library. This function also accepts the path to your generated JMH benchmark reports as an optional parameter and archives the benchmark results. Running benchmarks in pull request builds allows you to constantly monitor the performance implications of a given change. For example, the Jenkinsfile from Role Strategy Plugin:

buildPlugin()
runBenchmarks('jmh-report.json')

Visualizing benchmark results

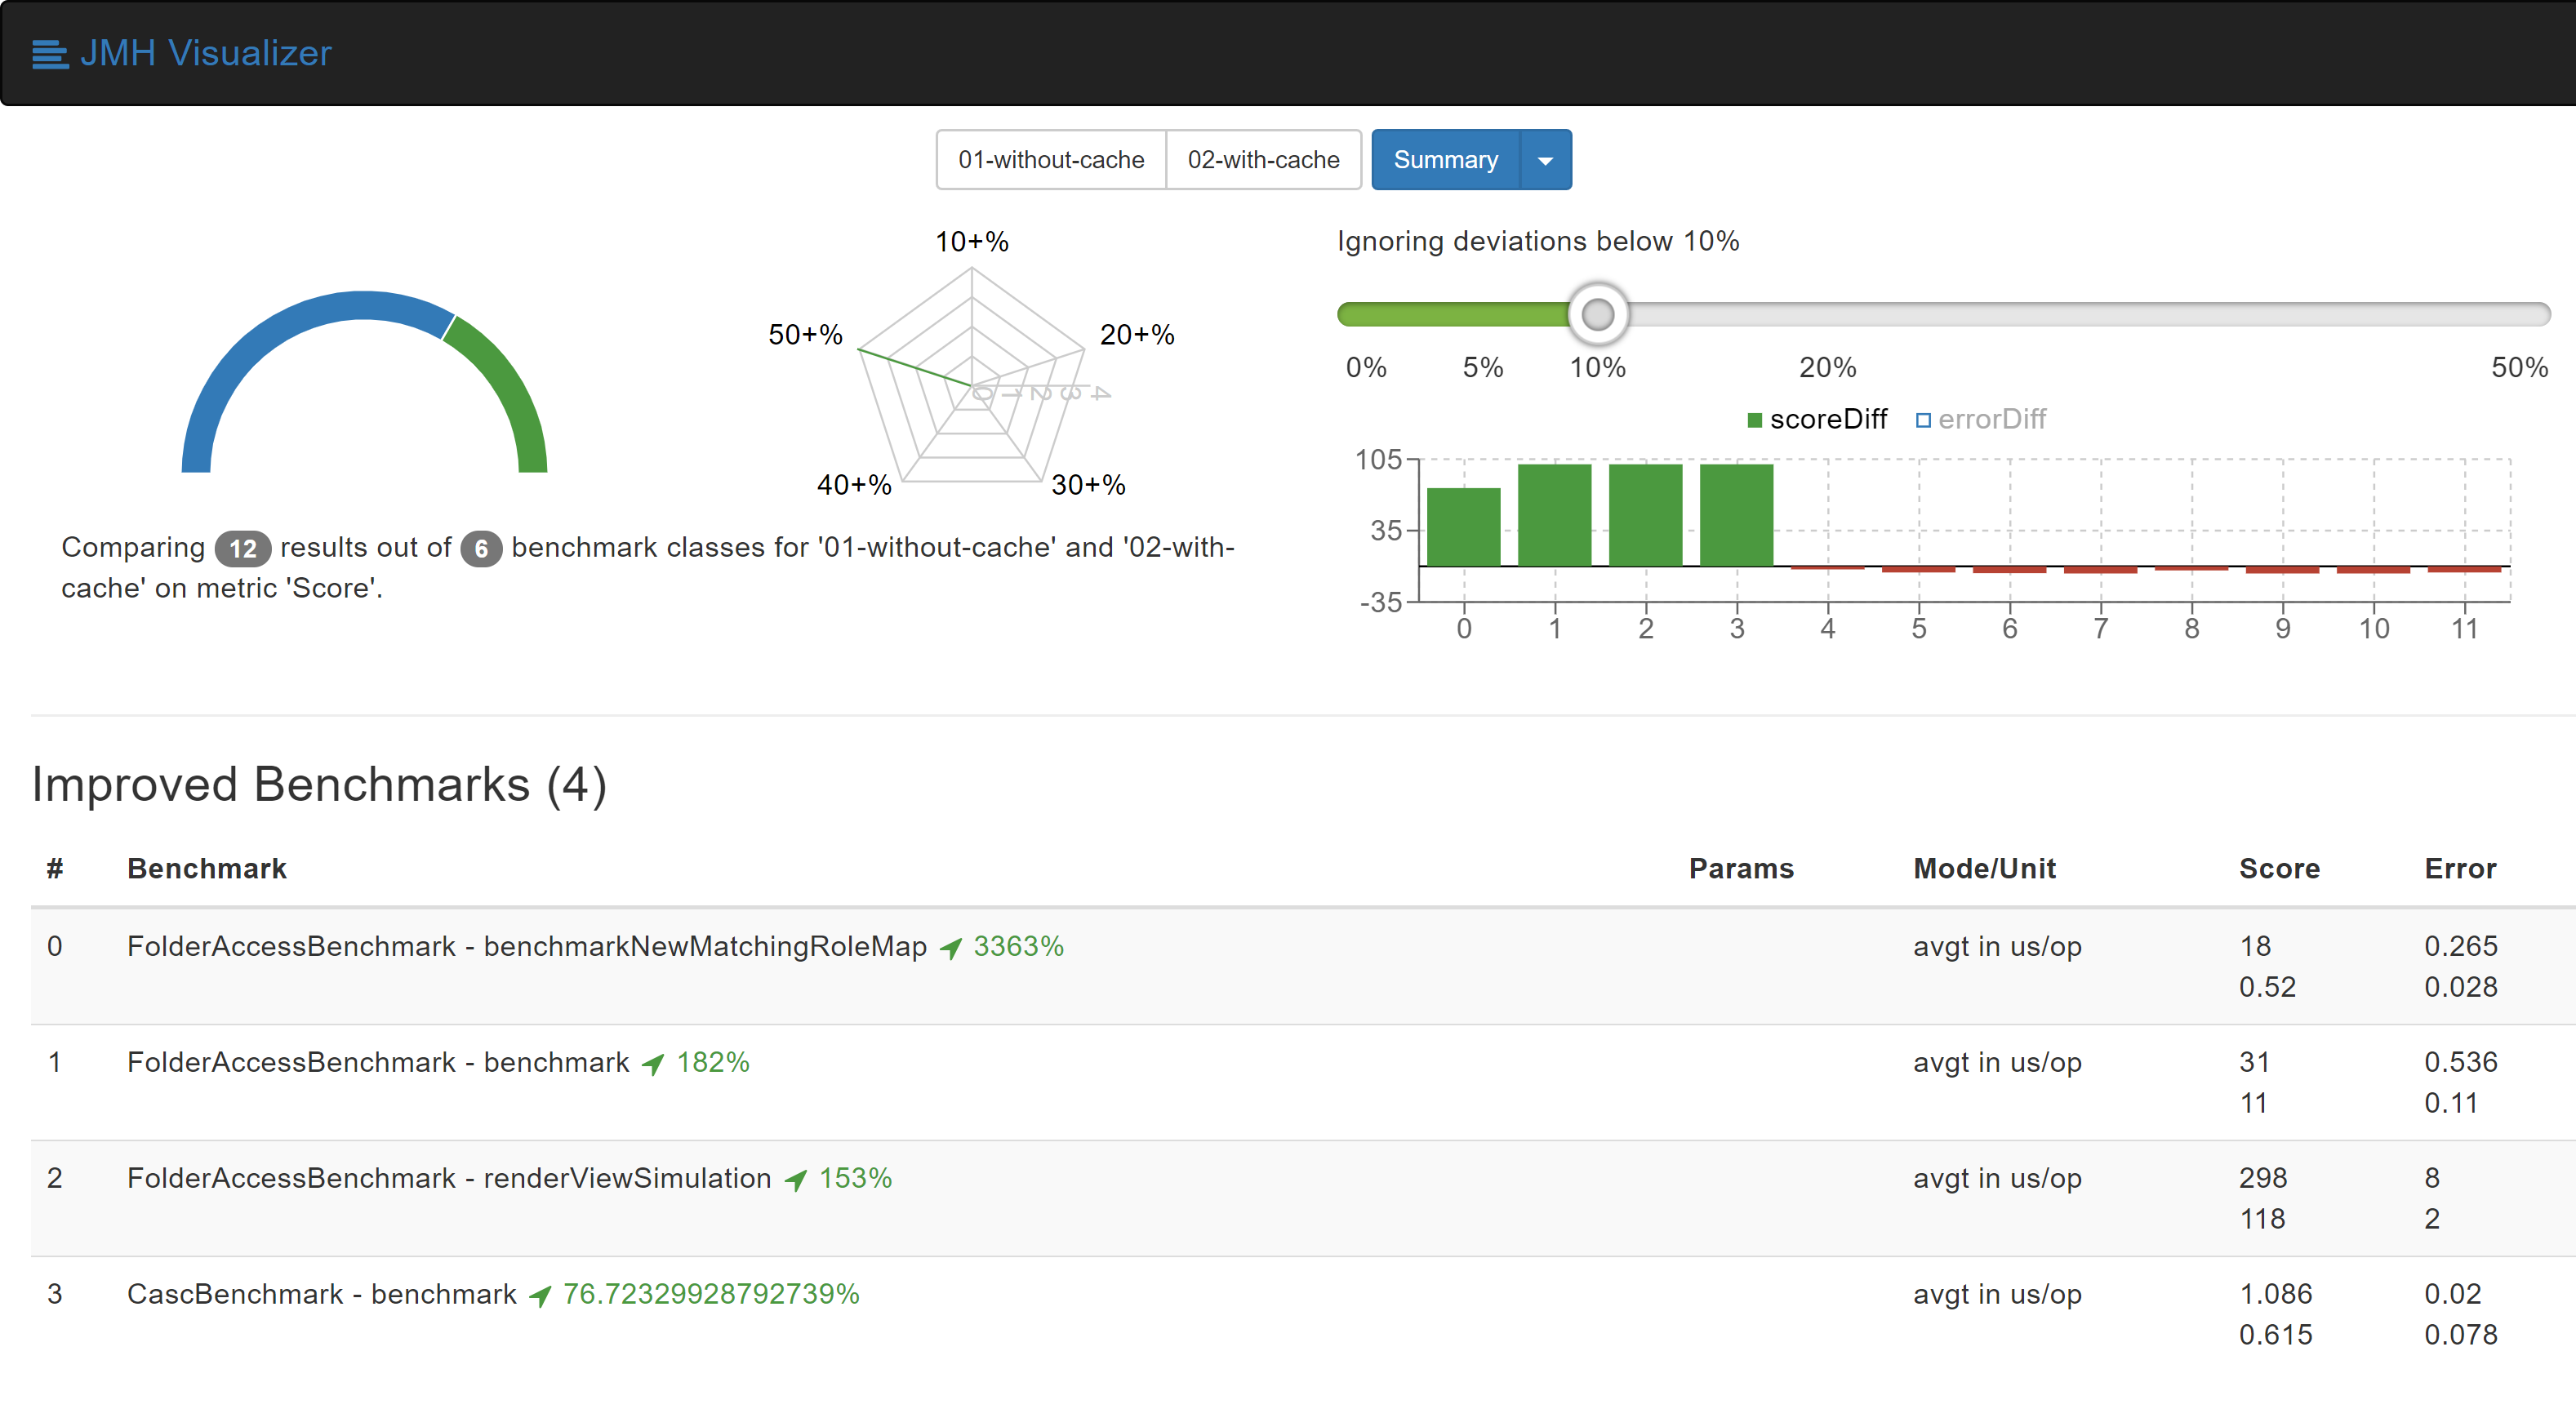
Benchmark reports generated (in JSON) can be visualized using the either the JMH Report Plugin or by passing the benchmark reports to the JMH visualizer web service. As an example, here is a visualized report of some benchmarks from the Role Strategy Plugin:

Role Strategy Plugin benchmarks visualized by JMH Visualizer

These improvements seen above were obtained through a small pull request to the plugin and shows how even seemingly small changes can bring major performance improvements. Microbenchmarks help to find these hot-spots and estimate the impact of changes.

Some tips and tricks

  • Since BenchmarkRunner class name in the example above does not qualify as a test according to Maven surefire plugin’s naming conventions, the benchmarks will not interfere with your JUnit tests.

  • Benchmark methods need to be annotated by @Benchmark for JMH to detect them.

  • Classes containing benchmarks are found automatically by the BenchmarkFinder when annotated with @JmhBenchmark.

  • A reference to the Jenkins instance is available through either JmhBenchmarkState#getJenkins() or throughJenkins.getInstance() like you would otherwise do.

  • JmhBenchmarkState provides setup() and tearDown() methods which can be overridden to configure the Jenkins instance according to your benchmark’s requirements.

  • The benchmark builds on ci.jenkins.io are currently throttled because of the limited availability of highmem nodes.

  • The benchmark framework was made available in Jenkins Test Harness 2.50, it is recommended to use version 2.51 as it includes some bug fixes.

Multi-branch Pipeline Jobs Support for GitLab SCM

$
0
0

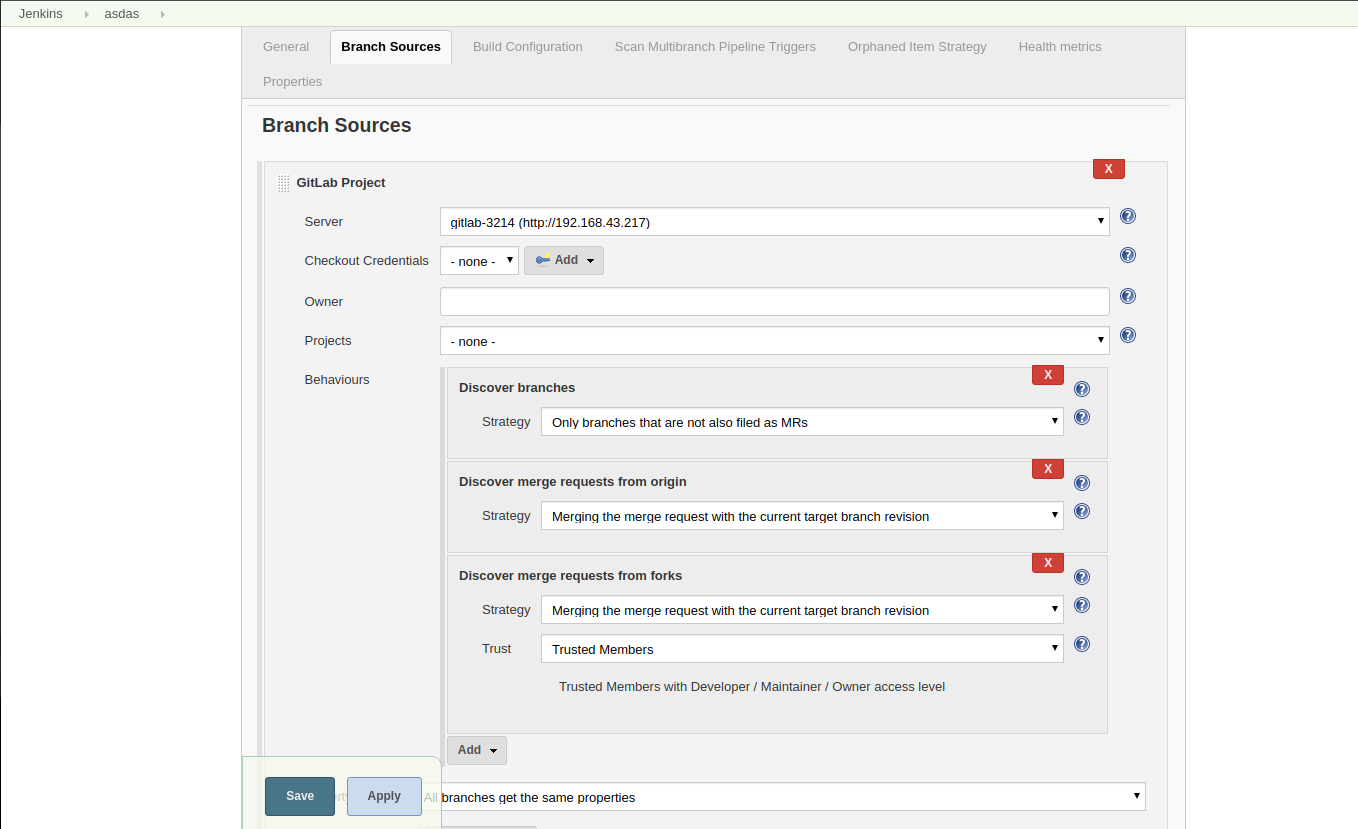
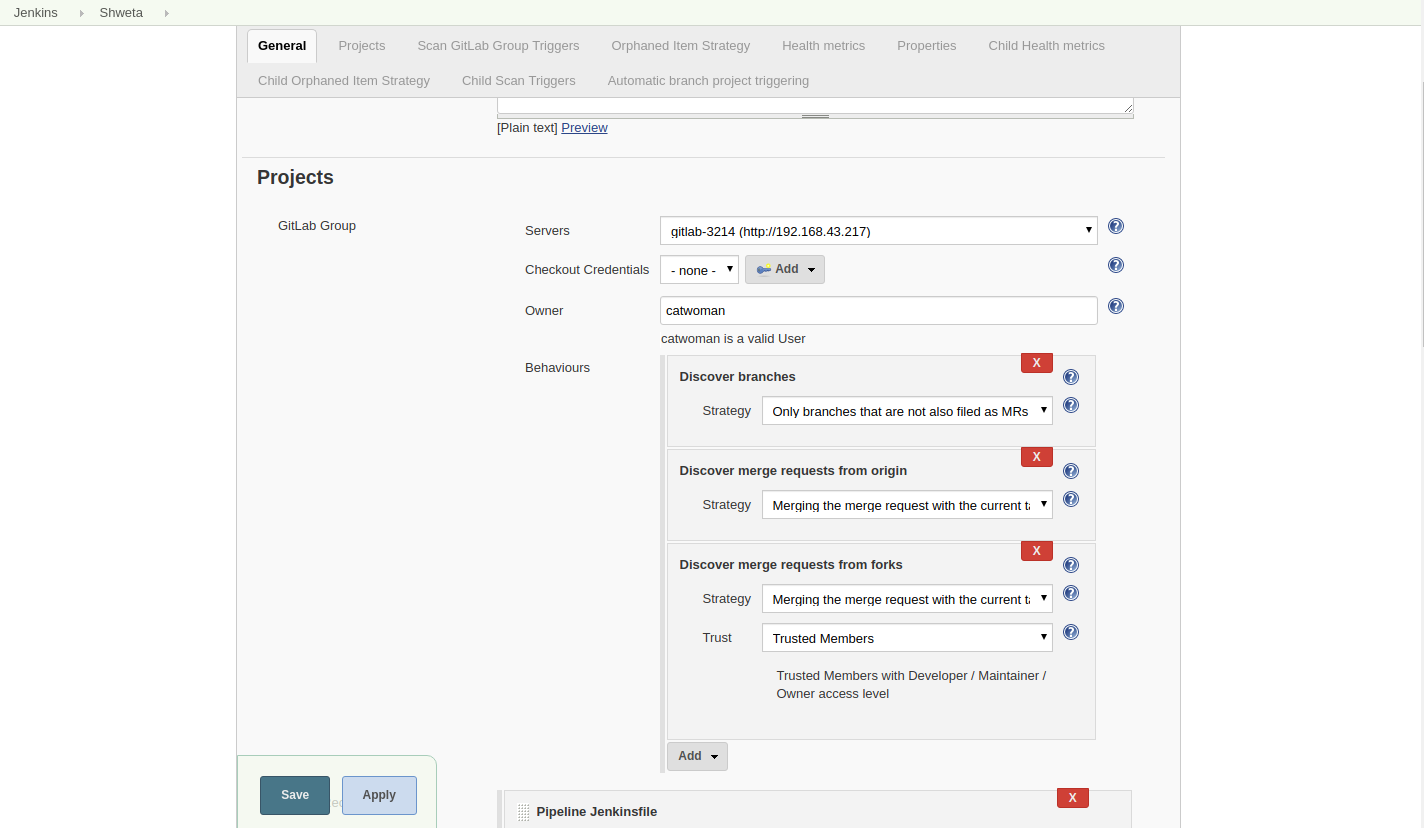
This is one of the Jenkins project in GSoC 2019. We are working on adding support for Multi-branch Pipeline Jobs and Folder Organisation in GitLab. The plan is to create the following plugins:

  • GitLab API Plugin - Wraps GitLab Java APIs.

  • GitLab Branch Source Plugin - Contains two packages:

    • io.jenkins.plugins.gitlabserverconfig - Manages server configuration and web hooks management. Ideally should reside inside another plugin with name GitLab Plugin. In future, this package should be moved into a new plugin.

    • io.jenkins.plugins.gitlabbranchsource - Adds GitLab Branch Source for Multi-branch Pipeline Jobs (including Merge Requests) and Folder organisation.

Present State

  • FreeStyle Job and Pipeline(Single Branch) Job are fully supported.

  • Multi-branch Pipeline Job is partially supported (no MRs detection).

  • GitLab Folder Organisation is not supported.

Goals of this project

  • Implement a lightweight GitLab Plugin that depends on GitLab API Plugin.

  • Follow convention of 3 separate plugins i.e. GitLab Plugin, GitLab API Plugin, GitLab Branch Source Plugin.

  • Implement GitLab Branch Source Plugin with support for Multi-branch Pipeline Jobs.

  • Support new Jenkins features such asJenkins Code as Configuration (JCasC),Incremental Tools.

  • Clear & Efficient design.

  • Support new SCM Trait APIs.

  • Support Java 8 and above.

Building the plugin

No binaries are available for this plugin as the plugin is in the very early alpha stage, and not ready for the general public quite yet. If you want to jump in early, you can try building it yourself from source.

Installation:

  • Checkout out source code to your local machine:

git clone https://github.com/baymac/gitlab-branch-source-plugin.git

cd gitlab-branch-source-plugin
  • Install the plugin:

mvn clean install

mvn clean install -DskipTests # to skip tests
  • Run the plugin:

mvn hpi:run # runs a Jenkins instance at localhost:8080

mvn hpi:run -Djetty.port=<port> # to run on your desired port number

If you want to test it with your Jenkins server, after mvn clean install follow these steps in your Jenkins instance:

  1. Select Manage Jenkins

  2. Select Manage Plugins

  3. Select Advanced tab

  4. In Upload Plugin section, select Choose file

  5. Select $<root_dir>/target/gitlab-branch-source.hpi

  6. Select Upload

  7. Select Install without restart

Usage

Assuming plugin installation has done been already.

Setting up GitLab Server Configuration on Jenkins

  1. On jenkins, select Manage Jenkins

  2. Select Configure System

  3. Scroll down to find the GitLab section

    gitlab-section

  4. Select Add GitLab Server | Select GitLab Server

  5. Now you will now see the GitLab Server Configuration options.

    gitlab-server

    There are 4 fields that needs to be configured:

    • Name - Plugin automatically generates an unique server name for you. User may want to configure this field to suit their needs but should make sure it is sufficiently unique. We recommend to keep it as it is.

    • Server URL - Contains the URL to your GitLab Server. By default it is set to "https://gitlab.com". User can modify it to enter their GitLab Server URL e.g. https://gitlab.gnome.org/, http://gitlab.example.com:7990. etc.

    • Credentials - Contains a list of credentials entries that are of type GitLab Personal Access Token. When no credential has been added it shows "-none-". User can add a credential by clicking "Add" button.

    • Web Hook - This field is a checkbox. If you want the plugin to setup a webhook on your GitLab project(s) related jobs, check this box. The plugin listens to a URL for the concerned GitLab project(s) and when an event occurs in the GitLab Server, the server sends an event trigger to the URL where the web hook is setup. If you want continuous integration (or continuous delivery) on your GitLab project then you may want to automatically set it up.

  6. Adding a Personal Access Token Credentials (To automatically generate Personal Access Token seenext section):

    1. User is required to add a GitLab Personal Access Token type credentials entry to securely persist the token inside Jenkins.

    2. Generate a Personal Access Token on your GitLab Server:

      1. Select profile dropdown menu from top-right corner

      2. Select Settings

      3. Select Access Token from left column

      4. Enter a name | Set Scope to api,read_user, read_repository

      5. Select Create Personal Access Token

      6. Copy the token generated

    3. Return to Jenkins | Select Add in Credentials field | Select Jenkins

    4. Set Kind to GitLab Personal Access Token

    5. Enter Token

    6. Enter a unique id in ID

    7. Enter a human readable description

    8. Select Add

      gitlab-credentials

  7. Testing connection:

    1. Select your desired token in the Credentials dropdown

    2. Select Test Connection

    3. It should return something like Credentials verified for user <username>

  8. Select Apply (at the bottom)

  9. GitLab Server is now setup on Jenkins

Creating Personal Access Token within Jenkins

Alternatively, users can generate a GitLab Personal Access Token within Jenkins itself and automatically add the GitLab Personal Access Token credentials to Jenkins server credentials.

  1. Select Advanced at the bottom of GitLab Section

  2. Select Manage Additional GitLab Actions

  3. Select Convert login and password to token

  4. Set the GitLab Server URL

  5. There are 2 options to generate token;

    1. From credentials - To select an already persisting Username Password Credentials or add an Username Password credential to persist it.

    2. From login and password - If this is a one time thing then you can directly enter you credentials to the text boxes and the username/password credential is not persisted.

  6. After setting your username/password credential, select Create token credentials.

  7. The token creator will create a Personal Access Token in your GitLab Server for the given user with the required scope and also create a credentials for the same inside Jenkins server. You can go back to the GitLab Server Configuration to select the new credentials generated (select "-none-" first then new credentials will appear). For security reasons this token is not revealed as plain text rather returns an id. It is a 128-bit long UUID-4 string (36 characters).

    gitlab-token-creator

Configuration as Code

No need for messing around in the UI. Jenkins Configuration as Code (JCasC) or simply Configuration as Code Plugin allows you to configure Jenkins via a yaml file. If you are a first time user, you can learn more about JCasChere.

Add configuration YAML:

There are multiple ways to load JCasC yaml file to configure Jenkins:

  • JCasC by default searches for a file with the name jenkins.yaml in $JENKINS_ROOT.

  • The JCasC looks for an environment variable CASC_JENKINS_CONFIG which contains the path for the configuration yaml file.

    • A path to a folder containing a set of config files e.g. /var/jenkins_home/casc_configs.

    • A full path to a single file e.g. /var/jenkins_home/casc_configs/jenkins.yaml.

    • A URL pointing to a file served on the web e.g. https://<your-domain>/jenkins.yaml.

  • You can also set the configuration yaml path in the UI. Go to <your-jenkins-domain>/configuration-as-code. Enter path or URL to jenkins.yaml and select Apply New Configuration.

An example of configuring GitLab server via jenkins.yaml:

credentials:system:domainCredentials:
      - credentials:
          - gitlabPersonalAccessToken:
              scope: SYSTEM
              id: "i<3GitLab"
              token: "XfsqZvVtAx5YCph5bq3r" # gitlab personal access tokenunclassified:gitLabServers:servers:
      - credentialsId: "i<3GitLab"manageHooks: truename: "gitlab.com"serverUrl: "https://gitlab.com"

For better security, see handling secretssection in JCasC documentation.

Future Scope of work

The second phase of GSoC will be utilized to develop GitLab Branch Source. The new feature is a work in progress, but the codebase is unstable and requires lot of bugfixes. Some features like Multibranch Pipeline Jobs are functioning properly. More about it at the end of second phase.

Issue Tracking

This project uses Jenkins JIRA to track issues. You can file issues undergitlab-branch-source-plugin component.

Acknowledgements

This plugin is built and maintained by the Google Summer of Code (GSoC) Team forMulti-branch Pipeline Support for GitLab. A lot of inspiration was drawn from GitLab Plugin, Gitea Plugin and GitHub Plugin.

Our team consists of: baymac, LinuxSuRen,Marky, Joseph,Justin, Jeff.

With support from: Oleg, Greg,Owen.

Also thanks to entire Jenkins community for contributing with technical expertise and inspiration.

Plugin Management Library and CLI Tool Alpha Release

$
0
0

"Everybody is re-inventing the wheel, partially implementing the "details" of plugin management (signed metadata, artifacts checksums, plugins detached from core,…​). It becomes obvious Jenkins should provide adequate tooling for plugin installation outside a live Jenkins instance."JENKINS-53767

My Google Summer of Code project tries to solve this problem by creating a library that will unify plugin management logic across the different implementations of Jenkins and providing a CLI tool that will make it easy for users to download plugins and view plugin information before Jenkins even starts. I’m excited to share that we just released an alpha version that you can check out here!

GSoC Phase 1 Update

While I looked into pulling the Plugin Manager out of Jenkins core, this ended up being a challenging first step due to the complexity and number of dependencies. We instead decided to start by converting theinstall-plugins.sh bash script in Jenkins Docker to Java. There are several issues with the install-plugins.sh script - namely, that it is a bash script and has limited extensibility. Furthermore, it does not retrieve all of the most-up-to-date update center metadata.

Alpha Release Details

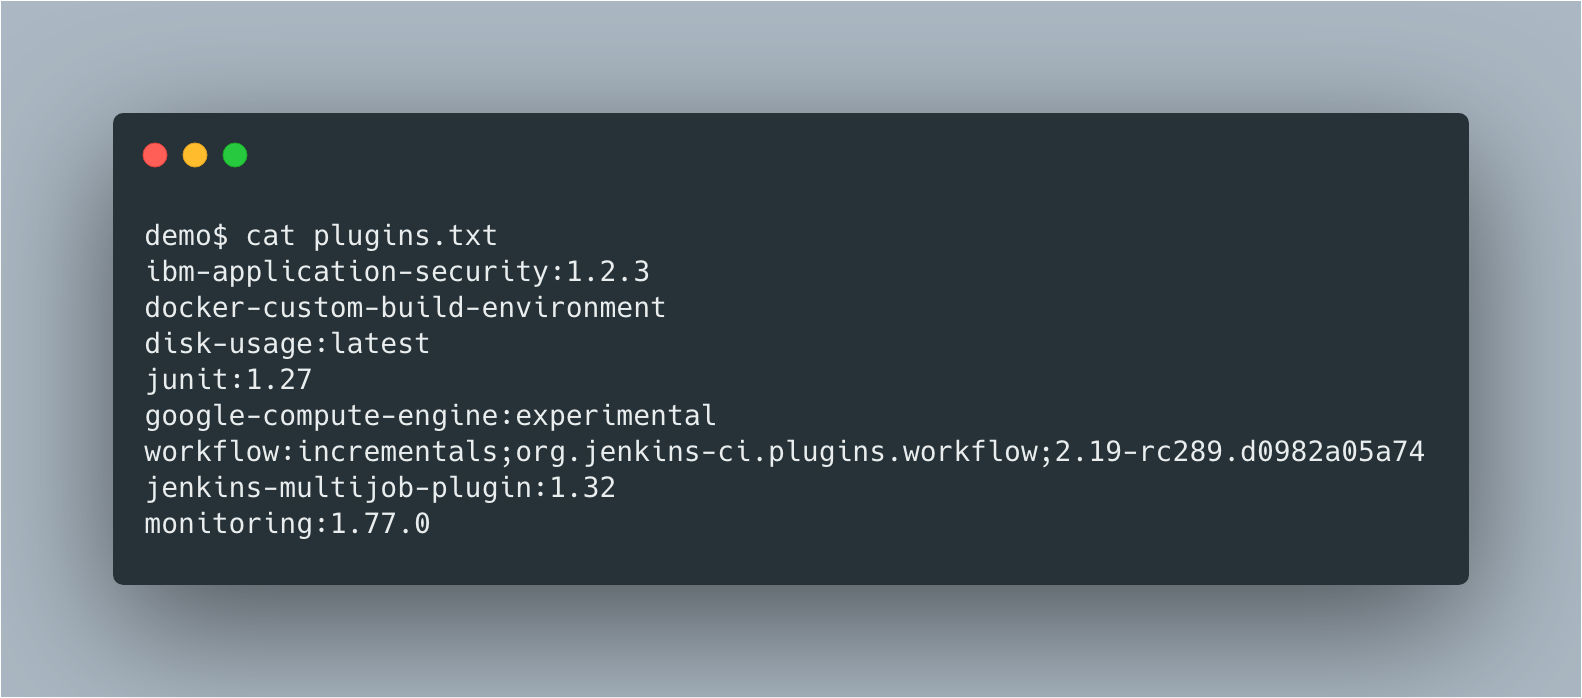
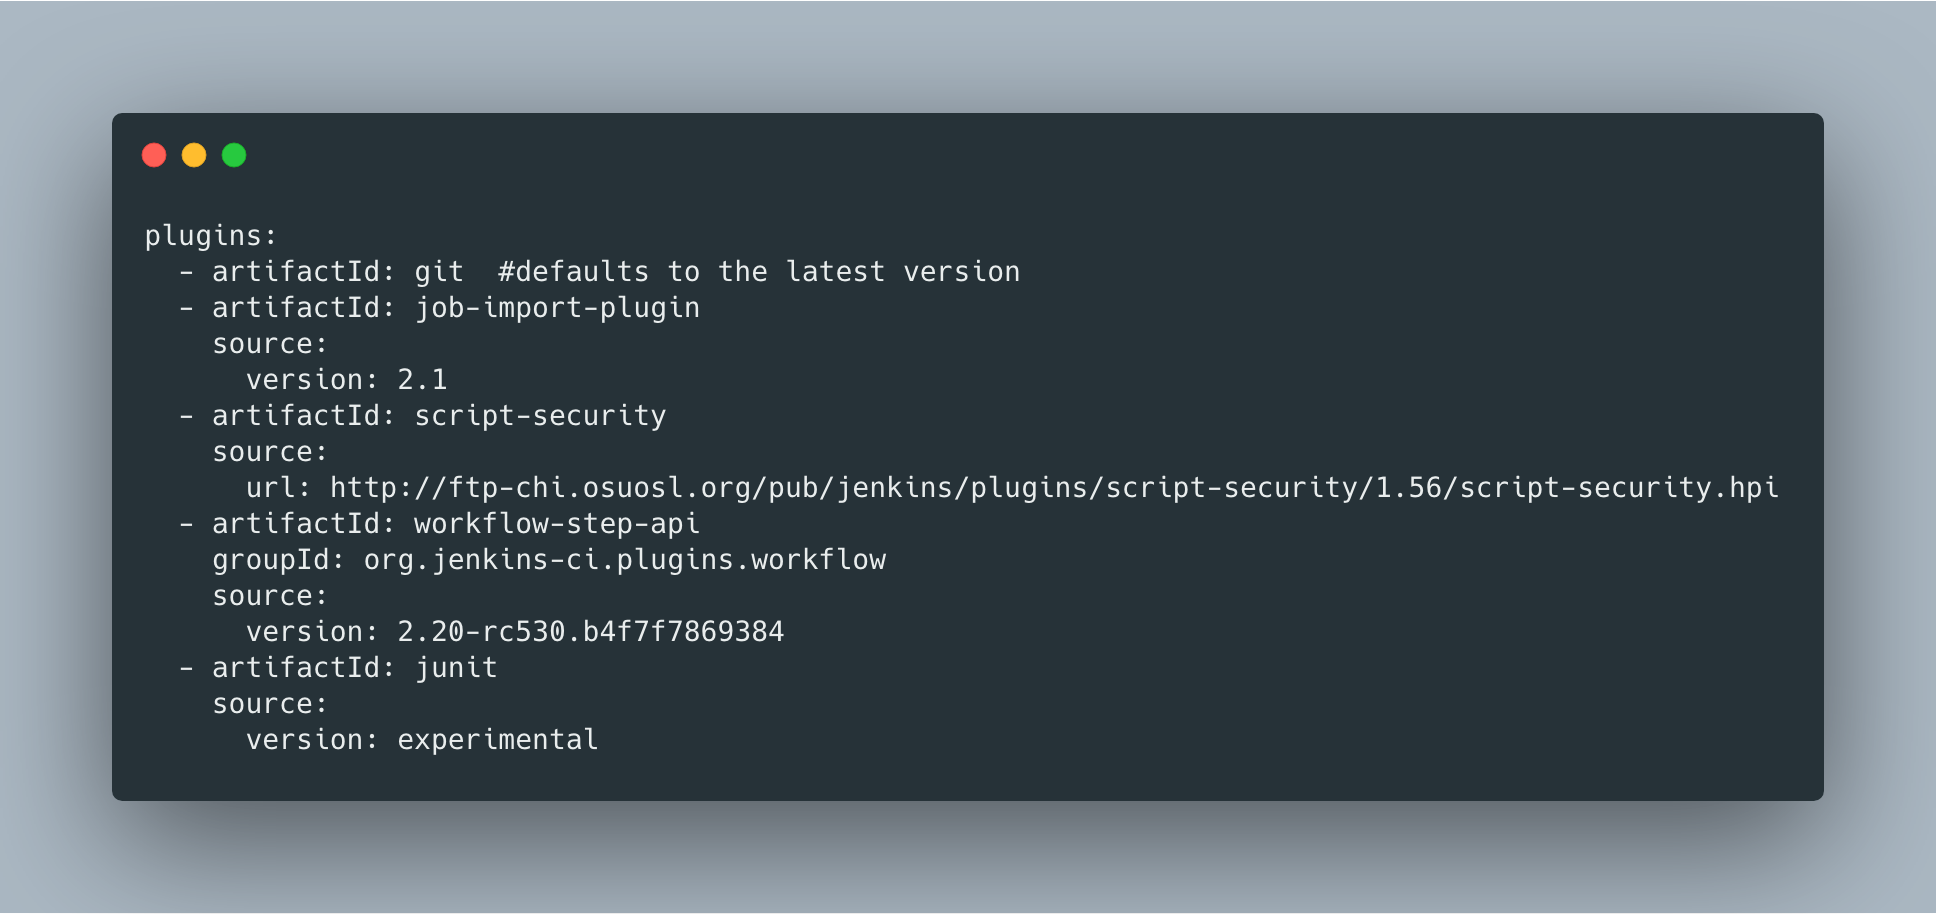
Mimicking what was done in the install-plugins.sh script from the official Jenkins Docker image, the new plugin management library takes in a list of plugins, their versions, and/or urls from which to download the plugins, and downloads the requested plugins and their dependencies. The plugins are downloaded from the update center to a specified directory, and can then be loaded into Jenkins. Currently, the plugins to be downloaded can be specified via a plugins.txt file and/or the -plugins cli option, but we plan to further expand the input formats that can be accepted.Custom version specifiers for different update centers are also supported.

Example plugins.txt File

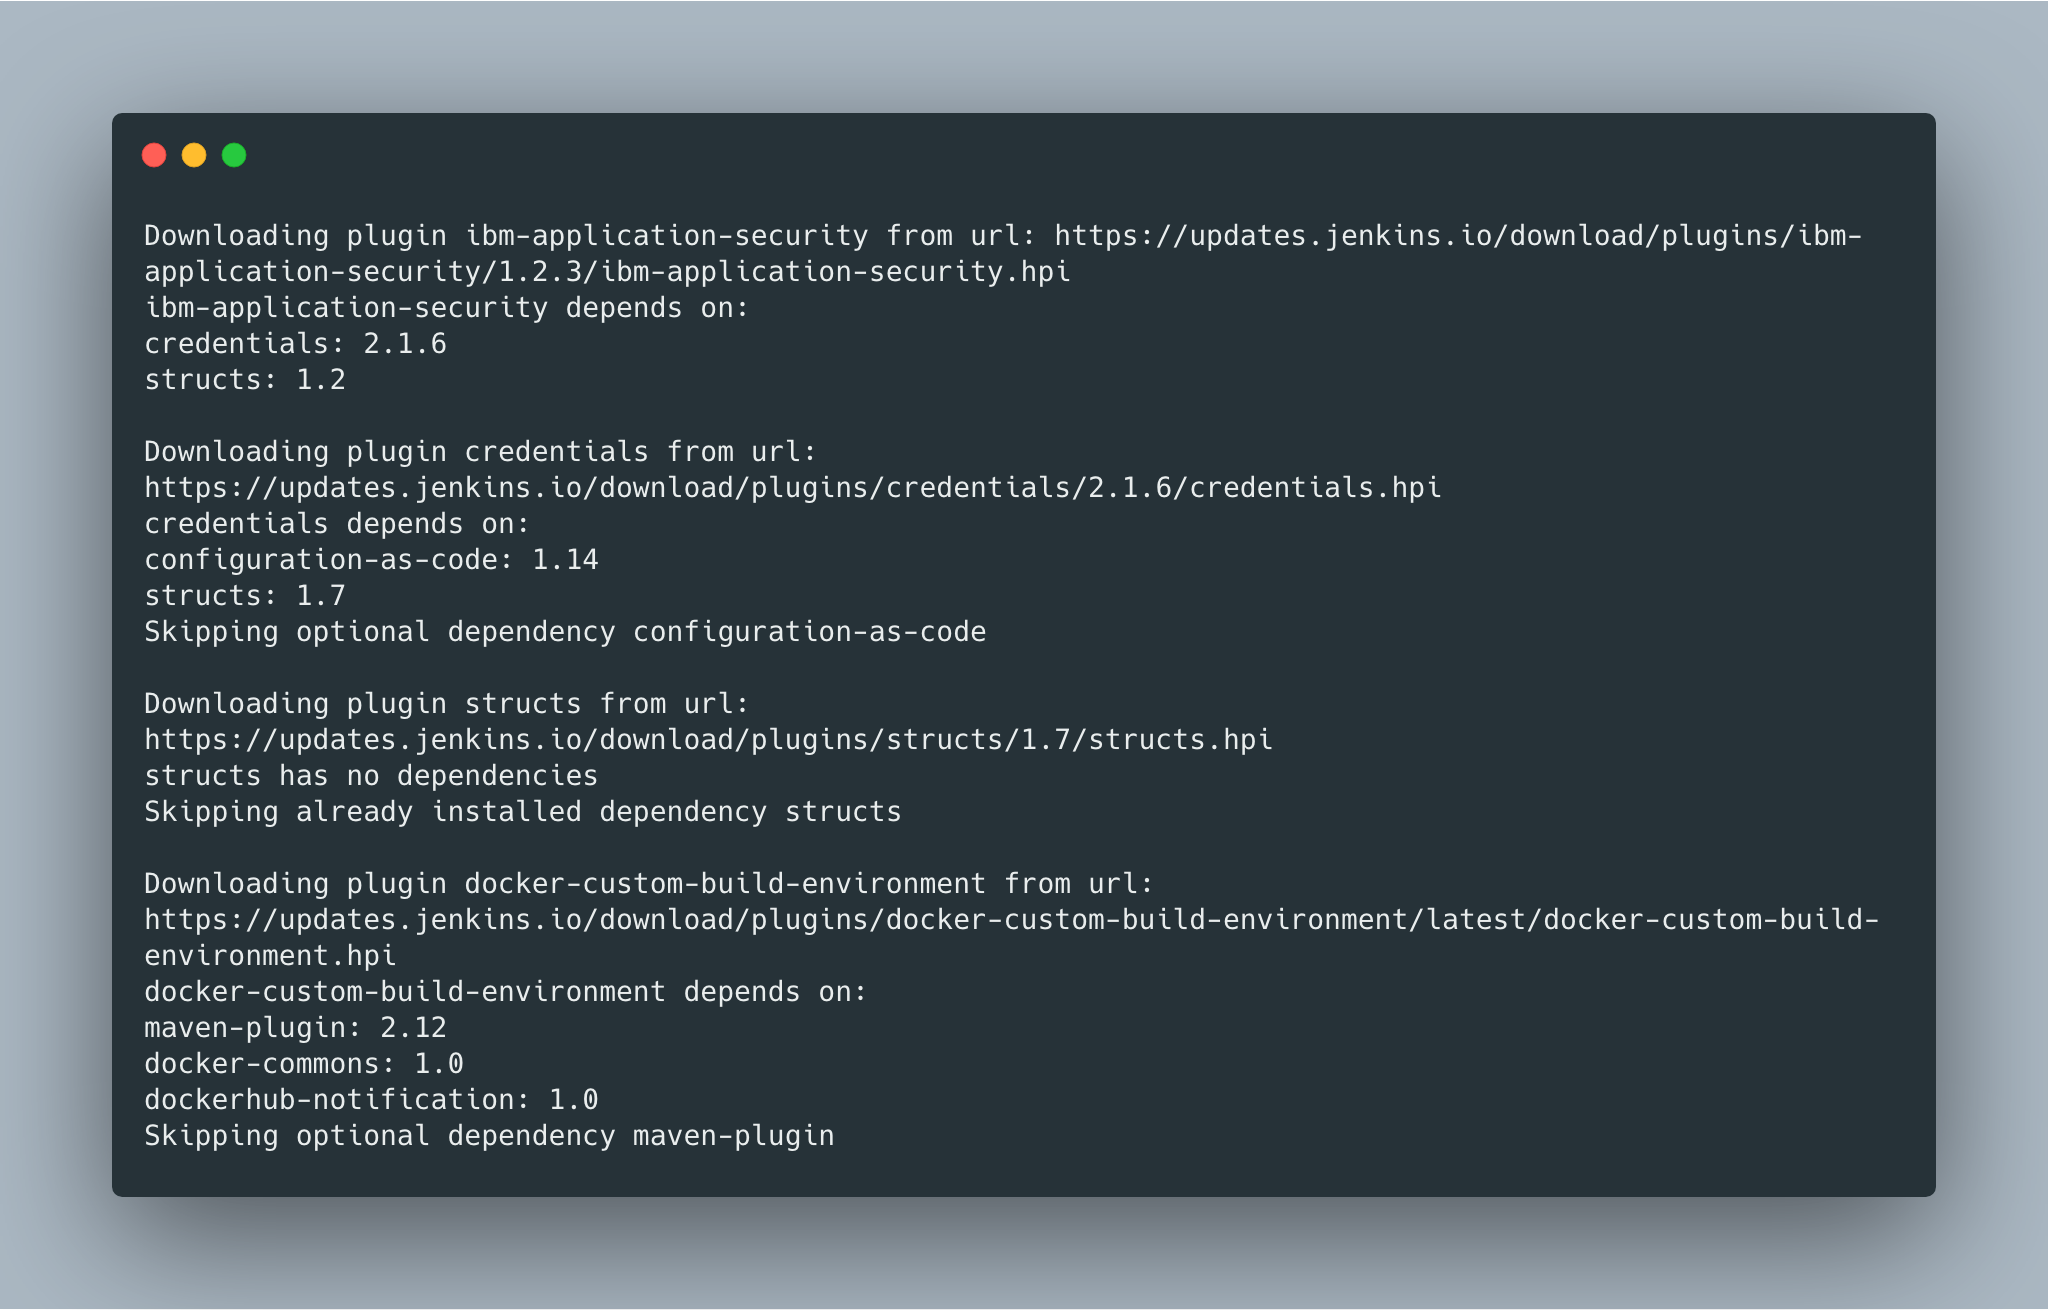
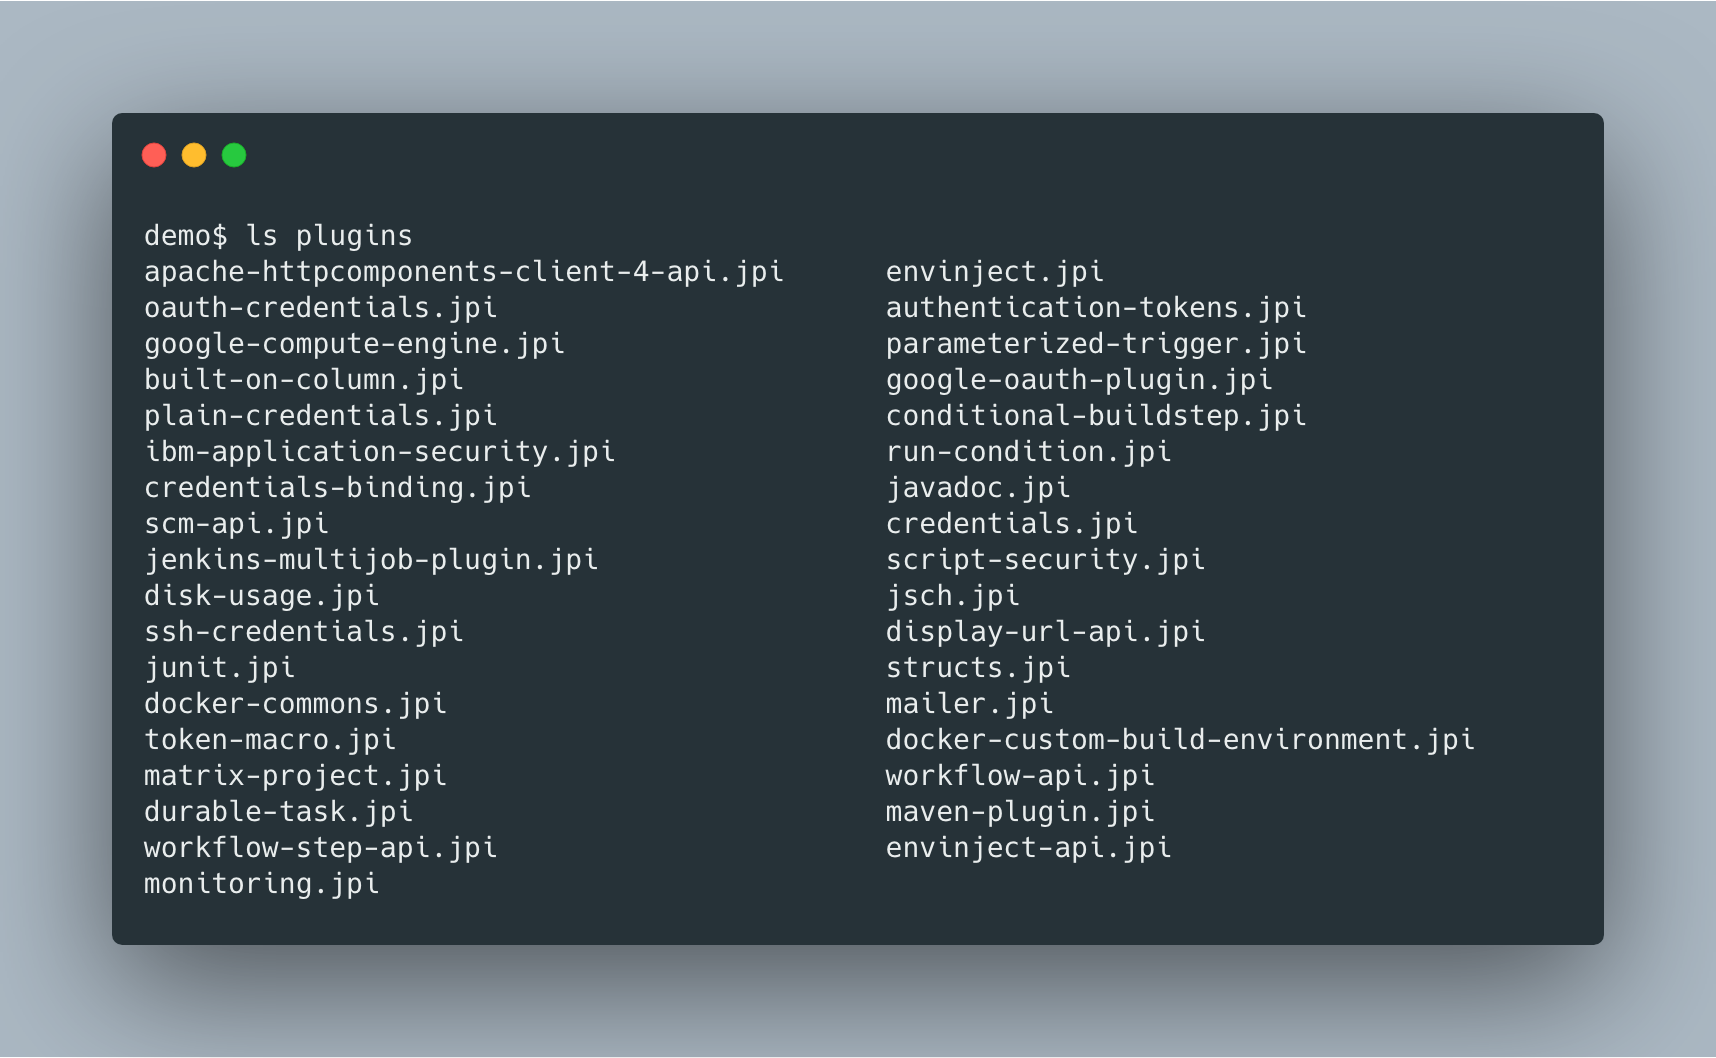
The library will first check if any of the requested plugins are currently either installed in the user-specified download location or user-specified Jenkins war file. Already installed plugins will be ignored or upgraded if a higher version is requested or required as a dependency. After determining the plugin download URL, the library will download the plugins and resolve and download their dependencies.

Example of Downloading Plugins
Plugin Download Directory

This is just the beginning: the plugin manager library and cli tool are very much still a work in progress. For the most up-to-date information on CLI options and how to run the tool, see the repository README.md. More robust input parsing, support for security warnings and available updates, Docker integration, and additional features coming soon!

Feel free to reach out through the Plugin Installation Manager CLI Tool Gitter chat or through the Jenkins Developer Mailing list. I would love to get your questions, comments, and feedback! We have meetings Tuesdays and Thursdays at 6PM UTC.


Jenkins Pipeline Stage Result Visualization Improvements

$
0
0

Some changes have recently been released to give Pipeline authors some new tools to improve Pipeline visualizations in Blue Ocean, in particular to address the highly-voted issue JENKINS-39203, which causes all non-failing stages to be visualized as though they were unstable if the overall build result of the Pipeline was unstable. This issue made it difficult to quickly identify why a build was unstable, and forced users to read through builds logs and the Jenkinsfile to figure out what actually happened.

In order to fix this issue, we introduced a new Pipeline API that can be used to attach additional result information to individual Pipeline steps. Visualization tools like Blue Ocean use this new API when deciding how a given stage should be displayed. Steps like junit that used to set only the overall build result now additionally use the new API to set step-level result information. We created the new unstable and warnError steps so that Pipeline authors with more complicated use cases can still take advantage of this new API.

The core fixes for the issue are present in the following plugins, all of which require Jenkins 2.138.4 or newer:

  • Pipeline: API 2.34

  • Pipeline: Basic Steps 2.18 (requires a simultaneous update to Pipeline: Groovy 2.70)

  • Pipeline: Graph Analysis 1.10

  • Pipeline: Declarative 1.3.9

  • Blue Ocean 1.17.0

Here is a screenshot from Blue Ocean of a Pipeline using the unstable step where only the failing stage is marked as unstable:

Visualization of a Pipeline in Blue Ocean with a single stage shown as unstable

Examples

Here are some examples of how to update your Pipelines to use the new improvements:

  • Use the new warnError step to catch errors and mark the build and stage as unstable.warnError requires a single String parameter, which is a message to log when an error is caught. When warnError catches an error, it logs the message and the error and sets the build and stage result to unstable. Using it looks like this:

    warnError('Script failed!') {
      sh('false')
    }
  • Use the new unstable step to set the build and stage result to unstable. This step can be used as a direct replacement for currentBuild.result = 'UNSTABLE', and may be useful in cases where warnError is not flexible enough. unstable requires a single String parameter, which is a message to log when the step runs. Using it might look like this:

    try {
      sh('false')
    } catch (ex) {
      unstable('Script failed!')
    }
  • JUnit Plugin: Update to version 1.28 or newer to pick up fixes for the junit step so that it correctly marks the stage as unstable.

  • Warnings Next Generation Plugin: Update to version 5.2.0 or newer to pick up fixes for the publishIssues and recordIssues steps so that they correctly mark the stage as unstable.

  • Other Plugins: If your Pipeline is marked as unstable by a step in another plugin, please file a new issue with the component set to that plugin (after checking for duplicates), clearly describing which step has the problem and under what circumstances it occurs, and link to the developer section of this post as a reference for how the maintainer might be able to address the problem.

Limitations

  • If you do not migrate to the unstable or warnError steps, or update plugins that set the build result to versions that integrate with the new API, then in cases where the build is unstable, Blue Ocean will not show any stages as unstable.

  • Even after these changes, currentBuild.result continues to refer only to the overall build result. Unfortunately, it was not possible to adapt the currentBuild global variable to make it track step or stage-level results, since it is implemented as a global variable, which means it does not have any step-level context through which it could use the new API.

  • Pipeline Stage View Plugin has not yet been updated to use the new API, so these changes do not affect the visualization it provides.

History

Jenkins Pipeline steps can complete in one of two ways: sucessfully, by returning a (possibly null) result, or unsucessfully, by throwing an exception. When a step fails by throwing an exception, that exception propagates throughout the Pipeline until another step or Groovy code catches it, or it reaches the top level of the Pipeline, which causes the Pipeline itself to fail. Depending on the type of exception thrown, the final result of the Pipeline may be something other than failure (for example in some cases it will be aborted). Because of the way the exception propagates, it is easy for tools like Blue Ocean to identify steps (and therefore stages) which failed due to an exception.

In order for Pipelines to be able to interact with established Jenkins APIs, it was also necessary for Pipeline builds to have an overall build result that can be modified during the build. Among other things, this allows Pipelines to use build steps and wrappers that were originally written for use in Freestyle projects.

In some cases, it is desirable for a Pipeline step to be able to complete sucessfully so that the rest of the Pipeline continues normal execution, but for it to be able to note that some kind of error occurred so that visualizations are able to identify that something went wrong with the step, even though it didn’t fail completely. A good example of this is the junit step. This step looks at specified test results, and if there were any failures, marks the overall build result as unstable. This kind of behavior is problematic for visualization tools like Blue Ocean, because the step completed successfully, and there is no programmatic way to associate the overall build result with the step that ended up setting that result.

Looking at JENKINS-39203 again, we see that there were essentially two options for the visualization. If the overall build result was unstable, either all steps that completed sucessfully could be shown as unstable, because they may have been the step that caused the build to become unstable, or they could be shown as successfull, because we have no way to relate the setting of the build result to a specific step. In the end, the first option was chosen.

To work around this issue, some users tried to do things like throw exceptions and add try/catch blocks around stages that handle exceptions so that Blue Ocean would be able to use the exceptions to mark step and stage results as desired, and then by catching the exception the Pipeline would be able to continue normal execeution. These kinds of workarounds were hard to understand, fragile, and did not work well (if at all) for Declarative Pipelines.

Developers

If you are a developer of a plugin that integrates with Pipeline using a step, and want to take advantage of the new API so that your step can report an non-succesful result without throwing an exception, please see this post to the Jenkins Developers mailing list, and respond there if you have any questions.

GSOC Phase 1 Updates On Working Hours Plugin

$
0
0
The Working Hour Plugin provides an interface to set up a schedule of allowable build days and times.  Jobs that run outside of configured working hours are held until the next allowable build time.

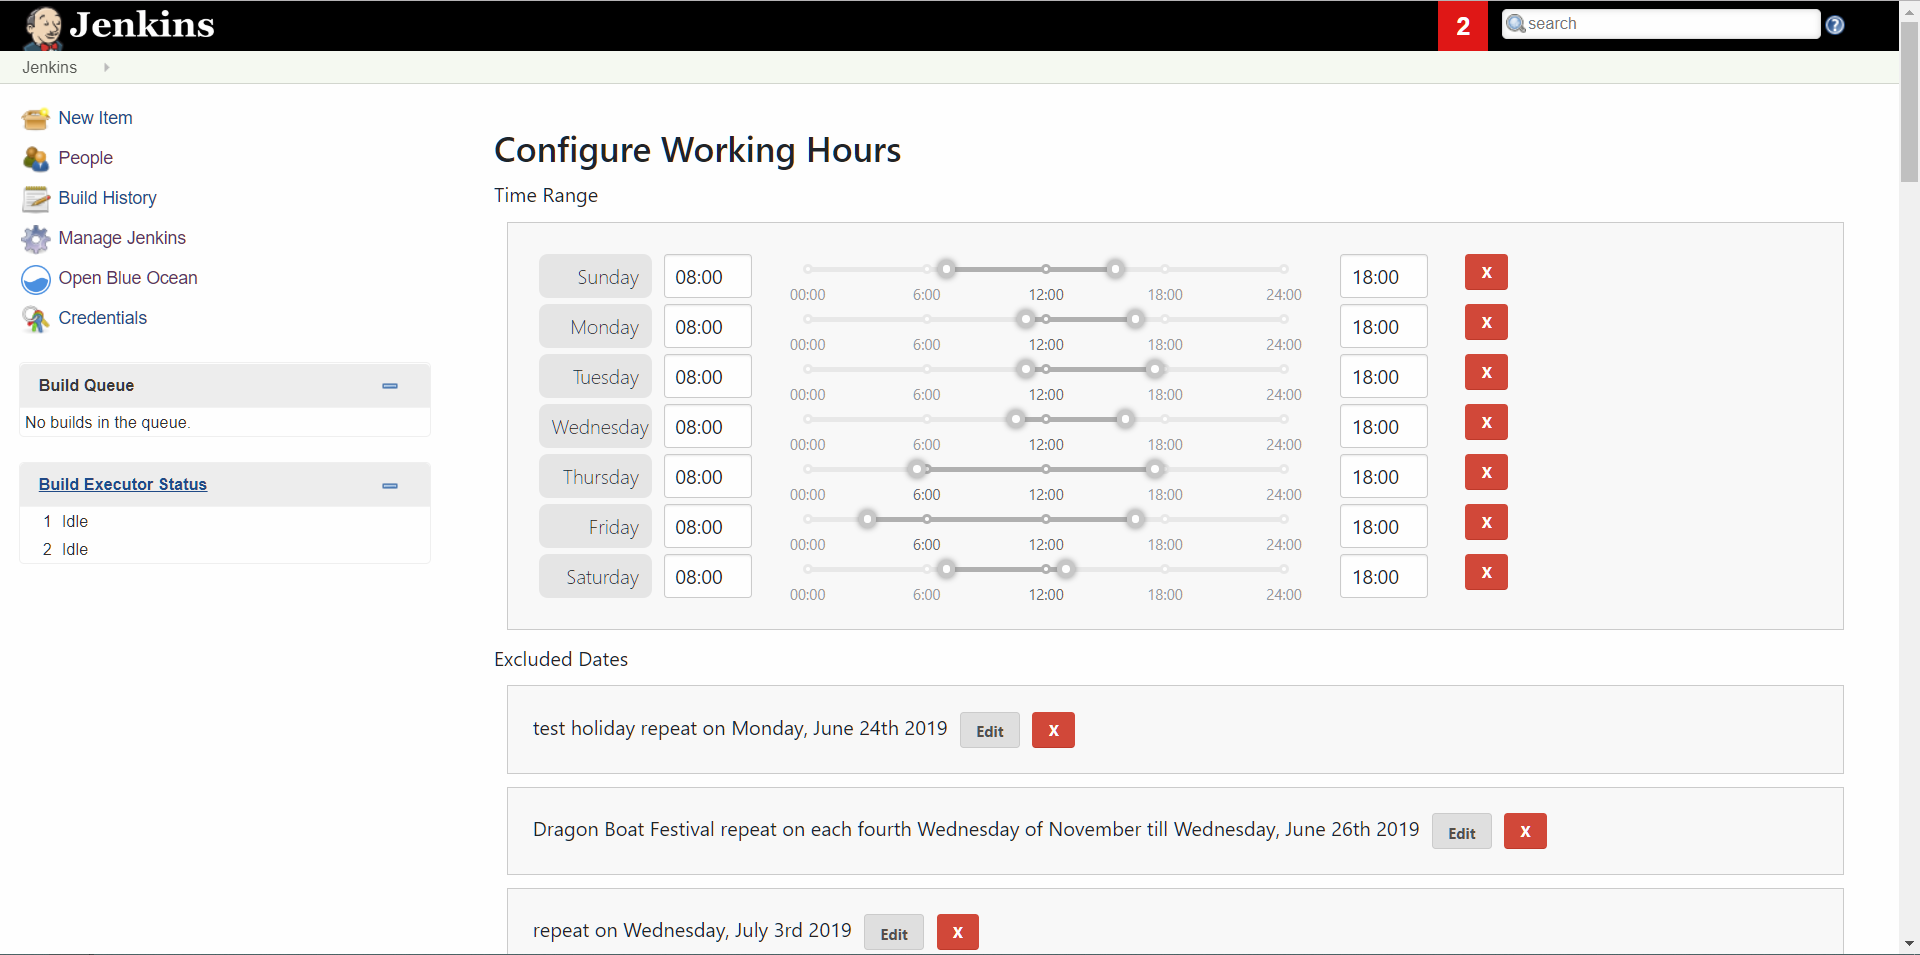
For the first code phase at Google Summer of Code, I’ve been working on Working Hours Project, which needed improvements on usability.

Rather than classical Jelly pages, React seems to be more prefered when we want to design a much customized UI with a huge amount of libraries we could use, especcially the open source components such as date pickers.

But we have to face a challenge of the integration of React and Jenkins, which I’m currently working on.

Achievements For The First Code Phase

For the first code phase, we are focusing on the UI improvements, we’ve achieved following major improvements:

  • A standalone webapp which could be then integrated.

  • Slider for choosing a time range.

  • More fields when setting a excluded date.

  • Presets for choosing a excluded date.

  • A Jenkins styling UI.

How We Integrate React Into Jenkins

At first, we found BlueOcean is a great example for using React in Jenkins, but yet it’s not a choice for common development with plugins. So we need to find out another way to integrate.

There are three steps to do the integration:

  • A mount point in your jelly file, usually it’s a element with a unique id.

  • Write your React Application, but need to set the mount point to the id you set above.

  • Copy the output after you build the Project into the plugin’s webapp dir.

  • Add your files using a script tag in your jelly file.

<script type="text/javascript" src="${resURL}/plugin/working-hours/js/main.js"></script>
  • Once we are using React, the traditional jelly request won’t be available anymore, another way to process requests will be using stapler. You can define a process function like below. [source, java]

public HttpResponse doDynamic(StaplerRequest request) {
        if (config == null) {
            config = ExtensionList.lookup(WorkingHoursPlugin.class).get(0);
        }
        String restOfPath = request.getRestOfPath();
        String[] pathTokens = restOfPath.split("/");
        List<String> params = new ArrayList<>();
        switch (params.get(0)) {
            case "list-excluded-dates":
                return listExcludedDate(request);
            case "set-excluded-dates":
                return setExcludedDates(request);
            case "list-time-ranges":
                return listTimeRanges(request);
            case "set-time-ranges":
                return setTimeRanges(request);
        }
    }

Run Our Application

If you would like to take a look at our plugin, you can go to the repoworking-hours-plugin

Just follow the README file, then you could run a copy of your working hours plugin.

Screenshots

The current plugin’s outlook is a bit simple and the plugin is a bit unconvinient for use.

One of the problems is that if we want to input a excluded date, it’ll be a string in a constant format like 15/9/2019, but the new UI choosed React so we could use a datepicker to improve this.

Current Plugin

Screenshot for Current Plugin

New

Time Ranges

Time Ranges Example

New

Exclude Dates

Excluded Dates Example

If you have any questions or advices, we are glad to hear from you.

Several useful links are listed below:

Remoting over Apache Kafka plugin with Kafka launcher in Kubernetes

$
0
0

I am Long Nguyen from FPT University, Vietnam. My project for Google Summer of Code 2019 is Remoting over Apache Kafka with Kubernetes features. This is the first time I have contributed for Jenkins and I am very excited to announce the features that have been done in Phase 1.

Project Introduction

Current version of Remoting over Apache Kafka plugin requires users to manually configure the entire system which includes Zookeeper, Kafka and remoting agents. It also doesn’t support dynamic agent provisioning so scalability is harder to achieve. My project aims to solve two problems:

  1. Out-of-the-box solution to provision Apache Kafka cluster.

  2. Dynamic agent provisioning in a Kubernetes cluster.

Current State

  • Kubernetes connector with credentials supported.

  • Apache Kafka provisioning in Kubernetes feature is fully implemented.

  • Helm chart is partially implemented.

Apache Kafka provisioning in Kubernetes

This feature is part of 2.0 version so it is not yet released officially. You can try out the feature by using the Experimental Update Center to update to 2.0.0-alpha version or building directly from master branch:

git clone https://github.com/jenkinsci/remoting-kafka-plugin.git
cd remoting-kafka-plugin/plugin
mvn hpi:run

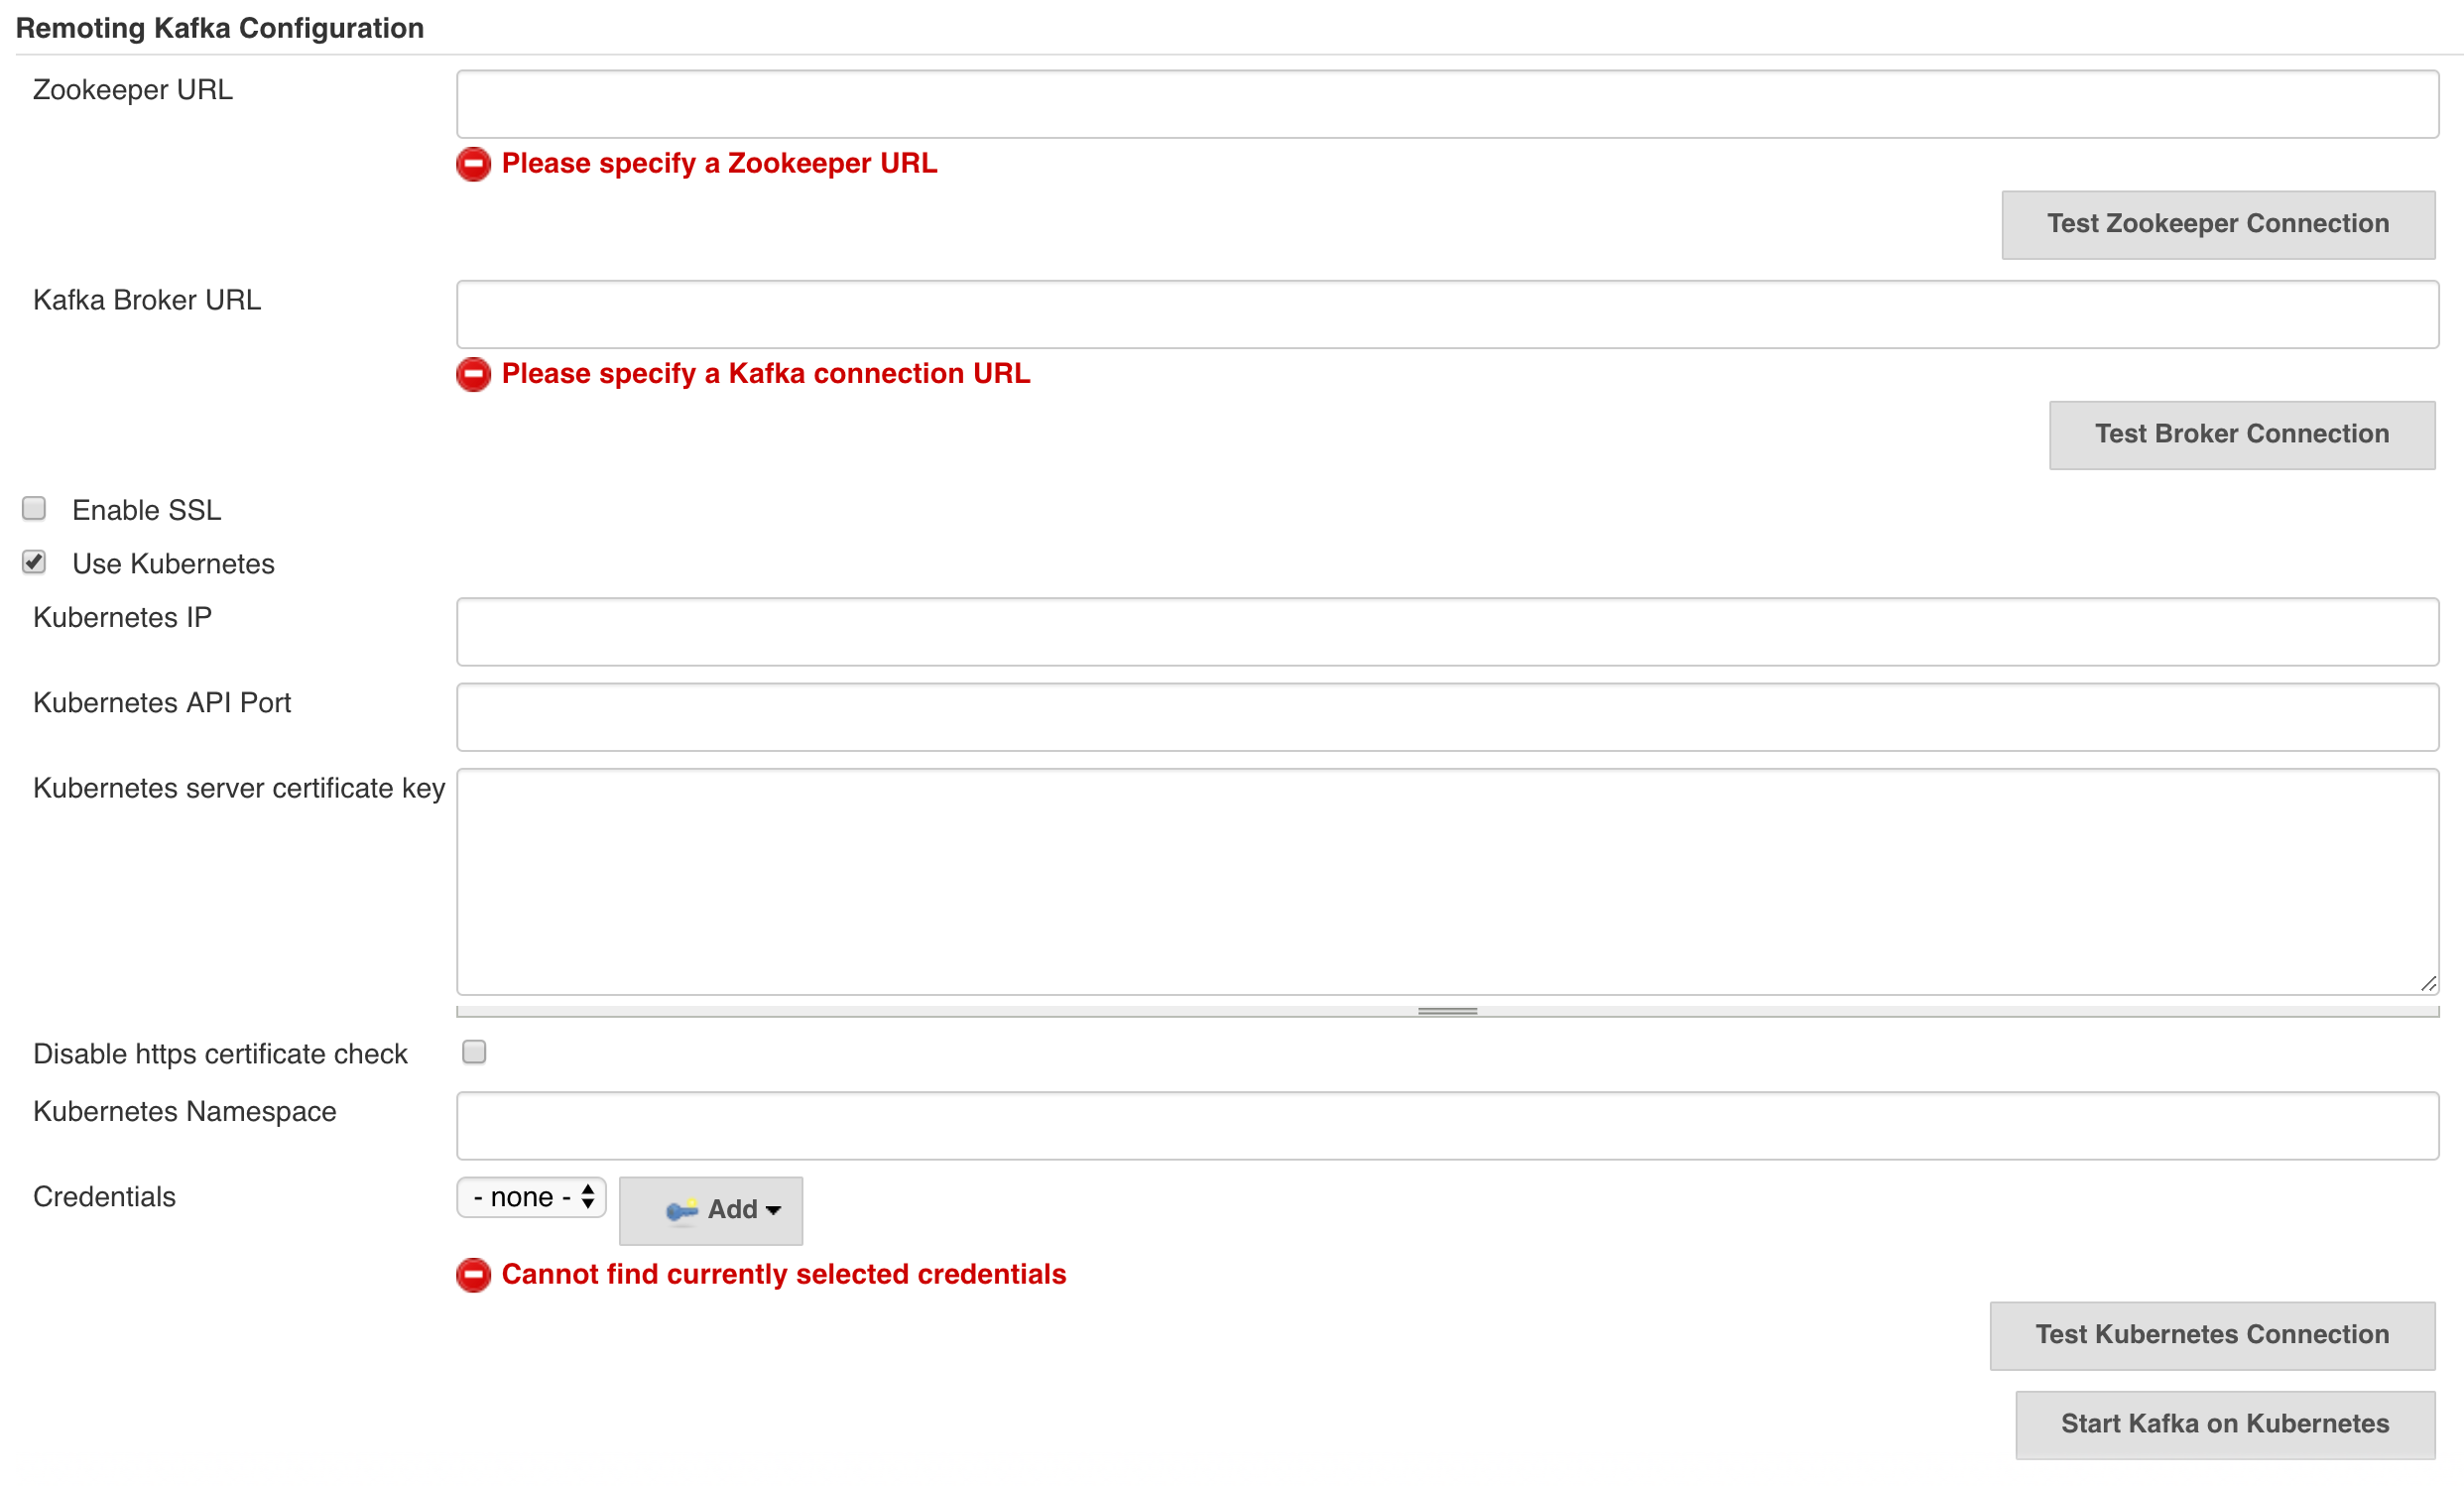
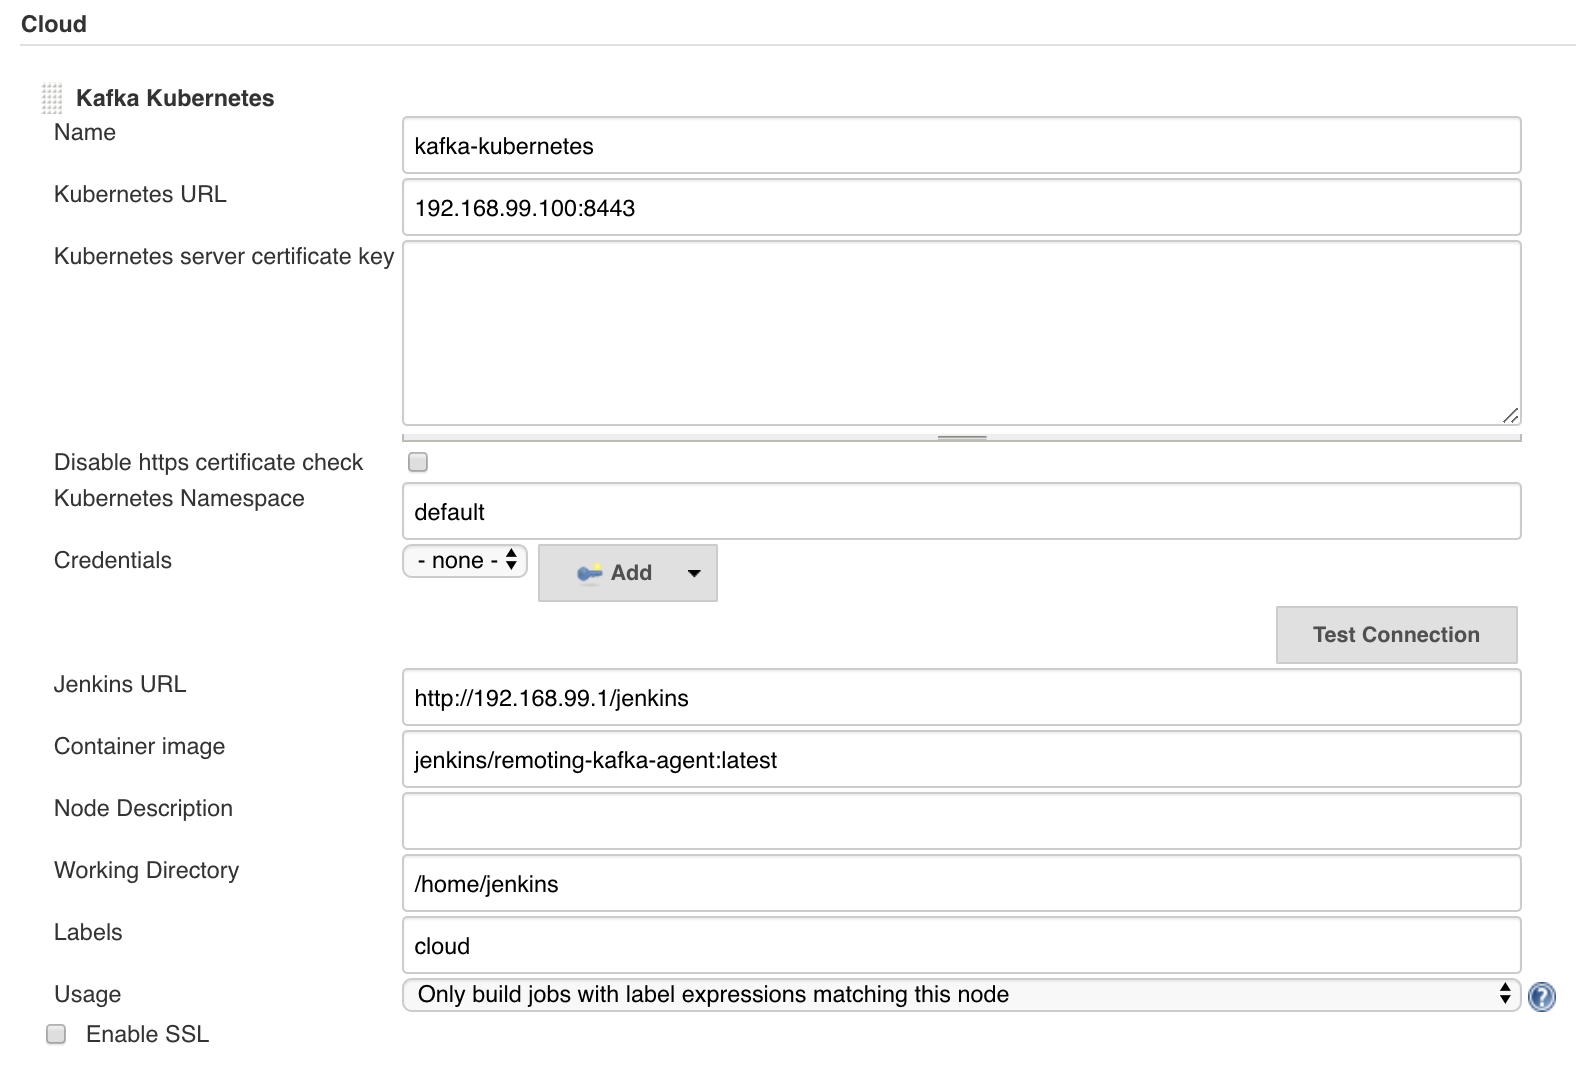
On the Global Configuration page, users can input Kubernetes server information and credentials. Then they can start Apache Kafka with only one button click.

Kafka provisioning in Kubernetes UI

When users click Start Kafka on Kubernetes button, Jenkins will create a Kubernetes client from the information and then apply Zookeeper and Kafka YAML specification files from resources.

Kafka provisioning in Kubernetes architecture

Helm Chart

Helm chart for Remoting over Apache Kafka plugin is based on stable/jenkins chart and incubator/kafka chart. As of now, the chart is still a Work in Progress because it is still waiting for Cloud API implementation in Phase 2. However, you can check out the demo chart with a single standalone Remoting Kafka Agent:

git clone -b demo-helm-phase-1 https://github.com/longngn/remoting-kafka-plugin.git
cd remoting-kafka-plugin
K8S_NODE=<your Kubernetes node IP> ./helm/jenkins-remoting-kafka/do.sh start

The command do.sh start will do the following steps:

  • Install the chart (with Jenkins and Kafka).

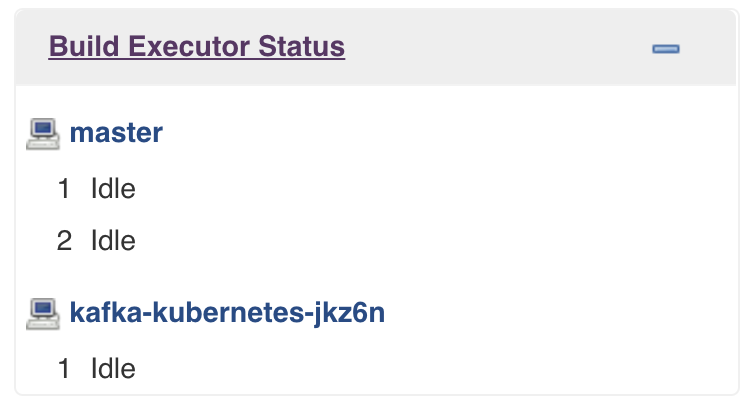
  • Launch a Kafka computer on Jenkins master by applying the following JCasC.

jenkins:nodes:
    - permanent:
        name: "test"
        remoteFS: "/home/jenkins"
        launcher:
          kafka: {}
  • Launch a single Remoting Kafka Agent pod.

You can check the chart state by running kubectl, for example:

$ kubectl get all -n demo-helm
NAME                                    READY   STATUS    RESTARTS   AGE
pod/demo-jenkins-998bcdfd4-tjmjs        2/2     Running   0          6m30s
pod/demo-jenkins-remoting-kafka-agent   1/1     Running   0          4m10s
pod/demo-kafka-0                        1/1     Running   0          6m30s
pod/demo-zookeeper-0                    1/1     Running   0          6m30s

NAME                              TYPE        CLUSTER-IP       EXTERNAL-IP   PORT(S)                      AGE
service/demo-0-external           NodePort    10.106.254.187   <none>        19092:31090/TCP              6m30s
service/demo-jenkins              NodePort    10.101.84.33     <none>        8080:31465/TCP               6m31s
service/demo-jenkins-agent        ClusterIP   10.97.169.65     <none>        50000/TCP                    6m31s
service/demo-kafka                ClusterIP   10.106.248.10    <none>        9092/TCP                     6m30s
service/demo-kafka-headless       ClusterIP   None             <none>        9092/TCP                     6m30s
service/demo-zookeeper            ClusterIP   10.109.222.63    <none>        2181/TCP                     6m30s
service/demo-zookeeper-headless   ClusterIP   None             <none>        2181/TCP,3888/TCP,2888/TCP   6m31s

NAME                           READY   UP-TO-DATE   AVAILABLE   AGE
deployment.apps/demo-jenkins   1/1     1            1           6m30s

NAME                                     DESIRED   CURRENT   READY   AGE
replicaset.apps/demo-jenkins-998bcdfd4   1         1         1       6m30s

NAME                              READY   AGE
statefulset.apps/demo-kafka       1/1     6m30s
statefulset.apps/demo-zookeeper   1/1     6m30s

Next Phase Plan

  • Implement Cloud API to provision Remoting Kafka Agent. (JENKINS-57668)

  • Integrate Cloud API implementation with Helm chart. (JENKINS-58288)

  • Unit tests and integration tests.

  • Release version 2.0 and address feedbacks. (JENKINS-58289)

Introducing the Pipeline Configuration History Plugin

$
0
0

Pipelines are the efficient and modern way how to create jobs in Jenkins. To recognize pipeline changes quickly and easily, we developed the Pipeline Configuration History plugin. This plugin detects changes of pipelines and provides the user an option to view changes between two builds (diffs) of pipeline configurations visibly and traceably.

How everything started

It all started 10 years ago — with classical job types (e.g. Freestyle, Maven, etc.). Every once in a while users contacted us because their jobs failed to build overnight. Why did the job fail? Was the failure related to a job configuration change? The users' typical answer was: "We didn’t change anything!", but is that really true? We thought about this and decided to develop a plugin that helped us solve this problem. This was the idea and the beginning of Job Configuration History.

Now it was possible to view changes of job configurations (like other branches, JDK versions, etc.) and more often the reason for breaking builds were changes of job configurations.

Screenshot of Job Configuration History

Over the years the plugin got developed and is still under development. New functions were added, that not only view job configurations, but also changes of global and agent configurations. It is also possible to recover old configuration versions. Today the plugin has more than 30,000 installations. For many years JobConfigHistory relieves our daily work — with more than 3,000 Jenkins jobs! Then there was a new type of job: Pipelines.

Pipelines - something new was needed

Pipeline jobs are fundamentally different than classical job types . While classic job types are configured via the Jenkins GUI, Pipeline jobs are configured as code. Every pipeline job indeed gets created via the Jenkins GUI, however that is not necessarily where the pipeline configuration is located. Pipelines can be configured:

  • Directly in the Jenkins job as script. The code gets inserted directly in the job configuration page.

  • As Jenkinsfile in the source code management system (SCM): The pipeline configuration is defined in a text file (Jenkinsfile) in the SCM. In the job itself only the path to the repository of the Jenkinsfile is configured. During the build the Jenkinsfile gets checked out from the SCM and processed.

  • As a shared library: A part of the pipeline configuration gets moved to separate files that can be used by several jobs. These files are also saved in the SCM. Even so a Jenkinsfile is still needed (or a pipeline script in the job).

With every save operation of the job configuration, JobConfigHistory creates a copy of the actual job configuration if something has changed. That only works for pipeline jobs if the pipeline configuration is inserted in the job configuration page as script. Changes in the Jenkinsfile or the shared libraries are not detected by JobConfigHistory. You have to use the SCM system to view changes of the Jenkinsfile or the shared libraries. It is complex and time intensive to find a correlation between the time of a build and a change to the Jenkinsfile or shared library.

This new problem is much more than JobConfigHistory. A new solution was needed to detect pipeline changes and show these changes in Jenkins. So we developed Pipeline Configuration History.

During every pipeline run the Jenkinsfile and related shared libraries are saved in the builds directory of the job. Pipeline Configuration History saves changes of the pipeline files between the last run and the previous run as history events. Therefore when a pipeline job ceases to build successfully, you can check if something has changed on any used pipeline file. You can also see the build where changes occurred.

Screenshot of Pipeline Configuration History

Because a pipeline configuration can consist of several files where changes could have occurred, only files with changes between two builds are shown in the diff. That makes the whole thing more compact and effective:

Screenshot of Pipeline Configuration History

But sometimes you may want to show more than the differences between pipeline files. You may want to see which pipeline files are in use or the content of those files when they were used. So it’s possible to view all files and their content. If required you can download them as well:

Screenshot of Pipeline Configuration History

Conclusion

We use Pipeline Configuration History successfully in production. It has helped us from the very first day as we solved problems that occurred due to pipeline configuration changes. Pipeline Configuration History won’t replace Job Configuration History. The plugins have different use cases. Many times small changes on job or pipeline configurations also have big impacts. Because of the correlation in time between changes of job or pipeline configurations and different build behavior, it is now possible to substantially reduce the time and effort to analyze build failures. The Job Configuration History and Pipeline Configuration History plugins let us help our users in consulting and in solving issues. We resolve problems much faster through easy access to the configuration history of jobs. These plugins are essential for our daily work.

DevOps World - Jenkins World 2019 San Francisco: Lunch Time Demos

$
0
0
2019 dwjw email san fran

If you’re looking for more opportunities to learn Jenkins and Jenkins X during the lunch hours while at DevOps World - Jenkins World 2019 San Francisco, come join us at the Jenkins and Jenkins X Community Booth!

If you don’t yet have your pass for DevOps World - Jenkins World 2019 San Francisco, and don’t want to miss out on the fun, you can get yours using JWFOSS for a 30% discount.

During lunch hours we are scheduling the following demo briefs at the Jenkins and Jenkins X Community Booth:

Wednesday August 14, 2019

12:10 - 12:25pm Faster Git Mark Waite

Attendees will learn the techniques they can use with Jenkins to make their systems clone and update git repositories faster and with less disc space.

12:25 - 12:40pm Observability in Jenkins X Oscar Medina

If you are using Jenkins X, you’re already building at rapid pace. However, most miss the opportunity to gain real insights into their build and release pipeline. I’ll show you how you can increase observability by activating metric capture and analysis during a containerized application deployment with Jenkins X. This entails modifying the declarative Tekton pipelines.

12:40 - 12:55pm Jenkins-Rest, A JClouds Java Library for the Jenkins REST API Martin d’Anjou

Using the Java-Rest library, we demonstrate how to submit a job to Jenkins, and track it to its completion, all from the command line, without ever touching the GUI.

12:55 - 1:10pm DevOps without Quality: An IT Horror Story Laura Keaton

DevOps, the current IT Industry sweetheart, has a dark secret that has victimized organizations on their transformational journey. Investigate two case studies that left development and delivery teams in tatters and how quality engineering solutions could have prevented their disastrous outcomes.

1:10 - 1:25pm Securing Your Jenkins Container Pipeline with Open Source Tools Christian Wiens

Discuss the security pitfalls of containers and how embedding an open source image scanning and policy based compliance tool like Anchore into your CI/CD pipeline can mitigate this risk.

Thursday August 15, 2019

12:25 - 12:40pm Results from the 2019 Jenkins Google Summer of Code Martin d’Anjou

In 2019, the Jenkins project participated in the Google Summer of Code. This is an annual, international, program which encourages college-aged students to participate in open source projects during the summer break between classes. In 2019, we had dozens of applications and many student projects. In this session, we will showcase the students' projects and talk about what they bring to the Jenkins ecosystem.

12:40 - 12:55pm Sysdig Secure Jenkins Plugin Marky Jackson

Sysdig Secure is a container security platform that brings together docker image scanning and run-time protection to identify vulnerabilities, block threats, enforce compliance, and audit activity across your microservices. The Sysdig Secure Jenkins plugin can be used in a Pipeline job, or added as a build step to a Freestyle job, to automate the process of running an image analysis, evaluating custom policies against images, and performing security scans.

12:55 - 1:10pm Using React for plugin UI Jeff Pearce

The working hours plugin has a date driven UI. During this summer’s Google Summer of Code, our student rewrite the UI in React, so that we could take advantage open source modules such as calendar pickers. I’ll talk about how the student approached the UI, demonstrate the UI and talk about particular challenges we faces.

1:10 - 1:25pm Jenkins GKE Plugin Craig Barber

In this demo we will showcase the Jenkins GKE plugin, newest addition to GCP’s suite of officially supported plugins. We’ll show how to leverage this plugin to deploy applications built in Jenkins pipelines to multiple clusters running in GKE.

Grab your lunch and join us at the community theater!

Jenkins code coverage diff in pull requests

$
0
0

Hello.

As you may know, during the last year GSoC Mr. Shenyu Zheng was working on the Jenkins Code Coverage API Plugin. With Mr. Zheng we made a change so the plugin now is able to check the difference in code coverage between pull requests and target branches.

In lots of projects it is a common practice to track if unit tests code coverage doesn’t decrease. So, with this plugin, you may skip separate services that track code coverage and have this feature right in your favorite CI system.

How it works

When you build a PR in Jenkins, using plugins like Github or Bitbucket Branch Source, that use SCM API Plugin, your PR knows what target branch commit it is based on. (The commit may change because of Discover pull requests from origin strategies). To calculate the diff, when you publish your coverage from PR, it looks for the target branch build for the commit that your PR was based on. If it finds the build on the target branch, it looks for any published code coverage for this target branch build. In case the build has it, the plugin calculates the percentage diff for the line coverage and shows it on the pull request build page. Also, it gives you a link to the target branch build that was used for the comparison.

That it how it looks like:

Decreased coverage

decrease

Increased coverage

increase

How to enable code coverage diff for pull requests

To enable this behavior you need to publish your code coverage with the calculateDiffForChangeRequests flag equals true, like this: .Jenkinsfile

node(...) {
  ...// Here we are using the istanbulCoberturaAdapter
  publishCoverage adapters: [istanbulCoberturaAdapter('cobertura-coverage.xml')],sourceFileResolver: sourceFiles('NEVER_STORE'),calculateDiffForChangeRequests: true

  ...
}

If you have some questions about this behavior, please ask me in email.

You are free to contribute to this plugin to make it better for everyone. There are a lot of interesting features that can be added and issues that can be solved. Also, you can write some new plugins for other code coverage formats that use the Code Coverage API plugin as a base.

Here is the repo of the plugin - Code Coverage API Plugin

Thank you.

Managing Jenkins Artifacts with the Azure Artifact Manager Plugin

$
0
0

Jenkins stores all generated artifacts on the master server filesystem. This presents a couple of challenges especially when you try to run Jenkins in the cloud:

  • As the number of artifacts grow, your Jenkins master will run out of disk space. Eventually, performance can be impacted.

  • Frequent transfer of files between agents and master may cause load, CPU or network issues which are always hard to diagnose.

Several existing plugins allow you to manage your artifacts externally. To use these plugins, you need to know how they work and perform specific steps in your job’s configuration. And if you are new to Jenkins, you may find it hard to follow existing samples in Jenkins tutorial like Recording tests and artifacts.

So, if you are running Jenkins in Azure, you can consider automatically managing new artifacts on Azure Storage. The new Azure Artifact Management plugin allows you to store artifacts in Azure blob storage and simplify your existing Jenkins jobs that contain Jenkins general artifacts management steps. This approach will give you all the advantages of a cloud storage, with less effort on your part to maintain your Jenkins instance.

Configuration

Azure storage account

First, you need to have an Azure Storage account. You can skip this section if you already have one. Otherwise, create an Azure storage account for storing your artifacts. Follow this tutorial to quickly create one. Then navigate to Access keys in the Settings section to get the storage account name and one of its keys.

1 azure accesskey

Existing Jenkins instance

For existing Jenkins instance, make sure you install the Azure Artifact Manager plugin. Then you can go to your Jenkins System Configuration page and locate the Artifact Management for Builds section. Select the Add button to configure an Azure Artifact Storage. Fill in the following parameters:

  • Storage Type: Azure storage supports several storage types like blob, file, queue etc. This plugin currently supports blob storage only.

  • Storage Credentials: Credentials used to authenticate with Azure storage. If you do not have an existing Azure storage credential in you Jenkins credential store, click the Add button and choose Microsoft Azure Storage kind to create one.

  • Azure Container Name: The container under which to keep your artifacts. If the container name does not exist in the blob, this plugin automatically creates one for you when artifacts are uploaded to the blob.

  • Base Prefix: Prefix added to your artifact paths stored in your container, a forward slash will be parsed as a folder. In the following screenshot, all your artifacts will be stored in the “staging” folder in the container “Jenkins”.

2.configuration

New Jenkins instance

If you need to create a new Jenkins master, follow this tutorial to quickly create an Jenkins instance on Azure. In the Integration Settings section, you can now set up Azure Artifact Manager directly. Note that you can change any of the configuration after your Jenkins instance is created. Azure storage account and credential, in this case, are still prerequisites.

3.integration setting azure

Usage

Jenkins Pipeline

Here are a few commonly used artifact related steps in pipeline jobs; all are supported to push artifacts to the Azure Storage blob specified.

You can use archiveArtifacts step to archive target artifacts into Azure storage. For more details about archiveArtifacts step, see the Jenkins archiveArtifacts setp documentation.

node {
  //...
  stage('Archive') {

    archiveArtifacts "pattern"
  }

}

You can use the unarchive step to retrieve the artifacts from Azure storage. For more details about unarchive step, please see unarchive step documentation.

node {
  //...
  stage('Unarchive') {

    unarchive mapping: ["pattern": '.']
  }

}

To save a set of files so that you can use them later in the same build (generally on another node or workspace), you can use stash step to store files into Azure storage for later use. Stash step documentation can be found here.

node {
  //...
  stash name: 'name', includes: '*'
}

You can use unstash step to retrieve the files saved with stash step from Azure storage to the local workspace. Unstash documentation can be found here.

node {
  //...
  unstash 'name'
}

FreeStyle Job

For a FreeStyle Jenkins job, you can use Archive the artifacts step in Post-build Actions to upload the target artifacts into Azure storage.

4.post build actions

This Azure Artifact Manager plugin is also compatible with some other popular management plugins, such as the Copy Artifact plugin. You can still use these plugins without changing anything.

5 build

Troubleshooting

If you have any problems or suggestions when using Azure Artifact Manager plugin, you can file a ticket on Jenkins JIRA for the azure-artifact-manager-plugin component.

Conclusion

The Azure Artifact Manager enables a more cloud-native Jenkins. This is the first step in the Cloud Native project. We have a long way to go to get Jenkins to run on cloud environments as a true “Cloud Native” application. We need help and welcome your participation and contributions to make Jenkins better. Please start contributing and/or give us feedback!


Plugin Management Library and CLI Tool Phase 2 GSoC Updates

$
0
0

At end of the first GSoC phase, Iannounced the first alpha release of the CLI tool and library that will help centralize plugin management and make plugin tooling easier.

Phase 2 has mainly been focused on improving upon the initial CLI and library written in Coding Phase 1. In particular, we’ve been focusing on getting the tool ready to incorporate into the Jenkins Docker Image to replace the install-plugins.sh bash script to download plugins. This work included parsing improvements so that blank lines and comments in the plugins.txt file are filtered out, allowing update centers and the plugin download directory to be set via environment variables or CLI Options, creating Windows compatible defaults, and fixing a bug in which dependencies for specific plugin versions were not always getting resolved correctly.

In parallel to getting the tool ready for Jenkins Docker integration, Phase 2 saw the addition of several new features.

Yaml Input

In addition to specifying the plugins they want to download via the --plugins CLI option or through a .txt file, users can now use a Jenkins yaml file with aplugins root element.

Say goodbye to the days of specifying incremental plugins like incrementals;org.jenkins-ci.plugins.workflow;2.20-rc530.b4f7f7869384 - you can enter the artifactId, groupId, and version to specify an incremental plugin.

Yaml Input Example
Yaml CLI Example

Making the Download Process More Transparent

Previously, the plugin download process was not very transparent to users - it was difficult to know the final set of plugins that would be downloaded after pulling in all the dependencies. Instead of determing the set of plugins that will be downloaded at the time of download, users now have the option to see the full set of plugins and their versions that will be downloaded in advance. With the --list CLI option, users can see all currently downloaded and bundled plugins, the set of all plugins that will be downloaded, and the effective plugin set - the set of all plugins that are already downloaded or will be downloaded.

List CLI Option Example

Viewing Information About plugins

Now that you know which plugins will be downloaded, wouldn’t it be nice to know if these are the latest versions or if any of the versions you want to install have security warnings? You can do that now too.

Security Warning CLI Option Example

Next Steps and Additional Information

The updates mentioned in this blog will be released soon so you can try them out. The focus of Phase 3 will be to continue to iterate upon and improve the library and CLI. We hope to release a first version and submit a pull request to Jenkins Docker soon. Thanks to everyone who has already tried it out and given feedback! I will also be presenting my work at DevOps World in San Francisco in a few weeks. You can use the code PREVIEW for a discounted registration ($799 instead of $1,499).

Feel free to reach out through the Plugin Installation Manager CLI Tool Gitter chat or through the Jenkins Developer Mailing list. I would love to get your questions, comments, and feedback! We have meetings Tuesdays and Thursdays at 6PM UTC.

Introducing new Folder Authorization Plugin

$
0
0

During my Google Summer of Code Project, I have created the brand new Folder Auth Plugin for easily managing permissions to projects organized in folders from the Folders plugin. This new plugin is designed for fast permission checks with easy-to-manage roles. The 1.0 version of the plugin has just been released and can be downloaded from your Jenkins' Update center.
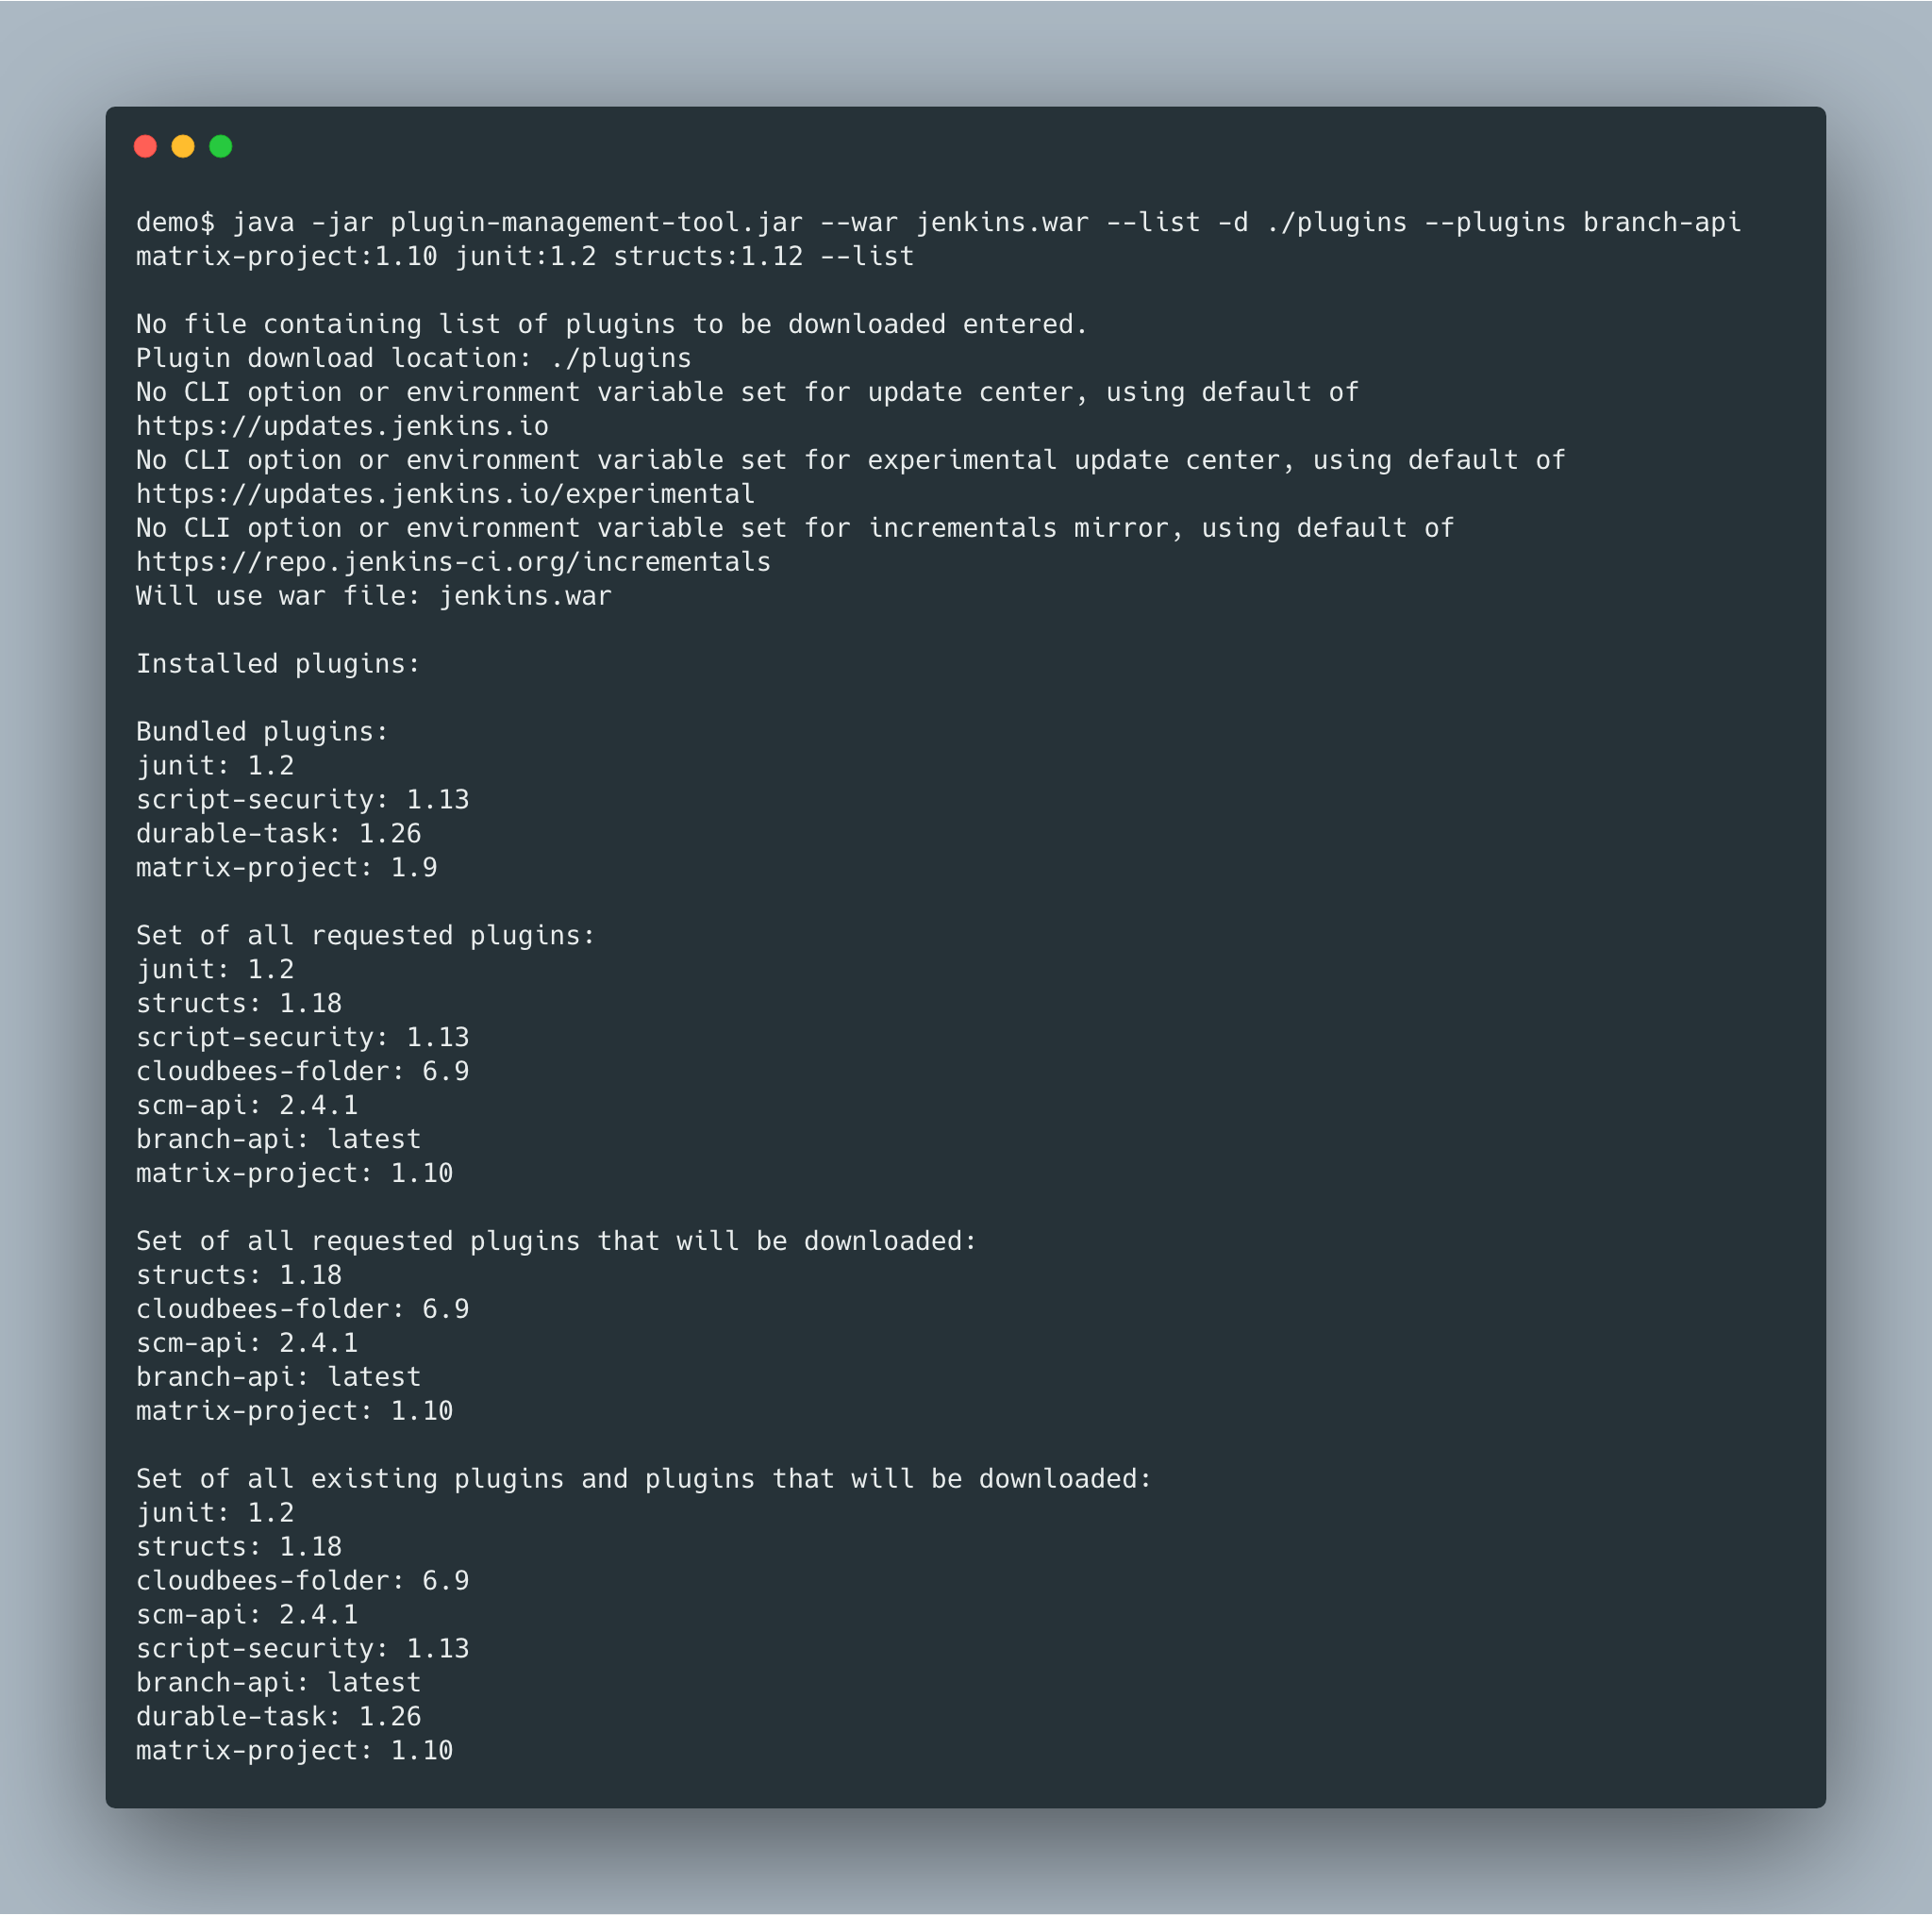
Screenshot of the Folder Auth Plugin

This plugin was inspired by the Role Strategy Plugin and brings about performance improvements and makes managing roles much easier. The plugin was developed to overcome performance limitations of the Role Strategy plugin on a large number of roles. At the same time, the plugin addresses one of the most popular ways of organizing projects in Jenkins, through folders. The plugin also has a new UI with more improvements to come in the future.
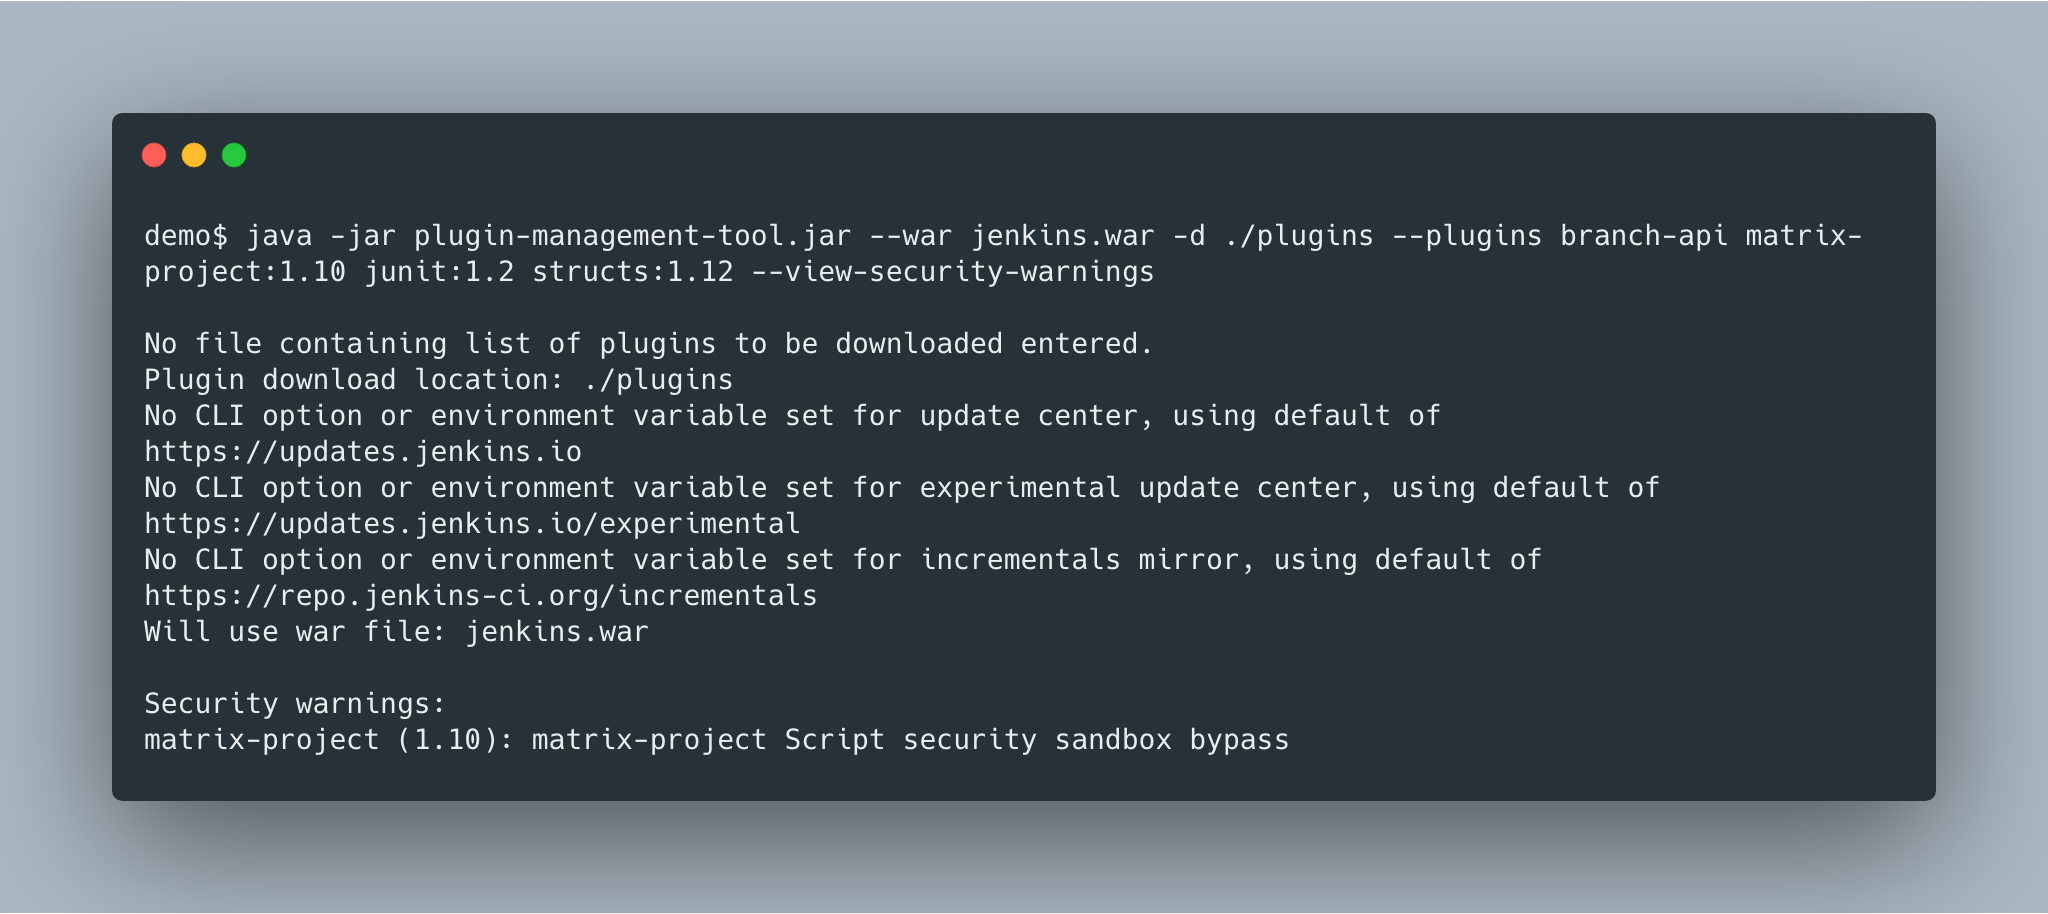
The plugin supports three types of roles which are applicable at different places in Jenkins.

  • Global Roles: applicable everywhere in Jenkins

  • Agent Roles: restrict permissions for multiple agents connected to your instance

  • Folder Roles: applicable to multiple jobs organized inside folders

Performance Improvements over Role Strategy Plugin

This plugin, unlike the Role Strategy plugin, does not use regular expressions for finding matching projects and agents giving us performance improvements and makes administrators' lives easier. To reduce the number of roles required to be managed, permissions given to a folder through a folder role get inherited to all of its children. This is useful for giving access to multiple projects through a single role. Similarly, an agent role can be applied to multiple agents and assigned to multiple users.
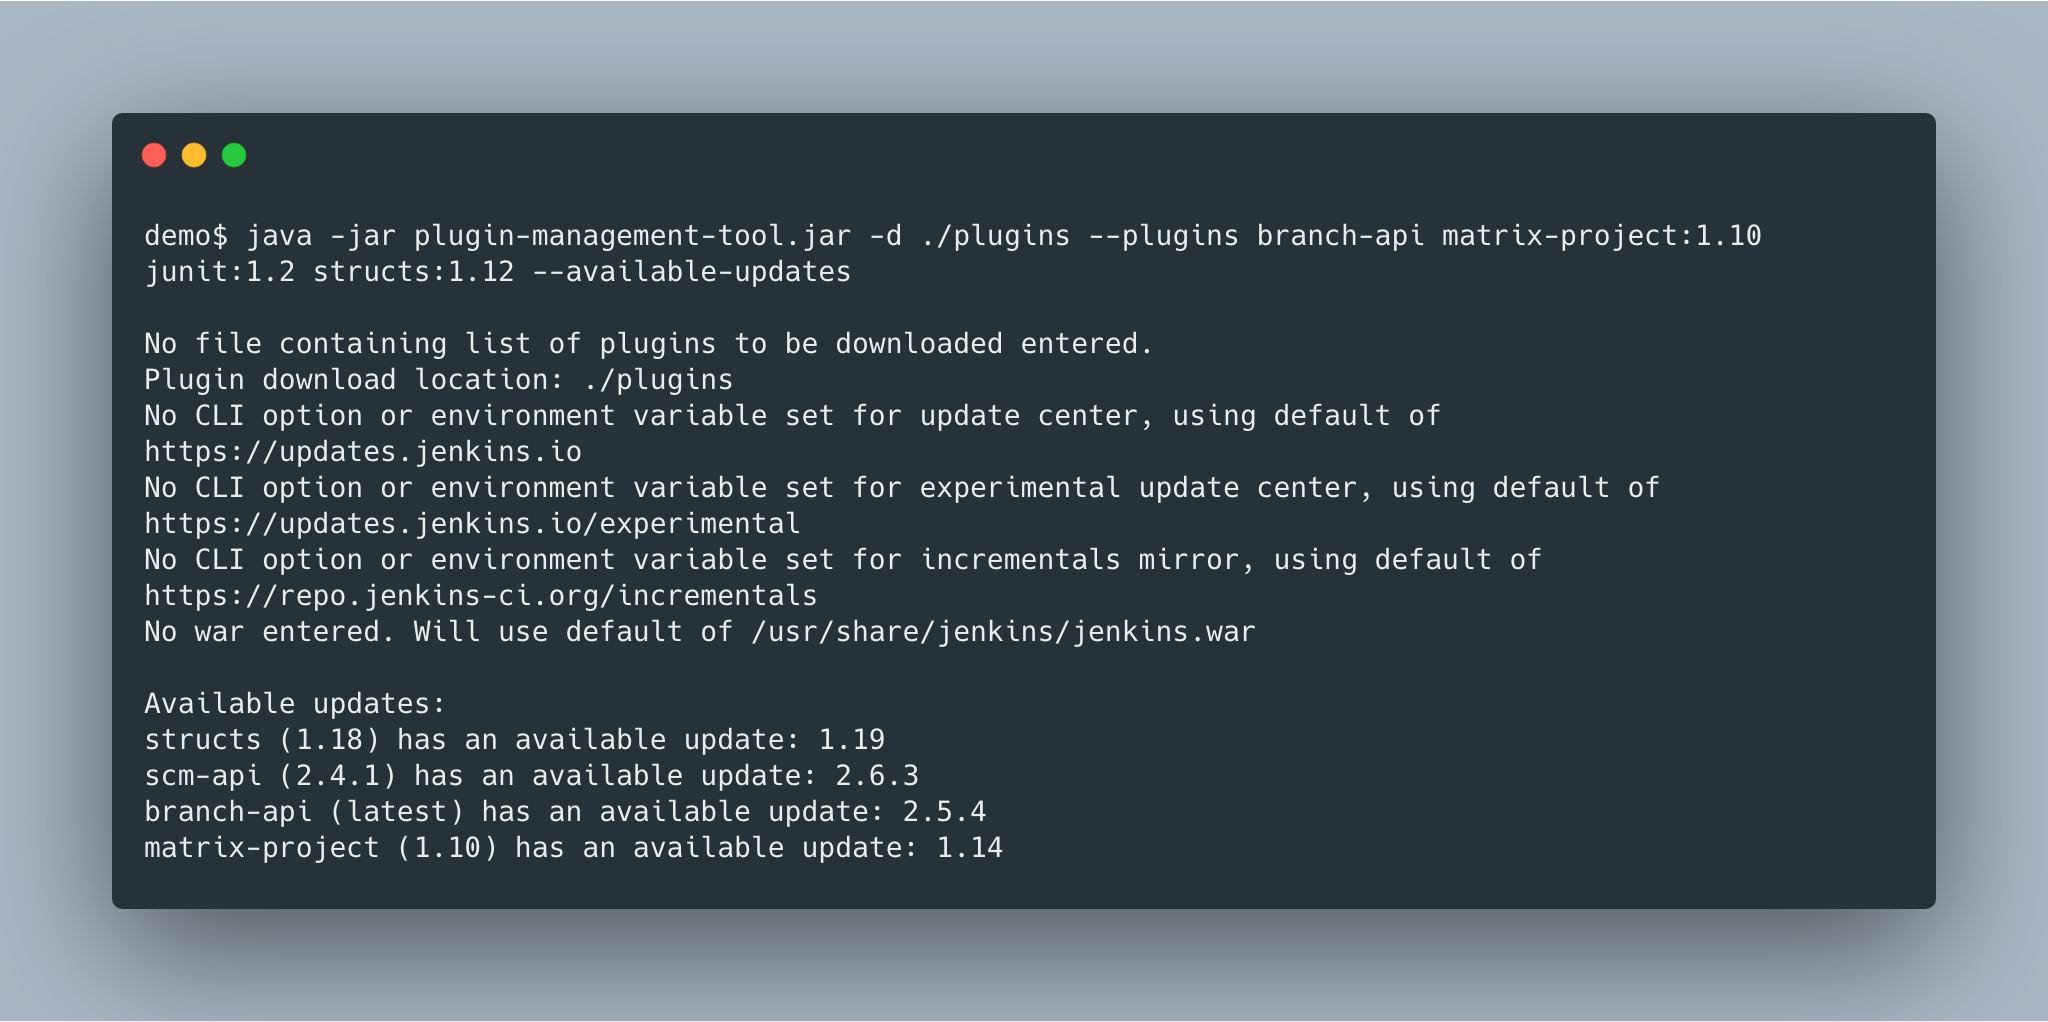
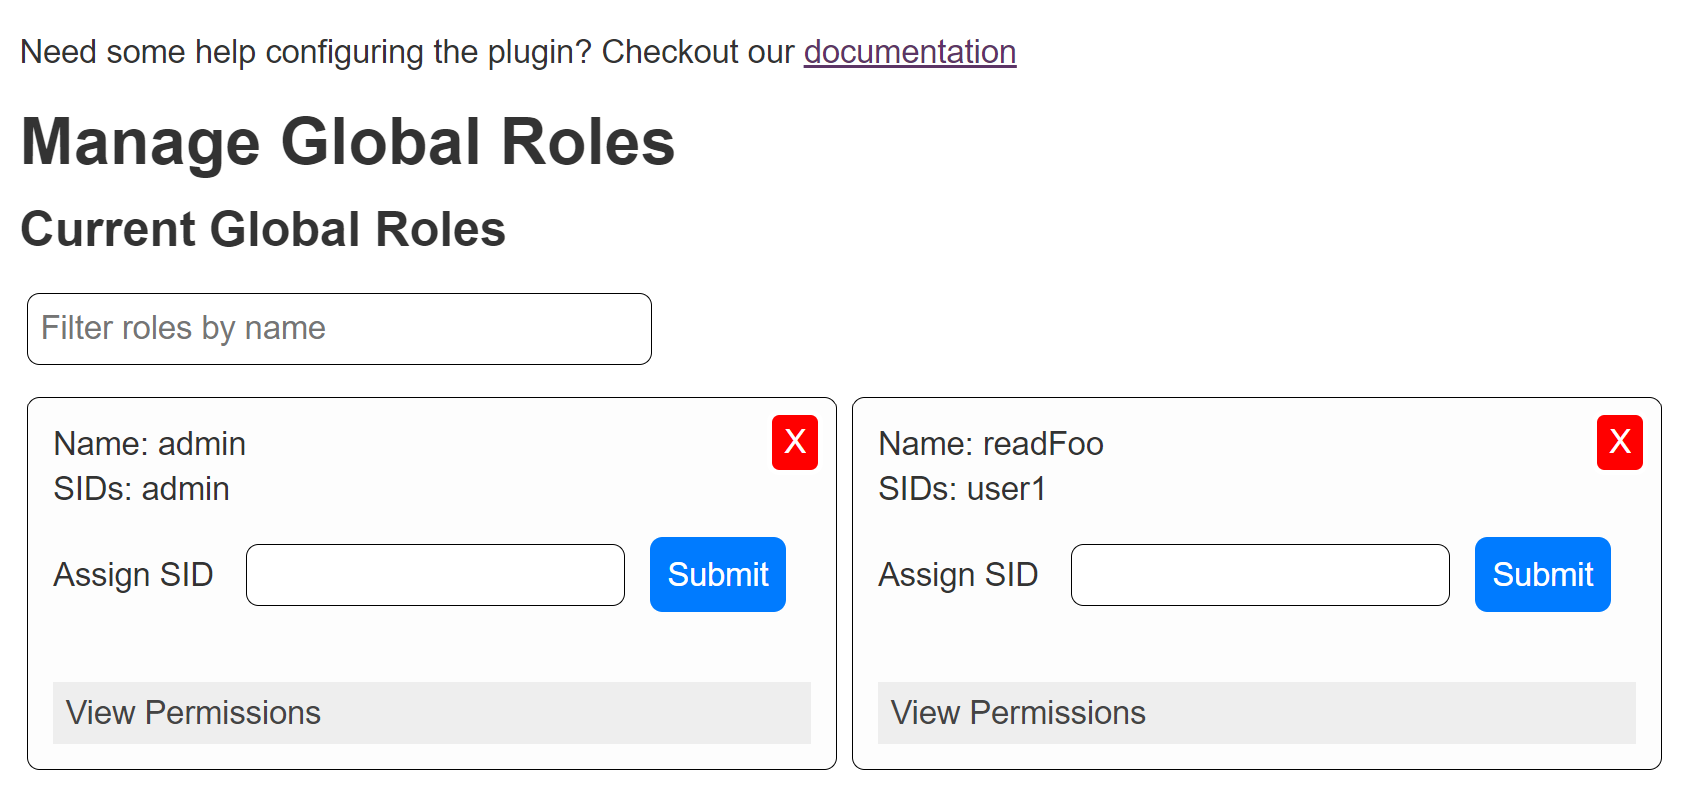
This plugin is designed to outperform Role Strategy Plugin in permission checks. The improvements were measured using themicro-benchmark framework I had created during the first phase of my GSoC project. Benchmarks for identical configurations for both plugin show that the permissions check are up to 934x faster for 500 global roles when compared to the global roles from the Role Strategy 2.13, which in itself contains several performance improvements. Comparing folder roles with Role Strategy’s project roles, a permission check for access to a job almost 15x faster for 250 projects organized in two-level deep folders on an instance with 150 users. You can see the benchmarks and the result comparisons here.

Jenkins Configuration as Code Support

The plugin supports Jenkins Configuration-as-Code so you can configure permissions without going through the Web UI. A YAML configuration looks like this:

jenkins:authorizationStrategy:folderBased:globalRoles:
        - name: "admin"permissions:
            - id: "hudson.model.Hudson.Administer"# ...sids:
            - "admin"
        - name: "read"permissions:
            - id: "hudson.model.Hudson.Read"sids:
            - "user1"folderRoles:
        - folders:
            - "root"name: "viewRoot"permissions:
            - id: "hudson.model.Item.Read"sids:
            - "user1"agentRoles:
        - agents:
            - "agent1"name: "agentRole1"permissions:
            - id: "hudson.model.Computer.Configure"
            - id: "hudson.model.Computer.Disconnect"sids:
            - "user1"

REST APIs with Swagger support

The plugin provides REST APIs for managing roles with OpenAPI specifications through Swagger.json. You can check out the Swagger API onSwaggerHub. SwaggerHub provides stubs in multiple languages which can be downloaded and used to interact with the plugin. You can also see some sample requests from the command line using curl.

Screenshot of the APIs on SwaggerHub
Another Screenshot of the APIs on SwaggerHub

What’s next

In the (not-too-distant) future, I would like to work on improving the UI and make the plugin easier to work with. I would also like to work on improving the APIs, documentation and more optimizations for improving the plugin’s performance.

Remoting over Apache Kafka 2.0: Built-in Kubernetes support

$
0
0

I am Long Nguyen from FPT University, Vietnam. My project for Google Summer of Code 2019 is Remoting over Apache Kafka with Kubernetes features. After a successful Phase 1, finally the 2.0 version of the plugin has been released. The 2.0 version provides seamless integration with Kubernetes environment.

2.0 version features

  • Start a simple Apache Kafka server in Kubernetes.

  • Dynamically provision Remoting Kafka Agent in Kubernetes.

  • Helm chart to bootstrap the whole system in Kubernetes.

Start a simple Apache Kafka server in Kubernetes

Use of the plugin requires that users have a configured Apache Zookeeper and Apache Kafka server, which could be intimidating for people who just want to try out the plugin. Now, users can start a simple, single-node Apache Kafka server in Kubernetes environment with just one button click.

Apache Kafka provisioning in Kubernetes UI

On the Global Configuration page, users can input Kubernetes server information and credentials. When users click Start Kafka on Kubernetes button, Jenkins will create a Kubernetes client from the information and then apply Apache Zookeeper and Apache Kafka YAML specification files from resources. After downloading images and creating containers, it will automatically update Apache Zookeeper and Apache Kafka URLs into respective fields.

Dynamically provision Remoting Kafka Agent in Kubernetes

With previous version, users have to manually add/remove nodes so it is hard to scale builds quickly. Kubernetes plugin allows us to dynamically provision agents in Kubernetes but it is designed for JNLP agent. With this new version, Remoting Kafka agent can also be provisioned automatically in Kubernetes environment.

Remoting Kafka Cloud UI

Users can find the new feature in Cloud section in /configure. Here users could input Kubernetes connection parameters and desired Remoting Kafka agent properties including labels. When new build with matching labels gets started and there are no free nodes, Cloud will automatically provision Remoting Kafka agent pod in Kubernetes to run the build.

Remoting Kafka Agent get provisioned

Helm Chart

Helm chart for Remoting over Apache Kafka plugin is based on stable/jenkins chart and incubator/kafka chart. You can follow the instruction here to install a demo ready-to-use Helm release. Your kubectl get all should look like this:

NAME                                READY   STATUS    RESTARTS   AGE
pod/demo-jenkins-64dbd87987-bmndf   1/1     Running   0          2m21s
pod/demo-kafka-0                    1/1     Running   0          2m21s
pod/demo-zookeeper-0                1/1     Running   0          2m21s

NAME                              TYPE        CLUSTER-IP      EXTERNAL-IP   PORT(S)                      AGE
service/demo-jenkins              NodePort    10.108.238.56   <none>        8080:30386/TCP               2m21s
service/demo-jenkins-agent        ClusterIP   10.98.85.184    <none>        50000/TCP                    2m21s
service/demo-kafka                ClusterIP   10.109.231.58   <none>        9092/TCP                     2m21s
service/demo-kafka-headless       ClusterIP   None            <none>        9092/TCP                     2m21s
service/demo-zookeeper            ClusterIP   10.103.2.231    <none>        2181/TCP                     2m21s
service/demo-zookeeper-headless   ClusterIP   None            <none>        2181/TCP,3888/TCP,2888/TCP   2m21s

NAME                           READY   UP-TO-DATE   AVAILABLE   AGE
deployment.apps/demo-jenkins   1/1     1            1           2m21s

NAME                                      DESIRED   CURRENT   READY   AGE
replicaset.apps/demo-jenkins-64dbd87987   1         1         1       2m21s

NAME                              READY   AGE
statefulset.apps/demo-kafka       1/1     2m21s
statefulset.apps/demo-zookeeper   1/1     2m21s

How to Contribute

You are welcome to try out the plugin and integrate it into your current setup. If you find out any bug or if you would like to request new feature, you can create ticket at JIRA. If you would like to contribute code directly, you can create pull requests in the GitHub page below.

My DevOps World - Jenkins World 2019 Experience

$
0
0

Last week I had the privilege of attending DevOps World - Jenkins World in San Francisco to present my Google Summer of Code project for plugin management. It was an amazing experience getting to meet people from all over world who are trying to make the development and release process easier and more efficient. I enjoyed learning more about industry tools, processes, and standards, and meeting CI/CD experts and contributors in the open source community.

Below is a summary of my experience. Thank you to the Jenkins project and CloudBees for making my trip and attendence possible!

Day 1

Monday was the Continuous Delivery Contributor Summit, which focused on projects under the CDF umbrella. After checking in and grabbing my badge, I was able to meet up with some of the Google Summer of Code org admins. It was great being able to actually meet them in person after talking to them over video conferencing and chats all summer!

Speaker Badge

Tracy Miranda started the summit out by introducing the Continuous Delivery Foundation, which aims to provide a vendor neutral home to help and sustain open source projects focusing on all aspects of continuous delivery. Currently, Jenkins, Tekton, Spinnaker, and JenkinsX have joined the foundation. Project updates were given for Jenkins, Tekton, and JenkinsX. In the afternoon, attendees split into different groups for unconference sessions. I presented my project to the Jenkins group. Afterwards, there was free time to chat with other attendees about my project and the other Jenkins projects. Lastly, lightning talks were given before everyone headed to the contributor appreciation event to grab some food and drinks.

Contributor Summit

Day 2

I attended the Jenkins Pipeline Fundamentals Short Course in the morning. Even though I’m working on a project for Jenkins, there’s still a lot I don’t know so I just wanted to try to learn more.

Jenkins Pipeline Basics Session

A lot of the afternoon sessions filled up, so I spent the afternoon trying to meet other people at the conference, before heading to the keynote. The keynote talked more about the CDF and some of the backstory behind its origin. This year is also a big anniversary for Jenkins - it has now been around for 15 years.

CDF Key Note
CDF Origin

After the keynote, I checked out a Women in Tech mixer and the opening of the exibition hall. Probably my favorite swag I picked up was the "Will Code for Beer" stickers and a bottle of hot sauce.

Jenkins Sticker
Will Code for Beer Sticker

Day 3

The morning began with another keynote. Shawn Ahmed of Cloudbees talked about the challenges of visibility into bottlenecks of the development process and Rajeev Mahajan discussed how HSBC tackled DevOps. The rest of the day I attended different sessions on container tooling, implementing CI/CD in a cloud native environment, running Jenkins on Jenkins, and database DevOps.

Session on Containers

After the sessions finished, I wandered around the expo until it closed, then joined some of the other conference attendees to have some fun at a ping pong bar nearby.

Day 4

The final and last day of the conference was probably my favorite. The morning keynote revealed that Zhao Xiaojie had won an award for his work on Jenkins advocacy, some other DevOps award panelists talked about their approaches to different challenges, then David Stanke gave an enjoyable presentation about cloud native CI/CD. I was able to present my summer project and attend a few more sessions, including one about DevOps at scale, and another about use cases for machine learning in CI/CD pipelines.

Plugin Management Tool Presentation

The last keynote given by James Govenor was a thoughtful look into the current and future states of tech. How does tech look like it will scale in the coming years in the U.S. and across the world? How can we make tech more inclusive and accessible? What can we do to minimize our environmental footprint? In particular, his points on welcoming people from a non-traditional computer science background resonated with me since I’m currently undergoing my own career transition to tech.

After the conference ended, I said goodbye to the remaining GSoC org admins before meeting an old friend for dinner and bringing along some new friends I met at the conference. I spent the remaining part of the night singing karaoke with them before heading out of San Francisco the next morning.

GSoC Mentors

Thanks again to everyone who supported me and encouraged me leading up to and during my presentation, patiently answered my questions as I tried to gather more context about CI/CD tools and practices, and made my first DevOps conference so enjoyable!

Introducing new GitLab Branch Source Plugin

$
0
0

The GitLab Branch Source Plugin has come out of its beta stage and has been released to the Jenkins update center. It allows you to create job based on GitLab user or group or subgroup project(s). You can either:

  • Import a single project’s branches as jobs from a GitLab user/group/subgroup (Multibranch Pipeline Job)

  • Import all or a subset of projects as jobs from a GitLab user/group/subgroup (GitLab Group Job or GitLab Folder Organization)

The GitLab Group project scans the projects, importing the pipeline jobs it identifies based on the criteria provided. After a project is imported, Jenkins immediately runs the jobs based on the Jenkinsfile pipeline script and notifies the status to GitLab Pipeline Status. This plugin unlike other Branch Source Plugins provides GitLab server configuration which can be configured in Configure System. Jenkins Configuration as Code (JCasC) can also be used to configure the server. To learn more about server configuration see my previous blog post.

Requirements

  • Jenkins - 2.176.2 (LTS)

  • GitLab - v11.0+

Creating a Job

To create a Multibranch Pipeline Job (with GitLab branch source) or GitLab Group Job, you must have GitLab Personal Access Token added to the server configuration. The credentials is used to fetch meta data of the project(s) and to set up hooks on GitLab Server. If the token has admin access you can also set up System Hooks while Web Hooks can be set up from any user token.

Create a Multibranch Pipeline Job:

Go to Jenkins > New Item > Multibranch Pipeline > Add Source > GitLab Project

GitLab Project Branch Source
  • Server - Select your desired GitLab server from the dropdown, needs to be configured before creating this job.

  • Checkout Credentials - Add credentials of type SSHPrivateKey or Username/Password if there are any private projects to be built by the plugin. If all projects are public then no checkout credentials required. Checkout credential is different from the credential (of type GitLab Personal Access Token) setup in GitLab server config.

  • Owner - Can be a user, group or subgroup. Depending on this the Projects field is populated.

  • Projects - Select the project you want to build from the dropdown.

  • Behaviours - These traits are very powerful tool to configure the build logic and post build logic. We have defined new traits. You can see all the information in repository documentation.

Save and wait for the branches indexing. You are free to navigate from here, the job progress is displayed to the left hand side.

Multibranch Pipeline Job Indexing

After the indexing, the imported project listed all the branches, merge requests and tags as jobs.

Multibranch Pipeline Job Folder

On visiting each job, you will find some action items on the left hand side:

  • You can trigger the job manually by selecting Build Now.

  • You can visiting the particular branch/merge request/tag on your GitLab Server by selecting the corresponding button.

Build Actions

Create a GitLab Group Job Type

Go to Jenkins > New Item > GitLab Group

GitLab Folder Organization

You can notice the configuration is very similar to Multibranch Pipeline Job with only Projects field missing. You can add all the projects inside your Owner i.e. User/Group/Subgroup. The form validation will check with your GitLab server if the owner is valid. You can add Discover subgroup project trait which allows you to discover this child projects of all subgroups inside a Group or Subgroup but this trait is not applicable to User. While indexing, web hook is created in each project. GitLab Api doesn’t support creation of Group web hooks so this plugin doesn’t support that feature which is only available in GitLab EE.

You can now explore your imported projects, configuring different settings on each of those folders if needed.

GitLab Group Folder

GitLab Pipeline Status Notification

GitLab is notified about build status from the point of queuing of jobs.

  • Success - the job was successful

  • Failure - the job failed and the pull request is not ready to be merged

  • Error - something unexpected happened; example: the job was aborted in Jenkins

  • Pending - the job is waiting in the build queue

GitLab Pipeline Status

On GitLab Pipeline status are hyperlinks to the corresponding Jenkins job build. To see the Pipeline Stages and the console output you will be required to visit your Jenkins server. We also planned to notify the pipeline stages to GitLab but it came with some drawbacks which has been addressed so far but there is future plan to add it as trait.

You can also skip notifying GitLab about the pipeline status by selecting Skip pipeline status notifications from the traits list.

Merge Requests

Implementing support for Merge Requests for the projects was challenging. First, MRs are of 2 types i.e. Origin branches and Forked Project branches so there had to be different implementation for each head. Second, MRs from forks can be from untrusted sources, so a new strategy Trust Members was implemented which allows CI to build MRs only from trusted users who have accesslevel of Developer/Maintainer/Owner.

Trusted Member Strategy

Third, MRs from forks do not support pipeline status notification due to GitLab issue, see this. You can add a trait Log Build Status as Comment on GitLab that allows you to add a sudo user (leave empty if you want owner user) to comment on the commit/tag/mrs the build result. To add a sudo user your token must have admin access. By default only failure/error are logged as comment but you can also enable logging of success build by ticking the checkbox.

Build Status Comment Trait

Sometimes, Merge Requests fail due to external errors so you want to trigger rebuild of mr by commenting jenkins rebuild. To enable this trigger add the trait Trigger build on merge request comment. The comment body can be changed in the trait. For security reasons, commentor should have Developer/Maintainer/Owner accesslevel in the project.

Merge request build trigger

Hooks

Web hooks are automatically created on your projects if configured to do so in server configuration. Web hooks are ensured to pass through a CSRF filter. Jenkins listens to web hooks on the path /gitlab-webhook/post. On GitLab web hooks are triggered on the following events:

  • Push Event - when a commit or branch is pushed

  • Tag Event - when a new tag is created

  • Merge Request Event - when a merge request is created/updated

  • Note Event - when a comment is made on a merge request

You can also set up System Hooks on your GitLab server if your token has admin access. System hooks are triggered when new projects are created, Jenkins triggers a rescan of the new project based on the configuration and sets up web hook on it. Jenkins listens to system hooks on the path /gitlab-systemhook/post. On GitLab system hooks are triigered on Repository Update Events.

You can also use Override Hook Management mode trait to override the default hook management and choose if you want to use a different context (say Item) or disable it altogether.

Override Hook Management

Job DSL and JCasC

You can use Job DSL to create jobs. Here’s an example of Job DSL script:

organizationFolder('GitLab Organization Folder') {
    description("GitLab org folder created with Job DSL")
    displayName('My Project')// "Projects"
    organizations {
        gitLabSCMNavigator {
            projectOwner("baymac")
            credentialsId("i<3GitLab")
            serverName("gitlab-3214")// "Traits" ("Behaviours" in the GUI) that are "declarative-compatible"
            traits {
                subGroupProjectDiscoveryTrait() // discover projects inside subgroups
                gitLabBranchDiscovery {
                    strategyId(3) // discover all branches
                }
                originMergeRequestDiscoveryTrait {
                    strategyId(1) // discover MRs and merge them with target branch
                }
                gitLabTagDiscovery() // discover tags
            }
        }
    }// "Traits" ("Behaviours" in the GUI) that are NOT "declarative-compatible"// For some 'traits, we need to configure this stuff by hand until JobDSL handles it// https://issues.jenkins.io/browse/JENKINS-45504
    configure {def traits = it / navigators / 'io.jenkins.plugins.gitlabbranchsource.GitLabSCMNavigator' / traits
        traits << 'io.jenkins.plugins.gitlabbranchsource.ForkMergeRequestDiscoveryTrait' {
            strategyId(2)
            trust(class: 'io.jenkins.plugins.gitlabbranchsource.ForkMergeRequestDiscoveryTrait$TrustPermission')
        }
    }// "Project Recognizers"projectFactories {
        workflowMultiBranchProjectFactory {
            scriptPath 'Jenkinsfile'
        }
    }// "Orphaned Item Strategy"
    orphanedItemStrategy {
        discardOldItems {
            daysToKeep(10)
            numToKeep(5)
        }
    }// "Scan Organization Folder Triggers" : 1 day// We need to configure this stuff by hand because JobDSL only allow 'periodic(int min)' for now
    triggers {
        periodicFolderTrigger {
            interval('1d')
        }
    }
}

You can also use JCasC to directly create job from a Job DSL script. For example see the plugin repository.

How to talk to us about bugs or new features?

Future work

  • Actively maintain GitLab Branch Source Plugin and take feedbacks from users to improve the plugin’s user experience.

  • Extend support for GitLab Pipeline to Blueocean.

Resources

Thank you Jenkins and Google Summer of Code :)

Viewing all 1087 articles
Browse latest View live