Quantcast
Channel: Jenkins Blog
Viewing all 1087 articles
Browse latest View live

Remoting over Apache Kafka plugin with Kafka launcher in Kubernetes

$
0
0

I am Long Nguyen from FPT University, Vietnam. My project for Google Summer of Code 2019 is Remoting over Apache Kafka with Kubernetes features. This is the first time I have contributed for Jenkins and I am very excited to announce the features that have been done in Phase 1.

Project Introduction

Current version of Remoting over Apache Kafka plugin requires users to manually configure the entire system which includes Zookeeper, Kafka and remoting agents. It also doesn’t support dynamic agent provisioning so scalability is harder to achieve. My project aims to solve two problems:

  1. Out-of-the-box solution to provision Apache Kafka cluster.

  2. Dynamic agent provisioning in a Kubernetes cluster.

Current State

  • Kubernetes connector with credentials supported.

  • Apache Kafka provisioning in Kubernetes feature is fully implemented.

  • Helm chart is partially implemented.

Apache Kafka provisioning in Kubernetes

This feature is part of 2.0 version so it is not yet released officially. You can try out the feature by using the Experimental Update Center to update to 2.0.0-alpha version or building directly from master branch:

git clone https://github.com/jenkinsci/remoting-kafka-plugin.git
cd remoting-kafka-plugin/plugin
mvn hpi:run

On the Global Configuration page, users can input Kubernetes server information and credentials. Then they can start Apache Kafka with only one button click.
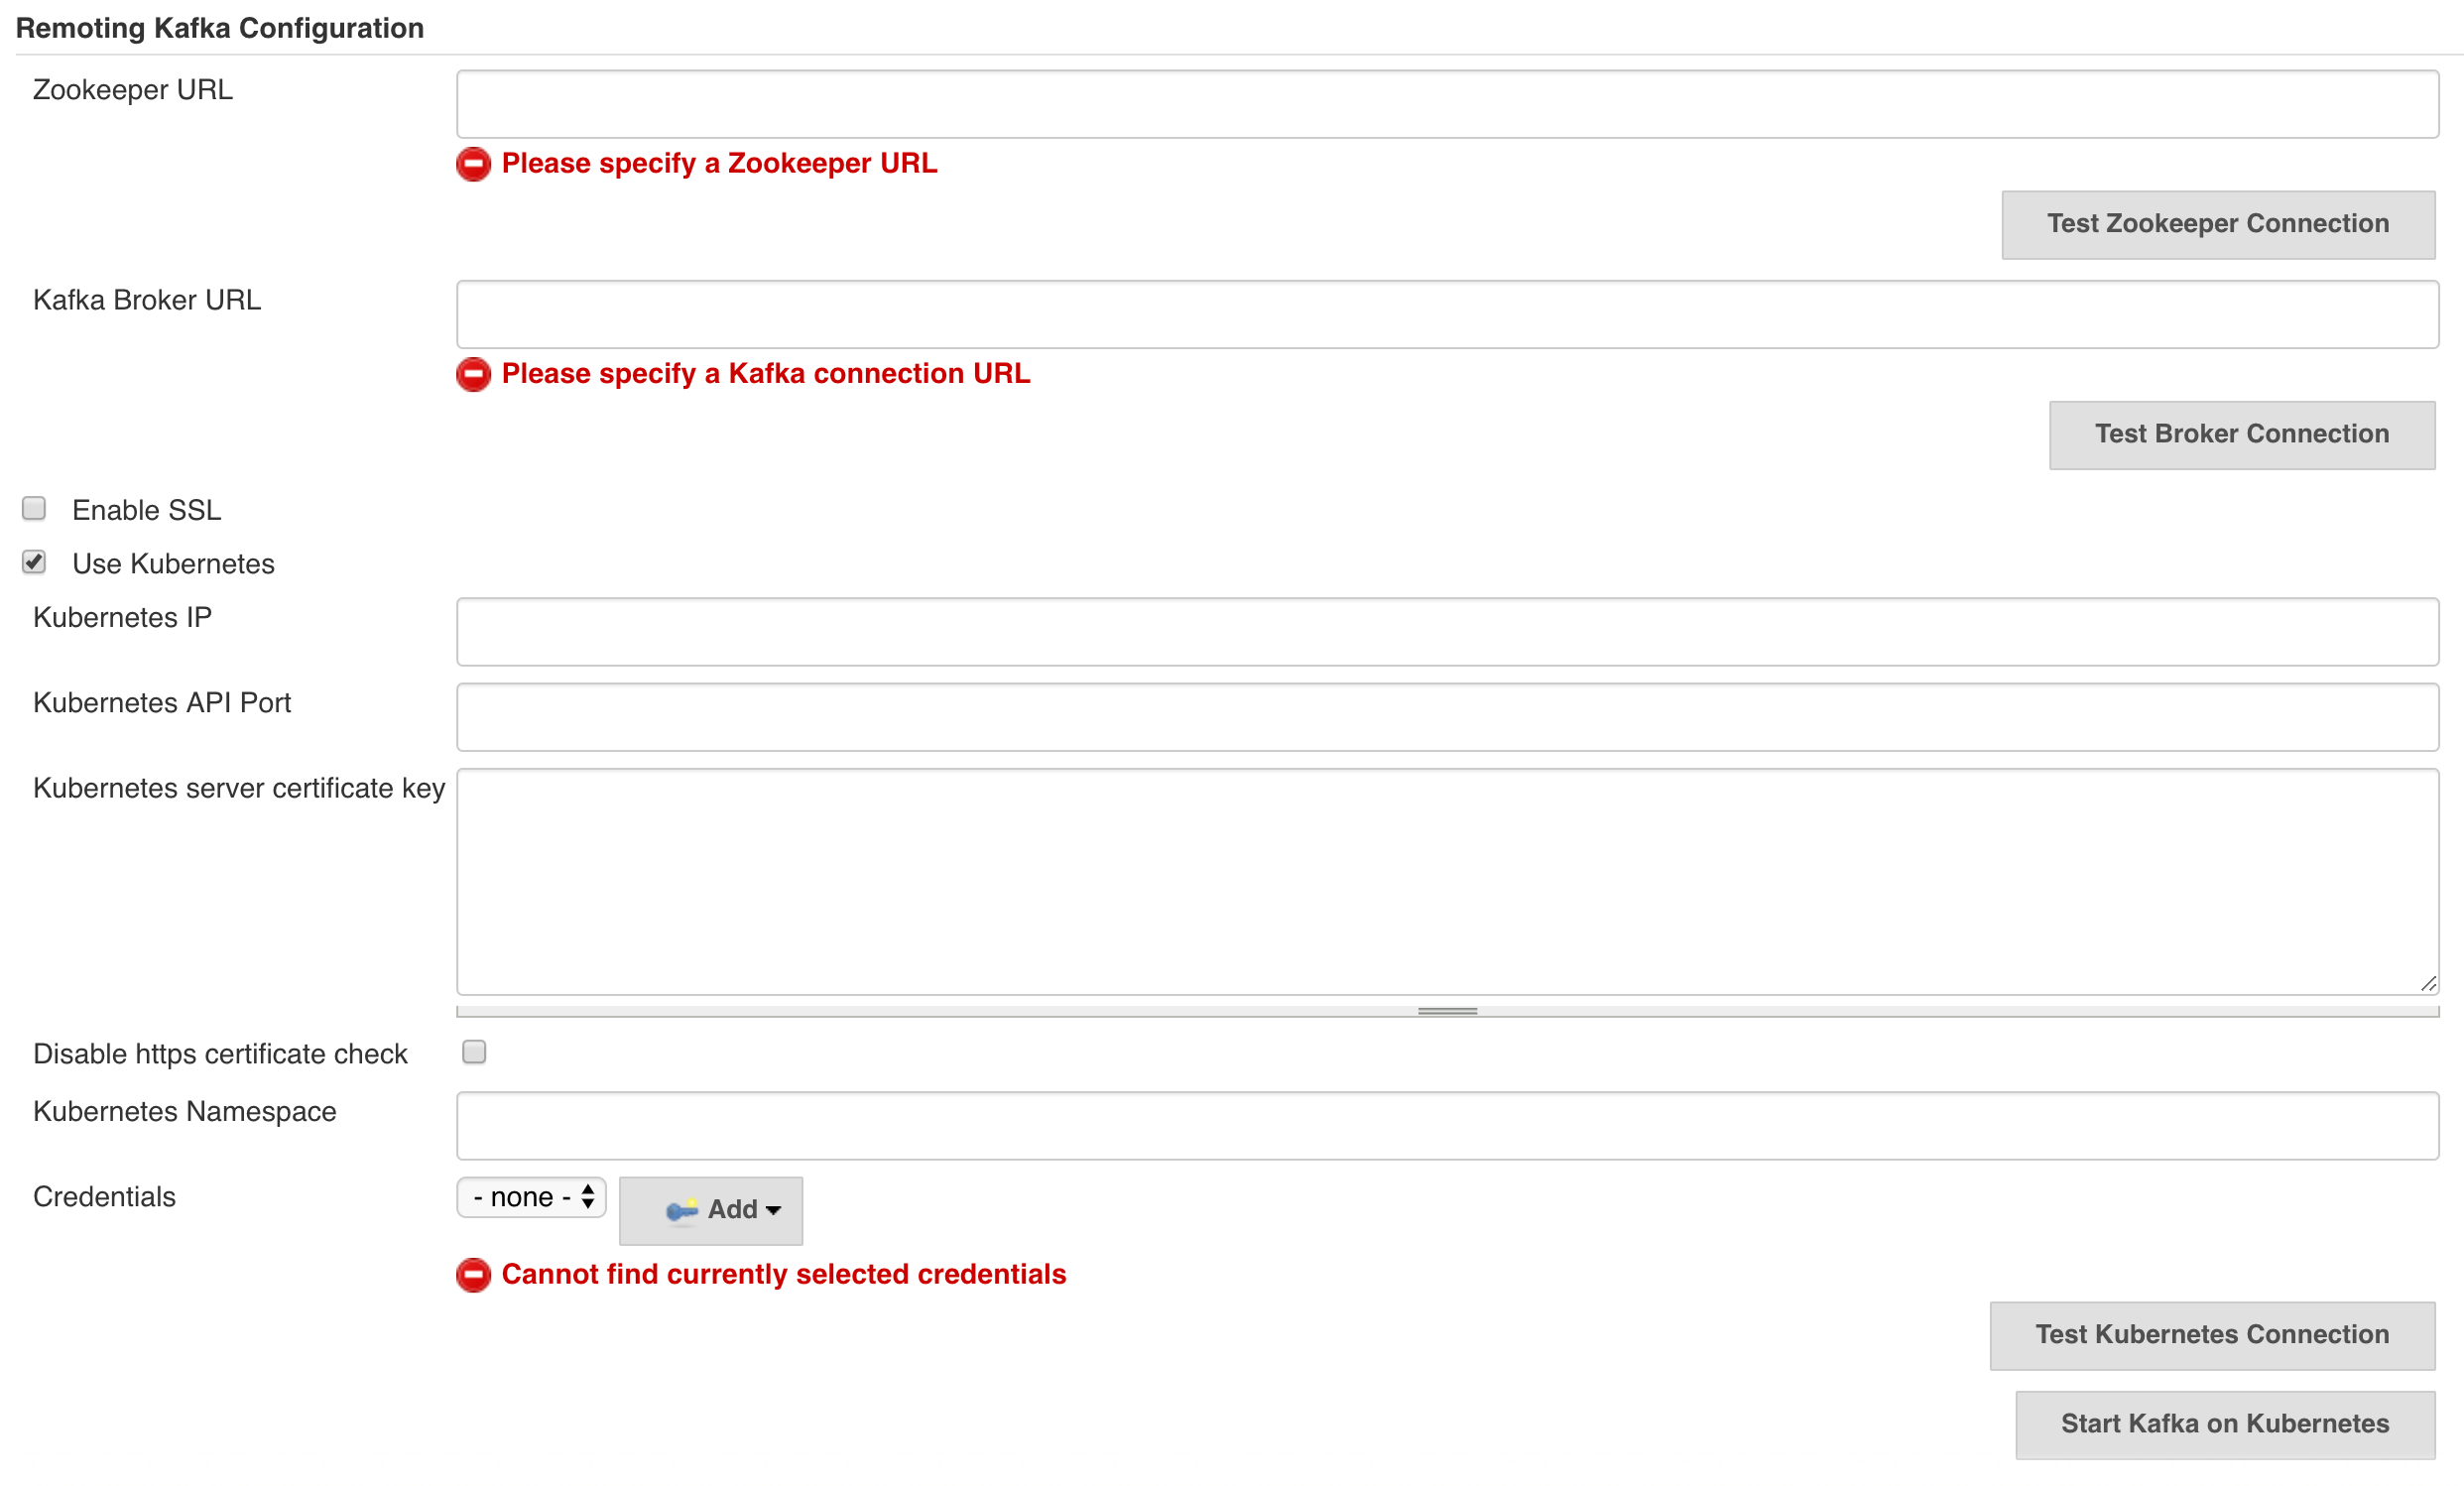
Kafka provisioning in Kubernetes UI

When users click Start Kafka on Kubernetes button, Jenkins will create a Kubernetes client from the information and then apply Zookeeper and Kafka YAML specification files from resources.

Kafka provisioning in Kubernetes architecture

Helm Chart

Helm chart for Remoting over Apache Kafka plugin is based on stable/jenkins chart and incubator/kafka chart. As of now, the chart is still a Work in Progress because it is still waiting for Cloud API implementation in Phase 2. However, you can check out the demo chart with a single standalone Remoting Kafka Agent:

git clone -b demo-helm-phase-1 https://github.com/longngn/remoting-kafka-plugin.git
cd remoting-kafka-plugin
K8S_NODE=<your Kubernetes node IP> ./helm/jenkins-remoting-kafka/do.sh start

The command do.sh start will do the following steps:

  • Install the chart (with Jenkins and Kafka).

  • Launch a Kafka computer on Jenkins master by applying the following JCasC.

jenkins:nodes:
    - permanent:
        name: "test"
        remoteFS: "/home/jenkins"
        launcher:
          kafka: {}
  • Launch a single Remoting Kafka Agent pod.

You can check the chart state by running kubectl, for example:

$ kubectl get all -n demo-helm
NAME                                    READY   STATUS    RESTARTS   AGE
pod/demo-jenkins-998bcdfd4-tjmjs        2/2     Running   0          6m30s
pod/demo-jenkins-remoting-kafka-agent   1/1     Running   0          4m10s
pod/demo-kafka-0                        1/1     Running   0          6m30s
pod/demo-zookeeper-0                    1/1     Running   0          6m30s

NAME                              TYPE        CLUSTER-IP       EXTERNAL-IP   PORT(S)                      AGE
service/demo-0-external           NodePort    10.106.254.187   <none>        19092:31090/TCP              6m30s
service/demo-jenkins              NodePort    10.101.84.33     <none>        8080:31465/TCP               6m31s
service/demo-jenkins-agent        ClusterIP   10.97.169.65     <none>        50000/TCP                    6m31s
service/demo-kafka                ClusterIP   10.106.248.10    <none>        9092/TCP                     6m30s
service/demo-kafka-headless       ClusterIP   None             <none>        9092/TCP                     6m30s
service/demo-zookeeper            ClusterIP   10.109.222.63    <none>        2181/TCP                     6m30s
service/demo-zookeeper-headless   ClusterIP   None             <none>        2181/TCP,3888/TCP,2888/TCP   6m31s

NAME                           READY   UP-TO-DATE   AVAILABLE   AGE
deployment.apps/demo-jenkins   1/1     1            1           6m30s

NAME                                     DESIRED   CURRENT   READY   AGE
replicaset.apps/demo-jenkins-998bcdfd4   1         1         1       6m30s

NAME                              READY   AGE
statefulset.apps/demo-kafka       1/1     6m30s
statefulset.apps/demo-zookeeper   1/1     6m30s

Next Phase Plan

  • Implement Cloud API to provision Remoting Kafka Agent. (JENKINS-57668)

  • Integrate Cloud API implementation with Helm chart. (JENKINS-58288)

  • Unit tests and integration tests.

  • Release version 2.0 and address feedbacks. (JENKINS-58289)


Introducing the Pipeline Configuration History Plugin

$
0
0

Pipelines are the efficient and modern way how to create jobs in Jenkins. To recognize pipeline changes quickly and easily, we developed the Pipeline Configuration History plugin. This plugin detects changes of pipelines and provides the user an option to view changes between two builds (diffs) of pipeline configurations visibly and traceably.

How everything started

It all started 10 years ago — with classical job types (e.g. Freestyle, Maven, etc.). Every once in a while users contacted us because their jobs failed to build overnight. Why did the job fail? Was the failure related to a job configuration change? The users' typical answer was: "We didn’t change anything!", but is that really true? We thought about this and decided to develop a plugin that helped us solve this problem. This was the idea and the beginning of Job Configuration History.

Now it was possible to view changes of job configurations (like other branches, JDK versions, etc.) and more often the reason for breaking builds were changes of job configurations.

Screenshot of Job Configuration History

Over the years the plugin got developed and is still under development. New functions were added, that not only view job configurations, but also changes of global and agent configurations. It is also possible to recover old configuration versions. Today the plugin has more than 30,000 installations. For many years JobConfigHistory relieves our daily work — with more than 3,000 Jenkins jobs! Then there was a new type of job: Pipelines.

Pipelines - something new was needed

Pipeline jobs are fundamentally different than classical job types . While classic job types are configured via the Jenkins GUI, Pipeline jobs are configured as code. Every pipeline job indeed gets created via the Jenkins GUI, however that is not necessarily where the pipeline configuration is located. Pipelines can be configured:

  • Directly in the Jenkins job as script. The code gets inserted directly in the job configuration page.

  • As Jenkinsfile in the source code management system (SCM): The pipeline configuration is defined in a text file (Jenkinsfile) in the SCM. In the job itself only the path to the repository of the Jenkinsfile is configured. During the build the Jenkinsfile gets checked out from the SCM and processed.

  • As a shared library: A part of the pipeline configuration gets moved to separate files that can be used by several jobs. These files are also saved in the SCM. Even so a Jenkinsfile is still needed (or a pipeline script in the job).

With every save operation of the job configuration, JobConfigHistory creates a copy of the actual job configuration if something has changed. That only works for pipeline jobs if the pipeline configuration is inserted in the job configuration page as script. Changes in the Jenkinsfile or the shared libraries are not detected by JobConfigHistory. You have to use the SCM system to view changes of the Jenkinsfile or the shared libraries. It is complex and time intensive to find a correlation between the time of a build and a change to the Jenkinsfile or shared library.

This new problem is much more than JobConfigHistory. A new solution was needed to detect pipeline changes and show these changes in Jenkins. So we developed Pipeline Configuration History.

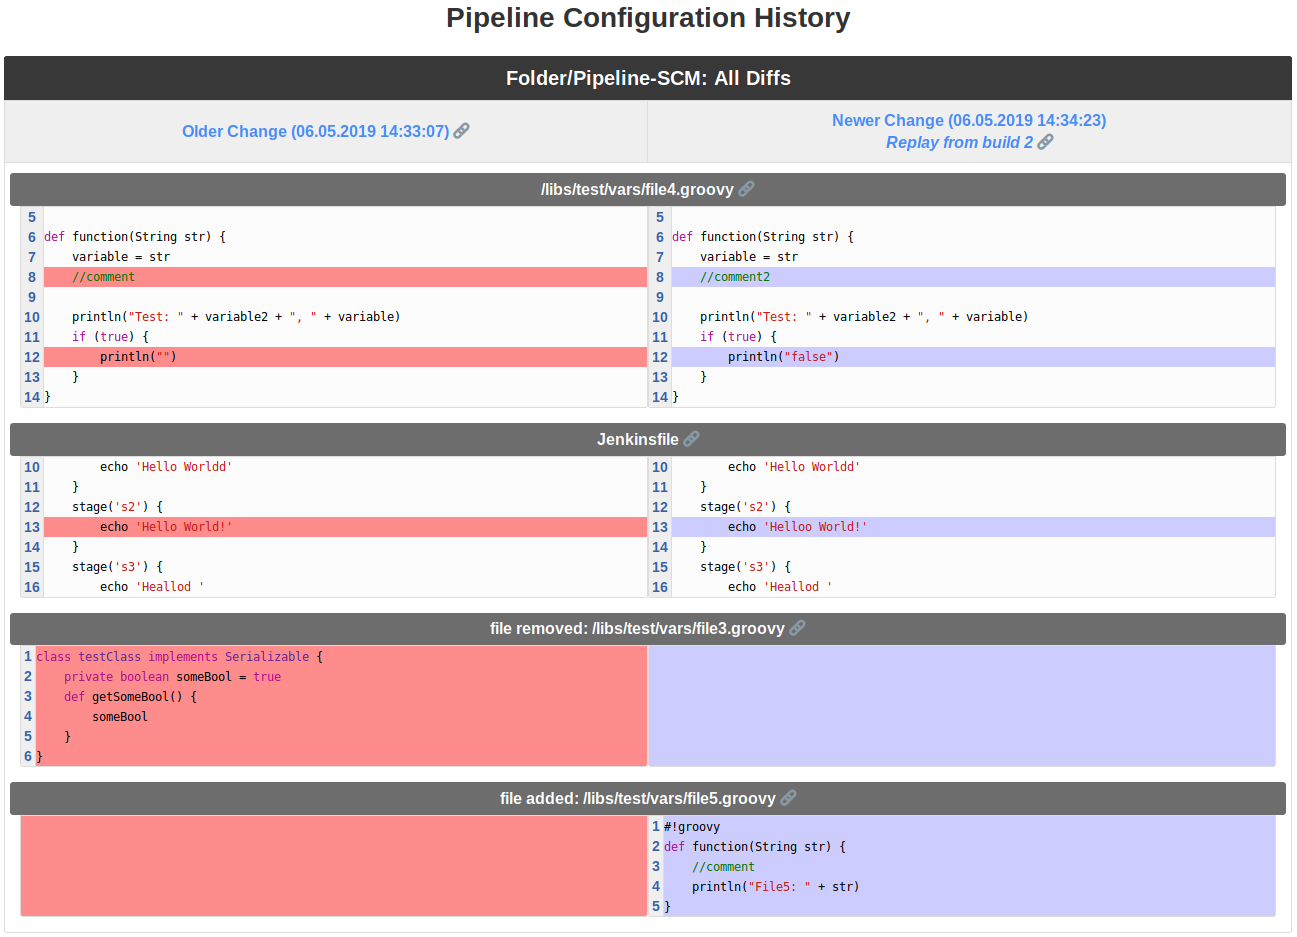
During every pipeline run the Jenkinsfile and related shared libraries are saved in the builds directory of the job. Pipeline Configuration History saves changes of the pipeline files between the last run and the previous run as history events. Therefore when a pipeline job ceases to build successfully, you can check if something has changed on any used pipeline file. You can also see the build where changes occurred.

Screenshot of Pipeline Configuration History

Because a pipeline configuration can consist of several files where changes could have occurred, only files with changes between two builds are shown in the diff. That makes the whole thing more compact and effective:

Screenshot of Pipeline Configuration History

But sometimes you may want to show more than the differences between pipeline files. You may want to see which pipeline files are in use or the content of those files when they were used. So it’s possible to view all files and their content. If required you can download them as well:

Screenshot of Pipeline Configuration History

Conclusion

We use Pipeline Configuration History successfully in production. It has helped us from the very first day as we solved problems that occurred due to pipeline configuration changes. Pipeline Configuration History won’t replace Job Configuration History. The plugins have different use cases. Many times small changes on job or pipeline configurations also have big impacts. Because of the correlation in time between changes of job or pipeline configurations and different build behavior, it is now possible to substantially reduce the time and effort to analyze build failures. The Job Configuration History and Pipeline Configuration History plugins let us help our users in consulting and in solving issues. We resolve problems much faster through easy access to the configuration history of jobs. These plugins are essential for our daily work.

DevOps World - Jenkins World 2019 San Francisco: Lunch Time Demos

$
0
0
2019 dwjw email san fran

If you’re looking for more opportunities to learn Jenkins and Jenkins X during the lunch hours while at DevOps World - Jenkins World 2019 San Francisco, come join us at the Jenkins and Jenkins X Community Booth!

If you don’t yet have your pass for DevOps World - Jenkins World 2019 San Francisco, and don’t want to miss out on the fun, you can get yours using JWFOSS for a 30% discount.

During lunch hours we are scheduling the following demo briefs at the Jenkins and Jenkins X Community Booth:

Wednesday August 14, 2019

12:10 - 12:25pm Faster Git Mark Waite

Attendees will learn the techniques they can use with Jenkins to make their systems clone and update git repositories faster and with less disc space.

12:25 - 12:40pm Observability in Jenkins X Oscar Medina

If you are using Jenkins X, you’re already building at rapid pace. However, most miss the opportunity to gain real insights into their build and release pipeline. I’ll show you how you can increase observability by activating metric capture and analysis during a containerized application deployment with Jenkins X. This entails modifying the declarative Tekton pipelines.

12:40 - 12:55pm From setup to build status on the command line Martin d’Anjou

Using bash, groovy, JCasC and the jenkins-rest, we demonstrate how to setup Jenkins from scratch, upload a configuration as code yaml file, create folders and jobs, run a build, and track it to its completion, all from the command line, without ever touching the GUI.

12:55 - 1:10pm DevOps without Quality: An IT Horror Story Laura Keaton

DevOps, the current IT Industry sweetheart, has a dark secret that has victimized organizations on their transformational journey. Investigate two case studies that left development and delivery teams in tatters and how quality engineering solutions could have prevented their disastrous outcomes.

1:10 - 1:25pm Securing Your Jenkins Container Pipeline with Open Source Tools Christian Wiens

Discuss the security pitfalls of containers and how embedding an open source image scanning and policy based compliance tool like Anchore into your CI/CD pipeline can mitigate this risk.

Thursday August 15, 2019

12:25 - 12:35pm Results from the 2019 Jenkins Google Summer of Code Martin d’Anjou

In 2019, the Jenkins project participated in the Google Summer of Code. This is an annual, international, program which encourages college-aged students to participate in open source projects during the summer break between classes. In 2019, we had dozens of applications and many student projects. In this session, we will showcase the students' projects and talk about what they bring to the Jenkins ecosystem.

12:35 - 12:45pm Plugin installation CLI Tool Natasha Stopa

This talk will demo the new plugin installation tool done as part of a Google Summer of Code project. It will show the CLI features and how the library has been incorporated into other areas of Jenkins.

12:45 - 12:55pm Sysdig Secure Jenkins Plugin Marky Jackson

Sysdig Secure is a container security platform that brings together docker image scanning and run-time protection to identify vulnerabilities, block threats, enforce compliance, and audit activity across your microservices. The Sysdig Secure Jenkins plugin can be used in a Pipeline job, or added as a build step to a Freestyle job, to automate the process of running an image analysis, evaluating custom policies against images, and performing security scans.

12:55 - 1:10pm Using React for plugin UI Jeff Pearce

The working hours plugin has a date driven UI. During this summer’s Google Summer of Code, our student rewrite the UI in React, so that we could take advantage open source modules such as calendar pickers. I’ll talk about how the student approached the UI, demonstrate the UI and talk about particular challenges we faces.

1:10 - 1:25pm Jenkins GKE Plugin Craig Barber

In this demo we will showcase the Jenkins GKE plugin, newest addition to GCP’s suite of officially supported plugins. We’ll show how to leverage this plugin to deploy applications built in Jenkins pipelines to multiple clusters running in GKE.

Grab your lunch and join us at the community theater!

Jenkins code coverage diff in pull requests

$
0
0

Hello.

As you may know, during the last year GSoC Mr. Shenyu Zheng was working on the Jenkins Code Coverage API Plugin. With Mr. Zheng we made a change so the plugin now is able to check the difference in code coverage between pull requests and target branches.

In lots of projects it is a common practice to track if unit tests code coverage doesn’t decrease. So, with this plugin, you may skip separate services that track code coverage and have this feature right in your favorite CI system.

How it works

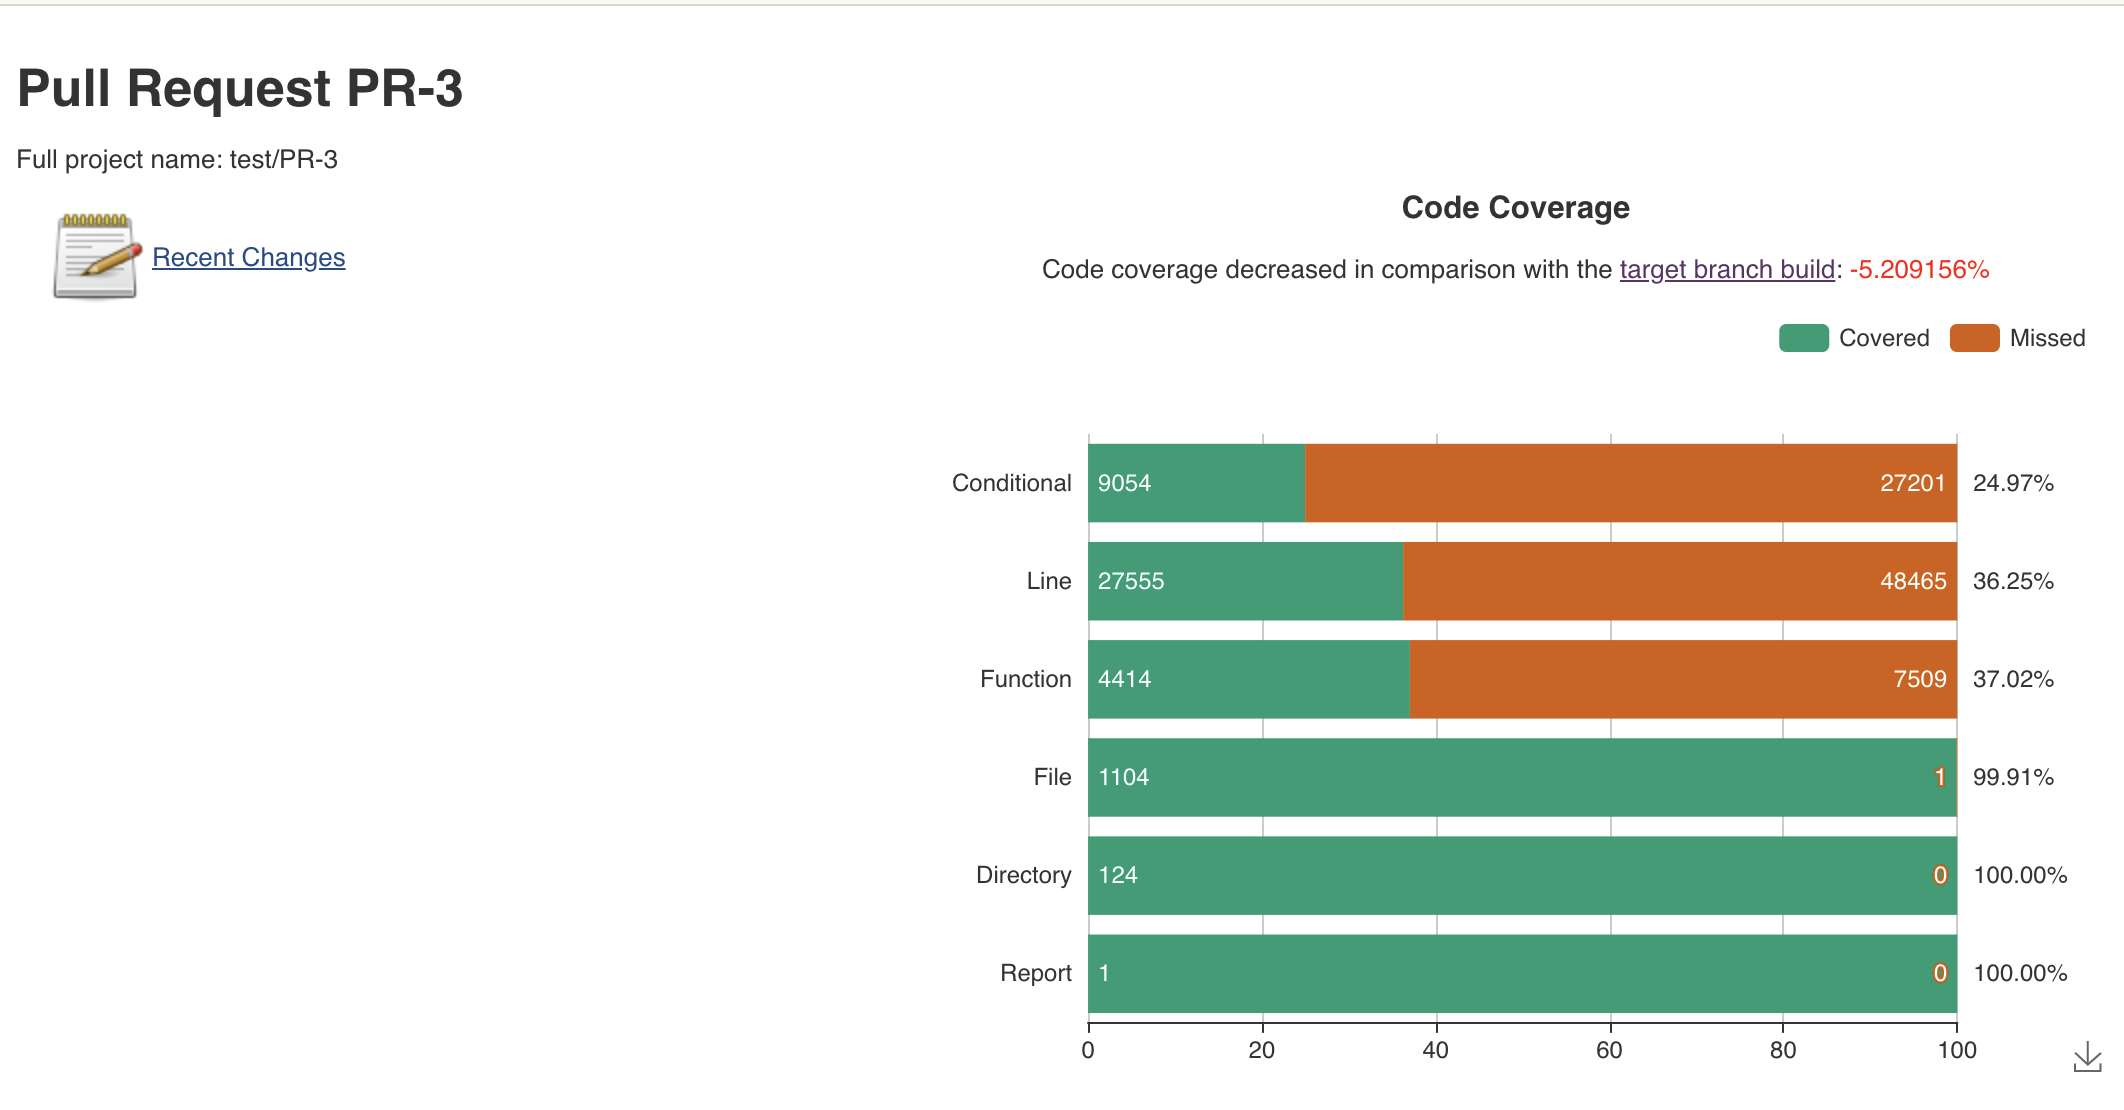
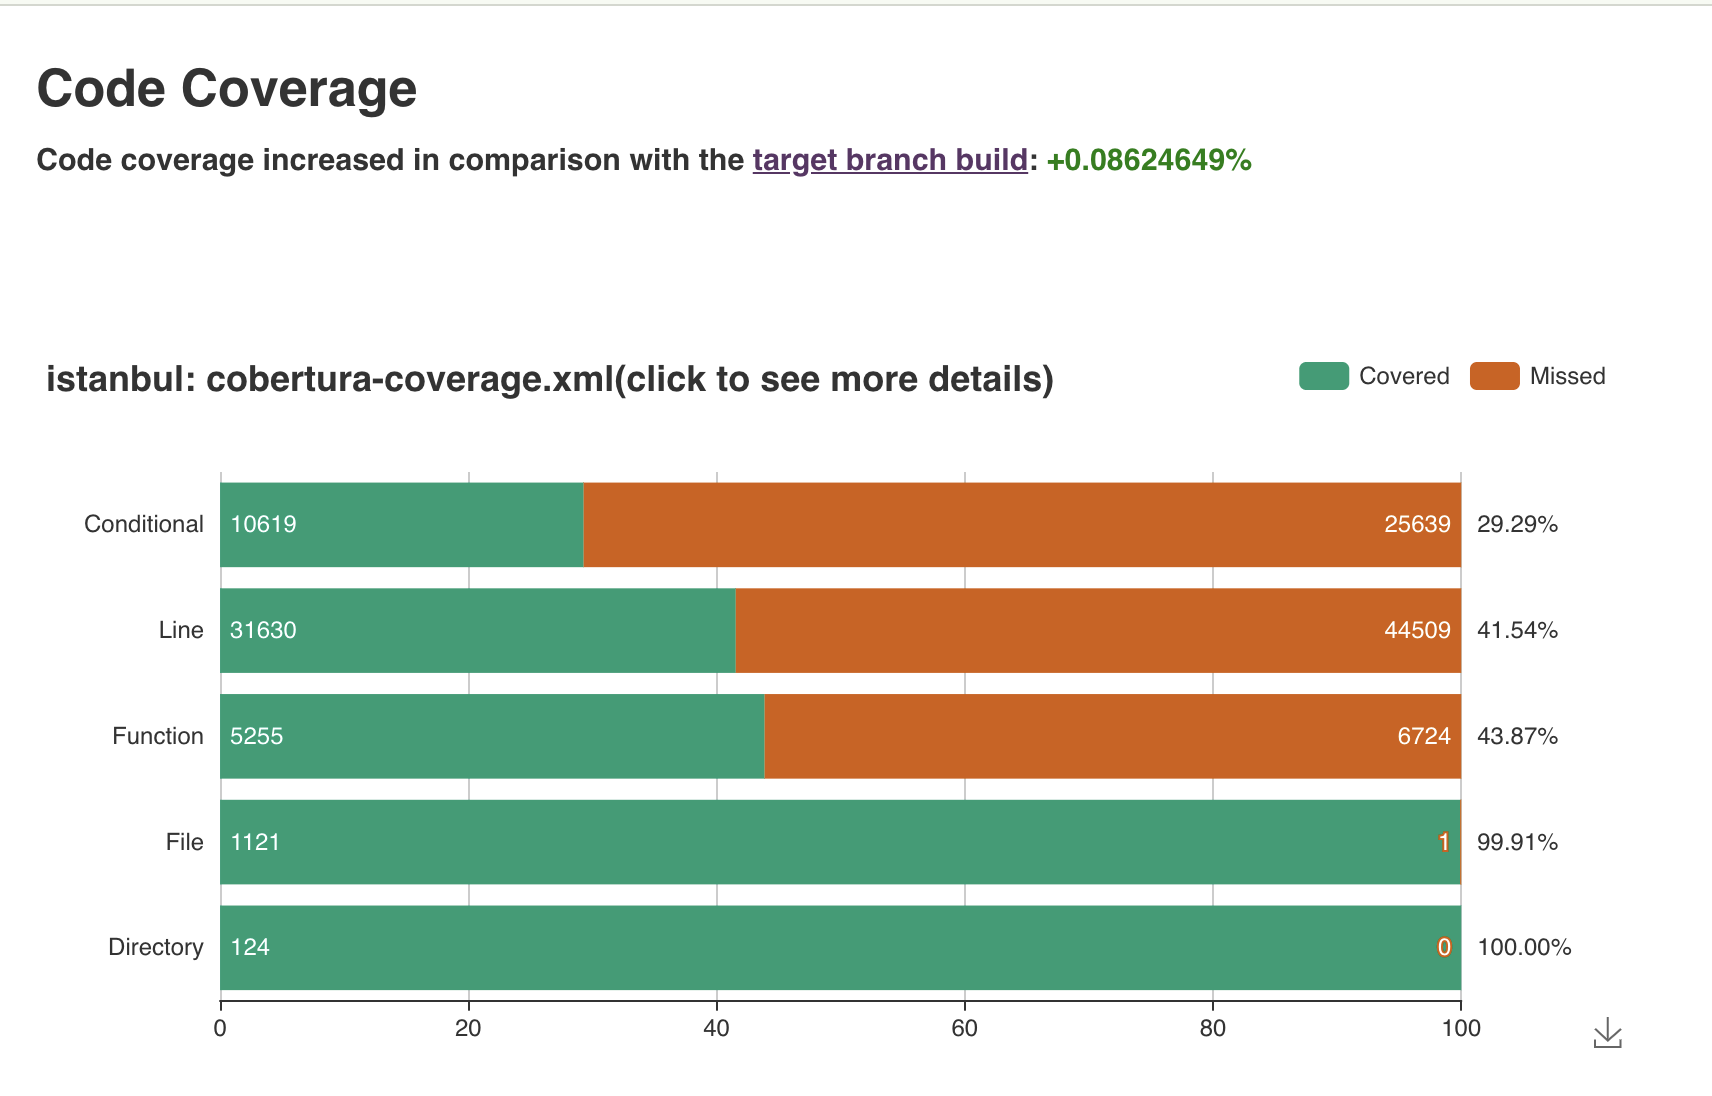
When you build a PR in Jenkins, using plugins like Github or Bitbucket Branch Source, that use SCM API Plugin, your PR knows what target branch commit it is based on. (The commit may change because of Discover pull requests from origin strategies). To calculate the diff, when you publish your coverage from PR, it looks for the target branch build for the commit that your PR was based on. If it finds the build on the target branch, it looks for any published code coverage for this target branch build. In case the build has it, the plugin calculates the percentage diff for the line coverage and shows it on the pull request build page. Also, it gives you a link to the target branch build that was used for the comparison.

That it how it looks like:

Decreased coverage

decrease

Increased coverage

increase

How to enable code coverage diff for pull requests

To enable this behavior you need to publish your code coverage with the calculateDiffForChangeRequests flag equals true, like this: .Jenkinsfile

node(...) {
  ...// Here we are using the istanbulCoberturaAdapter
  publishCoverage adapters: [istanbulCoberturaAdapter('cobertura-coverage.xml')],sourceFileResolver: sourceFiles('NEVER_STORE'),calculateDiffForChangeRequests: true

  ...
}

If you have some questions about this behavior, please ask me in email.

You are free to contribute to this plugin to make it better for everyone. There are a lot of interesting features that can be added and issues that can be solved. Also, you can write some new plugins for other code coverage formats that use the Code Coverage API plugin as a base.

Here is the repo of the plugin - Code Coverage API Plugin

Thank you.

Managing Jenkins Artifacts with the Azure Artifact Manager Plugin

$
0
0

Jenkins stores all generated artifacts on the master server filesystem. This presents a couple of challenges especially when you try to run Jenkins in the cloud:

  • As the number of artifacts grow, your Jenkins master will run out of disk space. Eventually, performance can be impacted.

  • Frequent transfer of files between agents and master may cause load, CPU or network issues which are always hard to diagnose.

Several existing plugins allow you to manage your artifacts externally. To use these plugins, you need to know how they work and perform specific steps in your job’s configuration. And if you are new to Jenkins, you may find it hard to follow existing samples in Jenkins tutorial like Recording tests and artifacts.

So, if you are running Jenkins in Azure, you can consider automatically managing new artifacts on Azure Storage. The new Azure Artifact Management plugin allows you to store artifacts in Azure blob storage and simplify your existing Jenkins jobs that contain Jenkins general artifacts management steps. This approach will give you all the advantages of a cloud storage, with less effort on your part to maintain your Jenkins instance.

Configuration

Azure storage account

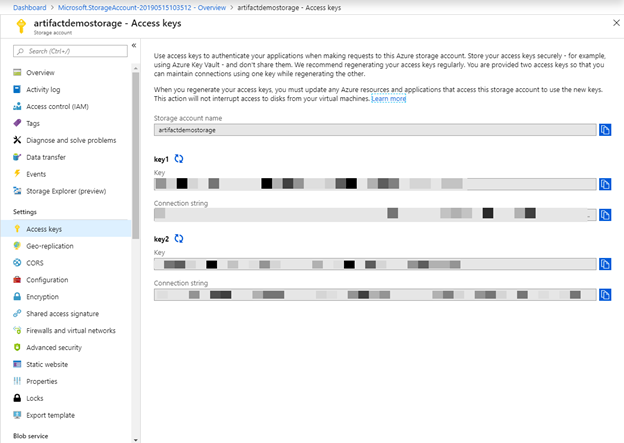
First, you need to have an Azure Storage account. You can skip this section if you already have one. Otherwise, create an Azure storage account for storing your artifacts. Follow this tutorial to quickly create one. Then navigate to Access keys in the Settings section to get the storage account name and one of its keys.

1 azure accesskey

Existing Jenkins instance

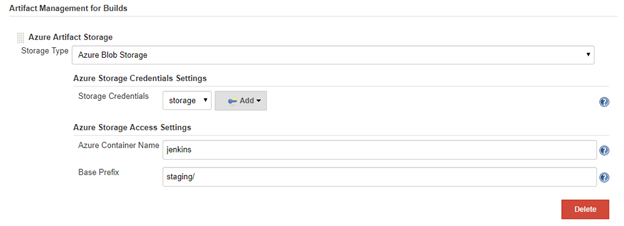
For existing Jenkins instance, make sure you install the Azure Artifact Manager plugin. Then you can go to your Jenkins System Configuration page and locate the Artifact Management for Builds section. Select the Add button to configure an Azure Artifact Storage. Fill in the following parameters:

  • Storage Type: Azure storage supports several storage types like blob, file, queue etc. This plugin currently supports blob storage only.

  • Storage Credentials: Credentials used to authenticate with Azure storage. If you do not have an existing Azure storage credential in you Jenkins credential store, click the Add button and choose Microsoft Azure Storage kind to create one.

  • Azure Container Name: The container under which to keep your artifacts. If the container name does not exist in the blob, this plugin automatically creates one for you when artifacts are uploaded to the blob.

  • Base Prefix: Prefix added to your artifact paths stored in your container, a forward slash will be parsed as a folder. In the following screenshot, all your artifacts will be stored in the “staging” folder in the container “Jenkins”.

2.configuration

New Jenkins instance

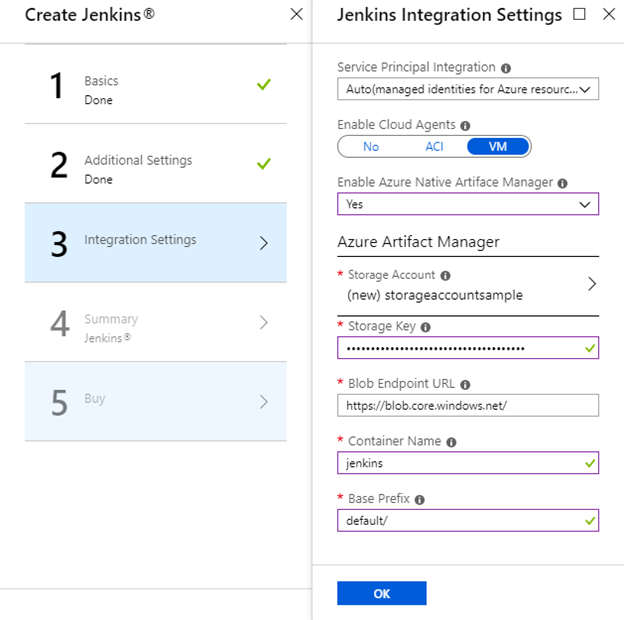
If you need to create a new Jenkins master, follow this tutorial to quickly create an Jenkins instance on Azure. In the Integration Settings section, you can now set up Azure Artifact Manager directly. Note that you can change any of the configuration after your Jenkins instance is created. Azure storage account and credential, in this case, are still prerequisites.

3.integration setting azure

Usage

Jenkins Pipeline

Here are a few commonly used artifact related steps in pipeline jobs; all are supported to push artifacts to the Azure Storage blob specified.

You can use archiveArtifacts step to archive target artifacts into Azure storage. For more details about archiveArtifacts step, see the Jenkins archiveArtifacts setp documentation.

node {
  //...
  stage('Archive') {

    archiveArtifacts "pattern"
  }

}

You can use the unarchive step to retrieve the artifacts from Azure storage. For more details about unarchive step, please see unarchive step documentation.

node {
  //...
  stage('Unarchive') {

    unarchive mapping: ["pattern": '.']
  }

}

To save a set of files so that you can use them later in the same build (generally on another node or workspace), you can use stash step to store files into Azure storage for later use. Stash step documentation can be found here.

node {
  //...
  stash name: 'name', includes: '*'
}

You can use unstash step to retrieve the files saved with stash step from Azure storage to the local workspace. Unstash documentation can be found here.

node {
  //...
  unstash 'name'
}

FreeStyle Job

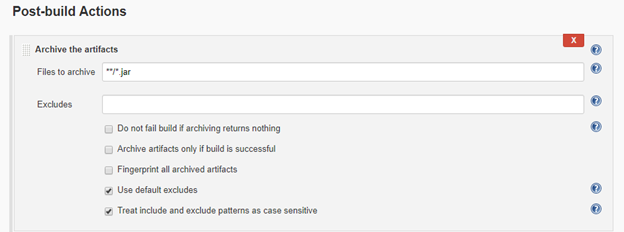
For a FreeStyle Jenkins job, you can use Archive the artifacts step in Post-build Actions to upload the target artifacts into Azure storage.

4.post build actions

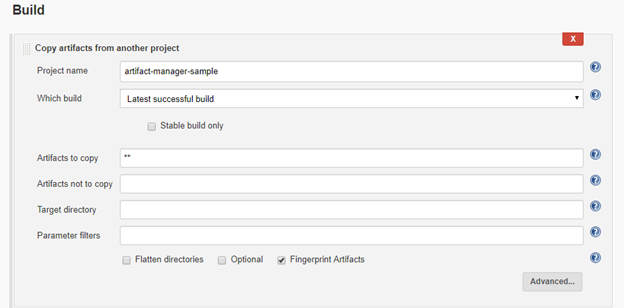
This Azure Artifact Manager plugin is also compatible with some other popular management plugins, such as the Copy Artifact plugin. You can still use these plugins without changing anything.

5 build

Troubleshooting

If you have any problems or suggestions when using Azure Artifact Manager plugin, you can file a ticket on Jenkins JIRA for the azure-artifact-manager-plugin component.

Conclusion

The Azure Artifact Manager enables a more cloud-native Jenkins. This is the first step in the Cloud Native project. We have a long way to go to get Jenkins to run on cloud environments as a true “Cloud Native” application. We need help and welcome your participation and contributions to make Jenkins better. Please start contributing and/or give us feedback!

Plugin Management Library and CLI Tool Phase 2 GSoC Updates

$
0
0

At end of the first GSoC phase, Iannounced the first alpha release of the CLI tool and library that will help centralize plugin management and make plugin tooling easier.

Phase 2 has mainly been focused on improving upon the initial CLI and library written in Coding Phase 1. In particular, we’ve been focusing on getting the tool ready to incorporate into the Jenkins Docker Image to replace the install-plugins.sh bash script to download plugins. This work included parsing improvements so that blank lines and comments in the plugins.txt file are filtered out, allowing update centers and the plugin download directory to be set via environment variables or CLI Options, creating Windows compatible defaults, and fixing a bug in which dependencies for specific plugin versions were not always getting resolved correctly.

In parallel to getting the tool ready for Jenkins Docker integration, Phase 2 saw the addition of several new features.

Yaml Input

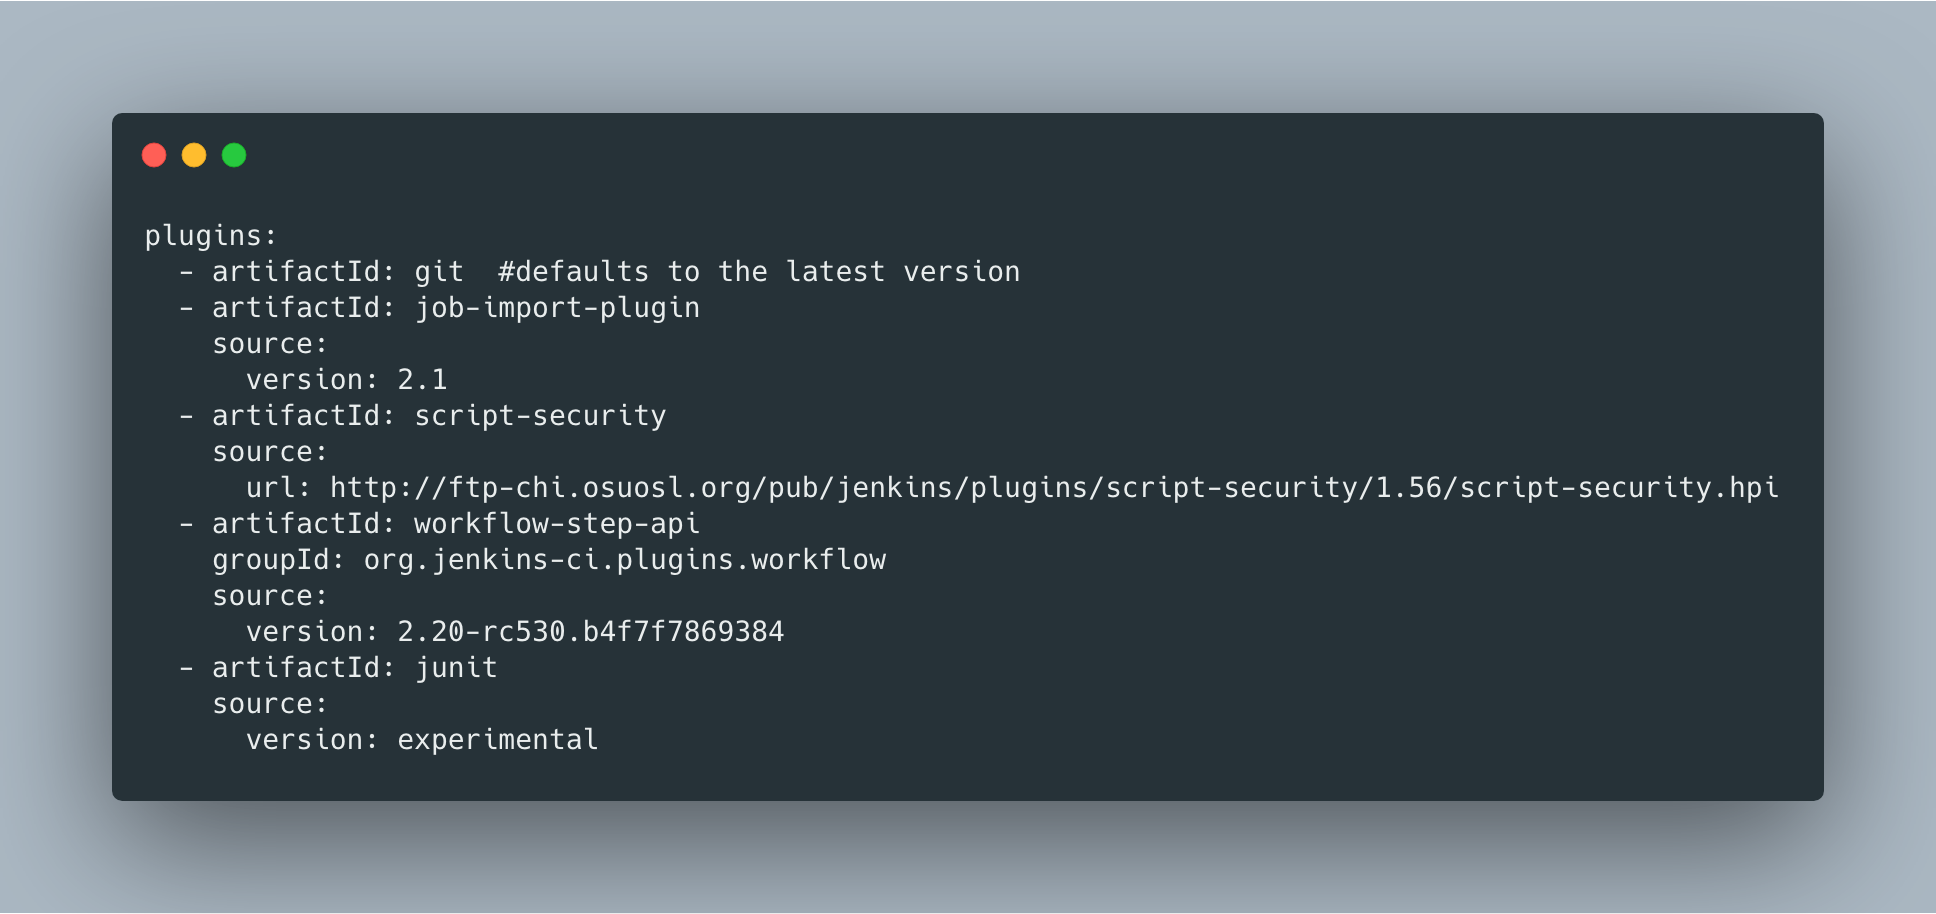
In addition to specifying the plugins they want to download via the --plugins CLI option or through a .txt file, users can now use a Jenkins yaml file with aplugins root element.

Say goodbye to the days of specifying incremental plugins like incrementals;org.jenkins-ci.plugins.workflow;2.20-rc530.b4f7f7869384 - you can enter the artifactId, groupId, and version to specify an incremental plugin.

Yaml Input Example
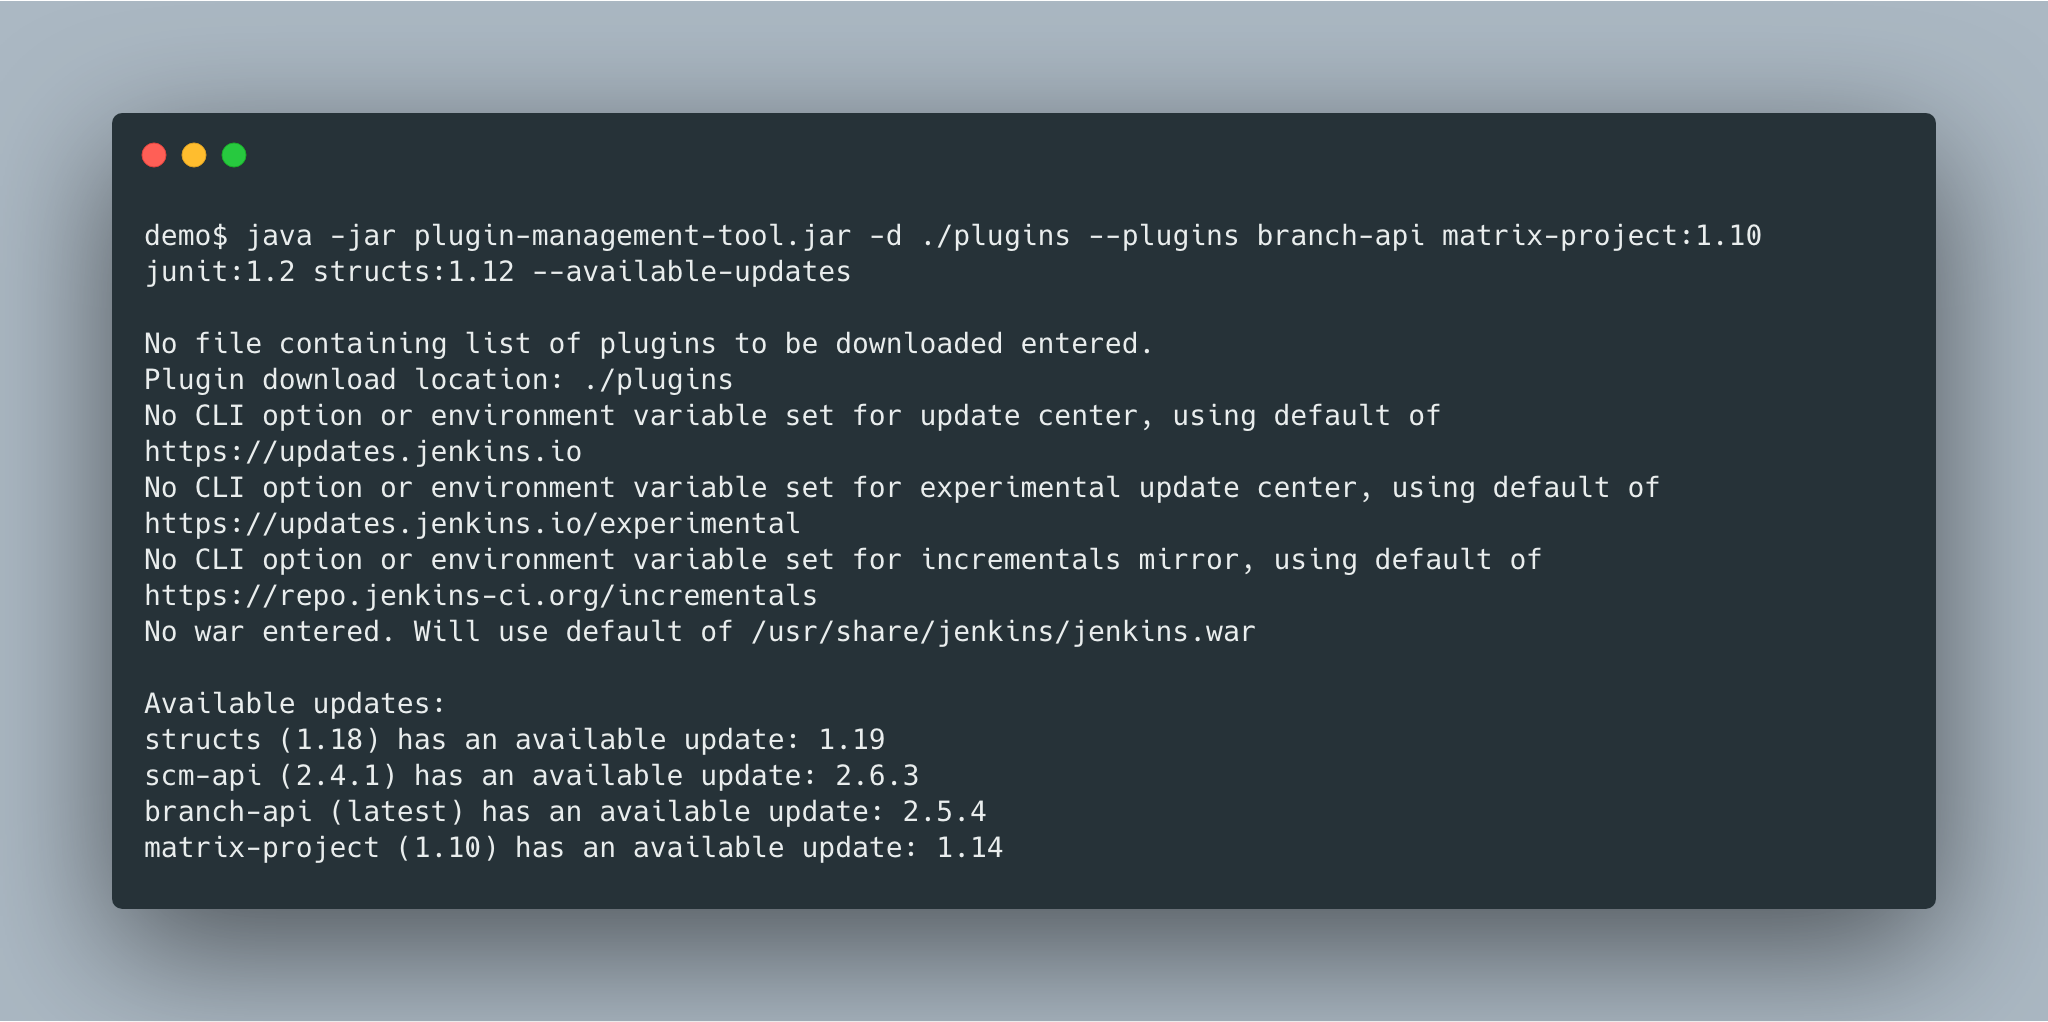
Yaml CLI Example

Making the Download Process More Transparent

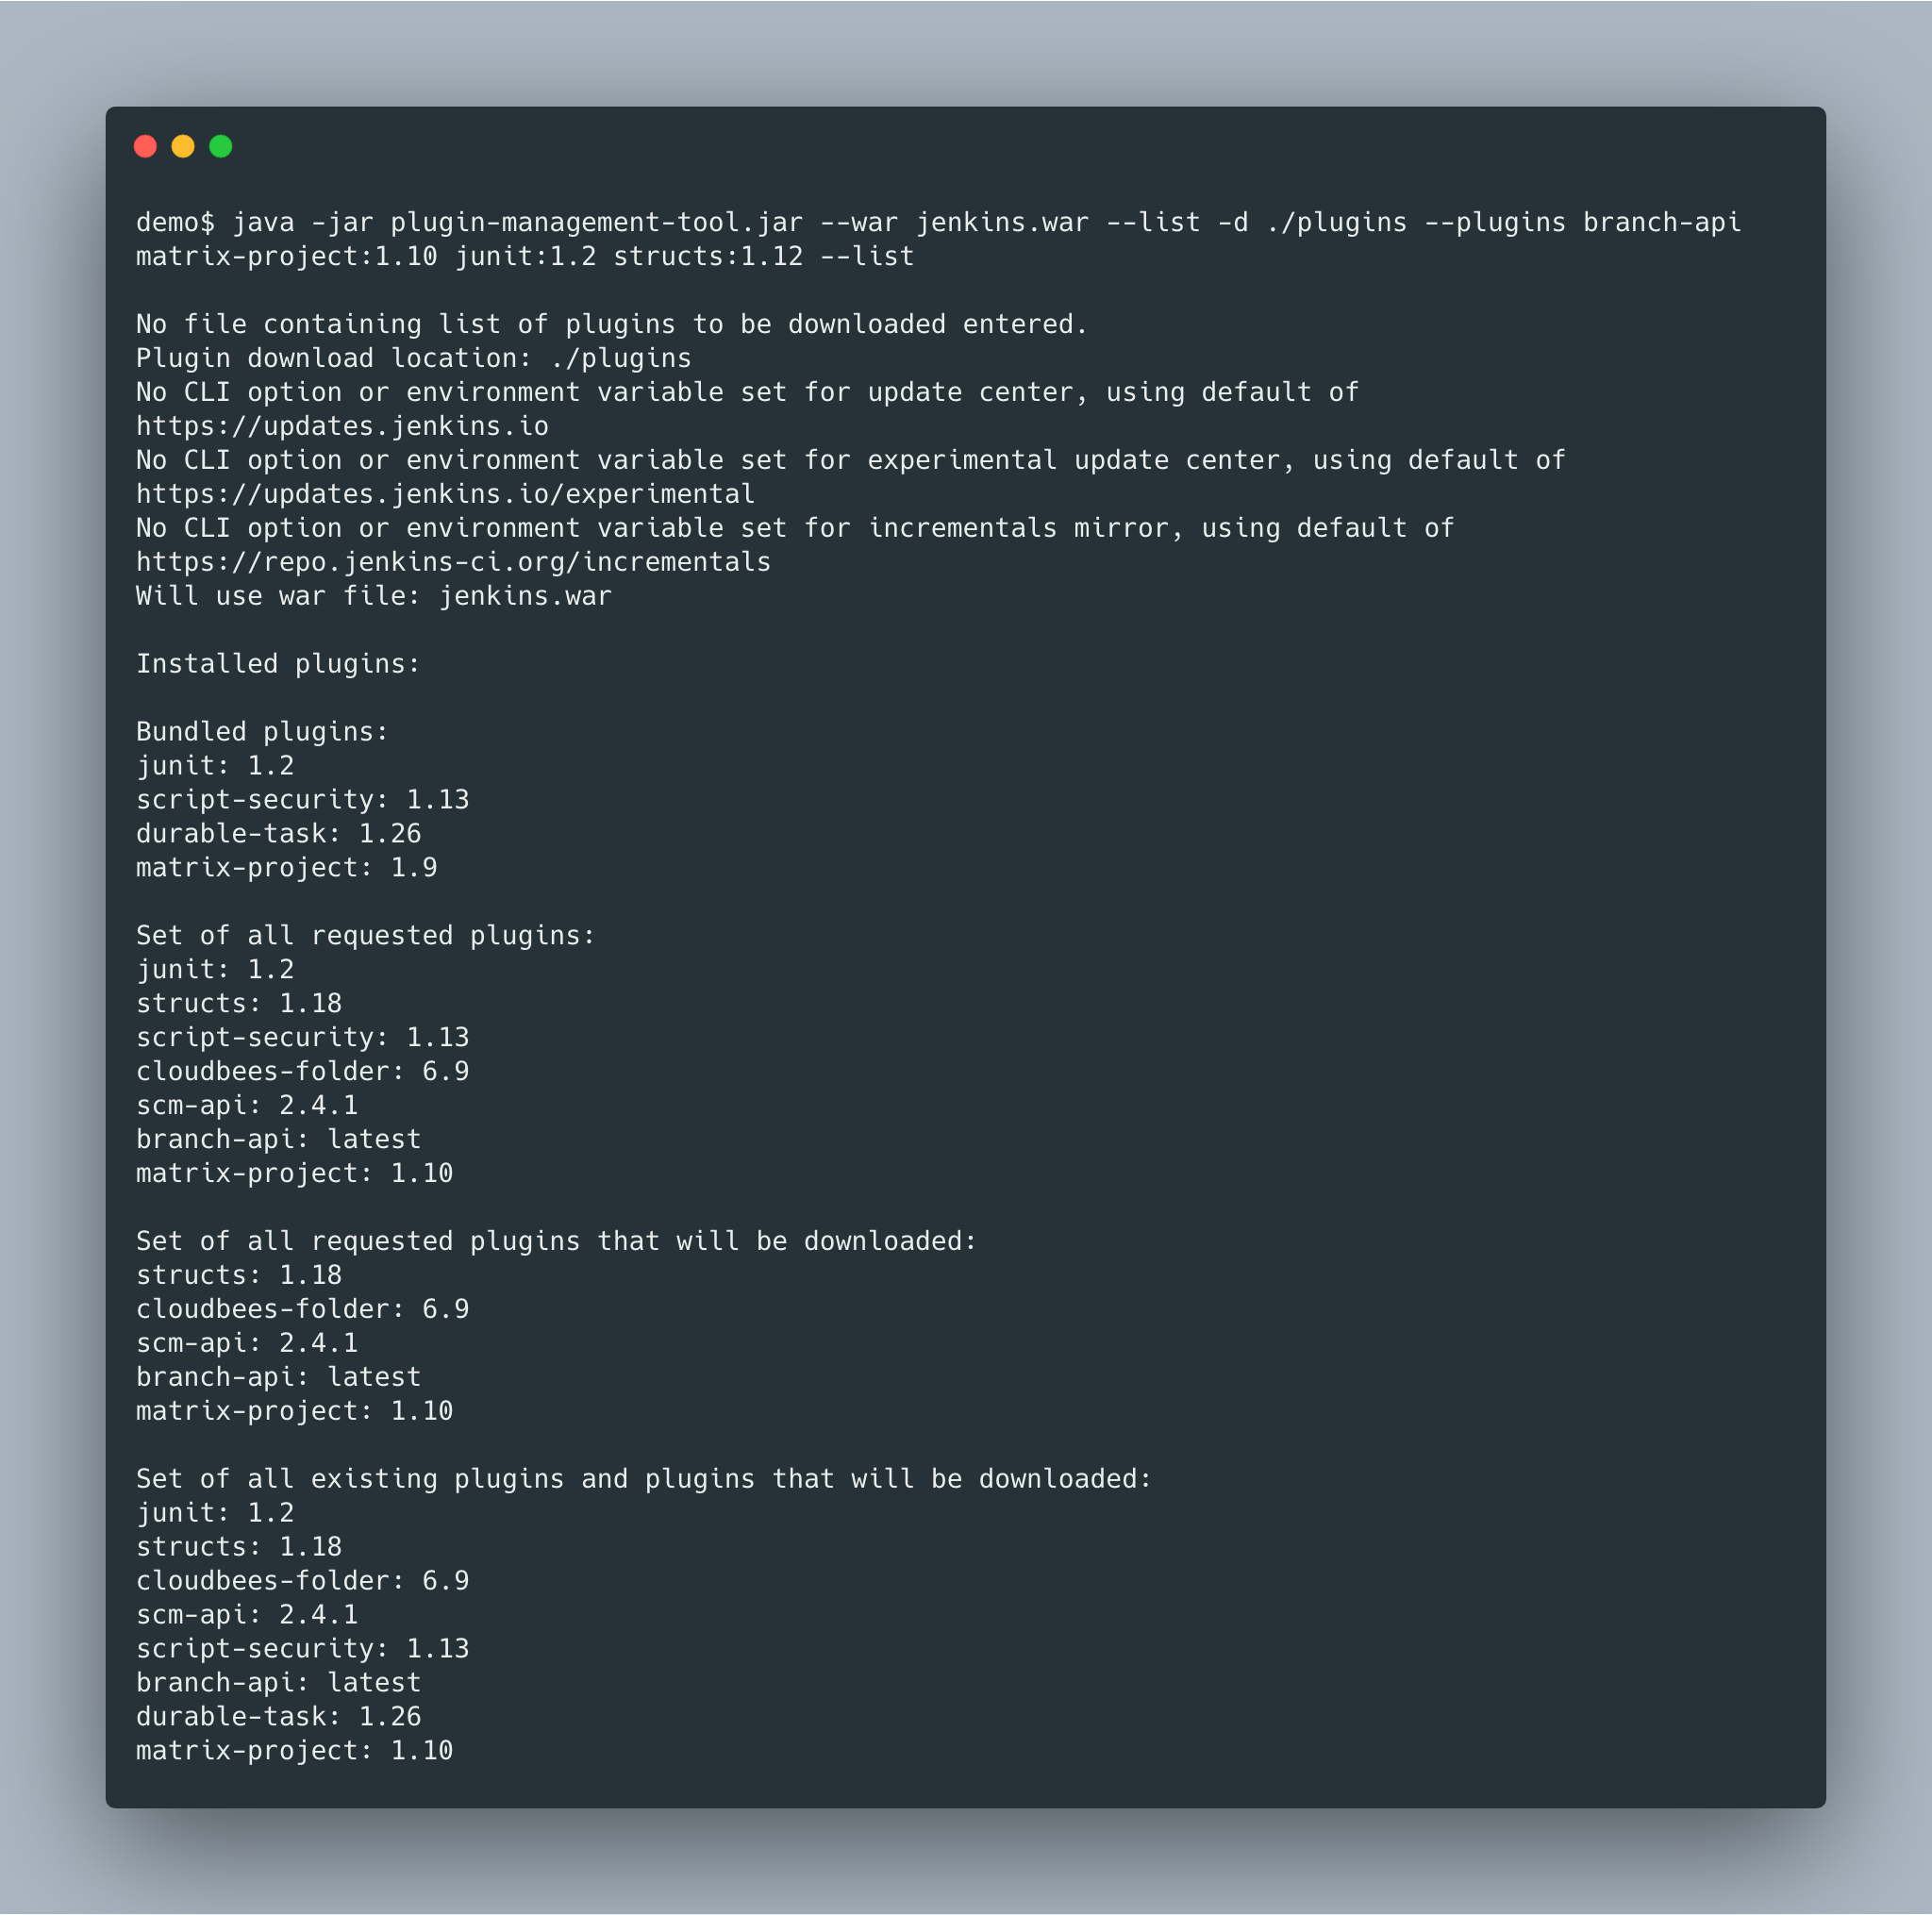
Previously, the plugin download process was not very transparent to users - it was difficult to know the final set of plugins that would be downloaded after pulling in all the dependencies. Instead of determing the set of plugins that will be downloaded at the time of download, users now have the option to see the full set of plugins and their versions that will be downloaded in advance. With the --list CLI option, users can see all currently downloaded and bundled plugins, the set of all plugins that will be downloaded, and the effective plugin set - the set of all plugins that are already downloaded or will be downloaded.

List CLI Option Example

Viewing Information About plugins

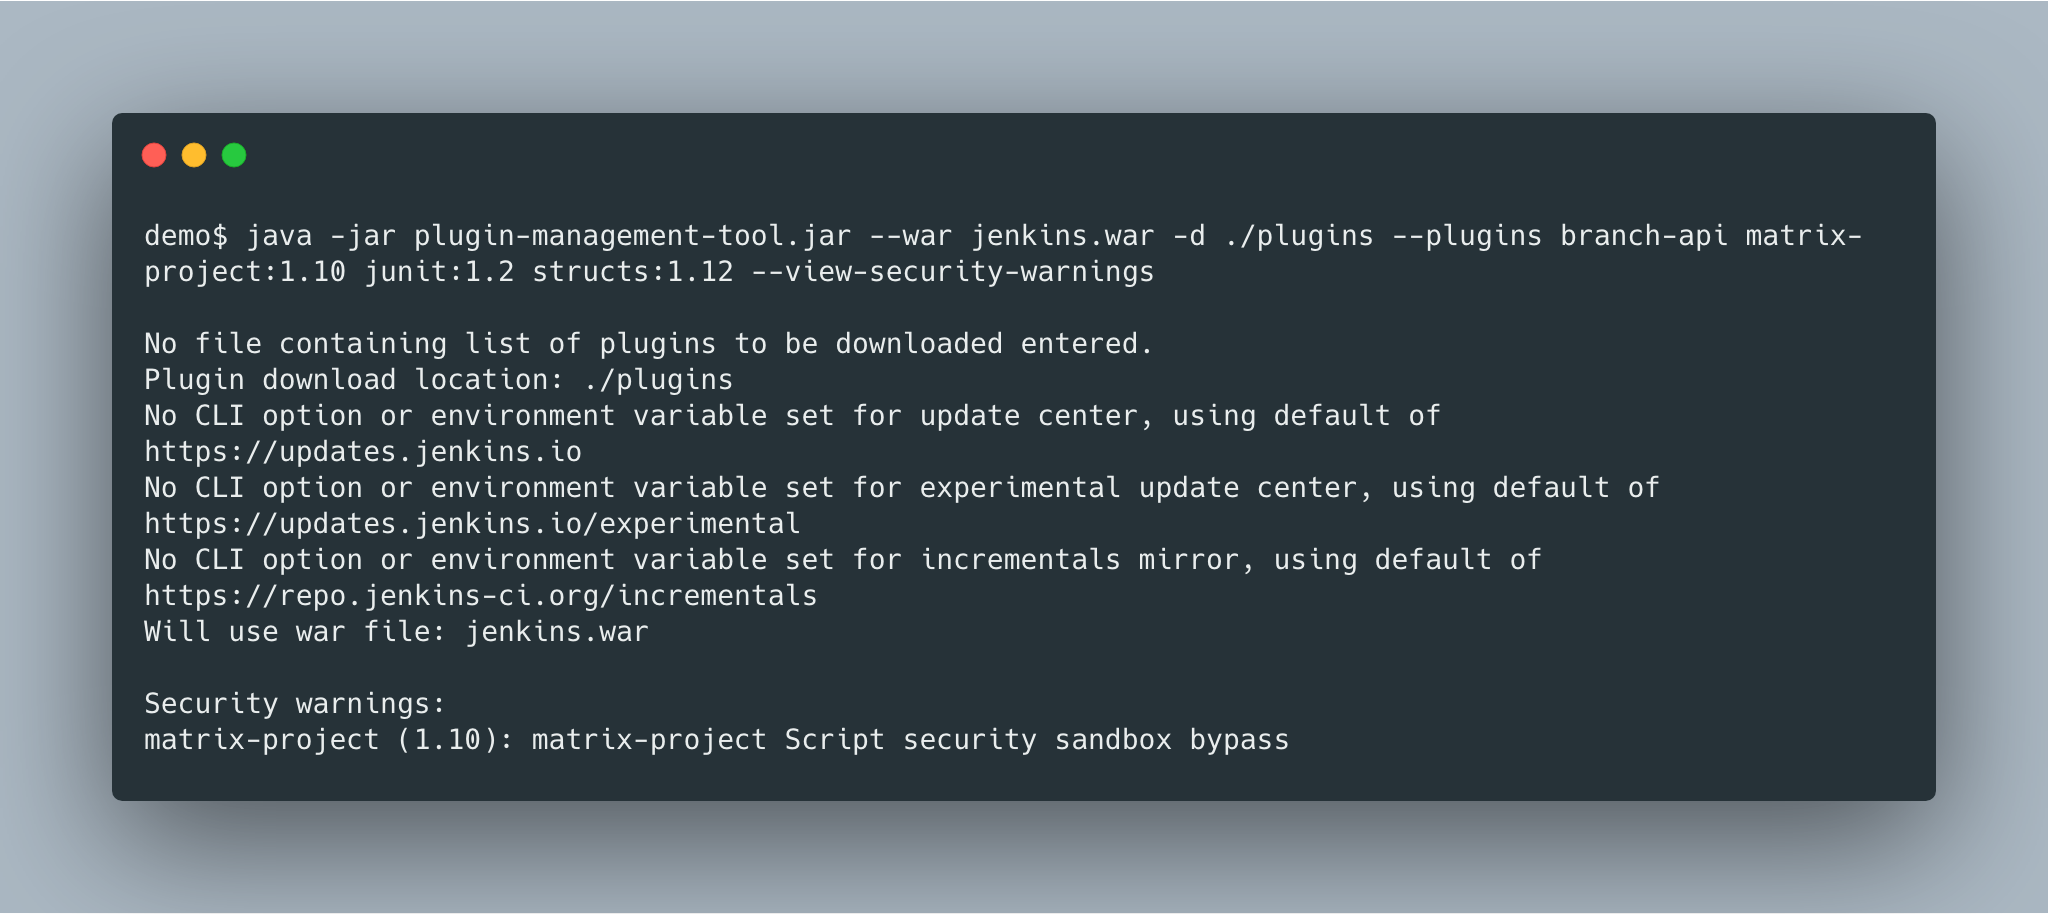
Now that you know which plugins will be downloaded, wouldn’t it be nice to know if these are the latest versions or if any of the versions you want to install have security warnings? You can do that now too.

Security Warning CLI Option Example

Next Steps and Additional Information

The updates mentioned in this blog will be released soon so you can try them out. The focus of Phase 3 will be to continue to iterate upon and improve the library and CLI. We hope to release a first version and submit a pull request to Jenkins Docker soon. Thanks to everyone who has already tried it out and given feedback! I will also be presenting my work at DevOps World in San Francisco in a few weeks. You can use the code PREVIEW for a discounted registration ($799 instead of $1,499).

Feel free to reach out through the Plugin Installation Manager CLI Tool Gitter chat or through the Jenkins Developer Mailing list. I would love to get your questions, comments, and feedback! We have meetings Tuesdays and Thursdays at 6PM UTC.

Introducing new Folder Authorization Plugin

$
0
0

During my Google Summer of Code Project, I have created the brand new Folder Auth Plugin for easily managing permissions to projects organized in folders from the Folders plugin. This new plugin is designed for fast permission checks with easy-to-manage roles. The 1.0 version of the plugin has just been released and can be downloaded from your Jenkins' Update center.

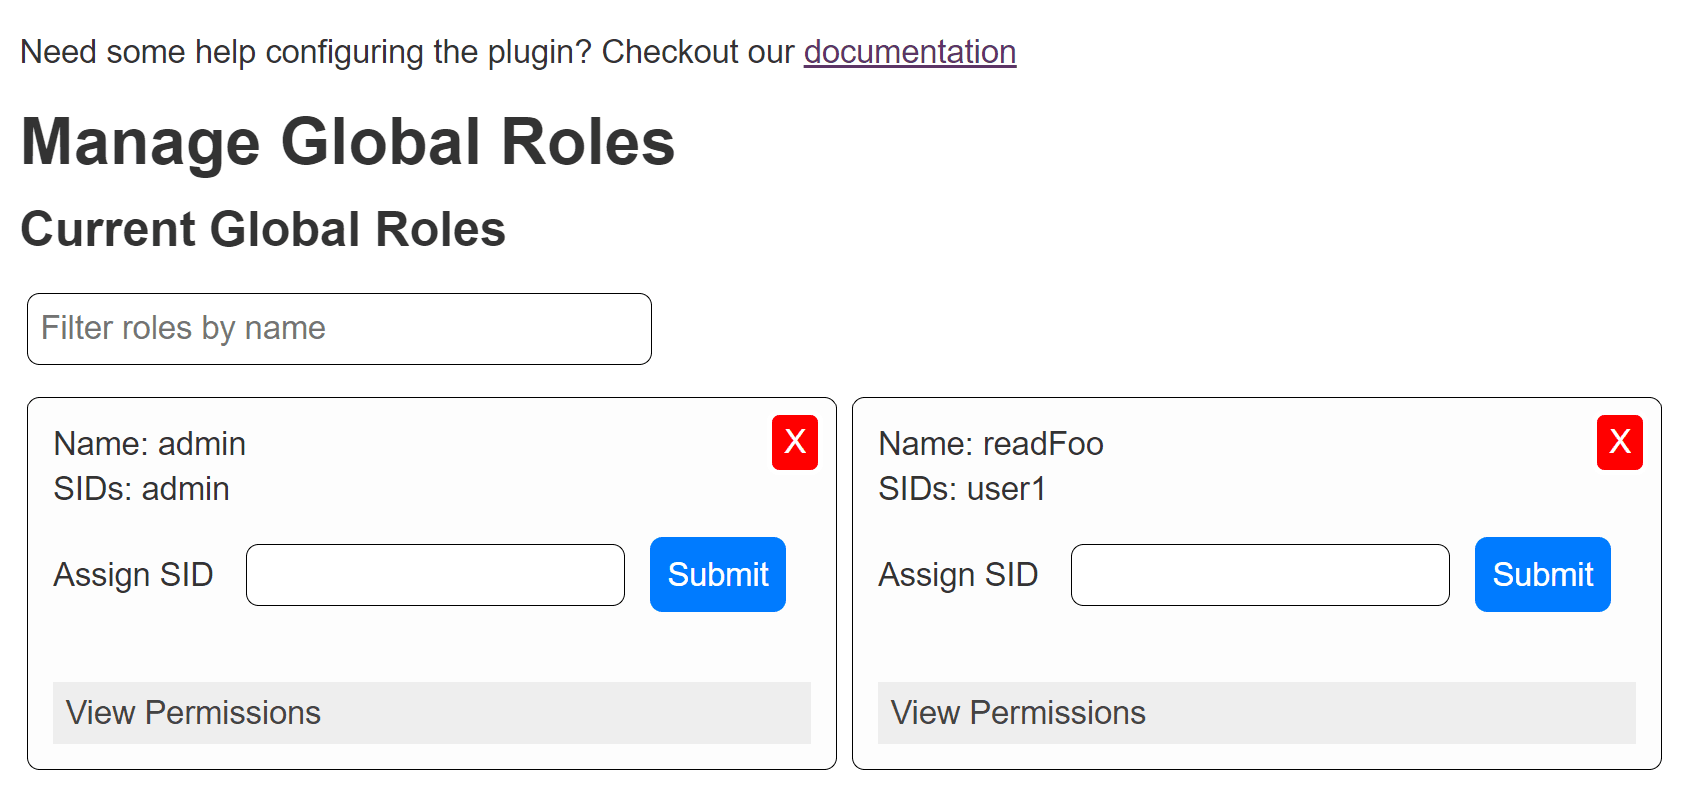
This plugin was inspired by the Role Strategy Plugin and brings about performance improvements and makes managing roles much easier. The plugin was developed to overcome performance limitations of the Role Strategy plugin on a large number of roles. At the same time, the plugin addresses one of the most popular ways of organizing projects in Jenkins, through folders. The plugin also has a new UI with more improvements to come in the future.

The plugin supports three types of roles which are applicable at different places in Jenkins.

  • Global Roles: applicable everywhere in Jenkins

  • Agent Roles: restrict permissions for multiple agents connected to your instance

  • Folder Roles: applicable to multiple jobs organized inside folders

Screenshot of the Folder Auth Plugin

Performance Improvements over Role Strategy Plugin

This plugin, unlike the Role Strategy plugin, does not use regular expressions for finding matching projects and agents giving us performance improvements and makes administrators' lives easier. To reduce the number of roles required to be managed, permissions given to a folder through a folder role get inherited to all of its children. This is useful for giving access to multiple projects through a single role. Similarly, an agent role can be applied to multiple agents and assigned to multiple users.

This plugin is designed to outperform Role Strategy Plugin in permission checks. The improvements were measured using themicro-benchmark framework I had created during the first phase of my GSoC project. Benchmarks for identical configurations for both plugin show that the permissions check are up to 934x faster for 500 global roles when compared to the global roles from the Role Strategy 2.13, which in itself contains several performance improvements. Comparing folder roles with Role Strategy’s project roles, a permission check for access to a job almost 15x faster for 250 projects organized in two-level deep folders on an instance with 150 users. You can see the benchmarks and the result comparisons here.

Jenkins Configuration as Code Support

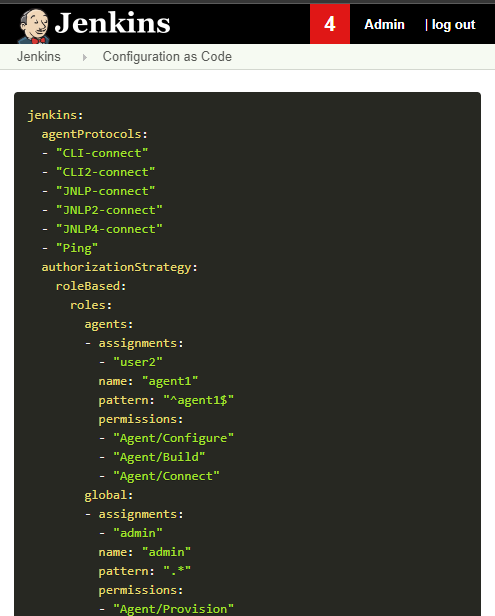
The plugin supports Jenkins Configuration-as-Code so you can configure permissions without going through the Web UI. A YAML configuration looks like this:

jenkins:authorizationStrategy:folderBased:globalRoles:
        - name: "admin"permissions:
            - id: "hudson.model.Hudson.Administer"# ...sids:
            - "admin"
        - name: "read"permissions:
            - id: "hudson.model.Hudson.Read"sids:
            - "user1"folderRoles:
        - folders:
            - "root"name: "viewRoot"permissions:
            - id: "hudson.model.Item.Read"sids:
            - "user1"agentRoles:
        - agents:
            - "agent1"name: "agentRole1"permissions:
            - id: "hudson.model.Computer.Configure"
            - id: "hudson.model.Computer.Disconnect"sids:
            - "user1"

REST APIs with Swagger support

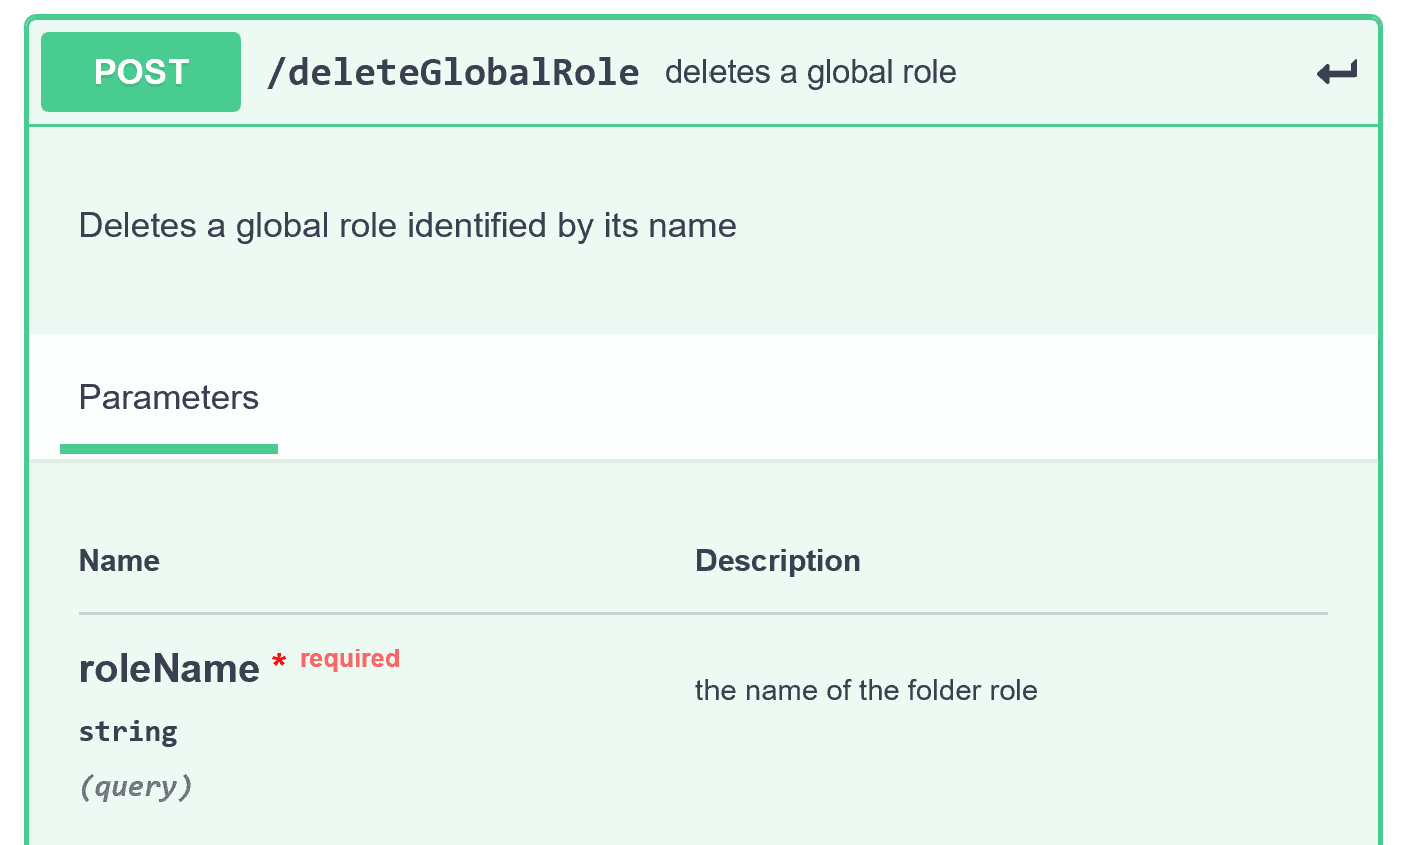
The plugin provides REST APIs for managing roles with OpenAPI specifications through Swagger.json. You can check out the Swagger API onSwaggerHub. SwaggerHub provides stubs in multiple languages which can be downloaded and used to interact with the plugin. You can also see some sample requests from the command line using curl.

Screenshot of the APIs on SwaggerHub
Another Screenshot of the APIs on SwaggerHub

What’s next

In the (not-too-distant) future, I would like to work on improving the UI and make the plugin easier to work with. I would also like to work on improving the APIs, documentation and more optimizations for improving the plugin’s performance.

Remoting over Apache Kafka 2.0: Built-in Kubernetes support

$
0
0

I am Long Nguyen from FPT University, Vietnam. My project for Google Summer of Code 2019 is Remoting over Apache Kafka with Kubernetes features. After a successful Phase 1, finally the 2.0 version of the plugin has been released. The 2.0 version provides seamless integration with Kubernetes environment.

2.0 version features

  • Start a simple Apache Kafka server in Kubernetes.

  • Dynamically provision Remoting Kafka Agent in Kubernetes.

  • Helm chart to bootstrap the whole system in Kubernetes.

Start a simple Apache Kafka server in Kubernetes

Use of the plugin requires that users have a configured Apache Zookeeper and Apache Kafka server, which could be intimidating for people who just want to try out the plugin. Now, users can start a simple, single-node Apache Kafka server in Kubernetes environment with just one button click.

Apache Kafka provisioning in Kubernetes UI

On the Global Configuration page, users can input Kubernetes server information and credentials. When users click Start Kafka on Kubernetes button, Jenkins will create a Kubernetes client from the information and then apply Apache Zookeeper and Apache Kafka YAML specification files from resources. After downloading images and creating containers, it will automatically update Apache Zookeeper and Apache Kafka URLs into respective fields.

Dynamically provision Remoting Kafka Agent in Kubernetes

With previous version, users have to manually add/remove nodes so it is hard to scale builds quickly. Kubernetes plugin allows us to dynamically provision agents in Kubernetes but it is designed for JNLP agent. With this new version, Remoting Kafka agent can also be provisioned automatically in Kubernetes environment.

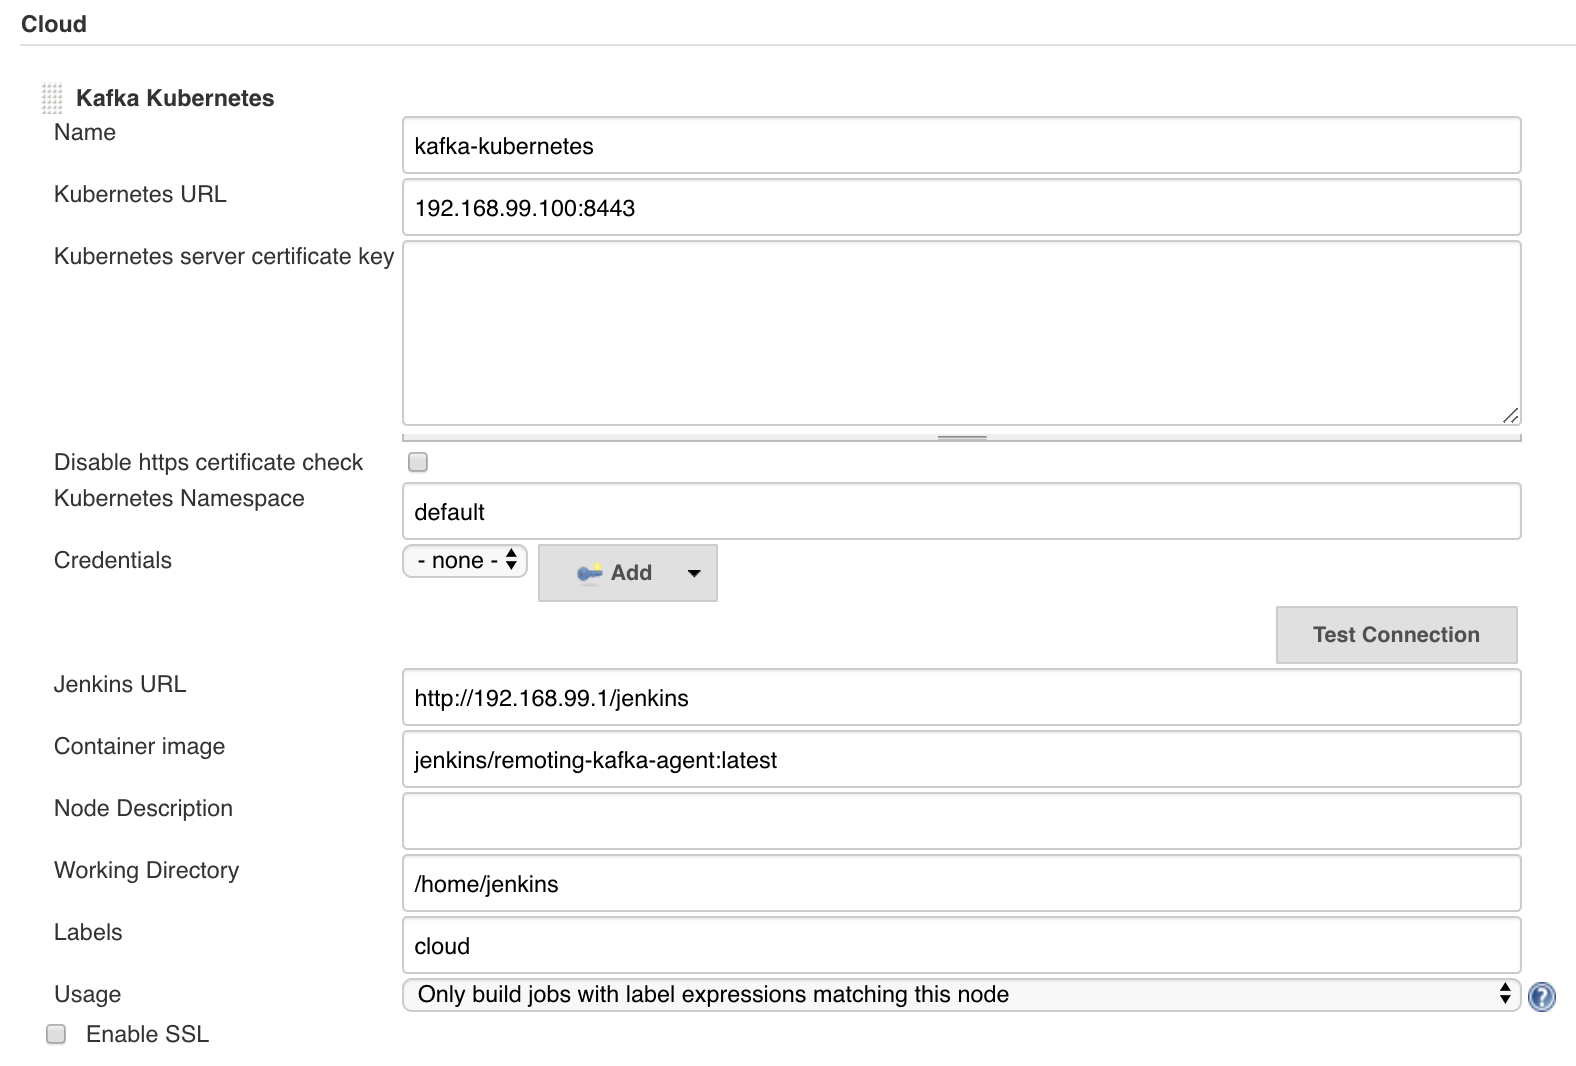
Remoting Kafka Cloud UI

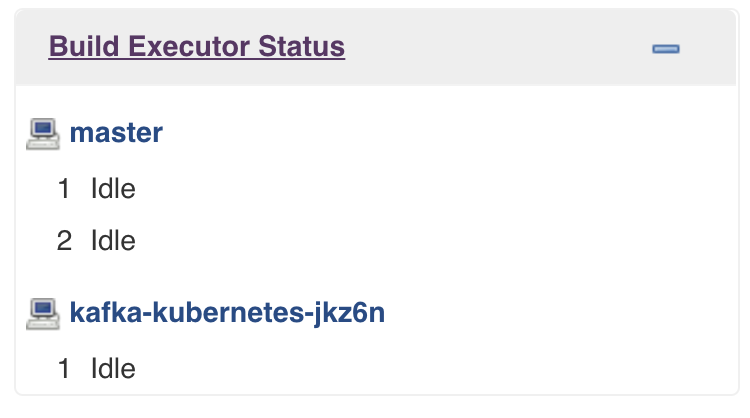
Users can find the new feature in Cloud section in /configure. Here users could input Kubernetes connection parameters and desired Remoting Kafka agent properties including labels. When new build with matching labels gets started and there are no free nodes, Cloud will automatically provision Remoting Kafka agent pod in Kubernetes to run the build.

Remoting Kafka Agent get provisioned

Helm Chart

Helm chart for Remoting over Apache Kafka plugin is based on stable/jenkins chart and incubator/kafka chart. You can follow the instruction here to install a demo ready-to-use Helm release. Your kubectl get all should look like this:

NAME                                READY   STATUS    RESTARTS   AGE
pod/demo-jenkins-64dbd87987-bmndf   1/1     Running   0          2m21s
pod/demo-kafka-0                    1/1     Running   0          2m21s
pod/demo-zookeeper-0                1/1     Running   0          2m21s

NAME                              TYPE        CLUSTER-IP      EXTERNAL-IP   PORT(S)                      AGE
service/demo-jenkins              NodePort    10.108.238.56   <none>        8080:30386/TCP               2m21s
service/demo-jenkins-agent        ClusterIP   10.98.85.184    <none>        50000/TCP                    2m21s
service/demo-kafka                ClusterIP   10.109.231.58   <none>        9092/TCP                     2m21s
service/demo-kafka-headless       ClusterIP   None            <none>        9092/TCP                     2m21s
service/demo-zookeeper            ClusterIP   10.103.2.231    <none>        2181/TCP                     2m21s
service/demo-zookeeper-headless   ClusterIP   None            <none>        2181/TCP,3888/TCP,2888/TCP   2m21s

NAME                           READY   UP-TO-DATE   AVAILABLE   AGE
deployment.apps/demo-jenkins   1/1     1            1           2m21s

NAME                                      DESIRED   CURRENT   READY   AGE
replicaset.apps/demo-jenkins-64dbd87987   1         1         1       2m21s

NAME                              READY   AGE
statefulset.apps/demo-kafka       1/1     2m21s
statefulset.apps/demo-zookeeper   1/1     2m21s

How to Contribute

You are welcome to try out the plugin and integrate it into your current setup. If you find out any bug or if you would like to request new feature, you can create ticket at JIRA. If you would like to contribute code directly, you can create pull requests in the GitHub page below.


My DevOps World - Jenkins World 2019 Experience

$
0
0

Last week I had the privilege of attending DevOps World - Jenkins World in San Francisco to present my Google Summer of Code project for plugin management. It was an amazing experience getting to meet people from all over world who are trying to make the development and release process easier and more efficient. I enjoyed learning more about industry tools, processes, and standards, and meeting CI/CD experts and contributors in the open source community.

Below is a summary of my experience. Thank you to the Jenkins project and CloudBees for making my trip and attendence possible!

Day 1

Monday was the Continuous Delivery Contributor Summit, which focused on projects under the CDF umbrella. After checking in and grabbing my badge, I was able to meet up with some of the Google Summer of Code org admins. It was great being able to actually meet them in person after talking to them over video conferencing and chats all summer!

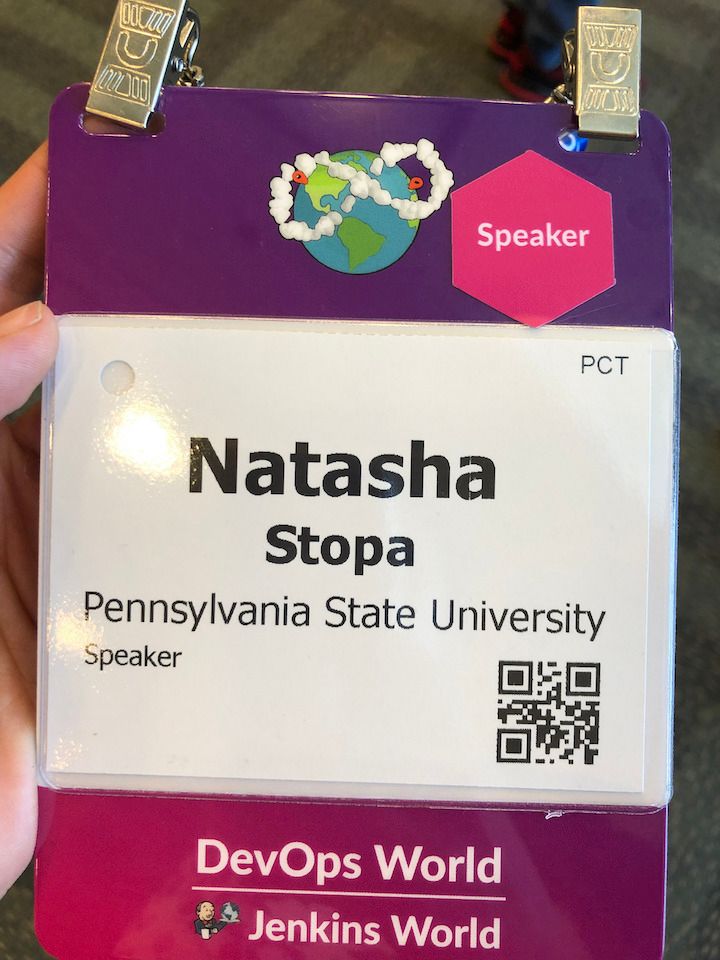
Speaker Badge

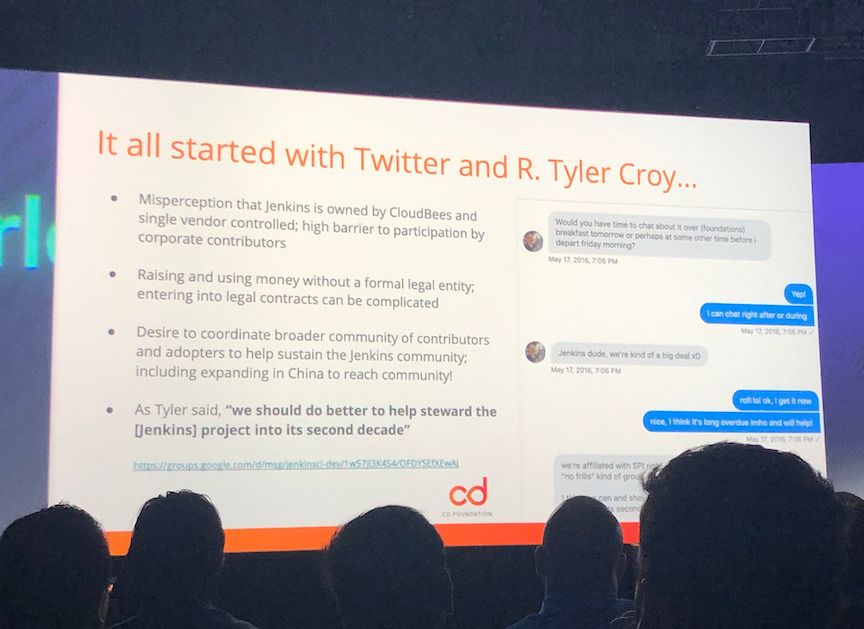
Tracy Miranda started the summit out by introducing the Continuous Delivery Foundation, which aims to provide a vendor neutral home to help and sustain open source projects focusing on all aspects of continuous delivery. Currently, Jenkins, Tekton, Spinnaker, and JenkinsX have joined the foundation. Project updates were given for Jenkins, Tekton, and JenkinsX. In the afternoon, attendees split into different groups for unconference sessions. I presented my project to the Jenkins group. Afterwards, there was free time to chat with other attendees about my project and the other Jenkins projects. Lastly, lightning talks were given before everyone headed to the contributor appreciation event to grab some food and drinks.

Contributor Summit

Day 2

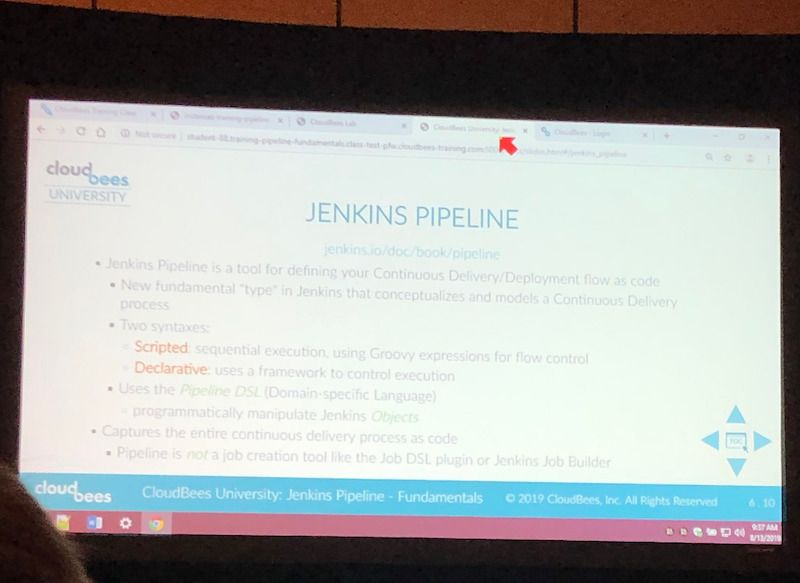
I attended the Jenkins Pipeline Fundamentals Short Course in the morning. Even though I’m working on a project for Jenkins, there’s still a lot I don’t know so I just wanted to try to learn more.

Jenkins Pipeline Basics Session

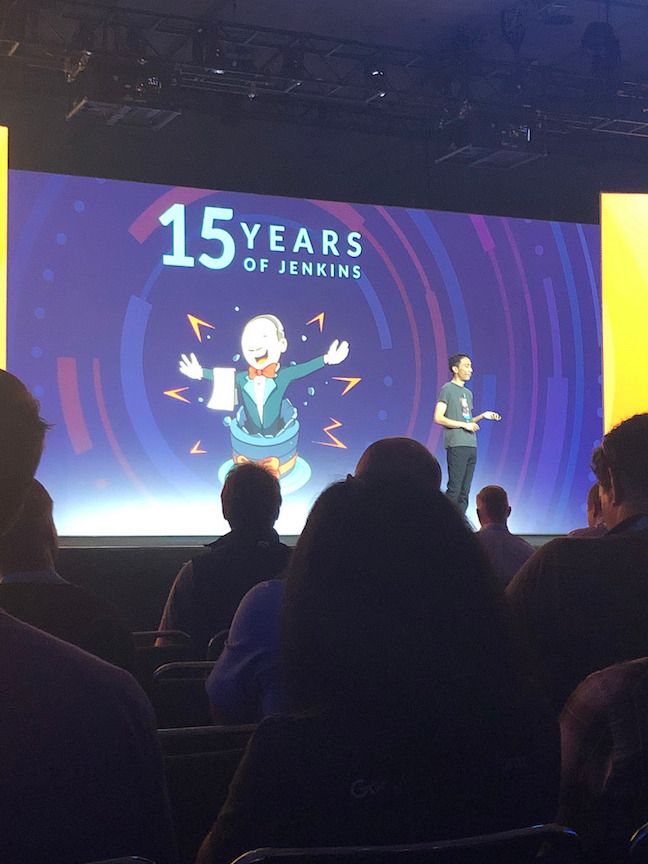
A lot of the afternoon sessions filled up, so I spent the afternoon trying to meet other people at the conference, before heading to the keynote. The keynote talked more about the CDF and some of the backstory behind its origin. This year is also a big anniversary for Jenkins - it has now been around for 15 years.

CDF Key Note
CDF Origin

After the keynote, I checked out a Women in Tech mixer and the opening of the exibition hall. Probably my favorite swag I picked up was the "Will Code for Beer" stickers and a bottle of hot sauce.

Jenkins Sticker
Will Code for Beer Sticker

Day 3

The morning began with another keynote. Shawn Ahmed of Cloudbees talked about the challenges of visibility into bottlenecks of the development process and Rajeev Mahajan discussed how HSBC tackled DevOps. The rest of the day I attended different sessions on container tooling, implementing CI/CD in a cloud native environment, running Jenkins on Jenkins, and database DevOps.

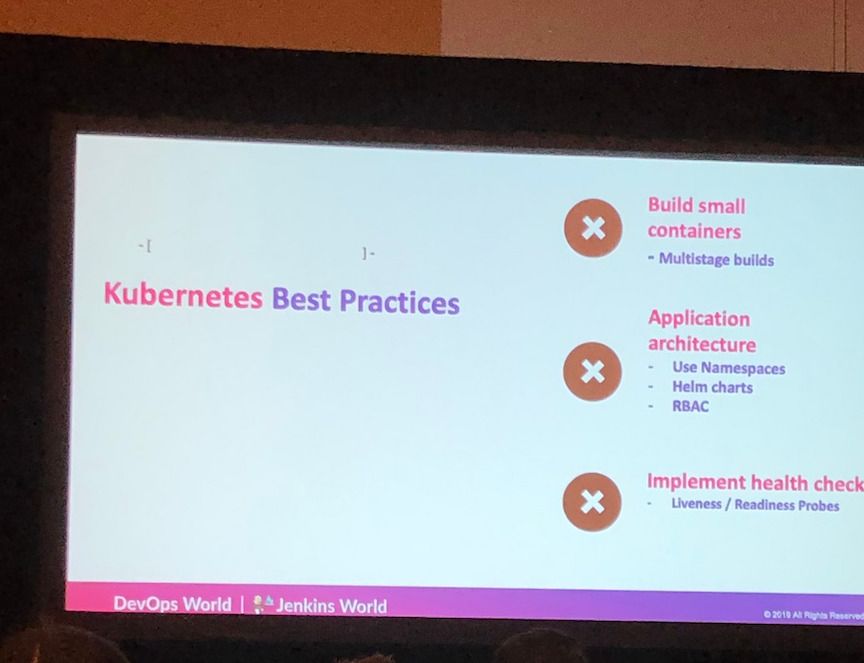
Session on Containers

After the sessions finished, I wandered around the expo until it closed, then joined some of the other conference attendees to have some fun at a ping pong bar nearby.

Day 4

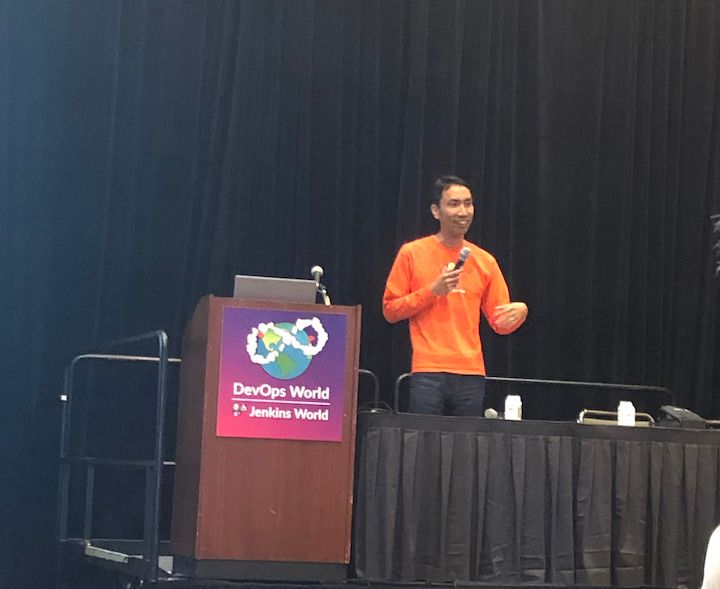
The final and last day of the conference was probably my favorite. The morning keynote revealed that Zhao Xiaojie had won an award for his work on Jenkins advocacy, some other DevOps award panelists talked about their approaches to different challenges, then David Stanke gave an enjoyable presentation about cloud native CI/CD. I was able to present my summer project and attend a few more sessions, including one about DevOps at scale, and another about use cases for machine learning in CI/CD pipelines.

Plugin Management Tool Presentation

The last keynote given by James Govenor was a thoughtful look into the current and future states of tech. How does tech look like it will scale in the coming years in the U.S. and across the world? How can we make tech more inclusive and accessible? What can we do to minimize our environmental footprint? In particular, his points on welcoming people from a non-traditional computer science background resonated with me since I’m currently undergoing my own career transition to tech.

After the conference ended, I said goodbye to the remaining GSoC org admins before meeting an old friend for dinner and bringing along some new friends I met at the conference. I spent the remaining part of the night singing karaoke with them before heading out of San Francisco the next morning.

GSoC Mentors

Thanks again to everyone who supported me and encouraged me leading up to and during my presentation, patiently answered my questions as I tried to gather more context about CI/CD tools and practices, and made my first DevOps conference so enjoyable!

Introduce React Plugin Template

$
0
0

The template’s main repo is at React Plugin Template

This template is part of the project Working Hours UI Improvement duringGoogle Summer of Code 2019, which improved the UI of Working Hours Plugin using this pattern to develop Jenkins plugins with React. The Working Hours Plugin repository can be found at Working Hours Plugin.

Overview

Developing plugin for Jenkins has always been easy to do with its Jelly based UI render system, but Jelly seems to be pretty heavy when we want to use more modernized frameworks like React, or if we need to make the plugin UI more customized. This is what this template is built for.

And with React integrated, development of Jenkins plugin is more modernized, developer can now use tons of React libraries, the way to use libraries is now tinier and safer with webpack, in short, coding with Jenkins plugin can be much easier.

Features

FeatureSummary

React Integrated

React is integrated, you can take full control of the UI

Using Iframe

Using iframe can create a new javascript env, we can get rid of some side effects of some polyfills which was added globally.(such as Prototype.js)

Maven Lifecycle

npm commands are integrated into Maven lifecycle with help of Frontend Maven Plugin

Webpack

Webpack helps us reduce the size of the bundle, also avoids pollution on the global namespace.

Jenkins Crumb attached

Crumb is attached to Axios client, now you can send requests in the way you used to do in React.

Express as devserver

You can run your react app in a standalone page so you can develop in webpack hot reload mode, also with webpack proxy, the standalone app is still accessible to the jenkins dev server.

Axios as http client

Axios hugely simplify the way to make requests.

Screenshots

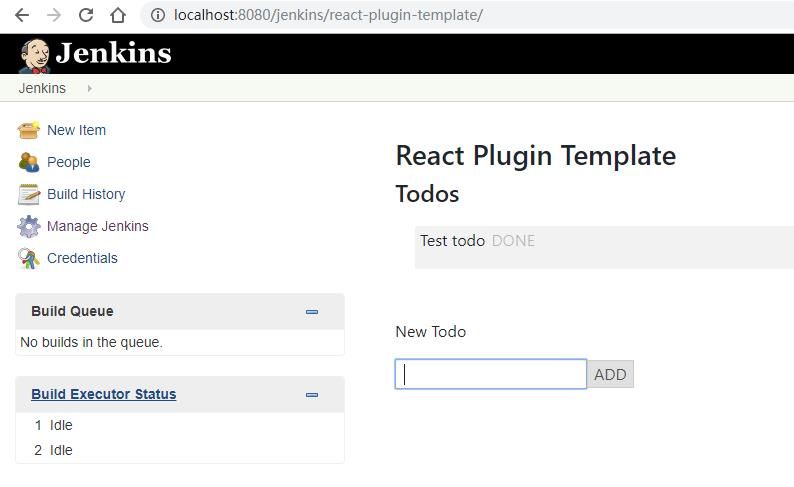
Example Plugin UI

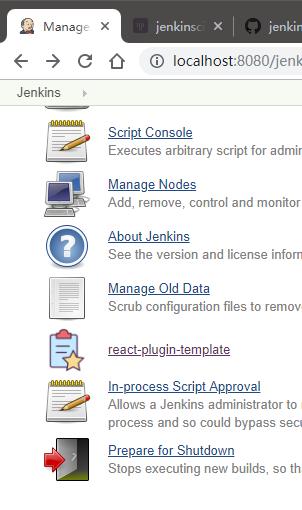
plugin ui Management Link

management link

Getting Started

Clone the repo:

git clone https://github.com/jenkinsci/react-plugin-template.git
cd react-plugin-template

Install the Maven dependencies and node modules.

mvn install -DskipTests

Run standalone React app with hot reload

npm run start

Run plugin

mvn hpi:run -Dskip.npm -f pom.xml

Send HTTP requests

As Crumb Issuer is default enabled in Jenkins and each ajax request is required to contain a Jenkins Crumb in request header, so be sure to use the axiosInstance which is already set up with Jenkins Crumb and exported at src/main/react/app/api.js.

export const apiGetData = () => {return axiosInstance.post("/data");
};

Or if you want to use your own http client, remember to add the Jenkins Crumb to your request’s header, the Crumb’s key and content could be found at src/main/react/app/utils/urlConfig.js, then you can set the header like below.

const headers = {};
const crumbHeaderName = UrlConfig.getCrumbHeaderName();if (crumbHeaderName) {
  headers[crumbHeaderName] = UrlConfig.getCrumbToken();
}

Write your own request handler

Now you can customize your request pattern as you want, also we need to write a handler.

Jenkins is using stapler to preprocess the requests, so if you need a request handler. For example and also in this template, you can use an Action class to create a sub-url, and then a StaplerProxy to proxy the request like a router. More info about a handler can be found here Stapler Reference.

Example handler

ManagementLink would get the request and then hand it off to the PluginUI

@ExtensionpublicclassPluginManagementLinkextends ManagementLink implements StaplerProxy {

    PluginUI webapp;

    publicObject getTarget() {return webapp;
    }publicString getUrlName() {return"react-plugin-template";
    }
}

PluginUI, stapler would then find methods in the target class, in this case, it finds doDynamic, then we can choose the next handler by return the methods result, in this case, getTodos or setTodos, and PluginUI just function like a url router.

publicclassPluginUI{public HttpResponse doDynamic(StaplerRequest request) {
        ...

        List<String> params = getRequestParams(request);switch (params.get(0)) {case"get-todos":return getTodos();case"set-todos":return setTodos(request);
        }
        ...
    }
}

Data Persistence

You can save your data with a descriptor

@ExtensionpublicclassPluginConfigextendsDescriptor<PluginConfig> implements Describable<PluginConfig>

And after each time you change data, call save() to persist them.

publicvoid setTodos(@CheckForNullList<Todo> value) {this.todos = value;
        save();
    }

And in your handler, you can get the config class by calling

config = ExtensionList.lookup(PluginConfig.class).get(0);

Customize your plugin

Be sure to modify all the occurrence of react-template

  • At org/jenkinsci/plugins/reactplugintemplate/PluginUI/index.jelly , change the iframe’s id and its source url.

  • At src/main/react/app/utils/urlConfig.js change

  • At src/main/react/server/config.js , change the proxy route.

  • At src/main/react/package.json , change the start script’s BASE_URL

  • At pom.xml , change the artifactId

  • At org/jenkinsci/plugins/reactplugintemplate/PluginManagementLink.java , change names.

Also use the same value to modify the occurrence in src\main\react\app\utils\urlConfig.js.

Customize a page for your plugin

A management Link is recommended, which would get your plugin a standalone page, along with a entry button in the /manage system manage page.

management link

How does this template work?

This template is putting a webpack project inside a Maven project, and this template is just chaining the build result by copy the webpack output to the plugin’s webapp folder to make it accessible from the iframe, then Jelly render the iframe and the client gets the Plugin UI.

Why iframe?

Over time, Jenkins has added a lot of various javascript libraries to every regular page, which now causes problems for using modern Javascript tooling and as such, we decided to inline the new react based pages in their own sandbox which prevents collisions with other libraries, and maybe the iframe is a good sandbox case.

Introducing new GitLab Branch Source Plugin

$
0
0

The GitLab Branch Source Plugin has come out of its beta stage and has been released to the Jenkins update center. It allows you to create job based on GitLab user or group or subgroup project(s). You can either:

  • Import a single project’s branches as jobs from a GitLab user/group/subgroup (Multibranch Pipeline Job)

  • Import all or a subset of projects as jobs from a GitLab user/group/subgroup (GitLab Group Job or GitLab Folder Organization)

The GitLab Group project scans the projects, importing the pipeline jobs it identifies based on the criteria provided. After a project is imported, Jenkins immediately runs the jobs based on the Jenkinsfile pipeline script and notifies the status to GitLab Pipeline Status. This plugin unlike other Branch Source Plugins provides GitLab server configuration which can be configured in Configure System. Jenkins Configuration as Code (JCasC) can also be used to configure the server. To learn more about server configuration see my previous blog post.

Requirements

  • Jenkins - 2.176.2 (LTS)

  • GitLab - v11.0+

Creating a Job

To create a Multibranch Pipeline Job (with GitLab branch source) or GitLab Group Job, you must have GitLab Personal Access Token added to the server configuration. The credentials is used to fetch meta data of the project(s) and to set up hooks on GitLab Server. If the token has admin access you can also set up System Hooks while Web Hooks can be set up from any user token.

Create a Multibranch Pipeline Job

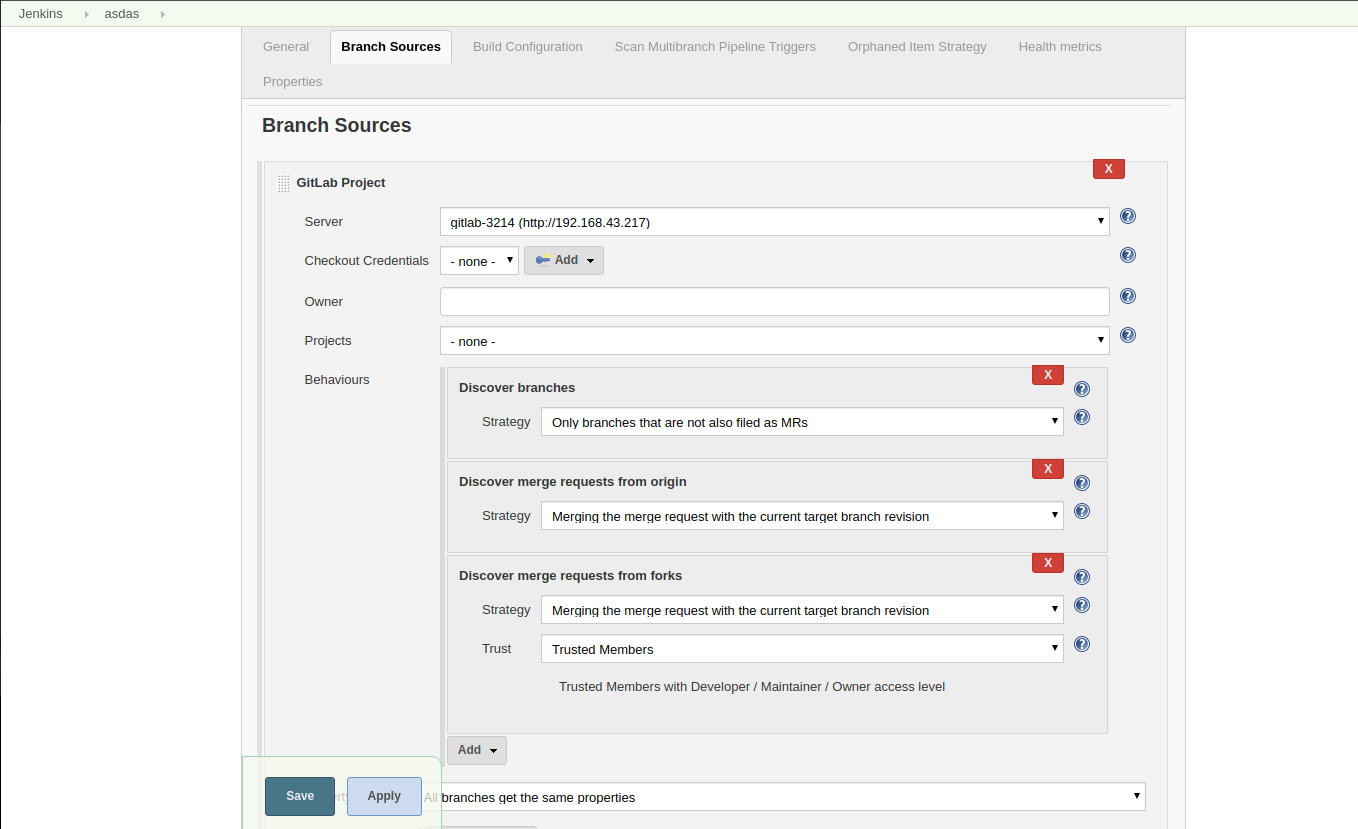
Go to Jenkins > New Item > Multibranch Pipeline > Add Source > GitLab Project

GitLab Project Branch Source
  • Server - Select your desired GitLab server from the dropdown, needs to be configured before creating this job.

  • Checkout Credentials - Add credentials of type SSHPrivateKey or Username/Password if there are any private projects to be built by the plugin. If all projects are public then no checkout credentials required. Checkout credential is different from the credential (of type GitLab Personal Access Token) setup in GitLab server config.

  • Owner - Can be a user, group or subgroup. Depending on this the Projects field is populated.

  • Projects - Select the project you want to build from the dropdown.

  • Behaviours - These traits are very powerful tool to configure the build logic and post build logic. We have defined new traits. You can see all the information in repository documentation.

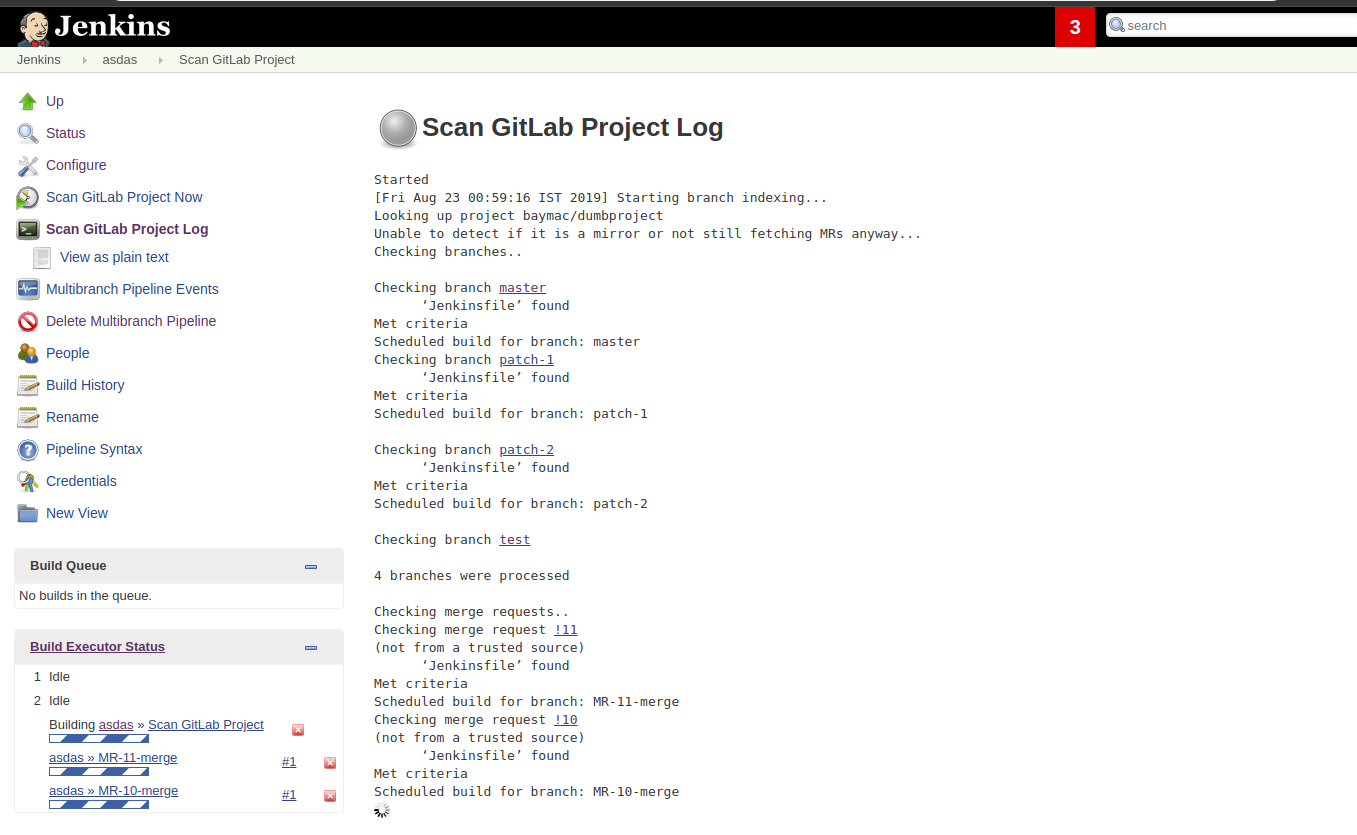
Save and wait for the branches indexing. You are free to navigate from here, the job progress is displayed to the left hand side.

Multibranch Pipeline Job Indexing

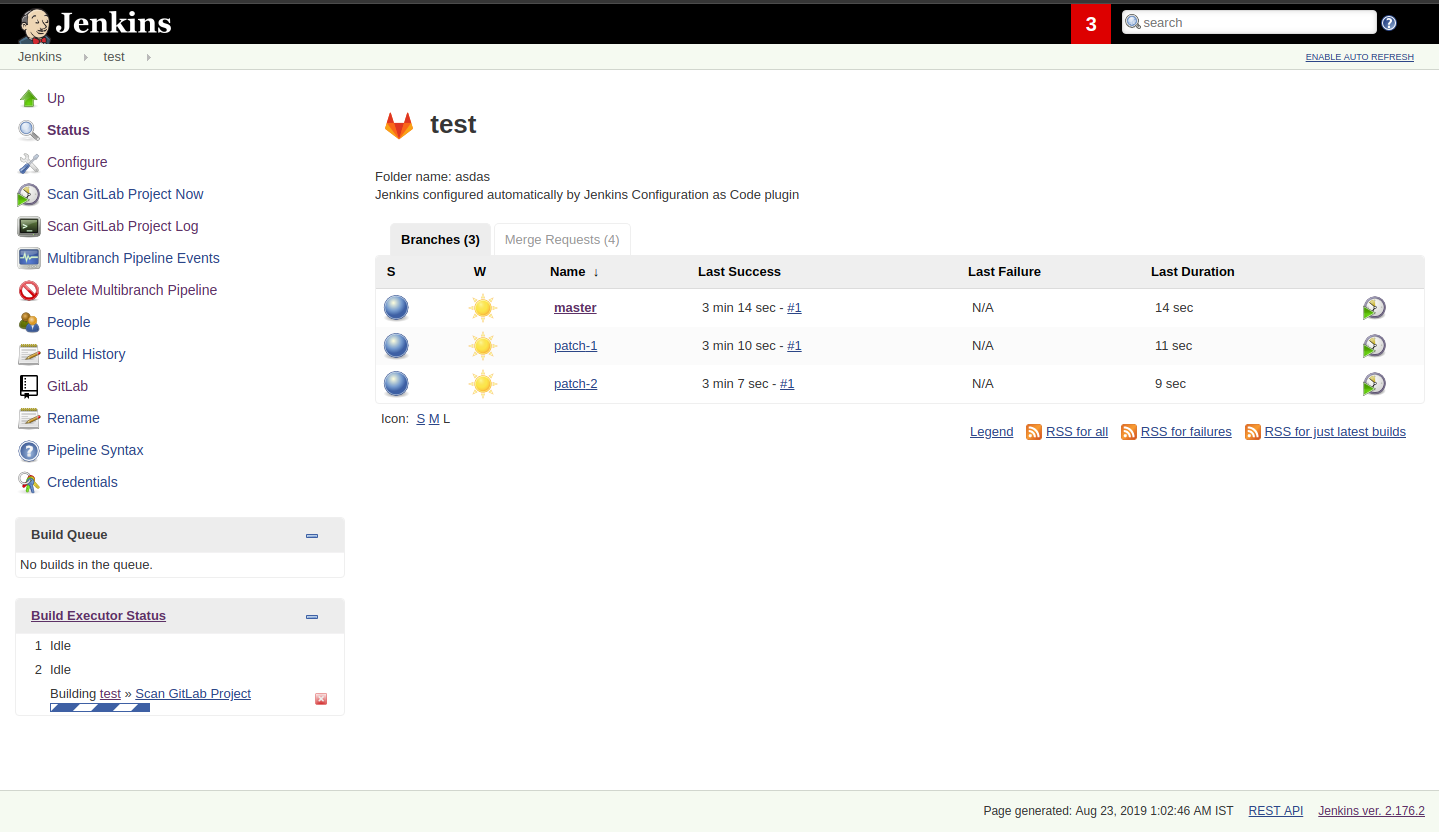
After the indexing, the imported project listed all the branches, merge requests and tags as jobs.

Multibranch Pipeline Job Folder

On visiting each job, you will find some action items on the left hand side:

  • You can trigger the job manually by selecting Build Now.

  • You can visiting the particular branch/merge request/tag on your GitLab Server by selecting the corresponding button.

Build Actions

Create a GitLab Group Job Type

Go to Jenkins > New Item > GitLab Group

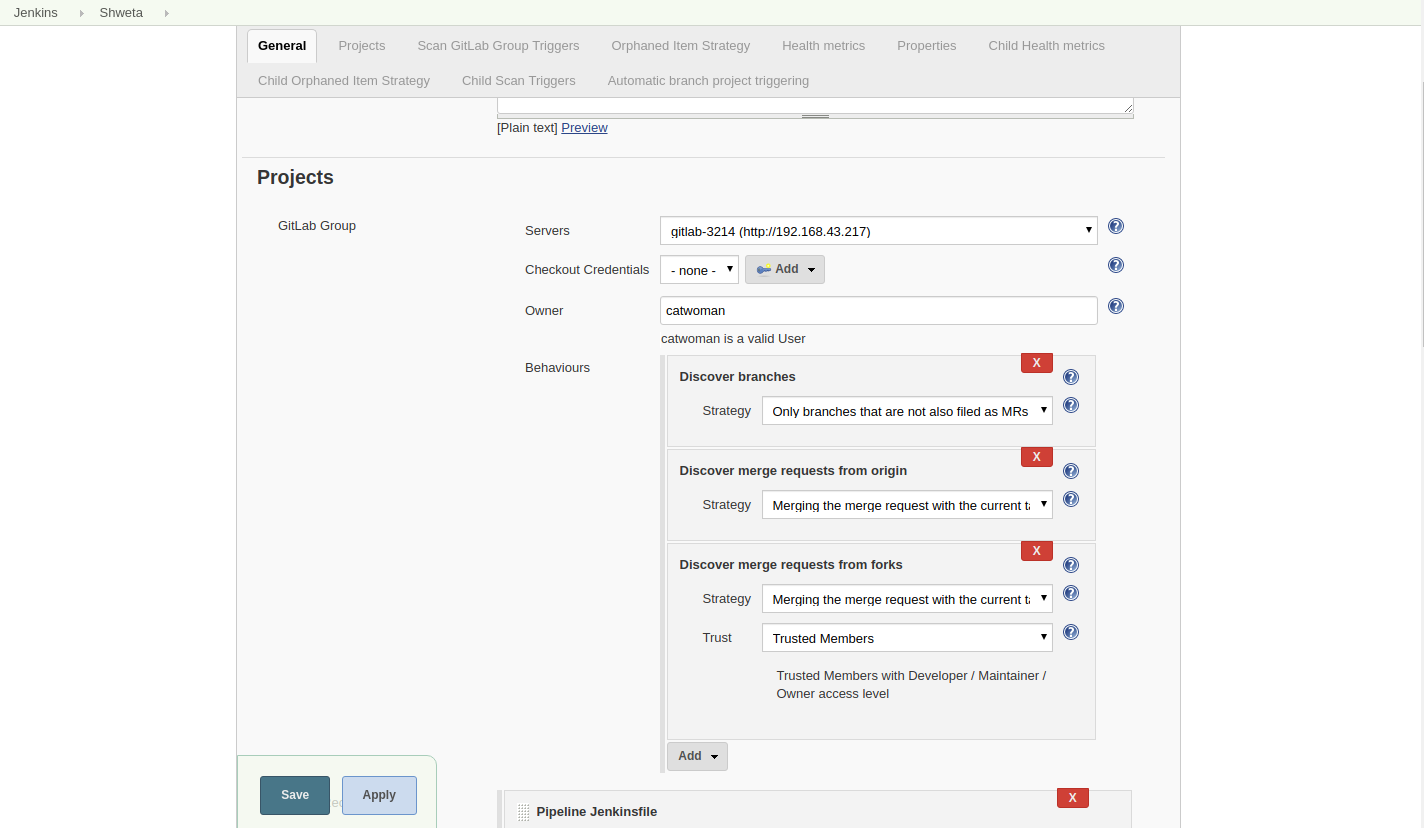
GitLab Folder Organization

You can notice the configuration is very similar to Multibranch Pipeline Job with only Projects field missing. You can add all the projects inside your Owner i.e. User/Group/Subgroup. The form validation will check with your GitLab server if the owner is valid. You can add Discover subgroup project trait which allows you to discover this child projects of all subgroups inside a Group or Subgroup but this trait is not applicable to User. While indexing, web hook is created in each project. GitLab Api doesn’t support creation of Group web hooks so this plugin doesn’t support that feature which is only available in GitLab EE.

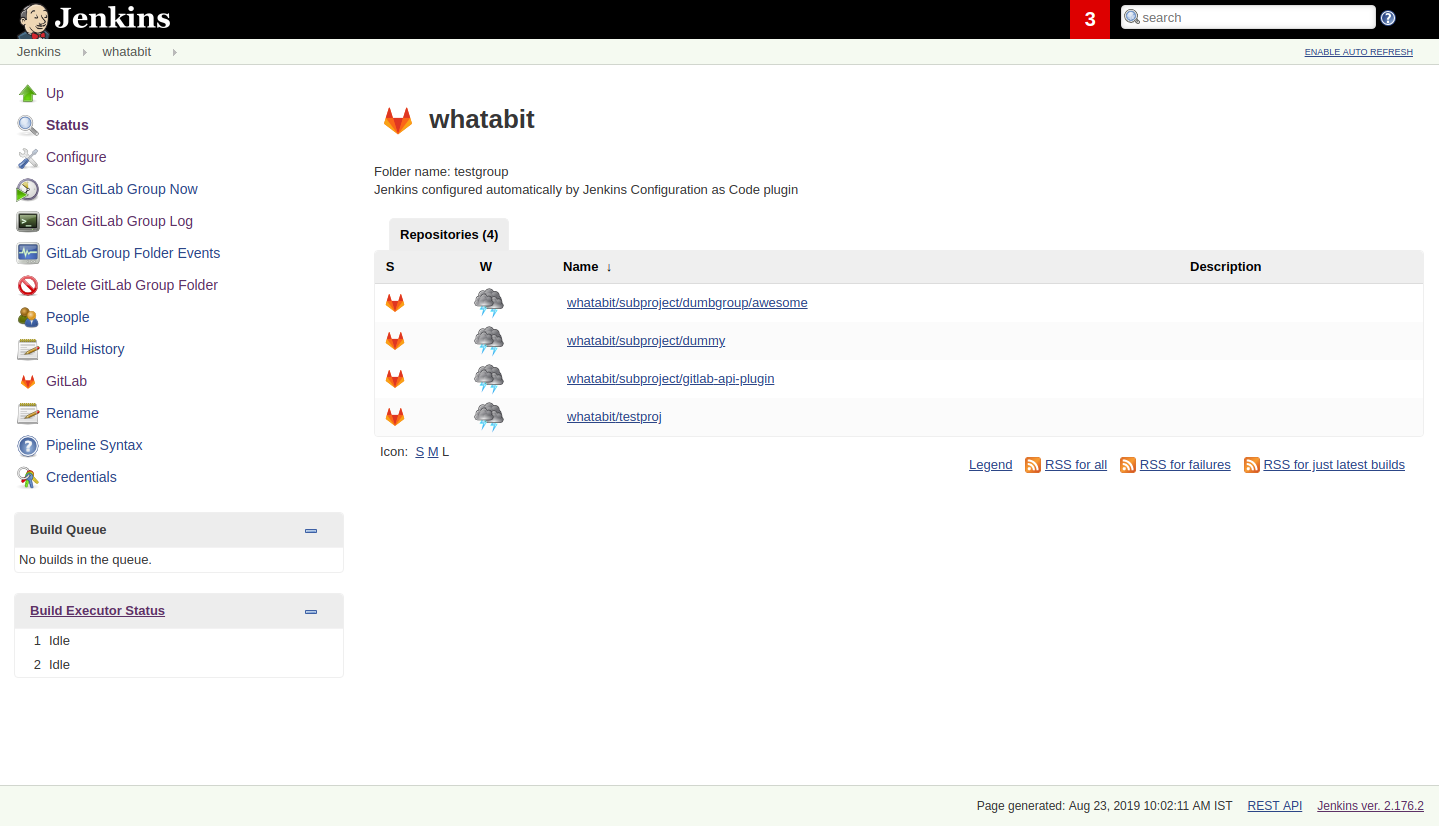
You can now explore your imported projects, configuring different settings on each of those folders if needed.

GitLab Group Folder

GitLab Pipeline Status Notification

GitLab is notified about build status from the point of queuing of jobs.

  • Success - the job was successful

  • Failure - the job failed and the merge request is not ready to be merged

  • Error - something unexpected happened; example: the job was aborted in Jenkins

  • Pending - the job is waiting in the build queue

GitLab Pipeline Status

On GitLab Pipeline status are hyperlinks to the corresponding Jenkins job build. To see the Pipeline Stages and the console output you will be required to visit your Jenkins server. We also planned to notify the pipeline stages to GitLab but it came with some drawbacks which has been addressed so far but there is future plan to add it as trait.

You can also skip notifying GitLab about the pipeline status by selecting Skip pipeline status notifications from the traits list.

Merge Requests

Implementing support for Merge Requests for the projects was challenging. First, MRs are of 2 types i.e. Origin branches and Forked Project branches so there had to be different implementation for each head. Second, MRs from forks can be from untrusted sources, so a new strategy Trust Members was implemented which allows CI to build MRs only from trusted users who have accesslevel of Developer/Maintainer/Owner.

Trusted Member Strategy

Third, MRs from forks do not support pipeline status notification due to GitLab issue, see this. You can add a trait Log Build Status as Comment on GitLab that allows you to add a sudo user (leave empty if you want owner user) to comment on the commit/tag/mrs the build result. To add a sudo user your token must have admin access. By default only failure/error are logged as comment but you can also enable logging of success build by ticking the checkbox.

Build Status Comment Trait

Sometimes, Merge Requests fail due to external errors so you want to trigger rebuild of mr by commenting jenkins rebuild. To enable this trigger add the trait Trigger build on merge request comment. The comment body can be changed in the trait. For security reasons, commentor should have Developer/Maintainer/Owner accesslevel in the project.

Merge request build trigger

Hooks

Web hooks are automatically created on your projects if configured to do so in server configuration. Web hooks are ensured to pass through a CSRF filter. Jenkins listens to web hooks on the path /gitlab-webhook/post. On GitLab web hooks are triggered on the following events:

  • Push Event - when a commit or branch is pushed

  • Tag Event - when a new tag is created

  • Merge Request Event - when a merge request is created/updated

  • Note Event - when a comment is made on a merge request

You can also set up System Hooks on your GitLab server if your token has admin access. System hooks are triggered when new projects are created, Jenkins triggers a rescan of the new project based on the configuration and sets up web hook on it. Jenkins listens to system hooks on the path /gitlab-systemhook/post. On GitLab system hooks are triigered on Repository Update Events.

You can also use Override Hook Management mode trait to override the default hook management and choose if you want to use a different context (say Item) or disable it altogether.

Override Hook Management

Job DSL and JCasC

You can use Job DSL to create jobs. Here’s an example of Job DSL script:

organizationFolder('GitLab Organization Folder') {
    description("GitLab org folder created with Job DSL")
    displayName('My Project')// "Projects"
    organizations {
        gitLabSCMNavigator {
            projectOwner("baymac")
            credentialsId("i<3GitLab")
            serverName("gitlab-3214")// "Traits" ("Behaviours" in the GUI) that are "declarative-compatible"
            traits {
                subGroupProjectDiscoveryTrait() // discover projects inside subgroups
                gitLabBranchDiscovery {
                    strategyId(3) // discover all branches
                }
                originMergeRequestDiscoveryTrait {
                    strategyId(1) // discover MRs and merge them with target branch
                }
                gitLabTagDiscovery() // discover tags
            }
        }
    }// "Traits" ("Behaviours" in the GUI) that are NOT "declarative-compatible"// For some 'traits, we need to configure this stuff by hand until JobDSL handles it// https://issues.jenkins.io/browse/JENKINS-45504
    configure {def traits = it / navigators / 'io.jenkins.plugins.gitlabbranchsource.GitLabSCMNavigator' / traits
        traits << 'io.jenkins.plugins.gitlabbranchsource.ForkMergeRequestDiscoveryTrait' {
            strategyId(2)
            trust(class: 'io.jenkins.plugins.gitlabbranchsource.ForkMergeRequestDiscoveryTrait$TrustPermission')
        }
    }// "Project Recognizers"projectFactories {
        workflowMultiBranchProjectFactory {
            scriptPath 'Jenkinsfile'
        }
    }// "Orphaned Item Strategy"
    orphanedItemStrategy {
        discardOldItems {
            daysToKeep(10)
            numToKeep(5)
        }
    }// "Scan Organization Folder Triggers" : 1 day// We need to configure this stuff by hand because JobDSL only allow 'periodic(int min)' for now
    triggers {
        periodicFolderTrigger {
            interval('1d')
        }
    }
}

You can also use JCasC to directly create job from a Job DSL script. For example see the plugin repository.

How to talk to us about bugs or new features?

Future work

  • Actively maintain GitLab Branch Source Plugin and take feedbacks from users to improve the plugin’s user experience.

  • Extend support for GitLab Pipeline to Blueocean.

Jenkins World Contributor Summit and Ask the Expert booth

$
0
0

Jenkins turns 15 years old! Jenkins World brings together DevOps thought leaders, IT executives, continuous delivery practitioners and the Jenkins community and ecosystem in one global event, providing attendees with the opportunity to learn, explore, network face-to-face and help shape the next evolution of Jenkins development and solutions for DevOps.

There is also the Jenkins Contributor Summit in San Francisco. The Jenkins Contributor Summit is the place where current and future contributors get together to discuss, learn and collaborate on the latest and greatest efforts within Jenkins project. The morning portion of the summit is a mix of presentations by the core contributors. The presentations highlight what each effort is about and what community members can do to help. In the afternoon breakout sessions with Birds of a Feather tables for in-depth discussion, and collaboration with sub-project contributors.

I feel very honored to have been a part of this.

Jenkins World 2019

Day 1

Day one started with the contributor summit. This was a chance for everyone to get together and talk about contributions and put faces to names. Most people I had only met via video chat or on gitter so I was super excited. We gathered to hear about the start of the Jenkins open source landscape.

Contributor Summit Agenda

Next up was the BoF/Unconference. I was leading these sessions and I felt they went really well. We had fellow org admins Martin d’Anjou and Jeff Pearce give a talk about Google Summer of Code projects.

Unconference

Google Summer of Code student Natasha Stopa presented her project, Plugin Installation Manager Library/CLI Tool. This is a super cool project and very well received in the community.

GSOC Student

We closed out the session with a presentation from Steven Terrana from Booz Allen Hamilton and the awesome Jenkins Templating Engine. If you have not had a chance to try this, please make sure you do at https://github.com/boozallen/jenkins-templating-engine.

Community Plugin

Main Expo Hall

Day two and onward saw me and other Jenkins org admins in the Ask the Expert booth for the Jenkins community.

Jenkins World 2019

This was a really cool experience and gave me a chance to hear about things the community is working on and help with issues they are facing. There were a range of questions from Jenkins X to many of the plugins I maintain such and the Jenkins Prometheus and the Sysdig Secure Scanning plugins. There were also a lot of Kubernetes questions. There is a lot of marketing data regarding the increased usage of Kubernetes but I was seriously surprised by the massive interest in Jenkins on Kubernetes. Of course there were opportunities for selfie requests.

Community Booth

Lunch time demos got underway and we had a busy schedule. First up was the awesome Mark Waite to talk about theGit plugin. A lot of people use git in Jenkins. Thank you so much for all that you do Mark.

Lunch Time Demo - Mark Waite

Jenkins org admin Martin d’Anjou was next on deck to talk about the Google Summer of Code. So amazing to think that the Google Summer of Code is also in its 15th year like Jenkins!

Lunch Time Demo - Martin d’Anjou

Natasha Stopa is a Google Summer of Code student and she presented her project Plugin Installation Manager Library/CLI Tool. Natasha really put a lot of hard work in to this plugin and it was really awesome to see the turn out and support during her presentation.

Lunch Time Demo - Natasha Stopa

Finally there was me. I presented the Sysdig Secure Scanning Jenkins plugin which I am a maintainer of. I thank everyone who attended

Lunch Time Demo - Marky Jackson

Right after the lunch time demos I also oversaw the Jenkins open space. This was an opportunity for the community to talk about items and let them flow organically. I really enjoyed this session and felt it was also well received.

Jenkins Open Space

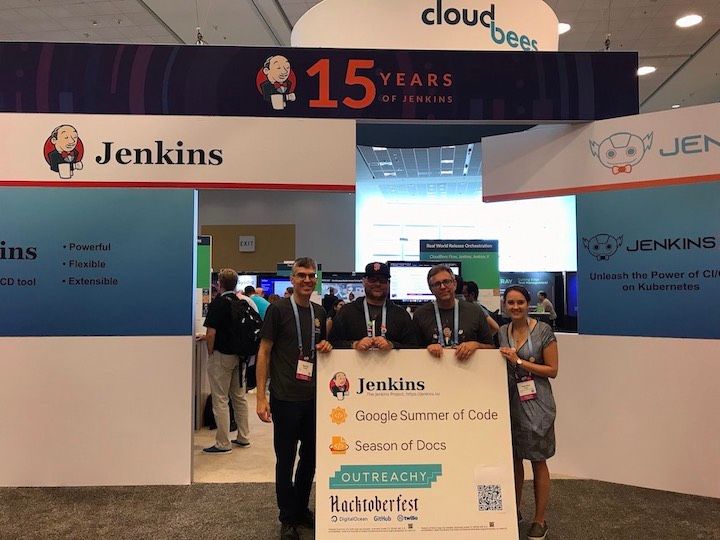
We closed out the day and the event with a picture of some of the Jenkins org admins and Google Summer of Code students. Missing from this photos are fellow org admins, Lloyd Chang and Oleg Nenashev

Closing Day

Closing

This was an amazing experience. Huge thanks to CloudBees, the Jenkins community, Google Summer of Code, Tracy Miranda, Alyssa Tong and my employer Sysdig.

To think Jenkins is 15 years old is amazing! There has been so much accomplished and the future is so bright. I am so thankful for the opportunity to serve and be a part of the open source community. Here’s to 15 more years all!

If you are interested in joining any one of the Jenkins open source special interest groups, look here. We can use your help: https://jenkins.io/sigs/

If you are interested in joining the Summer of Code, look here: https://jenkins.io/projects/gsoc/ If you want to chat with us, find us here: https://jenkins.io/chat/ Or if you want to email us, reach out at: https://jenkins.io/mailing-lists/

Some photos outtakes:

Outtakes
Outtakes
Outtakes
Outtakes

Performance Improvements to Role Strategy Plugin

$
0
0

The task for my Google Summer of Code program was to improve the performance of the Role Strategy Plugin. The performance issues for Role Strategy Plugin had been reported multiple times on Jenkins JIRA. With a large number of roles and with complex regular expressions, a large slow-down was visible on the Web UI. Even before GSoC started, there were a number of patches which tried to improve performance of the plugin (by Deepansh Nagaria and others).

At the time, there was no way to reliably measure improvements in performance. Therefore, we started by creating aframework for running micro-benchmarks on Jenkins Plugins. Benchmarks using the framework were added to the Role Strategy Plugin find performance critical parts of the plugins and to measure the improvements of a change. This blog post summarizes the changes that were made and performance improvements measured.

Caching matching roles

A couple of major changes were made to the Role Strategy Plugin to improve its performance. First, we started collection of roles that matched a given project name. The Role Strategy plugin before version 2.12 used to run over regular expressions for every role that it had for every permission checking request it got. Storing this produced set of roles in the memory provides us large improvements in performance and avoids repeated matching of project names with regular expressions. For keeping the plugin working securely, we invalidate the cache whenever any update is made to the roles.

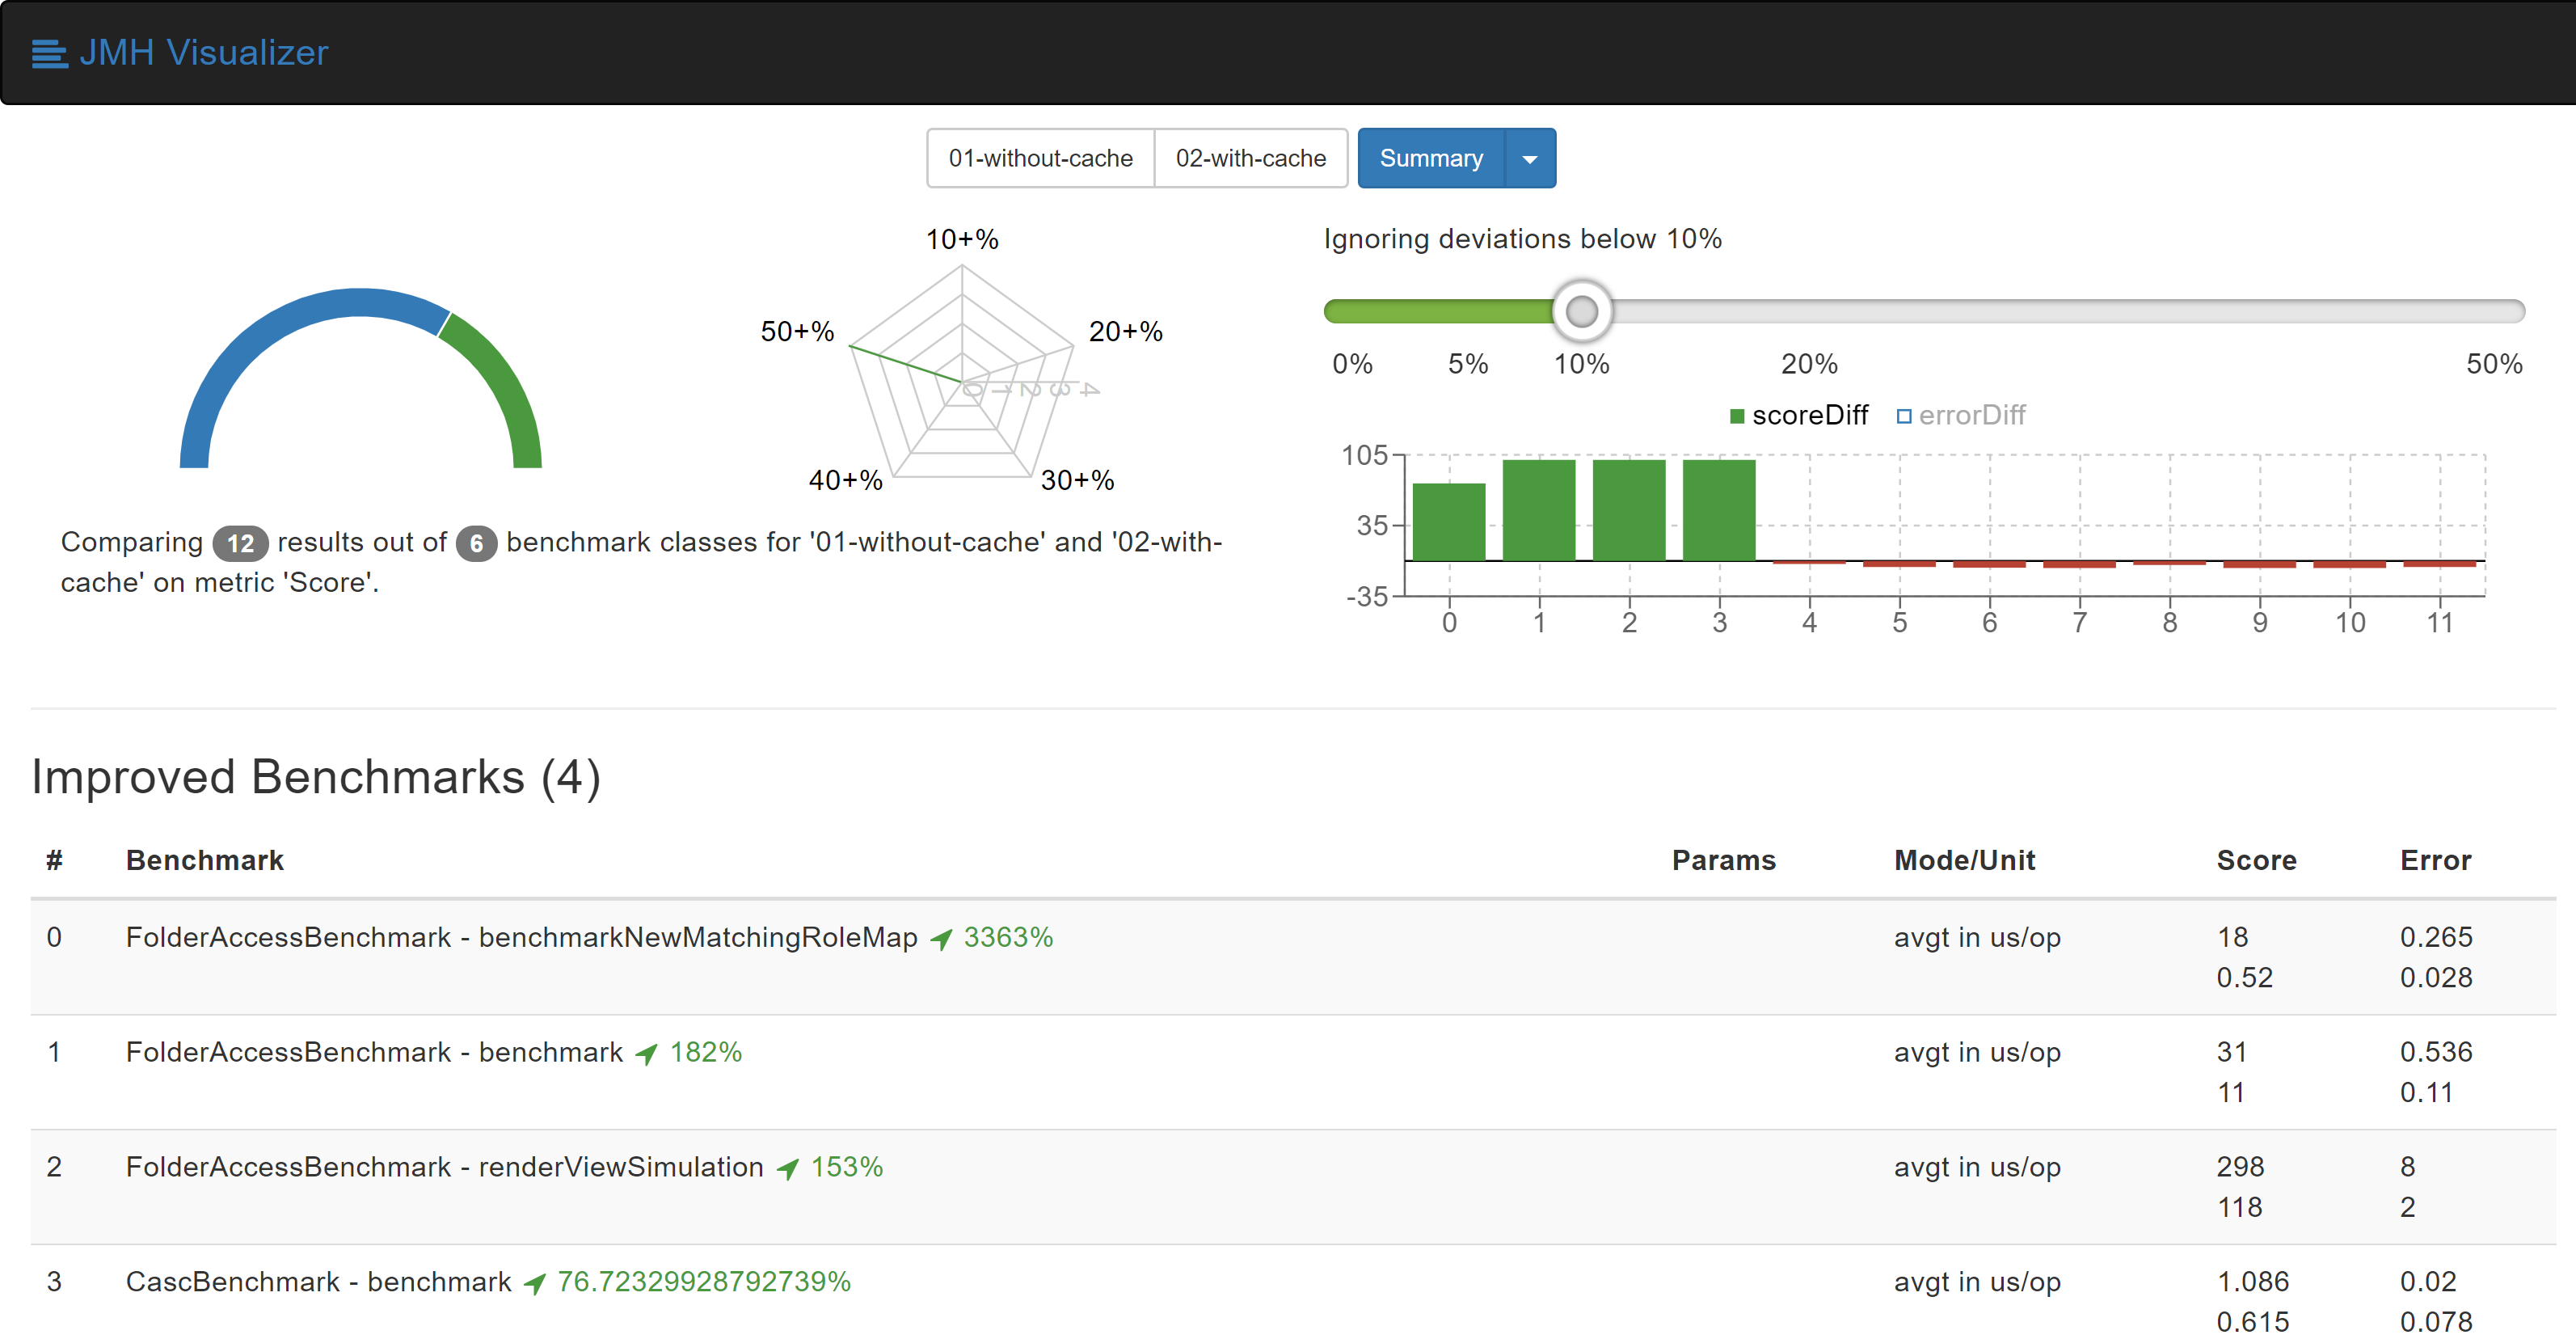
After this change, we were able to observe performance improvements of up to 3300%. These improvements were visualized usingJMH Visualizer.

Benchmarks results after caching matching roles

More information is available at pull request on GitHub:https://github.com/jenkinsci/role-strategy-plugin/pull/81

Calculating Implying Permisions when plugin is loaded

Jenkins' permission model allows one permissions to imply other permissions. When a permission check is made, we need to check if the user has any of permissions that would imply this permisison. For every permission checking request that that the Role Strategy, it used to calculate all the implying permissions. To avoid this, we now calculate and store implying permissions for every permission in the Jenkins system when the plugin gets loaded.

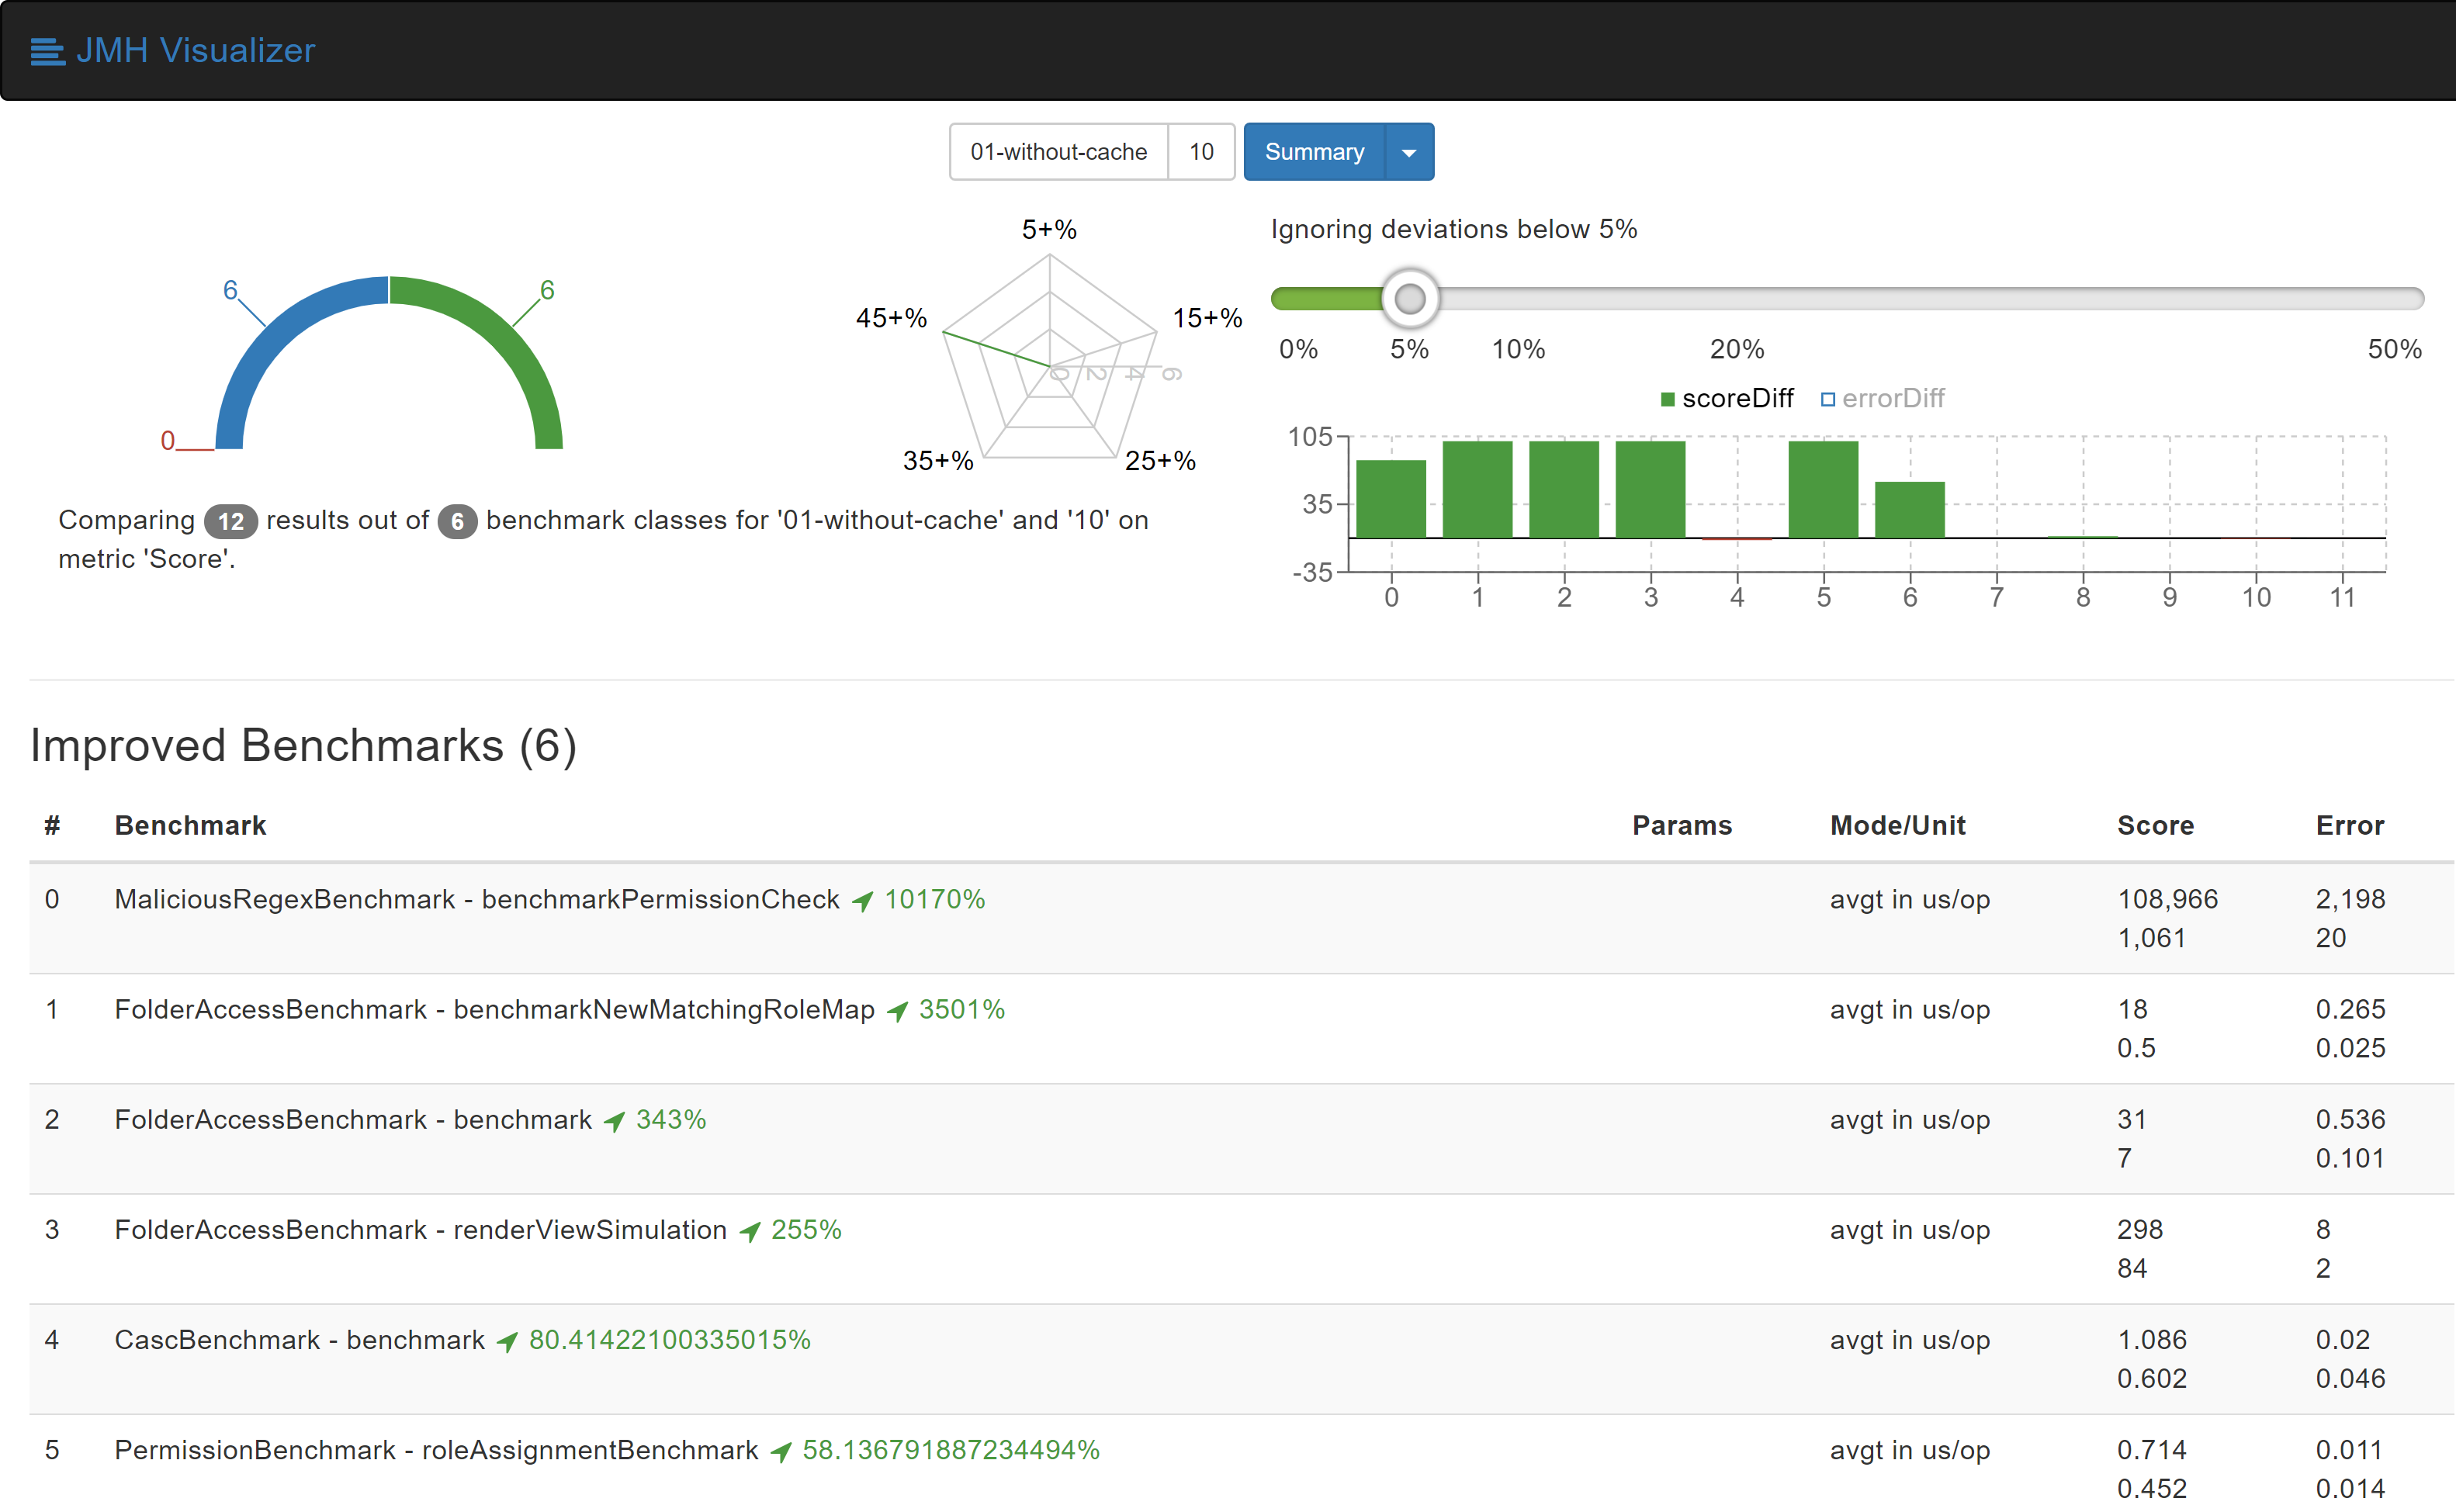
After both of these changes, we were able to experience improvements of up to 10000%. The benchmark results show it better:

Benchmarks results after both changes

More information about this change can be found at the GitHub pull request:https://github.com/jenkinsci/role-strategy-plugin/pull/83

Both of these changes were integrated into the Role Strategy Plugin and the improvements can be experienced starting with version2.13.

Bonus: Configuration-as-Code export now works for Role Strategy

With Configuration-as-Code plugin version1.24 and above, export of your configuration as YAML now works!

Role Strategy configuration export working with JCasC 1.24

As an alternative to Role Strategy Plugin, I also created the brand new Folder Authorization Plugin. You can check out the blog post for more information about the plugin.

I would love to hear your comments and suggestions. Please feel free to reach out to me through either theRole Strategy Plugin Gitter chat or throughJenkins Developer Mailing list.

Managing Jenkins with jcli

$
0
0

As a developer, I usually use Jenkins like this:

  • Find a job which is related with my current work

  • Trigger that job

  • Check the output of the build log

Sometimes, I might need to check the update center. Maybe a new plugin is needed, or I need to update an existing plugin. Or, I want to upload a plugin from my computer. For all these cases, I just don’t need a UI or even a browser. I like to use a CLI to complete most of my tasks. For example, I use kubectl to manage my Kubernetes cluster, to create or modify the kubernetes resources. So, I start to think, 'Why not use a CLI to manage my Jenkins?'.

Why create a new one?

First, I almost forgot about the existing Jenkins CLI, written in Java. Let me introduce how to use that one.

Visit Jenkins page from http://localhost:8080/jenkins/cli/. You’ll see a command like java -jar jenkins-cli.jar -s http://localhost:8080/jenkins/ help. So, a jar file needs to be download. We can use this command to complete this task wget http://localhost:8080/jenkins/jnlpJars/jenkins-cli.jar.

Now you can see that this is not a Linux-style CLI. Please consider some points below:

  • The users must have a JRE. This is not convenient for developers who don’t use Java.

  • The CLI is too wordy. We always need to type java -jar jenkins-cli.jar -s http://localhost:8080/jenkins/ as the initial command.

  • Cannot install it by some popular package manager, like brew or yum.

Of course, the Java CLI client is more native with Jenkins. But I’d like to use this more easily. So I decided to create a new CLI tool which would be written in Go and which would natively run on modern platforms.

That’s the story of creating jcli.

Features

  • Easy to maintain config file for jcli

  • Multiple Jenkins support

  • Plugins management (list, search, install, upload)

  • Job management (search, build, log)

  • Open your Jenkins with a browser

  • Restart your Jenkins

  • Connection with proxy support

How to get it?

You can clone jcli from the jenkins-cli repo. For now, we support these three most popular OS platforms: MacOS, Linux, and Windows.

MacOS

You can use brew to install jcli.

brew tap jenkins-zh/jcli
brew install jcli

Linux

It’s very simple to install jcli into your Linux OS. Just need to execute a command line at below:

curl -L https://github.com/jenkins-zh/jenkins-cli/releases/latest/download/jcli-linux-amd64.tar.gz|tar xzv
sudo mv jcli /usr/local/bin/

Windows

You can find the latest version by clicking here. Then download the tar file, cp the uncompressed jcli directory into your system path.

How to get started?

It’s very simple to use this. Once you get jcli on your computer, use this command to generate a sample configuration:

$ jcli config generate
current: yourServer
jenkins_servers:
- name: yourServer
  url: http://localhost:8080/jenkins
  username: admin
  token: 111e3a2f0231198855dceaff96f20540a9
  proxy: ""
  proxyAuth: ""
# Goto 'http://localhost:8080/jenkins/me/configure', then you can generate your token.

In most cases, you should modify three fields which are url, username and token. OK, I believe you’re ready. Please check whether you install the github plugin in your Jenkins:

jcli plugin list --filter name=github

That’s the end. It’s still in very early development stage. Any contribution is welcome.

Introducing the Jira Software plugin for Jenkins

$
0
0

According to a recent survey we conducted, software & IT teams on average use 4+ tools to move code from development to customer-facing production. As a result, teams struggle with keeping the status of work updated and understanding the overall health of their delivery pipeline.

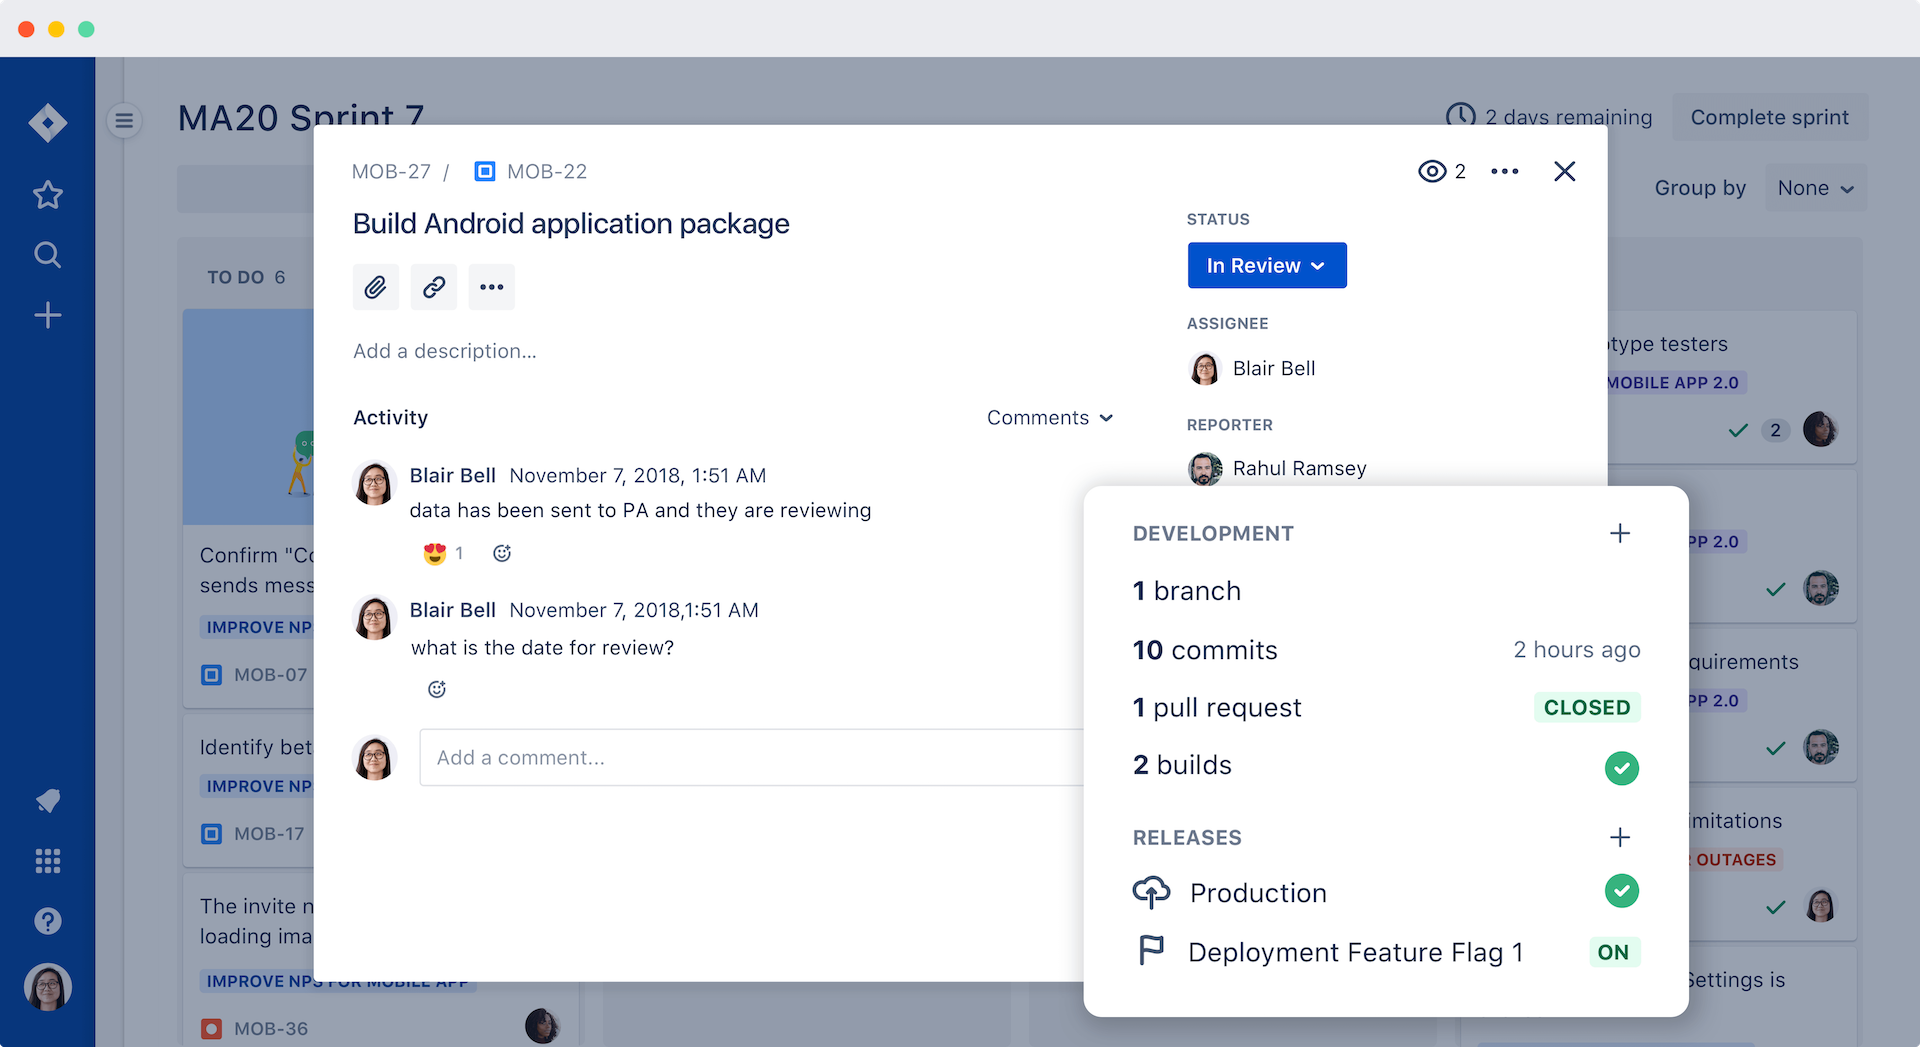
To solve this problem, I am excited to announce that we built an official Jenkins plugin for Jira Software Cloud. The plugin automatically associates build and deployment information from Jenkins with relevant Jira issues and exposes key information about your pipeline across Jira issues, boards and via JQL. This means you can use Jira Software to automatically update and track issues through your complete development pipeline, from backlog to release.

I hope this plugin adds value to you and your team. If you are interested in contributing or forking this plug-in you can head over to our project on the Jenkins GitHub repo to get started.

Better collaboration between teams

Use Jenkins build information in Jira Software to create a workflow between QA and developers and create a rapid feedback loop for testing at any point in your development process.

This new information view is so powerful because historically it was dispersed across multiple tools only accessible to a few members of your team. Now anyone involved in the software delivery process can self-serve this information. For example, product managers, QA, and support teams can view which features have been deployed to customers and which are still waiting in staging environments.

With better information sharing between tools in your delivery stack, you can also improve cross-collaboration between teams. Teams such as QA and operations can collaborate in the software teams next sprint. For example, you can use build information in Jira Software to create a workflow between QA and developers and create a rapid feedback loop for testing at any point in your development process.

Use Jira’s Querying Language for advanced views

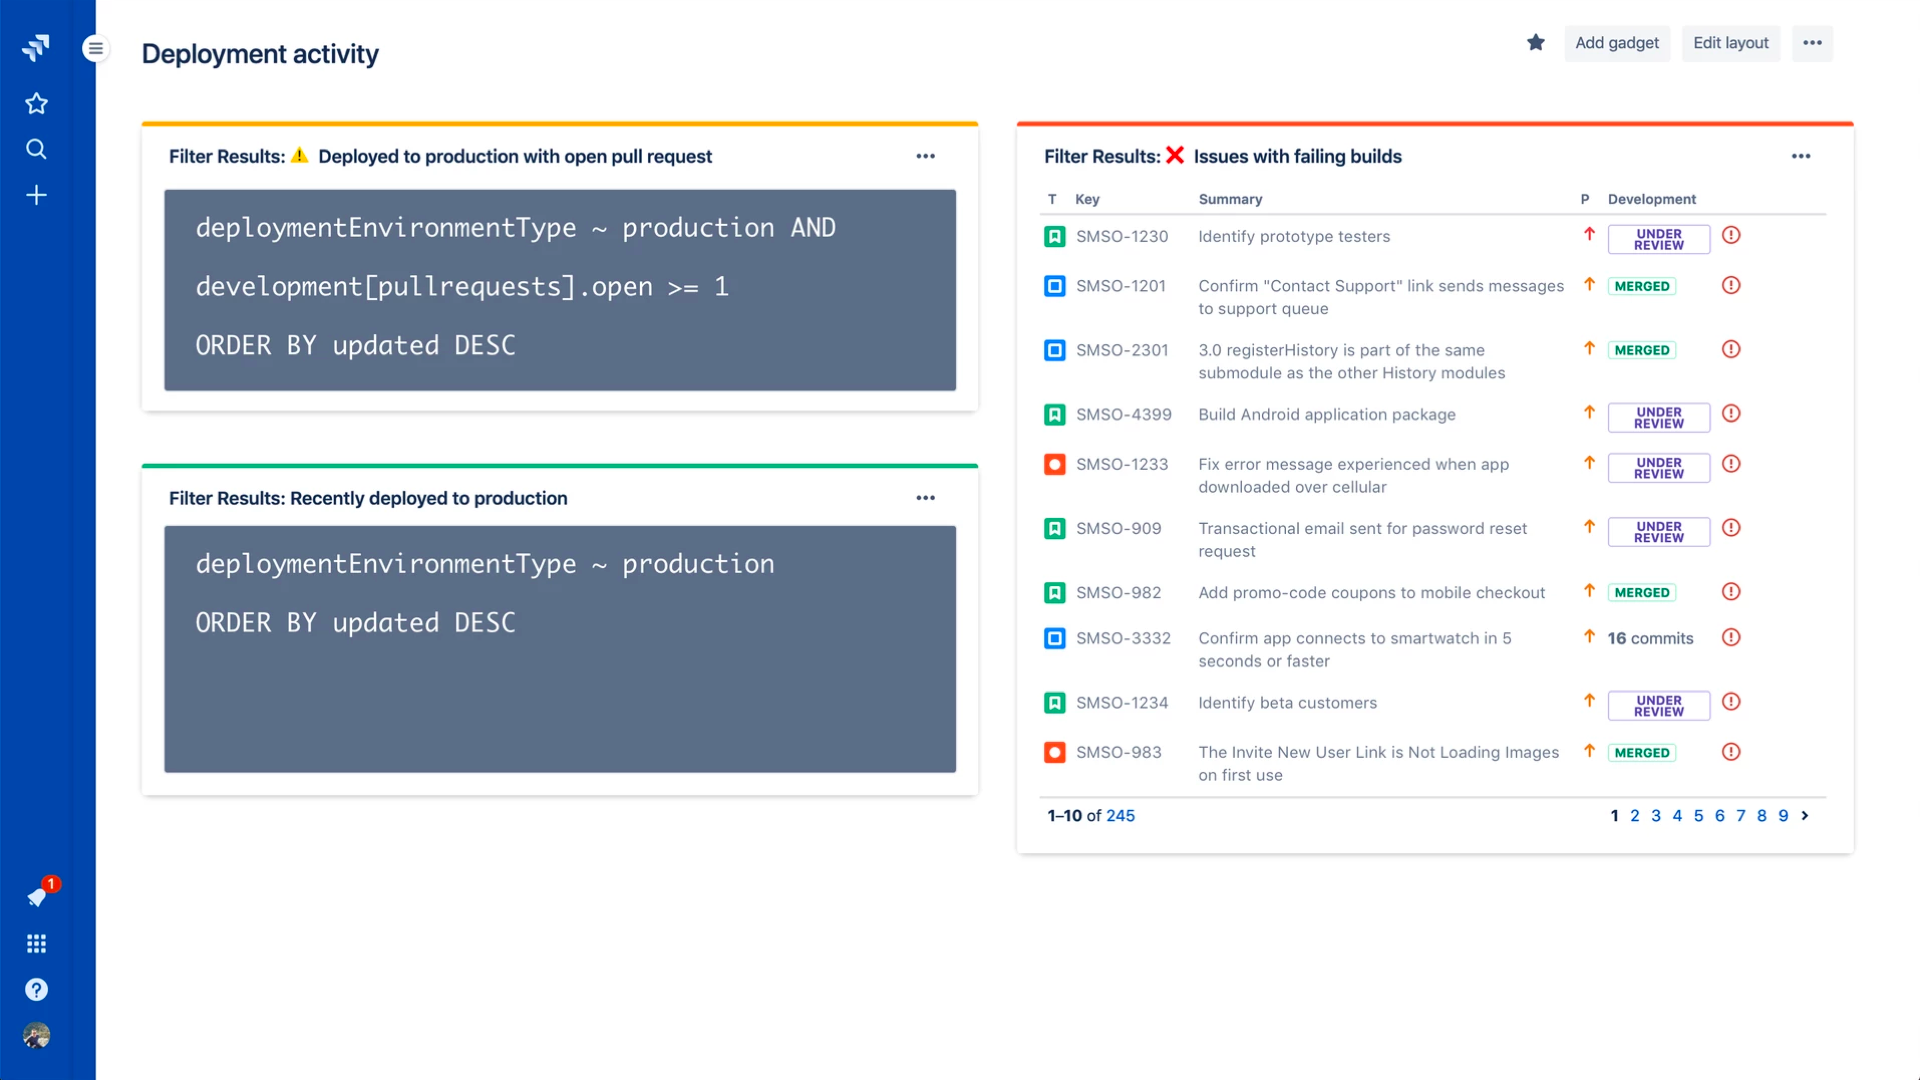
Build powerful views into your development pipeline with support for JQL.

In addition to building better ways to collaborate, these integrations also give your team deeper insight into the development pipeline from within Jira Software. You can now create powerful views into your delivery pipeline with JQL queries across multiple connected tools. For example, you can write a custom JQL query to report all Jira issues that have been deployed to production but still have an open PR.

deploymentEnvironmentType ~ “production“ AND development[pullrequests].open

Get started

In Jira Software Cloud

Create OAuth credentials in Jira for Jenkins

  1. Navigate to Jira home > Jira settings > Apps.

  2. Select OAuth credentials.

  3. Select Create credentials.

  4. Enter the following details:

In Jenkins

Install the Jenkins plugin

  1. Login to your Jenkins server and navigate to the Plugin Manager.

  2. Select the 'Available' tab and search for 'Atlassian Jira Software Cloud' as the plugin name then install it.

Set up Jenkins credentials

  1. In Jenkins, go to Manage Jenkins > Configure System screen and scroll to the Jira Software Cloud integration section.

  2. Select Add Jira Cloud Site > Jira Cloud Site. The Site name, ClientID, and Secret fields display.

  3. Enter the following details:

    • Site name: The URL for your Jira Cloud site, for example yourcompany.atlassian.net.

    • Client ID: Copy from OAuth credentials screen (Client ID column).

    • Secret: Select Add > Jenkins.

      • For Kind, select Secret text.

      • For Secret, copy from OAuth credentials screen (Secret column).

      • For Description, provide a helpful description

  4. Select Test settings to make sure your credentials are valid for your Jira site.

How to use the plugin

To start using the integration:

  1. Go into a specific pipeline in Jenkins ( Note: Your pipeline must be a 'Multibranch Pipeline' ).

  2. From the left-hand menu, select Pipeline Syntax.

  3. In the Snippet Generator, select jiraSendDeploymentInfo or jiraSendBuildInfo from the dropdown list of Sample Steps and fill in the relevant details.

  4. Select Generate Pipeline Script and copy/paste the output into your Jenkinsfile on the relevant Repository you are using. This will be used to notify Jira when you run that pipeline on that repo.

For sending build information

This is an example snippet of a very simple ‘build’ stage set up in a Jenkinsfile. After the pipeline is run, it will post the build information to your Jira Cloud site by looking at the branch name. If there is a Jira issue key (e.g. “TEST-123”) in the branch name, it will send the data over to Jira.

Jenkinsfile example

pipeline {
     agent any
     stages {
         stage('Build') {
             steps {
                 echo 'Building...'
             }
             post {
                 always {
                     jiraSendBuildInfo site: 'example.atlassian.net'
                 }
             }
         }
     }
 }

For sending deployment information

This is an example snippet of two stages that run on any change to the staging or master branch. Again, we use a post step to send deployment data to Jira and the relevant issues. Here, the environmentId, environmentName, and environmentType need to be set to whatever you want to appear in Jira.

Jenkinsfile example

pipeline {
     agent any
     stages {
         stage('Deploy - Staging') {
             when {
                 branch 'master'
             }
             steps {
                 echo 'Deploying to Staging from master...'
             }
             post {
                 always {
                     jiraSendDeploymentInfo site: 'example.atlassian.net', environmentId: 'us-stg-1', environmentName: 'us-stg-1', environmentType: 'staging'
                 }
             }
         }
         stage('Deploy - Production') {
            when {
                branch 'master'
            }
            steps {
                echo 'Deploying to Production from master...'
            }
            post {
                always {
                    jiraSendDeploymentInfo site: 'example.atlassian.net', environmentId: 'us-prod-1', environmentName: 'us-prod-1', environmentType: 'production'
                }
            }
         }
     }
 }

The entire Jenkinsfile may look something like this. This is only meant to represent an example of what the Jira snippets could look like within a stage or step.

Jenkinsfile example

pipeline {
     agent any
     stages {
         stage('Build') {
             steps {
                 echo 'Building...'
             }
             post {
                 always {
                     jiraSendBuildInfo site: 'example.atlassian.net'
                 }
             }
         }
         stage('Deploy - Staging') {
             when {
                 branch 'master'
             }
             steps {
                 echo 'Deploying to Staging from master...'
             }
             post {
                 always {
                     jiraSendDeploymentInfo site: 'example.atlassian.net', environmentId: 'us-stg-1', environmentName: 'us-stg-1', environmentType: 'staging'
                 }
             }
         }
         stage('Deploy - Production') {
            when {
                branch 'master'
            }
            steps {
                echo 'Deploying to Production from master...'
            }
            post {
                always {
                    jiraSendDeploymentInfo site: 'example.atlassian.net', environmentId: 'us-prod-1', environmentName: 'us-prod-1', environmentType: 'production'
                }
            }
         }
     }
 }

Questions or feedback?

If you have any questions, please contact Atlassian support and they will route it to the correct team to help you.


Audit Log Plugin for Jenkins Releases 1.0

$
0
0

Thanks to our Outreachy interns over the past year, I’m proud to announce the initial release of the Audit Log plugin for Jenkins. This plugin is the first major project completed related to Outreachy, and I’d like to give a brief overview of the functionality that was developed for this release. The primary goal of this plugin is to introduce an audit trail of various Jenkins events using structured logging and related audit logging standards. Initially, this plugin covers audit events related to core Jenkins concepts like user accounts, jobs, builds, nodes, and credentials usage. More specifically, this tracks:

  • User login and logout events

  • Credentials usage

  • User creation (when using the Jenkins user database as a security realm)

  • User password updates (ditto)

  • Starts and ends of builds

  • Creation/modification/deletion/copying of items (which correspond to projects, pipelines, folders, etc.)

  • Creation/modification/deletion of nodes.

This plugin defines and exports standardized log event classes and schemas corresponding to these events. Other plugins can add audit-log as a dependency to define their own audit events using Apache Log4j Audit and its catalog editor; then they can use the Maven plugin for generating the audit event classes for use in the plugin.

The other major feature of this plugin is configuring where to output these audit logs. By default, audit logs will be written in HTML files (rotated once per day) to $JENKINS_HOME/logs/html/audit.html which are viewable through the "Audit Logs" root action link. In the system settings, a section for audit logging is added where the main audit log output can be configured. This can initially be configured to output via either a JSON log file in $JENKINS_HOME/logs/audit.log by default or to a syslog server using RFC5424 encoding.

Overall, this experience has been rather interesting. Besides having an opportunity to mentor new contributors, Outreachy has helped open my eyes to the struggles that developers from around the world are dealing with which can be improved upon to help expand our communities. For example, many countries do not have reliable internet or electricity, so the use of synchronous videoconferencing and other heavyweight, synchronous processes common to more corporate-style development are inadequate in this international context. This doesn’t even begin to account for the difference in timezones which is not always an issue, though both problems are addressable by using asynchronous communication methods like chat and email. This notion of asynchronous communication is an important aspect of the Apache Way, for example, which emphasises processes that allow for vendor neutral communities to form and thrive around a project.

This mentoring project was valuable to myself as well. As a software engineer myself, project management is not my specialty, so this gave me a great opportunity to develop my own PM skills and technical leadership. My own typical discovery process for feature development involves experimenting directly with the code to see what features make sense to prioritize and which would take a vast effort to implement. Changing my own discovery process to avoid implementing the features myself was difficult to adjust to, though I did defer any of my own feature contributions to this plugin until after the initial release. In order to appropriately scope the project, I still had to spend a bit of time reading through the Jenkins codebase to determine which tasks could be implemented simply (e.g., good newbie-friendly issues), which tasks might require changes to Jenkins itself (previously discovered to take too long for these relatively short Outreachy rounds), and which tasks would require intimate familiarity with Jenkins and would likely be infeasible for new developers to Jenkins. Thanks to the work done in discovery and delivery, I’ve also identified potential features for Log4j itself which could be used in future versions of this plugin.

Overall, I think we did a good job of balancing the scope of this project without spending too much time in any specific area. The first release of this plugin is now available in the Jenkins Update Center. In the future, I hope to learn more about developing Jenkins UI components so that we can create a more dynamic and Jenkins-like configuration page for choosing where logs are output. While I don’t intend on using this plugin for further Outreachy rounds, I do hope to see more interest in it over time as the more security-conscious users out there discover this new plugin.

2019 Jenkins Board and Officer elections. Nominations are open!

$
0
0
This is a repost of the original announcement made by Kohsuke Kawaguchi in the Jenkins Developer mailing list. Minor changes were applied to reflect the posting date and to provide more links.

Nominations for the 2019 Jenkins Board elections open for three governing board positions and five officer positions, namely: Security, Events, Release, Infrastructure and Documentation.

The terms of office for these positions are:

  • Officer positions (1 year): November 4, 2019 to November 3, 2020

  • Governing board members (2 years): November 4, 2019 to November 3, 2021

To nominate someone, simply send an email to jenkinsci-board@googlegroups.com with their name and position you nominate them for. Please share any information on why you are making the nomination. Self nominations are also welcome.

The board positions and officer roles are an essential part of Jenkins' community governance and well-being. I highly encourage everyone to consider participating.

Key dates

  • Oct 04, 2019: Nominations close

  • Oct 08, 2019: List of nominees posted to mailing list

  • Oct 11, 2019: Nominees’ personal statements made available

  • Oct 14, 2019: Voting begins

  • Oct 27, 2019: Voting closes at 5pm Pacific Time

  • Nov 04, 2019: New representatives announced

Hacktoberfest 2019. Contribute to Jenkins!

$
0
0

Once again, Hacktoberfest is back! During this October event, everyone can support open-source by contributing changes, and can earn limited edition swag. We invite you to contribute to Jenkins, regardless of your experience and background. You can write code, improve documentation and design, localize Jenkins or create new artwork. Any GitHub pull request counts!

Quick start

  1. Sign-up to Hacktoberfest on the event website.

  2. Join our Gitter channel.

  3. Everything is set, just start creating pull-requests!

    • This year Hacktoberfest does not require labeling pull requests, but please mention Hacktoberfest in your pull requests for faster reviews (see FAQ: Marking Pull requests)

See the details below.

Hacktoberfest

How to contribute?

There are many ways tocontribute to Jenkins. It is not just about code, any pull request in GitHub counts towards the Hacktoberfest goal.

  • Code - Contribute to the code or automated tests. We have components written in Java, JavasScript, Groovy, Go, Ruby and other languages.

  • Write - Improve documentation, write blogposts, create tutorials or solution pages

  • Localize - Help us to Localize Jenkins to other languages

  • Design - artwork and UI improvements also count!

  • Organize - Organize a local meetup for Jenkins & Hacktoberfest (see our event kit)

  • Spread the word - Share your accomplishments in social media using the #hacktoberfest and #jenkinsci hashtags (or CC @jenkinsci in Twitter).

Where to contribute?

The Jenkins project is spread across multiple organizations on GitHub (jenkinsci, jenkins-infra, jenkins-zh). You are welcome to contribute to any repository in any of these organizations, or to any other Jenkins-related repository on GitHub. If you adopt Jenkins in your own open-source projects (e.g. Jenkins Pipeline or Configuration as Code), it counts as well! Some useful queries:

Featured projects. If you are a newcomer contributor, we have prepared a list of projects/components where you will get a warm welcome. All these projects have newbie-friendly tasks, contributing guidelines, and active maintainers who have committed to assist contributors and to quickly review pull requests. The list of featured projects will be updated during the event, and we will make sure to create more newbie-friendly tasks if needed.

If you wonder about Jenkins X, it also part of Hacktoberfest this year! They offer various topics, including hacking Jenkins X or improving its documentation. See this blogpost for the announcement and links.

How to get help?

If you are stuck or have any question, see our Hacktoberfest FAQ page for the common questions. If it does not help, please reach out to us in our Gitter chat.

Any meetups this year?

There are many events being organized by open-source communities. You can join one of these events. We invite to join the Jenkins Online Meetups on Oct 03 (APAC/EMEA - 7AM UTC,EMEA/Americas - 2PM UTC).

There will be also area meetups in Munich, Beijing, St. Petersburg and other cities. You can find the full list here.

JCasC Community Bridge Dev Tools - Phase 1

$
0
0

Community Bridge Introduction

Community Bridge is an initiative by the Linux Foundation to accelerate the adoption, innovation and sustainability of open source projects. I came across this initiative in a blog post. I had been contributing to Jenkins at the time and decided to have a chat with Oleg Nenashev and Tracy Miranda regarding the possibility of a project under the Community Bridge initiative. Fortunately for me JCasC ( Jenkins Configuration as Code) had the mentors as well as the project idea in place to start a project. After a few regular meetings we ironed out the details of the programme and on August 7th I began with my journey!

JCasC Developer Tools — JSON Schema

JSON files when submitted to a server undergo a validation to determine whether the values and the format are correct and that they conform to a well defined schema, this schema is known as a JSON Schema. A YAML file can also be validated using a JSON Schema. The main premise of JCasC is to load YAML files written by developers into the Jenkins instance. An example of a JCasC YAML file is:

---jenkins:systemMessage: “Hello World”numExecutors:2---

The above YAML configuration will configure Jenkins to display a message Hello world with the number of executors set to two. In order to validate the YAML we have a schema. This schema is written using jelly files (Executable XML files) and currently it is not a valid schema. The first phase of the project is based around rewriting the schema generation to java and developing a better test framework for it, because currently the schema is not testable.

Phase 1 — JCasC Dev Tools

The first week I got into studying how the schema was generated.With the support of two of my awesome mentors Tim Jacomb and Joseph Peterson I finally got an understanding of the current schema. So JCasC has a set of configurators for describing a YAML file. They are: a) Base Configurators b) Hetero Describable Configurators c) Data Bound Configurators These configurators together successfully describe a YAML file. We proceeded to generate the schema with the help of individual description of each of these configurators. The JSON Schema has a set of components, consider the above yaml file as an example:

---
{"jenkins": {"type": "object","properties": {"systemMessage": {"type": "string"
      },"numExecutors": {"type": "integer"
      }
    }
  }
}---

So here Jenkins is the base configurator and it has a set of attributes viz systemMessage and numExecutors, so our schema needs to be able to describe a set of attributes for every field in the schema. Some of the fields that our JSON Schema uses to describe the YAML are:

1) type : String, int, Boolean etc.

2) properties : A set of fields describing the part field.

3) id: Unique Identifier for the field Thus the above schema successfully verifies the YAML configuration.

JAVA Rewrite

We used JSON Objects to build components of the schema.The basic flow that is followed to generate the schema is as follows:

a) Iterate through the Base Configurators.

b) Iterate over the list of Base Configurator.Attributes and add each attribute to the schema.

c) Iterate over the HeteroDescribable Configurators and add each configurator to the schema along with its required properties.

The set of PR’s Resolved during Phase 1 are as follows:

That is all from me guys, I am currently preparing for phase 2 and working towards fixing any pending issues of Phase 1. Thanks for reading.

Phase 2 Goals:

We would primarily target VSCode integration in phase 2 with the aim of:

a)Validation of JCasC YAML files with the schema

b)Autocompletion

c)Integration with a live Jenkins instance.

Contributions

We would love to get feedback from you on the stuff we are working on. Contributions to the project would be highly appreciated.

Google Summer of Code Mentor and Org Admin Perspective

$
0
0

I was fortunate enough to participate in the Google Summer of Code 2019 as a mentor and org admin. This was great and I wanted to share in hopes of encouraging more people to join. You can learn more about the Google Summer of Code here: https://jenkins.io/projects/gsoc/

Community Bonding

The first phase of the project is the community bonding phase. This is where the student and other mentors come together to lay out the plan for the project. It is important to set expectations and ensure that the student is well aware of what will take place and also made to feel welcome.

Parichay Barpanda was the student and he was super awesome from the get go. The project he was working on was the Gitlab Branch Source Plugin. More can be found here: jenkinsci/gitlab-branch-source-plugin

From the mentor side it was myself and Justin Harringa. Justin was just amazing throughout this project and I seriously could not have done this without him. He was encouraging, empathetic and just all around great. I would gladly serve with him again.

We laid out our plan and guidance and got to work.

First Evaluations

The first evaluation was quickly upon us and Parichay was ready! The work he put in was nothing shy of amazing. We did our 1st demo and he really rocked it. A video of that demo can be found on : Youtube

Second Evaluations

There was not much time to rest before we realized that phase II end was upon us but Parichay was ready. Again, he nailed it.

That demo can be found here

Mentors Submit Final Evaluations

We had our final evaluation and at this point Parichay was seasoned. He was getting issues assigned to him, working on little bug fixes and setting his roadmap for features. He absolutely blew Justin and I away.

Parichay’s final evaluation demo can be seen here

At the conclusion of the final demo’s, Justin and I met and went over Parichay’s final evaluation. At this point we had met twice a week for several months, we have reviewed code daily, we had community involvement and most of all we had seen Parichay grow into a seasoned software developer.

Justin and I were without a doubt passing Parichay on his entire body of work. I am actually tearing up typing this because I am so proud of Parichay.

Org Admin

Being an org admin for the 2019 Google Summer of Code project for the Jenkins organization was truly rewarding and couldn’t have been accomplished without the help from Oleg Nenashev, Martin d’Anjou, Jeff Pearce and Lloyd Chang.

As an org admin we handled issues with mentors, community members and disagreements involving work. These items were only a few and as a team we handled them accordingly.

We regularly met to discuss and plan. Coordinating and dealing with a project like Google Summer of Code is no small feat but this team made it super easy and I am so thankful for them and all that I learned.

Closing

In looking back at this experience I am so grateful for the opportunity I was given. This was such a rewarding experience to not only be able to mentor but also be an org admin. Not only will I be back next year (we are already in the planning stages) but I highly encourage people reading this to consider joining. You will not be disappointed.

I am so thankful for all the students, mentors and fellow org admins. Your dedication to open source is so valued. You showed and continue to show what this project is all about, and that is being welcoming, open and transparent. Helping people grow as individuals while learning skills is what I love about this community.

Thank you to everyone and I hope your futures are bright!

Viewing all 1087 articles
Browse latest View live