Quantcast
Channel: Jenkins Blog
Viewing all 1087 articles
Browse latest View live

GSoC Project Intro: Code Coverage API Plugin

$
0
0

About me

My name is Shenyu Zheng, and I am an undergraduate student in Computer Science and Technology at Henan University from China.

I am very excited that I can participate in GSoC to work on Code Coverage API plugin with the Jenkins community and to contribute to the open source world. It is my greatest pleasure to write a plugin that many developers will use.

Abstract

There are a lot of plugins which currently implement code coverage, however, they all use similar config, charts, and content. So it will be much better if we can have an API plugin which does the most repeated work for those plugins and offers a unified APIs which can be consumed by other plugins and external tools.

This API plugin will mainly do these things:

  1. Find coverage reports according to the user’s config.

  2. Use adapters to convert reports into the our standard format.

  3. Parse standard format reports, and aggregate them.

  4. Show parsed result in a chart.

So, we can implement code coverage publishing by simply writing an adapter, and such adapter only needs to do one thing — convert a coverage report into the standard format. The implementation is based on extension points, so new adapters can be created in separate plugins. In order to simplify conversion for XML reports, there is also an abstraction layer which allows creating XSLT-based converters.

Current Progress - Alpha Version

I have developed an alpha version for this plugin. It currently integrates two different coverage tools - Cobertura and Jacoco. Also, it implements many basic functionalities like threshold, auto-detect, trend chart and so on.

Configuration Page

config pluginconfiguration page

We can input the path pattern for auto detect, so that plugin will automatically find reports and group them using a corresponding converter. That makes config simpler and the user doesn’t need to fully specify the report name. Also, if we want, we can manually specify each coverage report.

We also have global and per-report threshold configurations, which makes the plugin more flexible than existing plugins (e.g. global threshold for a multi-language project that has several reports).

Pipeline Support

In addition to configuring the Code Coverage API plugin from the UI page, we also have pipeline support.

node {
   publishCoverage(autoDetectPath: '**/*.xml', adapters: [jacoco(path: 'jacoco.xml')], globalThresholds: [[thresholdTarget: 'GROUPS', unhealthyThreshold: 20.0, unstableThreshold: 0.0]])
}

Report Defects

As we can see in Configuration page, we can set healthy threshold and stable threshold for each metric. The Code Coverage API plugin will report healthy score according to the healthy threshold we set.

threshold configthreshold config

resulthealth report

Also, we have a group of options which can fail the build if coverage falls below a particular threshold.

Coverage Result Page

The coverage result page now has a modernized UI which shows coverage results more clearly. The result page includes three parts - Trend chart, Summary chart, Child Summary chart.

Trend Chart

In the Trend chart, we can see the coverage trend of the selected coverage metrics.trend chart

Summary Chart

In the summary chart we can see the coverage summary of current coverage metric.summary chart

Child Summary Chart

In the Child summary chart, we can see the coverage summary of each child, also, we can use the range handler to filter item we want to see to reduce the chart size.child summary chart

By using those more modernized chart components, we can easily focus on the information we want to know.

Extensibility

We provide several extension points to make our plugin more extensible and flexible. Also, we have a series of abstract layers to help us implementing these extension points much easier.

CoverageReportAdapter

We can implement a coverage tool by implementing CoverageReportAdapter extension point. For example, by using the provided abstract layer, we can implement Jacoco simple like this:

publicfinalclassJacocoReportAdapterextends JavaXMLCoverageReportAdapter {@DataBoundConstructorpublic JacocoReportAdapter(String path) {super(path);
    }@OverridepublicString getXSL() {return"jacoco-to-standard.xsl";
    }@OverridepublicString getXSD() {returnnull;
    }@Symbol("jacoco")@ExtensionpublicstaticfinalclassJacocoReportAdapterDescriptorextends CoverageReportAdapterDescriptor<CoverageReportAdapter> {public JacocoReportAdapterDescriptor() {super(JacocoReportAdapter.class, "jacoco");
        }
    }
}

All we need is to extend an abstract layer for XML-based Java report and provide an XSL file to convert the report to our Java standard format. There are also other extension points which are under development.

Other Extension points

We also plan to provide extension points for coverage threshold and report detector. Once it completed, we can have more control over our coverage report process.

Next Phase Plan

The Alpha version now has many parts which still need to be implemented before the final release. So in next phase, I will mainly do those things.

  • APIs which can be used by others

  • Implementing abstract layer for other report formats like JSON. (JENKINS-51732).

  • Supporting converters for non-Java languages. (JENKINS-51924).

  • Supporting combining reports within a build(e.g. after parallel() execution in Pipeline) (JENKINS-51926).

  • Refactoring the configuration page to make it more user-friendly (JENKINS-51927).

How to Try It Out

Also, I have released the Alpha version in the Experimental Update Center. If you can give me some of your valuable advice about it, I will very appreciate.


GSoC Project Intro: Pipeline as YAML

$
0
0

About me

I am Abhishek Gautam, 3rd year student from Visvesvaraya National Institute of technology, India, Nagpur. I was a member of ACM Chapter and Google student developer club of my college. I am passionate about automation.

Project Summary

This is a GSoC 2018 project.

This project aims to develop a pull request Job Plugin. Users should be able to configure job type using YAML file placed in root directory of the Git repository being the subject of the pull request. The plugin should interact with various platforms like Bitbucket, Github, Gitlab, etc whenever a pull request is created or updated.

Plugin detects the presence of certain types of the report at conventional locations, and publish them automatically. If the reports are not present at conventional location, can specify the location using the YAML file.

Benefits to the community

  • Project administrators will be able to handle builds for pull requests more easily.

  • Build specifications for pull request can be written in a concise declarative format.

  • Build reports will be automatically published to Github, Bitbucket, etc.

  • Build status updates will be sent to git servers automatically.

  • Users will not have to deal with pipeline code.

  • If there will be no merge conflicts or build failures, the PR can be merged into target branch.

Prior work

  1. Travis YML Plugin: Designed to run .travis.yml as Jenkins pipeline job. Travis-CI does not support external pull requests. Jenkins environment is different than Travis and does not always make sense to use configurations defined for other environment in Jenkins. Also maintenance of this is slowed down and last commit for this plugin was on 14 Nov 2016.Click here to check.

  2. CodeShip Plugin: This plugin is designed to convert codeship "steps.yaml" and "services.yaml" to scripted pipeline code. This plugin has never been released.

  3. Jenkins pipeline builder: This is a external non-Java-based tool, which cannot be easily converted to a Jenkins plugin.

Design

This plugin will be developed on the top of the MultiBranch Pipeline plugin.

For now the plugin is bulding branches and Pull request both using Jenkinsfile.yaml, but this plugin is inclined to use for pull requests. This will be fixed in next coding phase.

This plugin is following below steps for now:

  • clone target repo

  • checkout to target branch

  • fetch the source branch

  • merge source-branch

  • call user call user script to build the repo.

  • push changes of pull request to target branch

  • publish test reports

Plugin will start above steps if and only if the pull request is mergeable, to avoid merge conflicts while merging the source branch to target branch. Pull request’s payload contains information if the pull request changes are mergeable or not hence, the pull request is mergebale or not can also be decided by the payload of webhook also.

How to run the Plugin

See How to run the demo and set credentials, owner and repository on your own and you will be good to go.

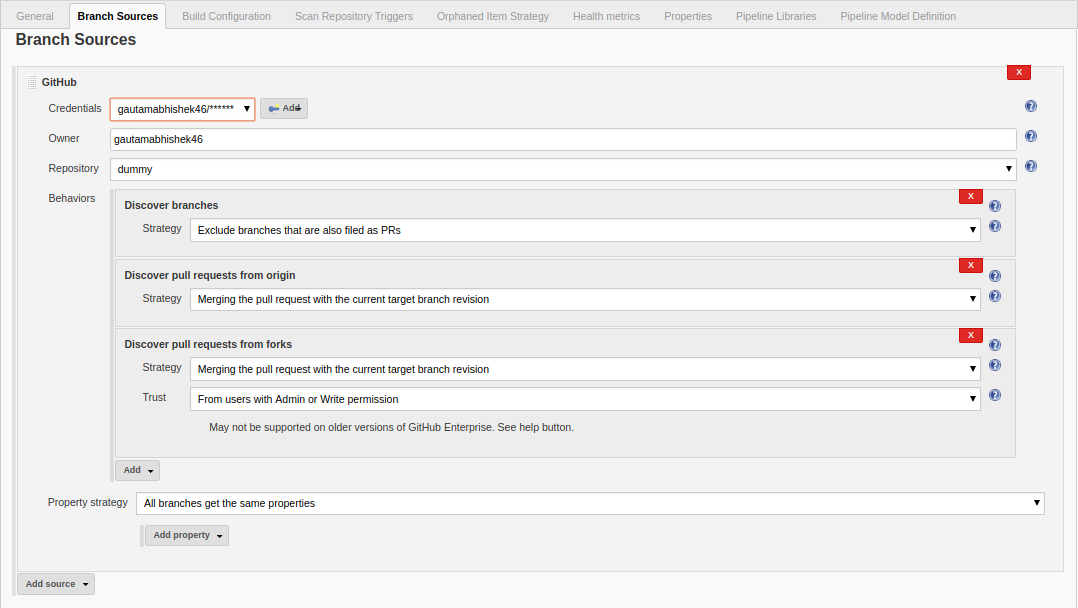
Example branch-source configuration.

branch source configuration

Phase 1 features

  1. Users are able to select the Jenkinsfile.yaml file as the source for the Pipeline configuration.

  2. Git Push step

  3. harvest results and reports (and post in the pull request)

    1. junit()

    2. findbugs()

    3. archiveArtifacts()

  4. Basic interface to parse and get build specifications from YAML file.

Things decided

  1. To build the plugin on the top of multibranch pipeline plugin. As that plugin has implementation of

    1. Nice interface to show different branch and pull requests build separately with use of suitable plugins like Github, Bitbucket.

    2. Detect trusted revisions in a repository.

    3. Publishing of build status to the repository.

  2. Convert the YAML configuration to declarative pipeline.

  3. User will provide path to the script relative to the root directory of the repository without extension (.sh or .bat) in the YAML file. The plugin will generate pipeline script to detect the platform and call .sh or .bat script.

    Example:
      Path provided: ./scripts/hello
      a. On UNIX machine “./scripts/hello.sh” will be called
      b. On non-UNIX machine “./scripts/hello.bat” will be called.

Implementations till now

A first prototype of the plugin is ready. It supports all features of Multi-Branch Pipeline and offers the following features.

Build description is defined via YAML file stored within the SCM repo. This plugin will depend on GitHub plugin, Bitbucket plugin, Gitlab plugin if users will be using respective paltfroms for their repositories.

  1. Basic conversion of YAML to Declarative Pipeline: A class YamlToPipeline is written which will load the "Jenkinsfile.yaml" and make use of PipelineSnippetGenerator class to generate Declarative pipeline code.

  2. Reporting of results.

  3. Plugin is using Yaml from target branch right now. (Maybe this needs some discussion, example: what if pull request contains changes in Jenkinsfile.yaml)

  4. Git Push step: To push the changes of pull request to the target branch. This is implemented using git-plugin, PushCommand is used for this from git-plugin. credentialId, branch name and repository url for intracting with Github, Bitbucket, etc will be taken automatically from "Branch-Source" (Users have to fill thes details of branch source in job configuration UI). (You can seeHow to run the demo)

Jenkinsfile.yaml example

For the phase 1 prototype demonstration, the following yaml file was used. Note that this format is subject to change in the next phases of the project, as we formalise the yaml format definition.

agent:dockerImage: maven:3.5.3-jdk-8args: -v /tmp:/tmptestResultPaths:
    - target/surefire-reports/*.xmlfindBugs: target/*.xmlstages:
    - name: Firstscripts:
        -   ./scripts/hello
    - name: Buildscripts:
        -   ./scripts/build
    - name: Testsscripts:
        -   ./scripts/testarchiveArtifacts:
    - Jenkinsfile.yaml
    - scripts/hello.sh

From the yaml file shown above, the plugin generates the following pipeline code:

pipeline {
  agent {
    docker {
      image 'maven:3.5.3-jdk-8'
      args '-v /tmp:/tmp'
      alwaysPull false
      reuseNode false
    }
  }
  stages {
    stage('First') {
      steps {
        script {if (isUnix()) {
            sh './scripts/hello.sh'
          } else {
            bat './scripts/hello.bat'
          }
        }
      }
    }
    stage('Build') {
      steps {
        script {if (isUnix()) {
            sh './scripts/build.sh'
          } else {
            bat './scripts/build.bat'
          }
        }pipeline
      }
      post {
        success {
          archiveArtifacts artifacts: '**/target/*.jar'
          archiveArtifacts artifacts: 'Jenkinsfile.yaml'
          archiveArtifacts artifacts: 'scripts/hello.sh'
        }
      }
    }
    stage('Tests') {
      steps {
        script {if (isUnix()) {
            sh './scripts/test.sh'
          } else {
            bat './scripts/test.bat'
          }
        }
      }
      post {
        success {
          junit 'target/surefire-reports/*.xml'
        }
        always {
          findbugs pattern: 'target/*.xml'
        }
      }
    }
  }
}

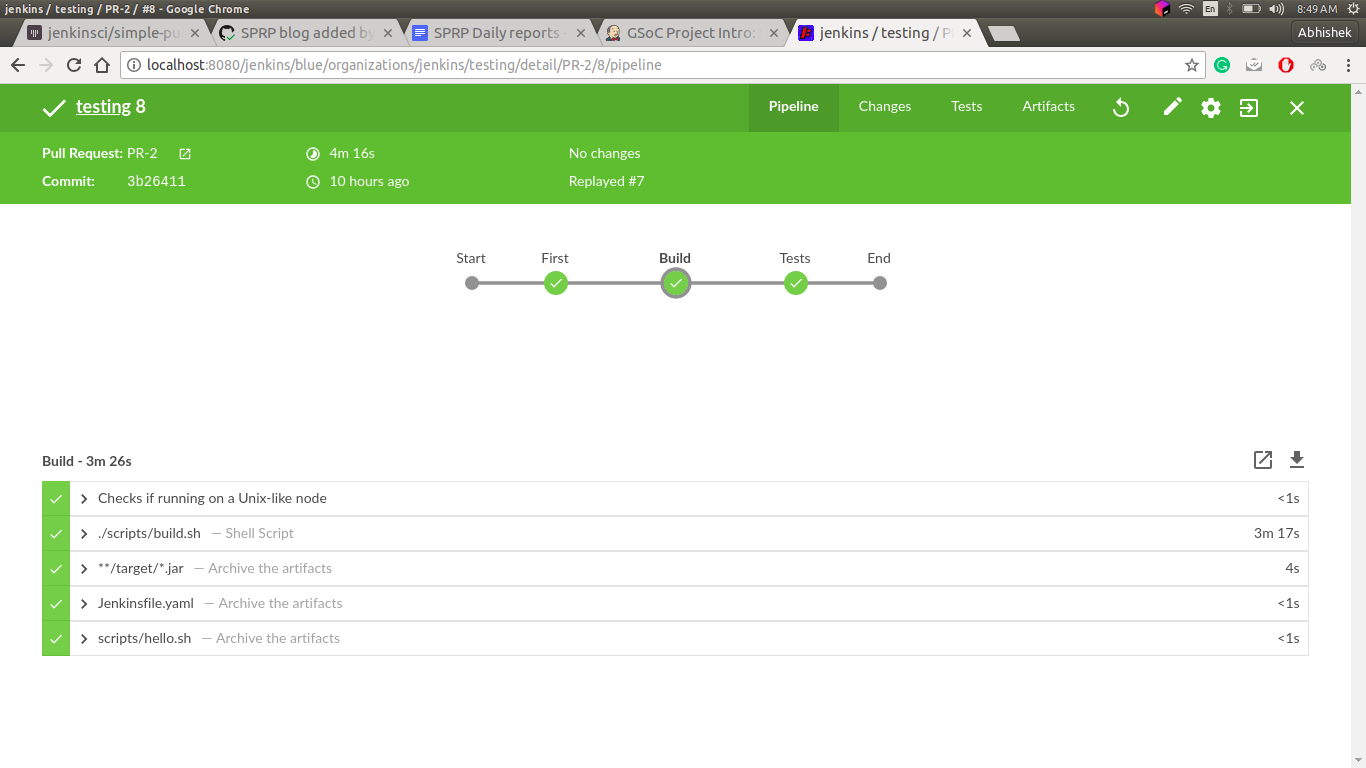
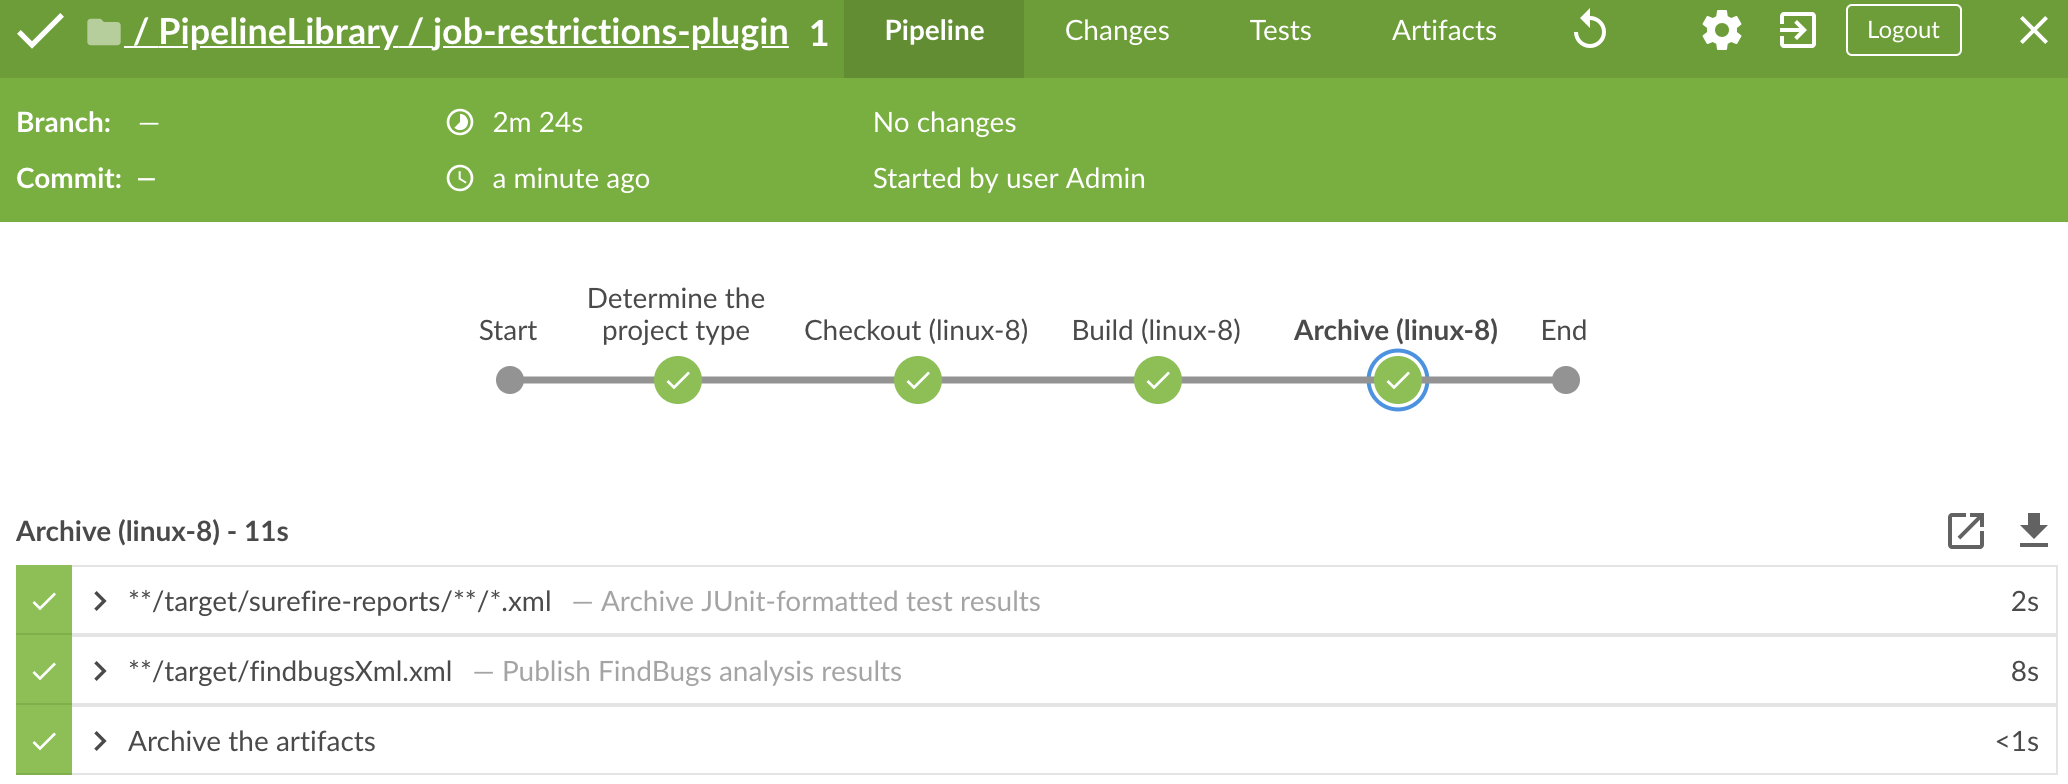
Pipeline view in Jenkins instance

pipeline view

Coding Phase 2 plans

  1. Decide a proper YAML format to use for Jenkinsfile.yaml

  2. Create Step Configurator for SPRP plugin. Jenkins-51637. This will enable users to use Pipeline steps in Jenkinsfile.yaml.

  3. Automatic indentation generation in the generated Pipeline SnipperGenerator class.

  4. Write tests for the plugin.

Running Jenkins with Java 10 and 11 (experimental support)

$
0
0

As you probably know, we will have aJenkins and Java 10+ online hackathon this week. In order to enable early adopters to try out Jenkins with new Java versions, we have updated Jenkins core and Docker packages. Starting from Jenkins 2.127, weekly releases can be launched with Java 10 and Java 11 (preview). Although there are some known compatibility issues, the packages are ready for evaluation and exploratory testing.

This article explains how to run Jenkins with Java 10 and 11 using Docker images and WAR files. It also lists known issues and provides contributor guidelines.

Running in Docker

In order to simplify testing, we have created a newjenkins/jenkins-experimental repository on DockerHub. This repository includes various Jenkins Core images, including Java 10 and Java 11 images. We have also set up development branches and continuous delivery flows for Jenkins core, so now we can deliver patches for these images without waiting for weekly releases.

You can run the image simply as:

docker run -p 8080:8080 -p 50000:50000 jenkins/jenkins-experimental:latest-jdk10

The following tags are available:

  • 2.127-jdk10, 2.127-jdk11 - Weekly releases packaged with Java 10 and 11

  • latest-jdk10 - Jenkins core build from the java10-support branch

  • latest-jdk11 - Automatic build from the core’s java11-support branch.

Java 10/11 images are fully compatible with the officialjenkins/jenkins Docker image documentation, e.g. you can use plugins.txt to install plugins, mount volumes and pass extra options via environment variables.

Running Jenkins without Docker

Java 10

  1. Download Jenkins WAR for 2.127 or above (or build the experimental branch)

  2. Run WAR with the following command:

${JAVA10_HOME}/bin/java --add-modules java.xml.bind -jar jenkins.war \
    --enable-future-java --httpPort=8080 --prefix=/jenkins

Java 11

  1. Download Jenkins WAR for 2.127 or above (or build the experimental branch)

  2. Download the following libraries to the same directory as jenkins.war

  3. Run the following command:

Run Jenkins with ${JAVA11_HOME}/bin/java \
    -p jaxb-api.jar:javax.activation.jar --add-modules java.xml.bind,java.activation \
    -cp jaxb-core.jar:jaxb-impl.jar \
    -jar jenkins.war --enable-future-java --httpPort=8080 --prefix=/jenkins

Current state

As of June 17, we have achieved the following state:

Known issues

So far we know about the following issues:

We anticipate to discover and report more issues during the hackathon this week.

Contributing

If you discover incompatibilities in plugins, pleasereport issues in our bugtracker. We have java10 and java11 labels for such issues.

If you are interested to try out Jenkins with Java 10 and 11 before June 22nd, you may be interested to sign-up to the Jenkins and Java 10+ online hackathon. Everybody is welcome to join, independently of their Jenkins experience and amount of time they have available. Exploratory testing is also within the hackathon’s scope. During this event, please also use the java10_hackathon label. It will help us to track contributions and send folks some small "thank you" gifts for participating (details will be figured out during the hackathon).

If you want to contribute patches to the core, please submit pull requests to java10-support orjava11-support branches. If the patches are compatible with Java 8, we will try to upstream them to weekly releases. For plugin patches please create pull requests against main branches and then follow guidelines from plugin maintainers. If you need additional reviews and you are a member of the jenkinsci organization, feel free to mention the @jenkinsci/java10-support team in your PRs.

GSoC Project Intro: Jenkins Remoting over Message Bus/Queue

$
0
0

About me

My name is Pham Vu Tuan, I am a final year undergraduate student from Singapore. This is the first time I participate in Google Summer of Code and contribute to an open-source organization. I am very excited to contribute this summer.

Mentors

I have GSoC mentors who help me in this project Oleg Nenashev and Supun Wanniarachchi. Besides that, I also receive great support from developers in remoting project Devin Nusbaum and Jeff Thompson.

Overview

Current versions of Jenkins Remoting are based on the TCP protocol. If it fails, the agent connection and the build fails as well. There are also issues with traffic prioritization and multi-agent communications, which impact Jenkins stability and scalability.

This project aims to develop a plugin in order to add support of a popular message queue/bus technology (Kafka) as a fault-tolerant communication layer in Jenkins.

Why Kafka?

When planning for this project, we want to use traditional message queue system such as ActiveMQ or RabbitMQ. However, after some discussion, we decided to have a try with Kafka with more suitable features with this project:

  • Kafka itself is not a queue like ActiveMQ or RabbitMQ, it is a distributed, replicated commit log. This helps to remove message delivery complexity we have in traditional queue system.

  • We need to support data streaming as a requirement, and Kafka is good at this aspect, which RabbitMQ is lack of.

  • Kafka is said to have a better scalability and good support from the development community.

Current State

The project is reaching the end of the first phase and here are things we have achieved so far:

  • Setup project as a set of Docker Compose components: Kafka cluster, Jenkins master (with plugin) and a custom agent (JAR).

  • Create a PoC with new command transport implementation to support Kafka, which involves of command invocation, RMI, classloading and data streaming.

  • Make neccessary changes in Remoting and Jenkins core to make them extensible for the use of this project.

  • Decide to use Kafka as a suitable final implementation.

We planned to release an alpha version of this plugin by the end of this phase, but decided to move this release to the second phase because we need to wait for remoting and core patches to be released.

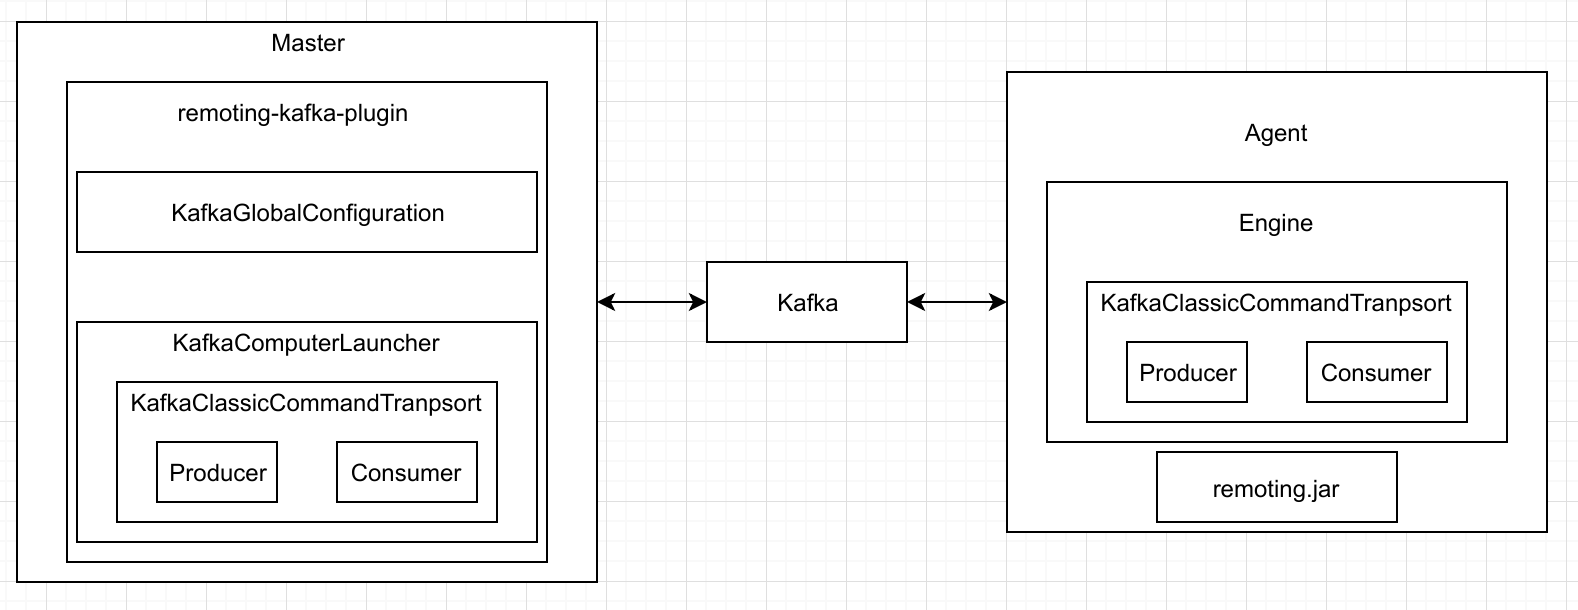
Architecture Overview

The project consists of multiple components:

  • Kafka Client Library - new command transport implementation, producer and consumer client logic.

  • Remoting Kafka Plugin - plugin implementation with KafkaGlobalConfiguration and KafkaComputerLauncher.

  • Remoting Kafka Agent - A custom JAR agent with remoting JAR packaged together with a custom Engine implementation to setup a communication channel with Kafka.

  • All the components are packaged together with Docker Compose.

The below diagram is the overview of the current architecture:remoting kafka architecture

With this design, master is not communicating with agent using direct TCP communication anymore, all the communication commands are transfered with Kafka.

Features

1. Kafka Global Configuration

kafka global config

2. Custom agent start up as a JAR

User can start running an agent with the following command:start agent

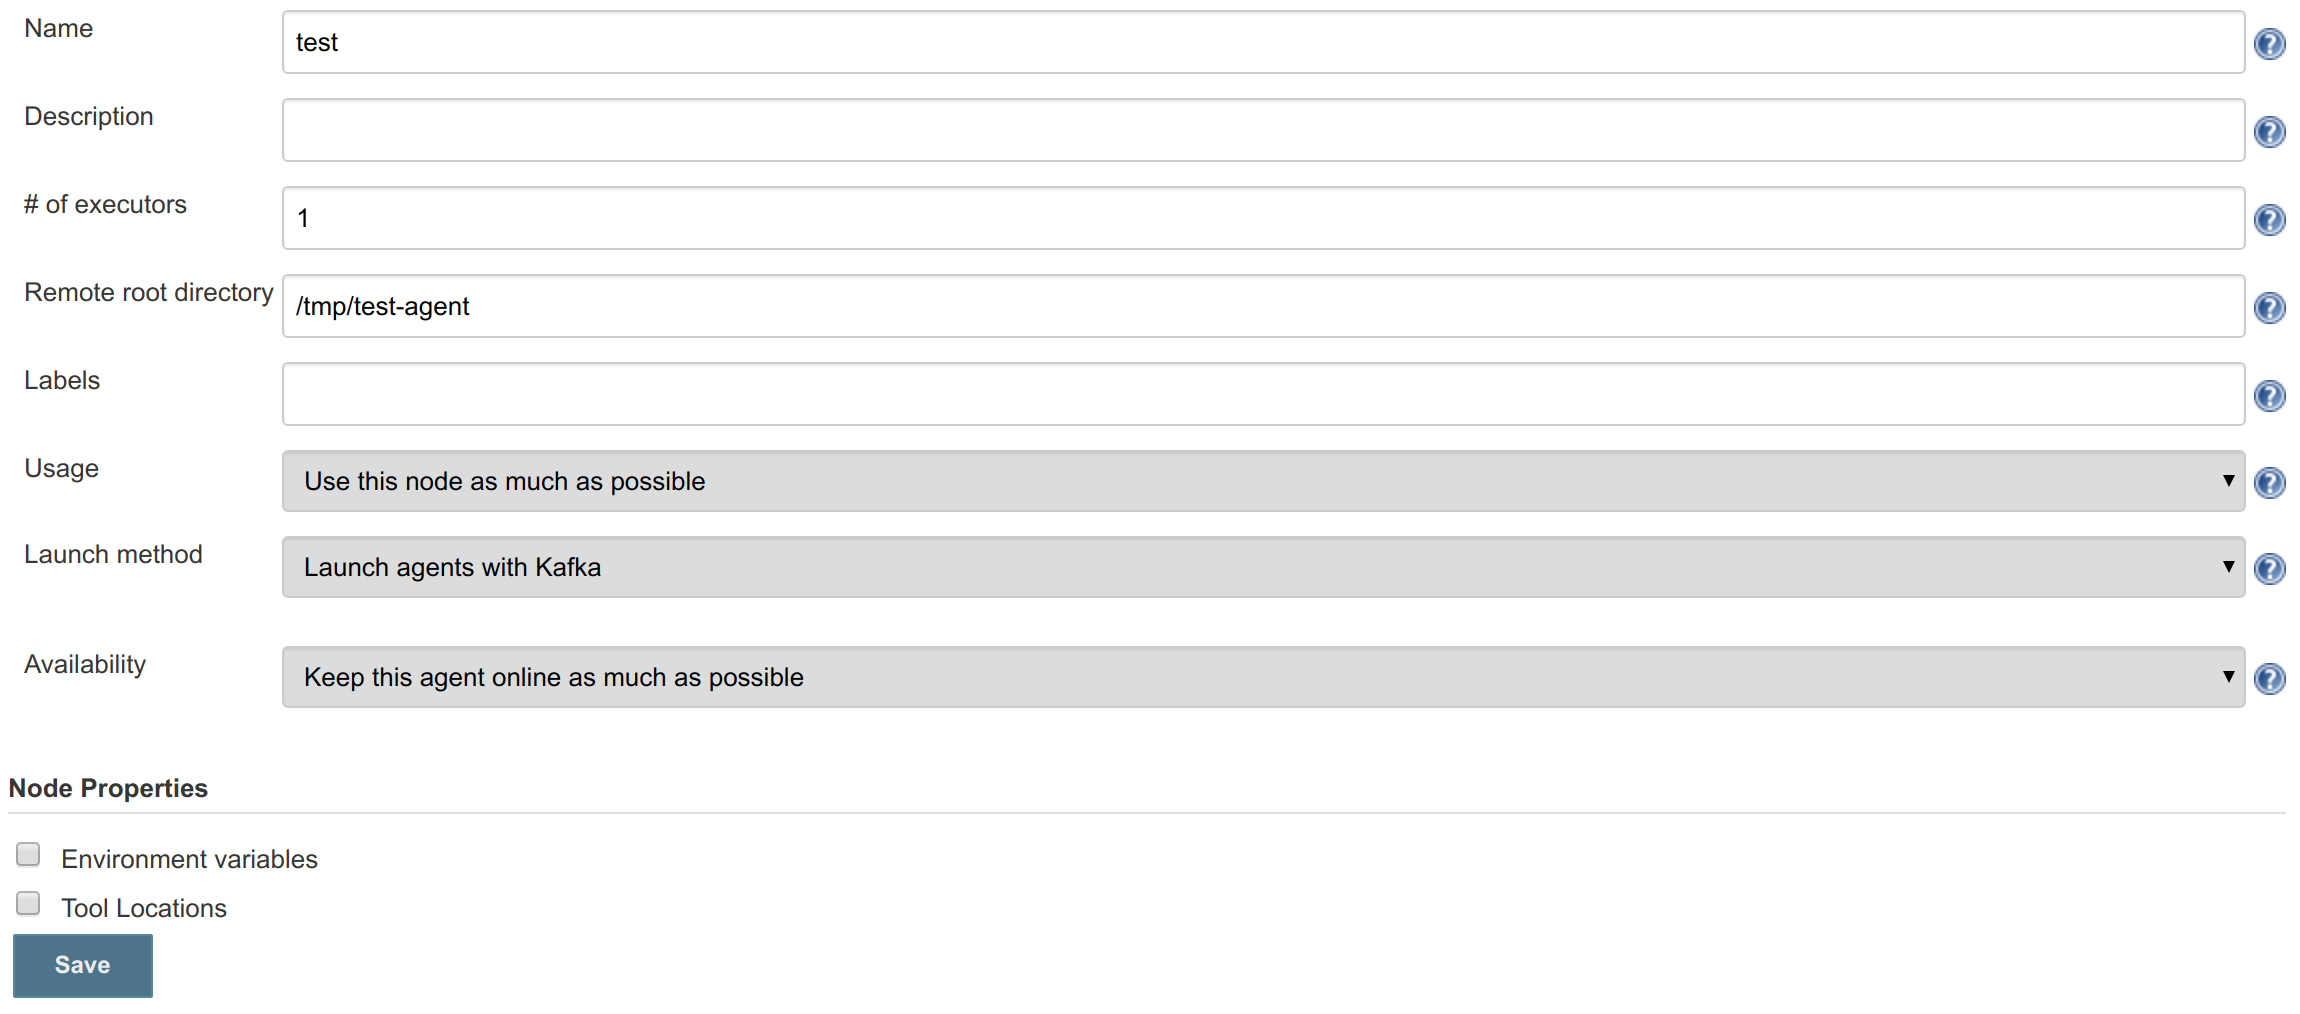
3. Launch agents with Kafka

launch agent kafka

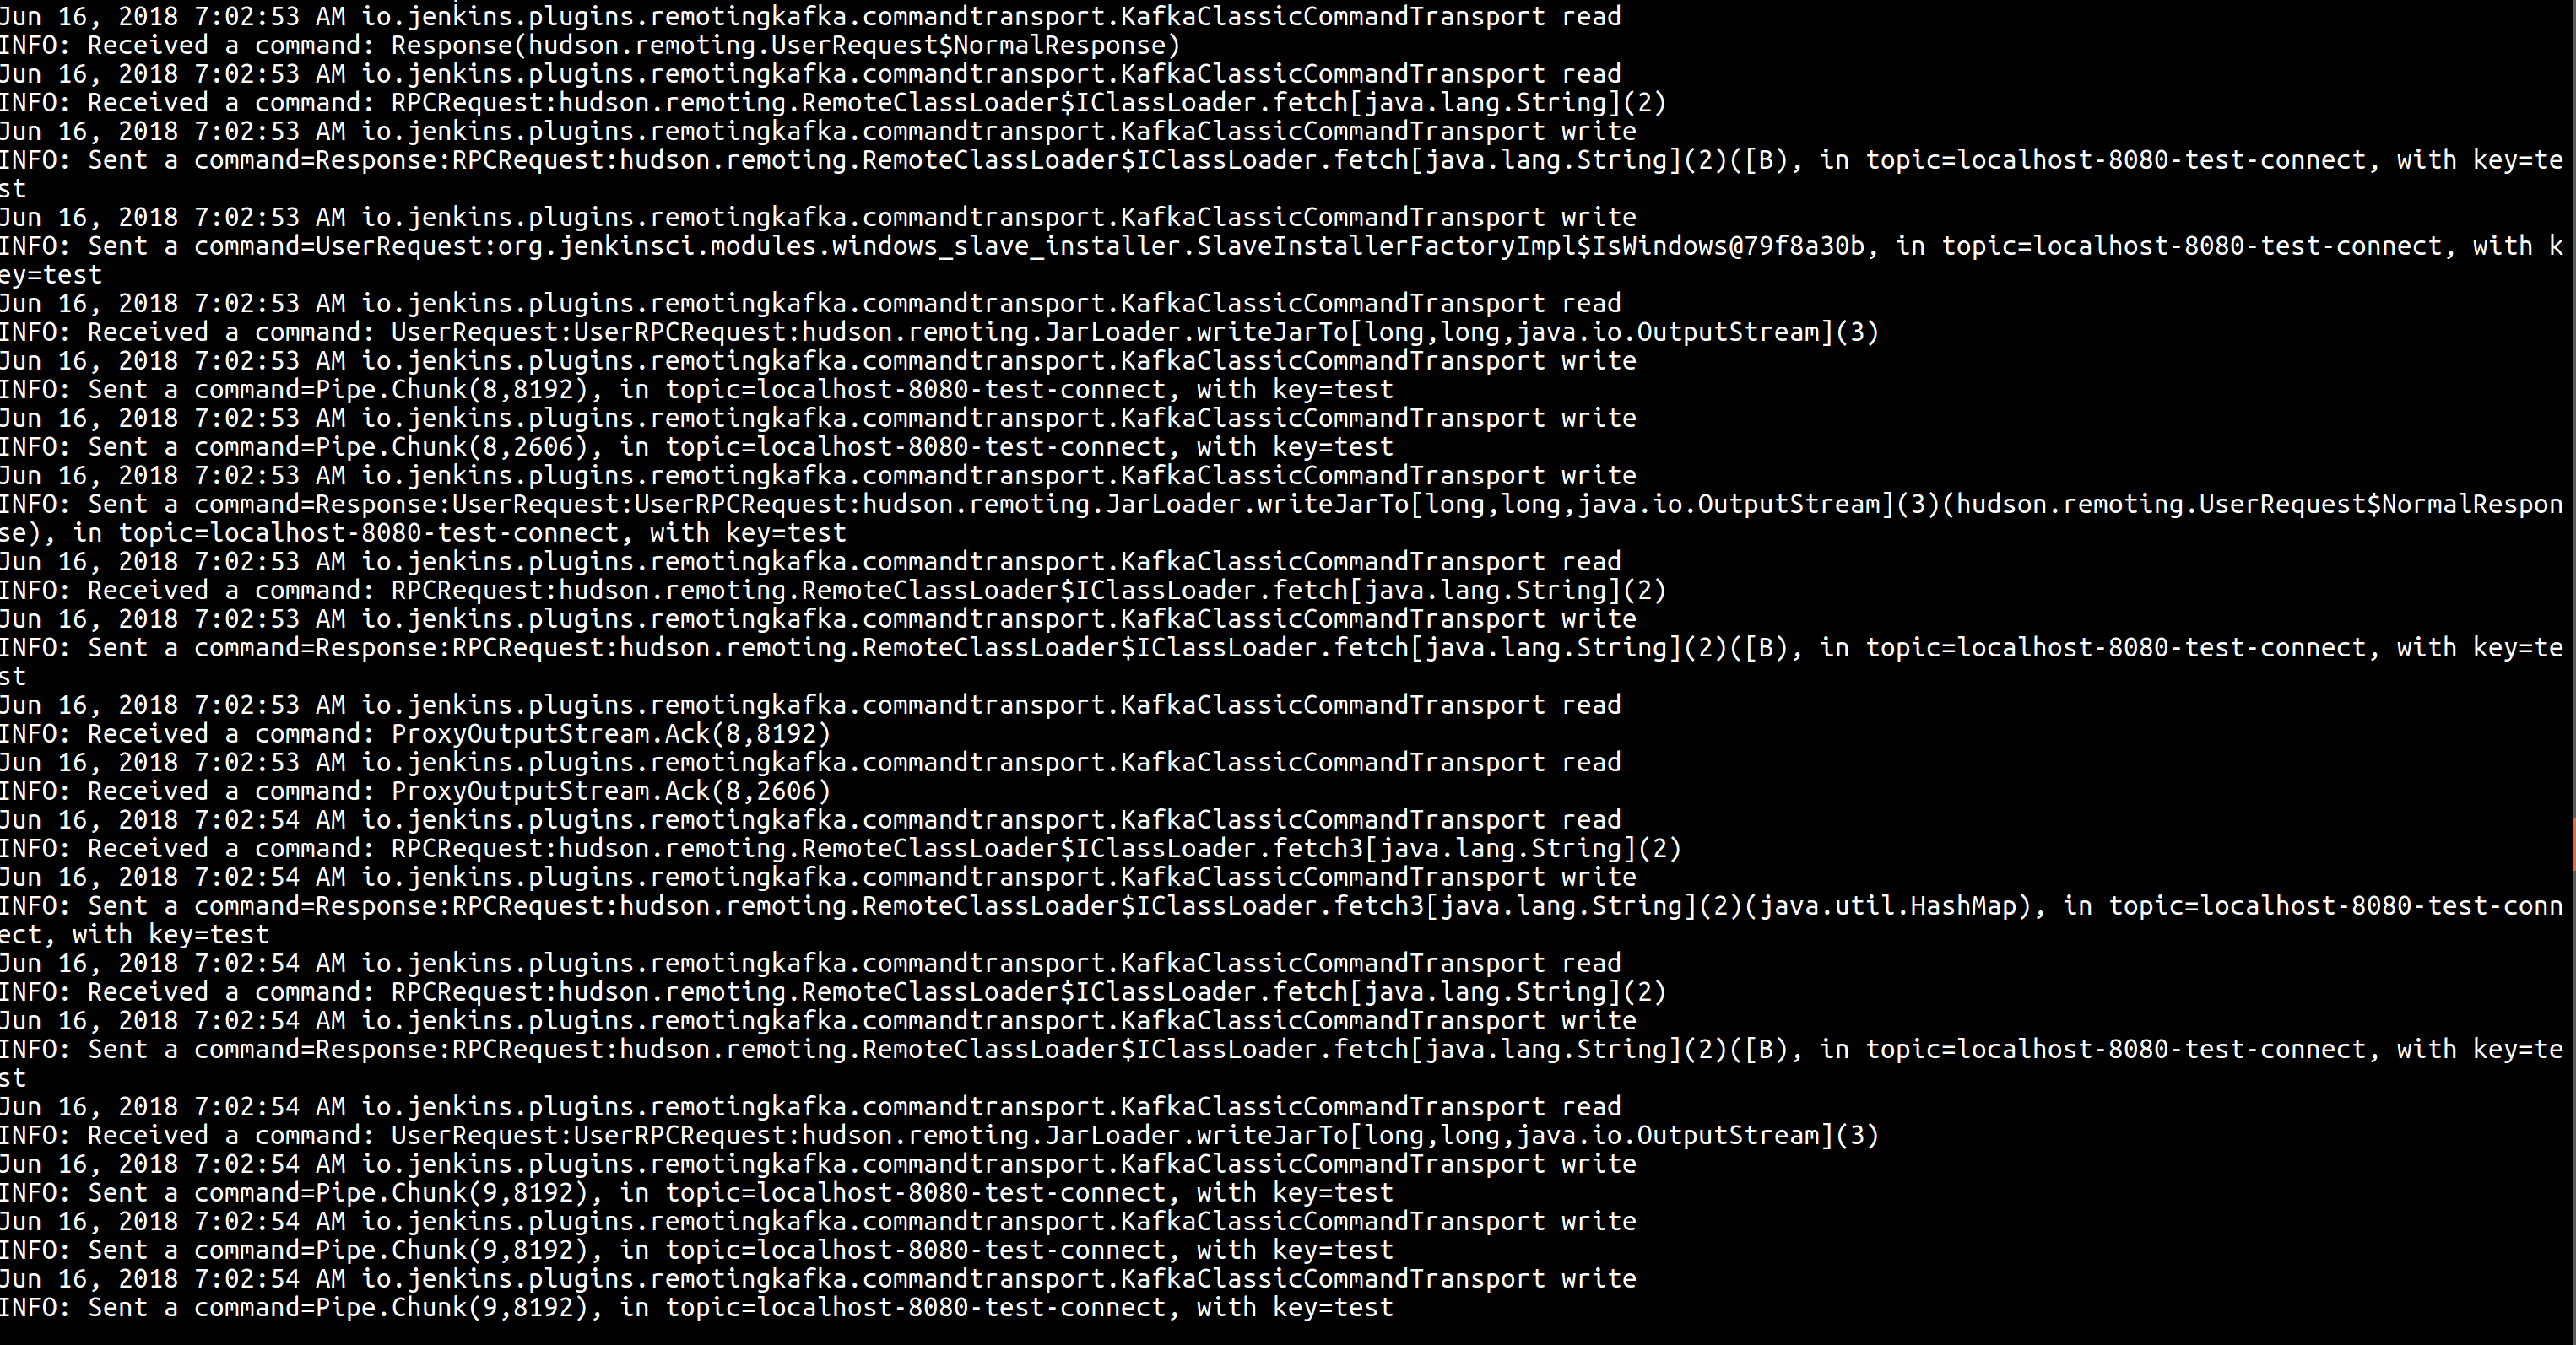
4. Commands transferred between master and agent over Kafka

kafka commands

Remoting operations are being executed over Kafka. In the log you may see:

  • Command execution (SlaveInstallerFactoryImpl.isWindows())

  • Classloading (Classloader.fetch())

  • Log streaming (Pipe.chunk())

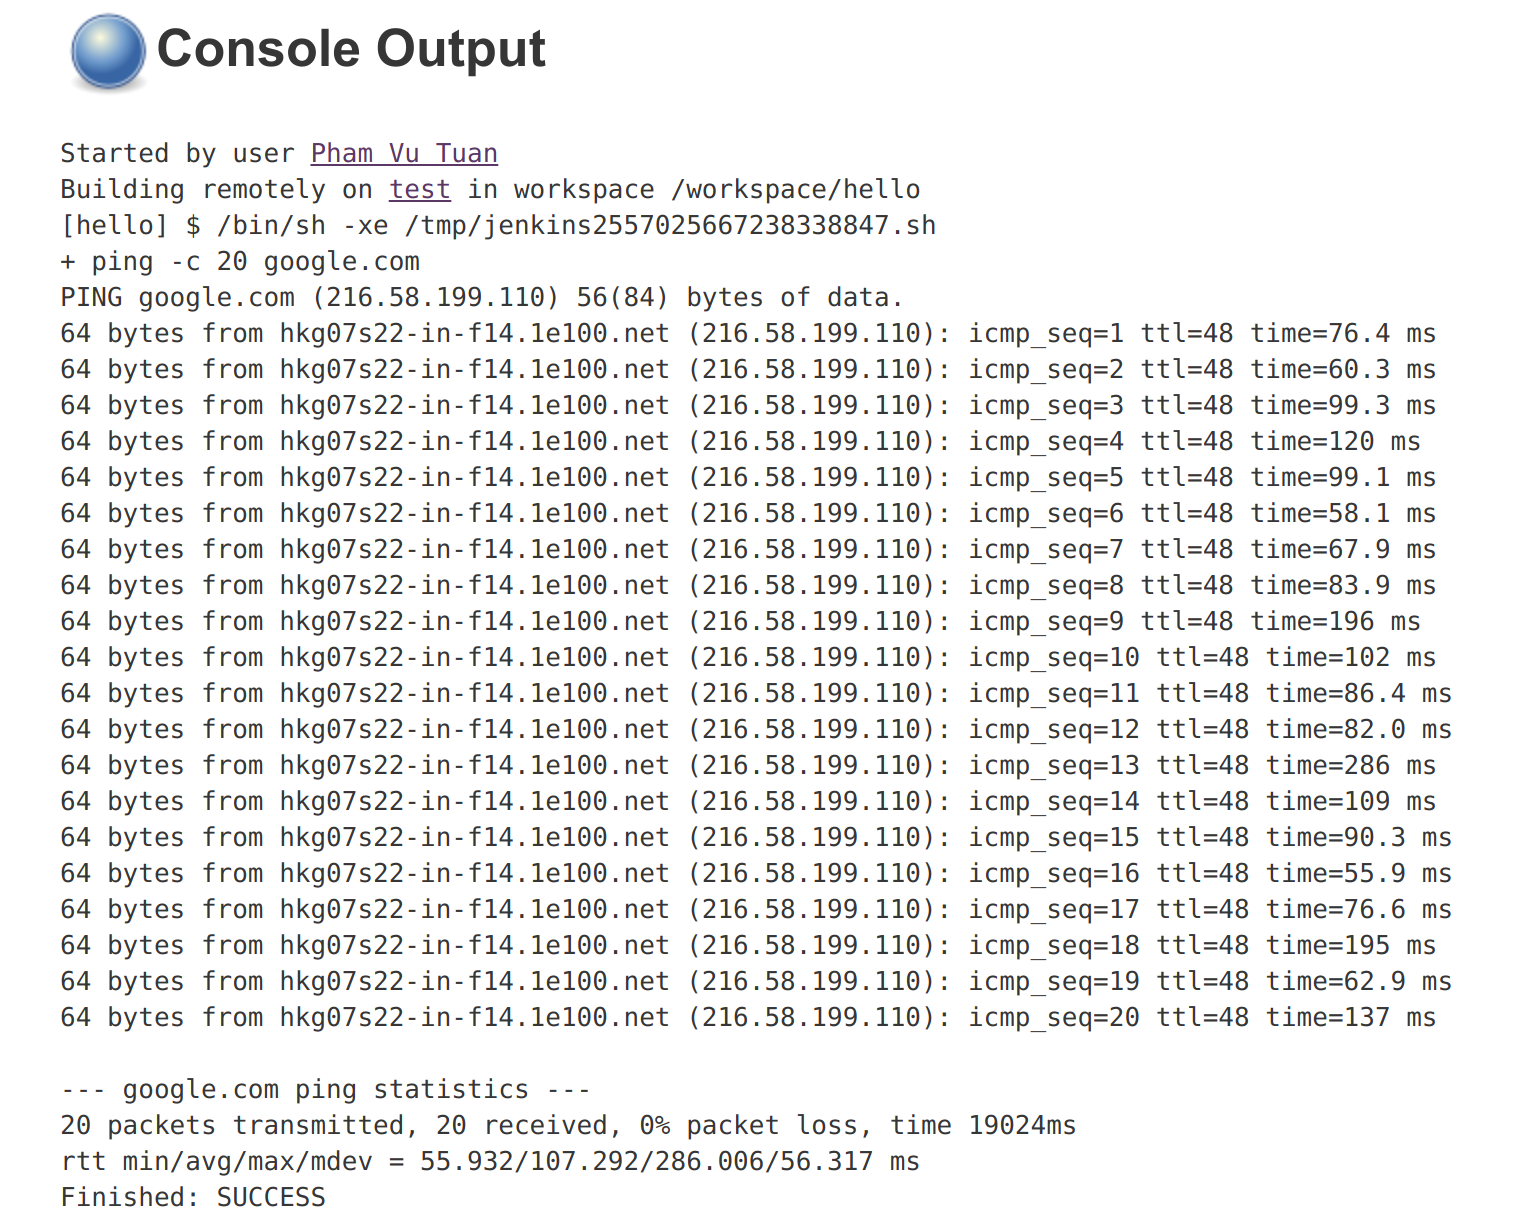
5. Run jobs with remoting Kafka

It is possible to run jobs on Agents connected over Kafkaremoting kafka run job

Next Phase Plan

Here are the tasks planned for the next phase:

How to run demo

You can try to run a demo of the plugin by following the instruction.

Jenkins & Java 10+ Online Hackathon. Day 2 Update

$
0
0

Jenkins Java

As you probably know, this week we have aJenkins & Java 10 Online Hackathon. This is an open online event, where we work together on Jenkins core and plugins in order to find and fix compatibility issues, share experiences and have some fun. Everybody is welcome to join, independently of their Jenkins experience and amount of time they have available.

After the kicked off on Monday Jenkins contributors have been working on Java 10 and Java 11 support in Jenkins. We have already received contributions from 12 hackathon participants, and the number keeps growing. There are still 3 days ahead, but we have already achieved some important results we want to share.

Jenkins Pipeline

One of our major efforts over last 2 days was to get Jenkins Pipeline working on Java 10+. When the hackathon started Jenkins Pipeline was not working at all, and it was a major blocker for Java support and for exploratory testing in particular. We’ve been working together with Sam van Oort and Devin Nusbaum to fix the libraries in the Jenkins core, Pipeline: Support plugin and Docker packaging.

Just to summarize the result of two days in one screenshot…​

Successful Pipeline on Java 10

Yes, we have got it running! Over two days we have got from the "Pipeline Crashes Immediately" state to the situation when the most of key Pipeline features are operational, including Scripted and Declarative Pipeline, BlueOcean, shared libraries and dozens of plugins being used in the Jenkins plugin build flow.

There is still a lot of work to do to get the changes finalized, but Jenkins Pipeline is available for testing on Java 10 and 11 now. If you want to try it out, you can use a new jenkins/jenkins-experimental:blueocean-jdk10 image we have created. It bundles all the required patches, so you can just run the following command to get started:

docker run -p 8080:8080 -p 50000:50000 jenkins/jenkins-experimental:blueocean-jdk10

If you want to try more complex scenarions, see theRunning Jenkins with Java 10 and 11 blogpost and List of Required patches.

What else?

Although Pipeline is the most visible change, there are other ongoing activities:

  • Devin Nusbaum explored plugin startup issues we had with JDK 11ea+17 and confirmed that we need to upgrade our images to JDK 11ea+18

  • Gianpaolo Macario is working on adopting the Java 10 experimental images in hiseasy-jenkins project

  • Sam van Oort and Devin Nusbaum are working on getting plugin build and test flows when using JDK 10 with Maven

  • Nicolas de Loof is working on cleaning up Illegal reflective access warnings in Jenkins components, using the new Fields micro-library

  • Olivier Lamy and Nicolas de Loof are updating theAnimal Sniffer plugin for Maven to make it compatible with Java 9 and above

  • Kohsuke Kawaguchi has released a repackaged version of ASM 6.2 we use in the project

  • Last but not least, Liam Newman and Tracy Miranda helped us a lot to run the meetings and to get this hackathon organized

There are also other contributors working on exploratory testing and reporting defects they discover. See our status doc for the full list.

What’s next?

Tomorrow we will have 2 sessions:

  • At 8AM UTC we will have a sync-up. According to the requests from hackathon paticipants, we will have an intro session to Jenkins development for newcomers

  • At 4PM UTC we will have a meeting with key JDK Project Jigsaw committers

    • Mark Reinhold, Mandy Chung and Paul Sandoz will join us to talk about Java 10/11 adoption

    • YouTube link

We will also post participant links in our Gitter channel 15 minutes before the meetings. If you have any questions, please join the meetings or raise questions in the chat during the call.

Can I still join the hackathon?

Yes, you can! It is possible to hop in and hop off at any time. Just respond to the registration form, join our Gitter channel and start hacking/testing.

We also have a number ofnewbie-friendly issues you can start from. See our Kick-off session andslides for quick start guidelines.

Securing your Jenkins CI/CD Container Pipeline with Anchore (in under 10 minutes)

$
0
0

(adapted from this blog post by Daniel Nurmi)

As more and more Jenkins users ship docker containers, it is worth thinking about the security implications of this model, where the variance in software being included by developers has increased dramatically from previous models. Security implications in this context include what makes up the image, but also the components of the app that get bundled into your image. Docker images are increasingly becoming a “unit of deployment”, and if you look at a typical app (especially if it is a microservice), much of the components, libraries, and system are someone else’s code.

Anchore exists to provide technology to act as a last line of defense, verifying the contents of these new deployable units against user specified policies to enforce security and compliance requirements. In this blog you will get a quick tour of this capability, and how to add the open-source Anchore Engine API service into your pipeline to validate that the flow of images you are shipping comply with your specific requirements, from a security point of view.

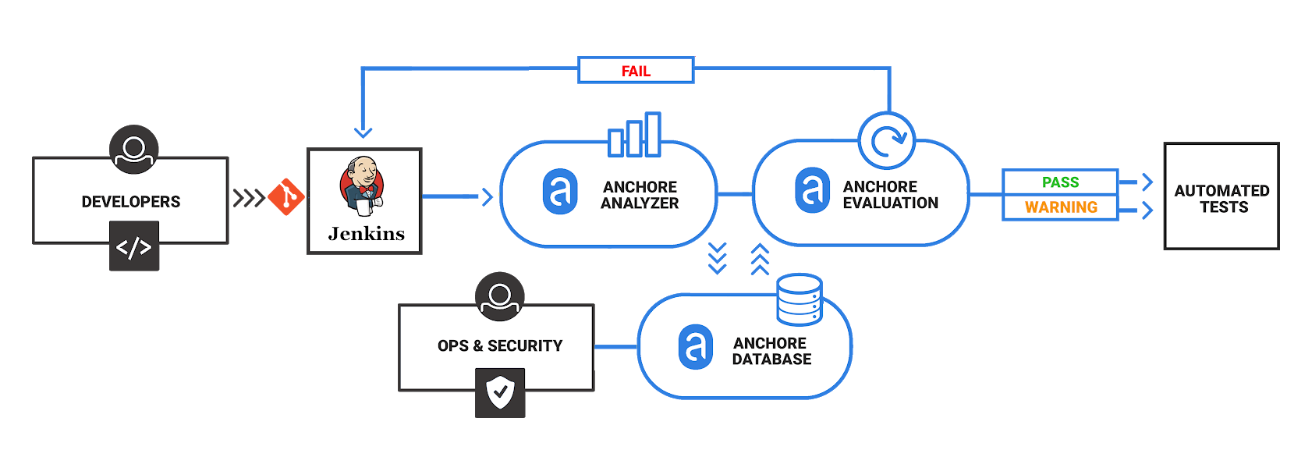
anchore pipeline

Key among the fundamental tenets of agile development is the notion of “fail fast, fail often”, which is where CI/CD comes in: A developer commits code into the source code repository, such as git, that automatically triggers Jenkins to perform a build of the application that is then run through automated tests. If these tests fail the developer is notified immediately and can quickly correct the code. This level of automation increases the overall quality of code and speeds development.

While some may feel that “fail fast” sounds rather negative (especially regarding security), you could better describe this process as “learn fast” as mistakes are found earlier in the development cycle and can be easily corrected. The increased use of CI/CD platforms such as Jenkins has helped to improve the efficiency of development teams and streamlined the testing process. We can leverage the same CI/CD infrastructure to improve the security of our container deployments.

For many organizations the last step before deploying an application is for the security team to perform an audit. This may entail scanning the image for vulnerable software components (like outdated packages that contain known security vulnerabilities) and verifying that the applications and OS are correctly configured. They may also check that the organization’s best practices and compliance policies have been correctly implemented.

In this post we walk through adding security and compliance checking into the CI/CD process so you can “learn fast” and correct any security or compliance issues early in the development cycle. This document will outline the steps to deploy Anchore’s open source security and compliance scanning engine with Jenkins to add analytics, compliance and governance to your CI/CD pipeline.

Anchore has been designed to plug seamlessly into the CI/CD workflow, where a developer commits code into the source code management system, which then triggers Jenkins to start a build that creates a container image. In the typical workflow this container image is then run through automated testing. If an image does not meet your organization’s requirements for security or compliance then it makes little sense to invest the time required to perform automated tests on the image, it would be better to “learn fast” by failing the build and returning the appropriate reports back to the developer to allow the issue to be addressed.

anchore flow

Anchore has published a plugin for Jenkins which, along with Anchore’s open source engine or Enterprise offering, allows container analysis and governance to be added quickly into the CI/CD process.

Requirements

This guide presumes the following prerequisites have been met:

  • Jenkins 2.x installed and running on a virtual machine or physical server.

  • Anchore-Engine installed and running, with accessible engine API URL (later referred to as <anchore_url>) and credentials (later referred to as <anchore_user> and <anchore_pass>) available - see Anchore Engine overview and installation.

Anchore’s Jenkins plugin can work with single node installations or installations with multiple worker nodes.

Step 1: Install the Anchore plugin

The Anchore plugin has been published in the Jenkins plugin registry and is available for installation on any Jenkins server. From the main Jenkins menu select Manage Jenkins, then Manage Plugins, select the Available tab, select and install Anchore Container Image Scanner.

installing

Step 2: Configure Anchore Plugin.

Once the Anchore Container Image Scanner plugin is installed - select Manage Jenkins menu click Configure System, and locate the Anchore Configuration section. Select and enter the following parameters in this section:

  • Click Enable Anchore Scanning

  • Select Engine Mode

  • Enter your <anchore_url> in the Engine URL text box - for example: http://your-anchore-engine.com:8228/v1

  • Enter your <anchore_user> and <anchore_pass> in the Engine Username and Engine Password fields, respectively

  • Click Save

An example of a filled out configuration section is below, where we’ve used “http://192.168.1.3:8228/v1” as <anchore_url>, “admin” as <anchore_user> and “foobar” as <anchore_pass>:

config

At this point the Anchore plugin is configured on Jenkins, and is available to be accessed by any project to perform Anchore security and policy checks as part of your container image build pipeline.

Step 3: Add Anchore image scanning to a pipeline build.

In the Pipeline model the entire build process is defined as code. This code can be created, edited and managed in the same way as any other artifact of your software project, or input via the Jenkins UI.

Pipeline builds can be more complex including forks/joins and parallelism. The pipeline is more resilient and can survive the master node failure and restarts. To add an Anchore scan you need to add a simple code snippet to any existing pipeline code that first builds an image and pushes it to a docker registry. Once the image is available in a registry accessible by your installed Anchore Engine, a pipeline script will instruct the Anchore plugin to:

  • Send an API call to the Anchore Engine to add the image for analysis

  • Wait for analysis of the image to complete by polling the engine

  • Send an API call to the Anchore Engine service to perform a policy evaluation

  • Retrieve the evaluation result and potentially fail the build if the plugin is configured to fail the build on policy evaluation STOP result (by default it will)

  • Provide a report of the policy evaluation for review

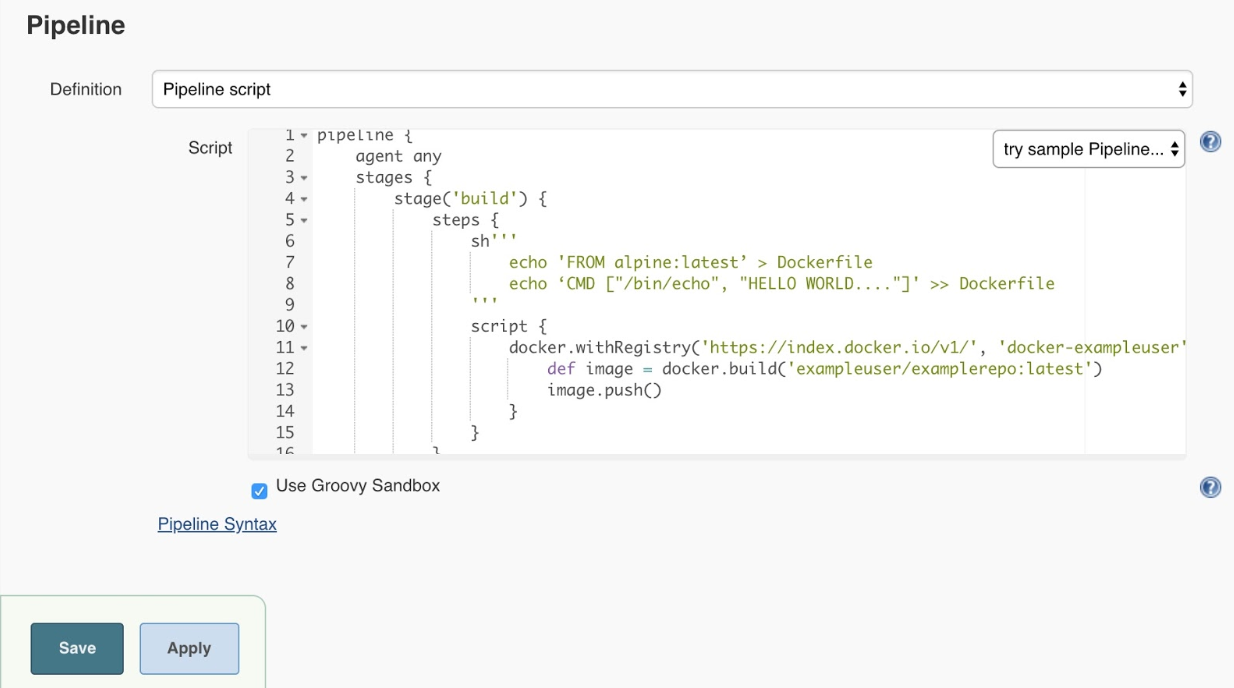
Below is an example end-to-end script that will make a Dockerfile, use the docker plugin to build and push the a docker container image to dockerhub, perform an Anchore image analysis on the image and the result, and cleanup the built container. In this example, we’re using a pre-configured docker-exampleuser named dockerhub credential for dockerhub access, and exampleuser/examplerepo:latest as the image to build and push. These values would need to be changed to reflect your own local settings, or you can use the below example to extract the analyze stage to integrate an anchore scan into any pre-existing pipeline script, any time after a container image is built and is available in a docker registry that your anchore-engine service can access.

pipeline {
    agent any
    stages {
        stage('build') {
            steps {
                sh'''
                    echo 'FROM debian:latest’ > Dockerfile
                    echo ‘CMD ["/bin/echo", "HELLO WORLD...."]' >> Dockerfile
                '''
                script {
                    docker.withRegistry('https://index.docker.io/v1/', 'docker-exampleuser') {
                        def image = docker.build('exampleuser/examplerepo:latest')
                        image.push()
                    }
                }
            }
        }
        stage('analyze') {
            steps {
                sh 'echo "docker.io/exampleuser/examplerepo:latest `pwd`/Dockerfile" > anchore_images'
                anchore name: 'anchore_images'
            }
        }
        stage('teardown') {
            steps {
                sh'''
                    for i in `cat anchore_images | awk '{print $1}'`;do docker rmi $i; done
                '''
            }
        }
    }
}

This code snippet writes out the anchore_images file that is read by the plugin to determine which image is to be added to Anchore Engine for scanning.

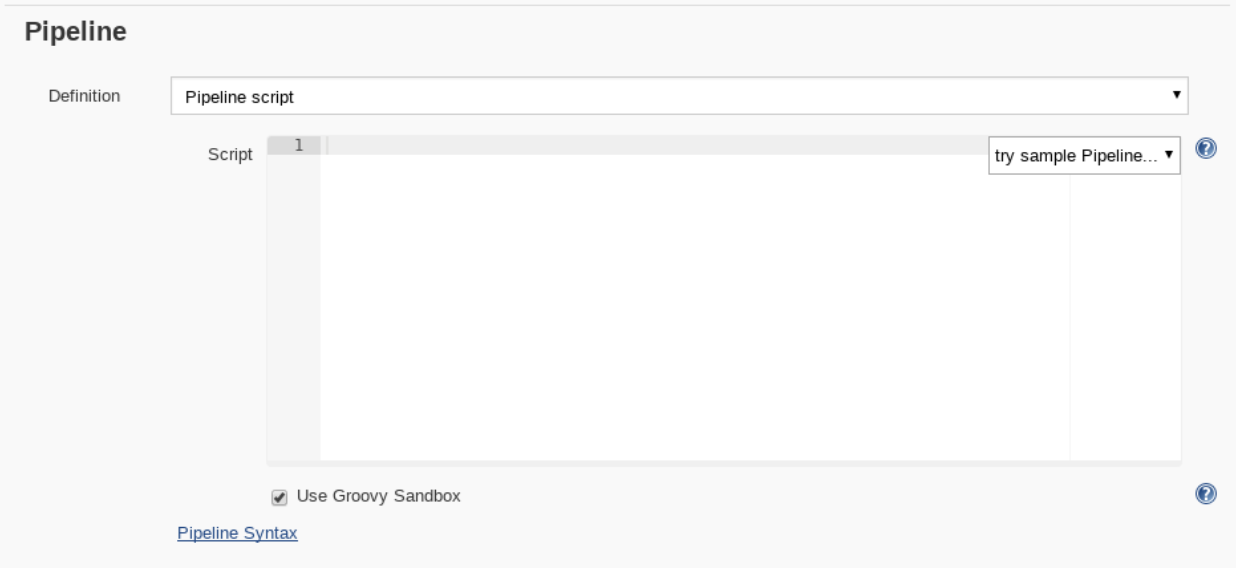
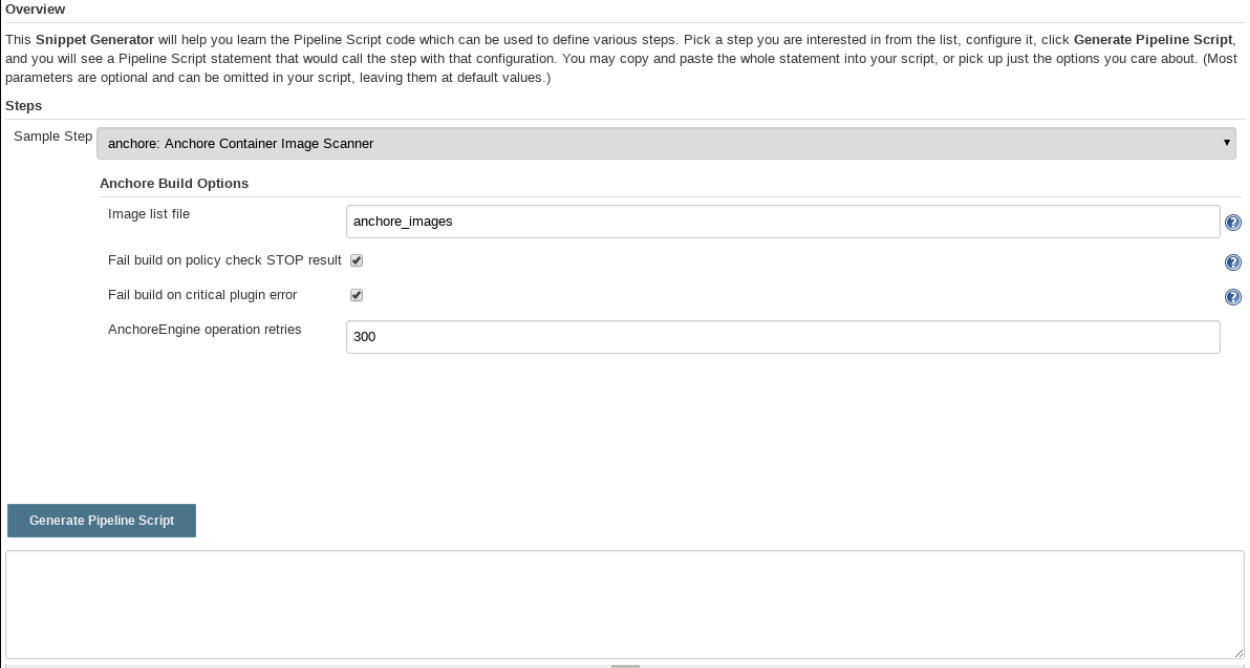
This code snippet can be crafted by hand or built using the Jenkins UI, for any Pipeline project. In the project configuration, select Pipeline Syntax from the Project.

pipe1

This will launch the Snippet Generator where you can enter the available plugin parameters and press the Generate Pipeline Script button which will produce a snippet that you can use as a starting point.

snippet

Using our example from above, next we save the project:

pipe2

Note that once you are happy with your script, you could also check it into a Jenkinsfile, alongside the source code.

Step 4: Run the build and review the results.

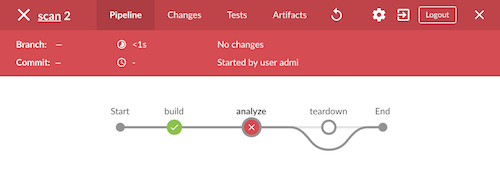
Finally, we run the build, which will generate a report. In the below screenshots, we’ve scanned the image docker.io/library/debian:latest to demonstrate some example results. Once the build completes, the final build report will have some links that will take you to a page that describes the result of the Anchore Engine policy evaluation and security scan:

result

In this case, since we left the Fail build on policy STOP result as its default (True), the build has failed due to anchore-engine reporting a policy violation. In order to see the results, click the Anchore Report (STOP) link:

report

Here, we can see that there is a single policy check that has generated a ‘STOP’ action, which triggered due to a high severity vulnerability being found against a package installed in the image. If there were only ‘WARN’ or ‘GO‘ check results here, they would also be displayed, but the build would have succeeded.

With the combination of Jenkins pipeline project capabilities, plus the Anchore scanner plugin, it’s quick and easy to add container image security scanning and policy checking to your Jenkins project. In this example, we provide the mechanism for adding scanning to a Jenkins pipeline project using a simple policy that is doing an OS package vulnerability scan, but there are many more policy options that can be configured and loaded into Anchore Engine ranging from security checks to your own site-specific best practice checks (software licenses, package whitelist/blacklist, dockerfile checks, and many more). For more information about the breadth of Anchore policies, you can find information about Anchore Engine configuration and usage here.

For more information on Jenkins Pipelines and Anchore Engine, check out the following information sources:

Using Jenkins X DevPods for development

$
0
0

I use macOS day to day, and often struggle to keep my devtools up to date. This isn’t any fault of packaging or tools, more just that I get tired of seeing the beachball:

beachball

The demands on dev machines grow, developers are now working across a more diverse set of technologies than just a JVM or a single scripting language these days.

This keeping up to date is a drag on time (and thus money). There are lots of costs involved with development, and Ihave written about about the machine cost for development (how using something like GKE can be much cheaper than buying a new machine) but there is also the cost of a developer’s time. Thankfully, there are ways to apply the same smarts here to save time as well as money. And time is money, or money is time?
Given all the work done in automating the detection and installation of required tools, environments, and libraries that goes on when you run ‘jx import’ in Jenkins X, it makes sense to also make those available for development time, and the concept of “DevPods” was born.

The pod part of the name comes from the Kubernetes concept of pods (but you don’t have to know about Kubernetes or pods to use Jenkins X. There is a lot to Kubernetes but Jenkins X aims to provide a developer experience that doesn’t require you to understand it).

Why not use Jenkins X from code editing all the way to production, before you even commit the code or open a pull request? All the tools are there, all the environments are there, ready to use (as they are used at CI time!).

This rounds out the picture: Jenkins X aims to deal with the whole lifecycle for you, from ideas/issues, change requests, testing, CI/CD, security and compliance verification, rollout and monitoring. So it totally makes sense to include the actual dev time tools.

If you have an existing project, you can create a DevPod by running (with the jx command):

jx create devpod

This will detect what type of project is (using build packs) and create a DevPod for you with all the tools pre-installed and ready to go.

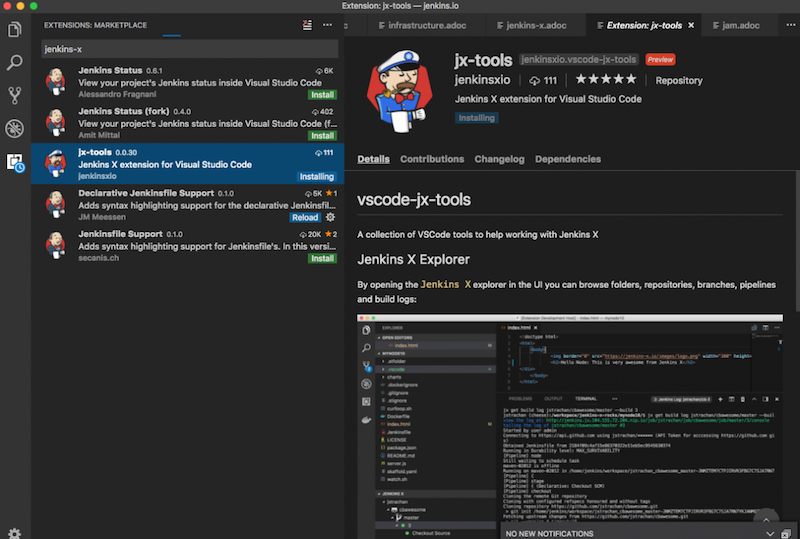
Obviously, at this point you want to be able to make changes to your app and try it out. Either run unit tests in the DevPod, or perhaps see some dev version of the app running in your browser (if it is a web app). Web-based code editors have been a holy grail for some time, but never have quite taken off in the mainstream of developers (despite there being excellent ones out there, most developers prefer to develop on their desktop). Ironically, the current crop of popular editors are based around“electron” which is actually a web technology stack, but it runs locally (Visual Studio Code is my personal favourite at the moment), in fact Visual Studio Code has a Jenkins X extension (but you don’t have to use it):

jx tools

To get your changes up to the Dev Pod, in a fresh shell run (and leave it running):

jx sync

This will watch for any changes locally (say you want to edit files locally on your desktop) and sync them to the Dev Pod.

Finally, you can have the Dev Pod automatically deploy an “edit” version of the app on every single change you make in your editor:

jx create devpod --sync --reuse
./watch.sh

The first command will create or reuse an existing Dev Pod and open a shell to it, then the watch command will pick up any changes, and deploy them to your “edit” app. You can keep this open in your browser, make a change, and just refresh it. You don’t need to run any dev tools locally, or any manual commands in the Dev Pod to do this, it takes care of that.

You can have many DevPods running (jx get devpods), and you could stop them at the end of the day (jx delete devpod), start them at the beginning, if you like (or as I say: keep them running in the hours between coffee and beer). A pod uses resources on your cluster, and as the Jenkins X project fleshes out its support for dev tools (via things like VS Code extensions) you can expect even these few steps to be automated away in the near future, so many of the above instructions will not be needed!

End-to-end experience

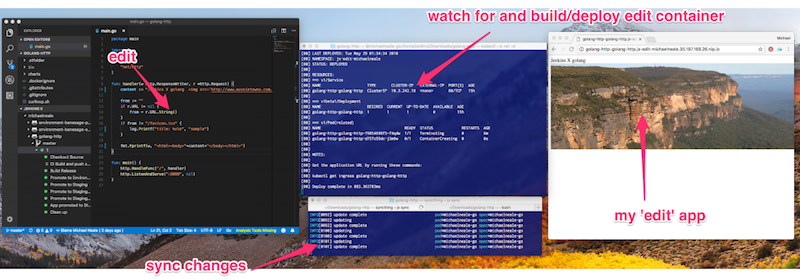
So bringing it all together, let me show a very wide (you may need to zoom out) screen shot of this workflow:

end end

From Left to Right:

  • I have my editor (if you look closely, you can see the Jenkins X extension showing the state of apps, pipelines and the environments it is deployed to).

  • In the middle I have jx sync running, pushing changes up to the cloud from the editor, and also the ‘watch’ script running in the DevPod. This means every change I make in my editor, a temporary version of the app (and its dependencies are deployed).

  • On the right is my browser open to the “edit” version of the app. Jenkins X automatically creates an “edit” environment for live changes, so if I make a change to my source on the left, the code is synced, build/tested and updated so I can see the change on the right (but I didn’t build anything locally, it all happens in the DevPod on Jenkins X).

On visual studio code: The Jenkins X extension for visual studio code can automate the creation of devpods and syncing for you. Expect richer support soon for this editor and others.

Explaining things with pictures

To give a big picture of how this hangs together:

picture

In my example, GitHub is still involved, but I don’t push any changes back to it until I am happy with the state of my “edit app” and changes. I run the editor on my local workstation and jx takes care of the rest. This gives a tight feedback loop for changes. Of course, you can use any editor you like, and build and test changes locally (there is no requirement to use DevPods to make use of Jenkins X).

Jenkins X comes with some ready to go environments: development, staging and production (you can add more if you like). These are implemented as Kubernetes namespaces to avoid the wrong app things talking to the wrong place. The development environment is where the dev tools live: and this is also where the DevPods can live! This makes sense as all the tools are available, and saves the hassle of you having slightly different versions of tools on your local workstation than what you are using in your pipeline.

DevPods are an interesting idea, and at the very least a cool name! There will be many more improvements/enhancements in this area, so keep an eye out for them. They are a work in progress, so do check the documentation page for better ways to use them.

Some more reading:

Presenting Jenkins Essentials at EclipseCon France

$
0
0

It’s been far too long since we posted an update on Jenkins Essentials. While it’s not quite ready for users to start trying it out, we continue hacking away on all manner of changes to support the safe and automatic upgrades of a running Jenkins environment. In the meantime, Jenkins contributorBaptiste Mathus took some time to introduce anddemonstrate Jenkins Essentials at the recently heldEclipseCon France,

Jenkins Essentials

From the talk’s abstract:

The Jenkins Project is working on providing its users with a brand new, strongly opinionated, and continuously delivered distribution of Jenkins: Jenkins Essentials. Constantly self-updating, including auto-rollback, with an aggressive subset of verified plugins.

In this talk, we will detail how this works: how we run and upgrade Jenkins itself. How instances are continuously sending health data back to help automated decision-making about the quality of given new release, and decide to generalize a given version of Jenkins to the whole fleet, or roll it back.

We will end giving an overview of the status of the project: how it’s managed in a fully open manner, from design to code and its infrastructure, and all the radical solutions to imagine and the upcoming challenges for the next months.

I hope you enjoy the video


You can learn more about Jenkins Essentials fromGitHub repository, or join us on ourGitter channel.


What I learned from the Jenkins & Java 10+ Hackathon

$
0
0

Last week I participated in theJenkins & Java 10 Online Hackathon. It was my first Jenkins hackathon and I roped inJonah Graham to do some pair-programming. The hackathon featured JDK Project Jigsaw committers Mandy Chung and Paul Sandoz, as well as Jenkins creator Kohsuke Kawaguchi. It was a great opportunity for me to learn a lot about Jenkins and Java 10.

Why Java 10?

With theJava 8 EoL data looming, the focus was on the current available version of Java, Java 10. Java 10 offers some nice new features and APIs, not leastimproved docker container integration. We learned from Paul of a number of projects with Java 10 migration success stories including Elasticsearch, Kafka & Netty.

At the beginning of the hackathon week, the Jenkins Pipeline feature would crash out when using Java 10. This was resolved with a number of fixes including the upgrade of theASM library. Then it was nice to see thingsup and running with Java 10.

Getting up & running

The first steps were to do some exploratory testing usingJenkins with Java 10 via Docker, thanks toOleg for providing clear instructions. This was boringly straightforward as most things worked and we only found oneissue to report. Next to try to get some patches in, we needed to set-up a dev environment. The live session gave us what we needed to set up aplugin orcore dev environment. One open question we had was whether Jenkins has semantic versioning andAPI tools to help identify when you might be breaking backwards compatibility. Overall it was straightforward to get a dev environment up and running.

Java 10 New APIs

The next step was to find an issue which we could help resolve. Many of the Java 10 issues were related to Illegal reflective access from various plugins or third-party libraries. However after investigating a couple, removing these warnings required a good architectural knowledge of the plugin or core code itself. In the end we decided that messing around with classloaders or attempting to upgrade version of jdom was not one for the newbies.

Instead we looked atremoving reflection in cases of isAccessible calls. We found theProcessHandle api very useful and a good replacement for some misuse of reflection, and even better it made the code work on Windows too. Mandy also pointed us to look at theLookup api as possible alternate to findClass calls.

Multi-Release JAR Builds

Using new APIs is all well and good but presents a problem when you want to maintain backwards compatibility with Java 8. Hence the need for some sort of multi-jar solution -Nicolas De loof proposed one such solution formulti-release jars with Maven for this case.

sun.misc.Signal

The Java Signal API is being deprecated, but so far no replacement APIs are available for signal handling. Jenkins makes use of the Signal APIs so a big question for the Jigsaw team was whether this would be replaced going forward. Kohsuke pointed out how it is important for Java to maintain this UNIX like behaviour as it shouldn’t matter to end users that Jenkins is written in Java. It seems these APIs will be replaced in due course, they just aren’t there right now.

Collaboration, Collaboration, Collaboration

It was great to have the discussions with the Jigsaw team. They reminded us how they need to know the Java use cases out there and how their team uses these to feed into their development process. In turn, the hackathon had Jenkins community members participate, for instanceeasy-jenkins was up and running with Java 10 by the end of the week. The hackathon had a great feeling of community spirit and was a reminder why collaborations with communities and also between different communities can be powerful and fun for all involved.

At the end of the week Jonah and I were both happy that we made our first Jenkins contributions (which were reviewed and merged quickly). Thanks to all who participated and made it highly enjoyable, especially Oleg for great organization. I look forward to the next one!

New design, UX and extensibility digest for login page et. al.

$
0
0

This blog post gives an introduction to the new design for the login and signup forms and Jenkins is (re)starting pages introduced in Jenkins 2.128. The first part of the blog post is an introduction to the new design and UX for Jenkins users. The later part is talking about extensibility in a more technical manner, aimed at plugin developers.

Overview

The recent changes to some core pages provide new design and UX and further dropping all external dependencies to prevent any possible malicious javascript introduced by third party libraries. To be clear, this never was an issue with previous releases of Jenkins, but having read this article, this author believes that the article has good points and leading by example may raise awareness of data protection.

This meant to drop the usage of the jelly layout lib (aka xmlns:l="/lib/layout") and as well the page decorators it supported. However there is a new SimplePageDecorator extension point (discussed below) which can be used to modify the look and feel for the login and sign up page.

The following pages have given a new design:

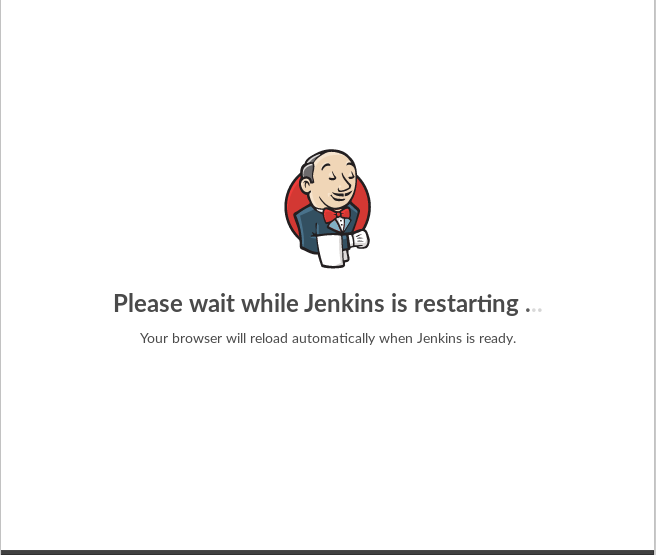
  • Jenkins is (re)starting pages

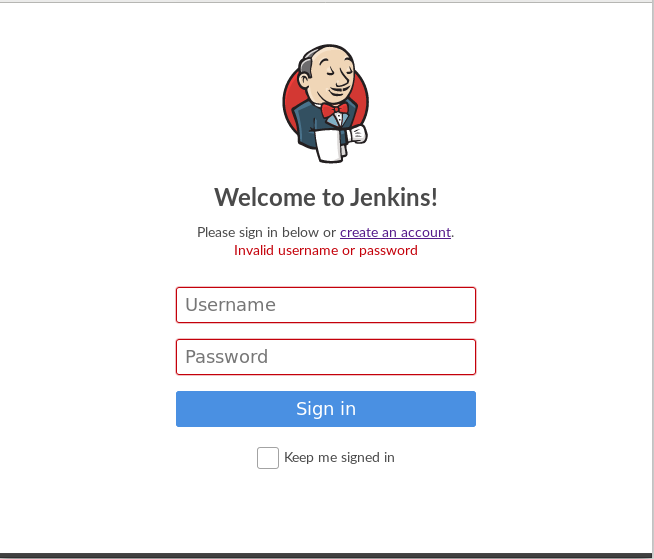
JENKINS 50447 1 a

JENKINS 50447 1 b

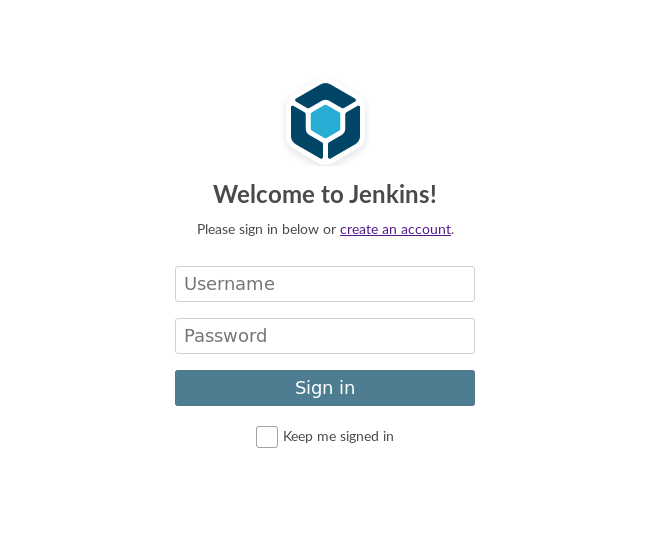
  • Login

JENKINS 50447 2

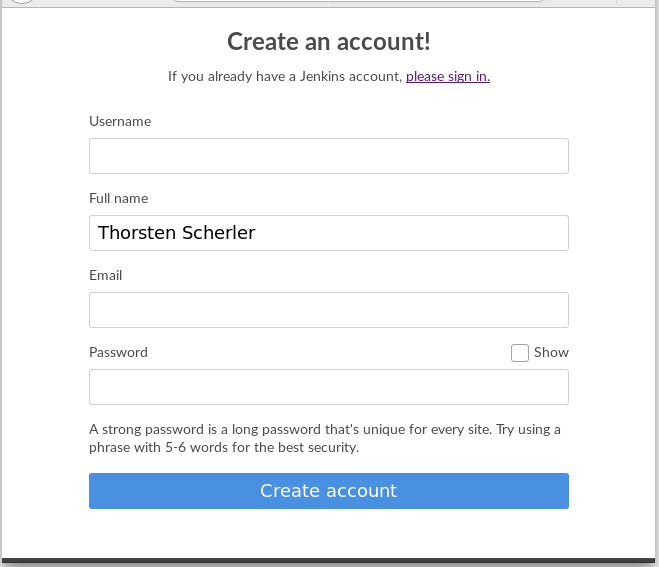
  • Sign up

JENKINS 50447 3

UX enhancement

Form validation has changed to give inline feedback about data validation errors in the same form.

  • Login

JENKINS 50447 4

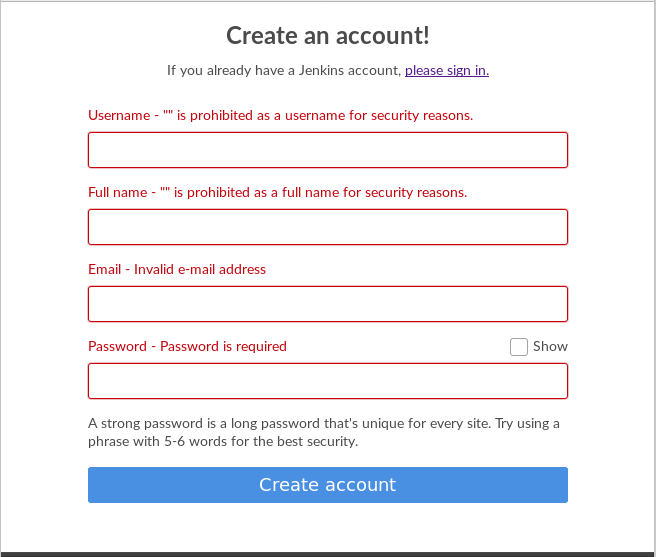
  • Sign up

JENKINS 50447 5

The above image shows that the validation is now done on all input fields instead of before breaking on the first error found, which should lead to fewer retry cycles.

Instead of forcing the user to repeat the password, the new UX introduces the possibility to display the password in clear text. Further a basic password strength meter indicates password strength to the user while she enters the password.

JENKINS 50447 6

Customizing the UI

The re-/starting screens do not support the concept of decorators very well, hence the decision to not support them for these pages.

The SimplePageDecorator is the key component for customization and uses three different files to allow overriding the look and feel of the login and signup pages.

  • simple-head.jelly

  • simple-header.jelly

  • simple-footer.jelly

All of the above SimplePageDecorator Jelly files are supported in the login page. The following snippet is a minimal excerpt of the login page, showing how it makes use of SimplePageDecorator.

<?jelly escape-by-default='true'?><j:jellyxmlns:j="jelly:core"xmlns:st="jelly:stapler"><j:newvar="h"className="hudson.Functions"/><html><head><!-- css styling, will fallback to default implementation --><st:includeit="${h.simpleDecorator}"page="simple-head.jelly"optional="true"/></head><body><divclass="simple-page"role="main"><st:includeit="${h.simpleDecorator}"page="simple-header.jelly"optional="true"/></div><divclass="footer"><st:includeit="${h.simpleDecorator}"page="simple-footer.jelly"optional="true"/></div></body></html></j:jelly>

The sign-up page only supports the simple-head.jelly:

<?jelly escape-by-default='true'?><j:jellyxmlns:j="jelly:core"xmlns:st="jelly:stapler"><j:newvar="h"className="hudson.Functions"/><html><head><!-- css styling, will fallback to default implementation --><st:includeit="${h.simpleDecorator}"page="simple-head.jelly"optional="true"/></head></html></j:jelly>

SimplePageDecorator - custom implementations

Have a look at Login Theme Plugin (currently unreleased), which allows you to configure your own custom content to be injected into the new login/sign-up page.

To allow easy customisation the decorator only implements one instance by the principal "first-come-first-serve". If jenkins finds an extension of the SimplePageDecorator it will use the Jelly files provided by that plugin. Otherwise Jenkins will fall back to the default implementation.

@ExtensionpublicclassMySimplePageDecoratorextends SimplePageDecorator {publicString getProductName() {return"MyJenkins";
   }
}
The above will take override over the default because the default implementation has a very low ordinal (@Extension(ordinal=-9999)) If you have competing plugins implementing SimplePageDecorator, the implementation with the highest ordinal will be used.

As a simple example, to customize the logo we display in the login page, create a simple-head.jelly with the following content:

<?jelly escape-by-default='true'?><j:jellyxmlns:j="jelly:core"><linkrel="stylesheet"href="${resURL}/css/simple-page.css"type="text/css"/><linkrel="stylesheet"href="${resURL}/css/simple-page.theme.css"type="text/css"/><style>.simple-page.logo {background-image: url('${resURL}/plugin/YOUR_PLUGIN/icons/my.svg');background-repeat: no-repeat;background-position: 50%0;height: 130px;
    }</style><linkrel="stylesheet"href="${resURL}/css/simple-page-forms.css"type="text/css"/></j:jelly>

To customize the login page further, create a simple-header.jelly like this:

<?jelly escape-by-default='true'?><j:jellyxmlns:j="jelly:core"><divid="loginIntro"><divclass="logo"></div><h1id="productName">Welcome to ${it.productName}!</h1></div></j:jelly>

For example, I used this technique to create a prototype of a login page for a CloudBees product I am working on:

JENKINS 50447 7

Conclusion

We hope you like the recent changes to some core pages and as well the new design and UX. We further hope you feel enabled to customize the look and feel to adopt your needs with the SimplePageDecorator.

What's New in Declarative Pipeline 1.3: Sequential Stages

$
0
0

We recently released version 1.3 of Declarative Pipelines, which includes a couple significant new features. We’re going to cover these features in separate blog posts. The next post will show the new ability to restart a completed Pipeline run starting from a stage partway through the Pipeline, but first, let’s look at the new sequential stages feature.

Sequential Stages

In Declarative 1.2, we added the ability to define stages to run in parallel as part of the Declarative syntax. Now in Declarative 1.3, we’ve added another way to specify stages nested within other stages, which we’re calling "sequential stages".

Running Multiple Stages in a Parallel Branch

One common use case is running build and tests on multiple platforms. You could already do that with parallel stages, but now you can run multiple stages in each parallel branch giving you more visibility into the progress of your Pipeline without having to check the logs to see exactly which step is currently running where, etc.

sequential stages

You can also use stage directives, including post, when, agent, and all the others covered in thePipeline Syntax reference in your sequential stages, letting you control behavior for different parts of each parallel branch.

In the example below, we are running builds on both Windows and Linux, but only want to deploy if we’re on the master branch.

pipeline {
    agent none

    stages {
        stage("build and deploy on Windows and Linux") {
            parallel {
                stage("windows") {
                    agent {
                        label "windows"
                    }
                    stages {
                        stage("build") {
                            steps {
                                bat "run-build.bat"
                            }
                        }
                        stage("deploy") {
                            when {
                                branch "master"
                            }
                            steps {
                                bat "run-deploy.bat"
                            }
                        }
                    }
                }

                stage("linux") {
                    agent {
                        label "linux"
                    }
                    stages {
                        stage("build") {
                            steps {
                                sh "./run-build.sh"
                            }
                        }
                        stage("deploy") {
                             when {
                                 branch "master"
                             }
                             steps {
                                sh "./run-deploy.sh"
                            }
                        }
                    }
                }
            }
        }
    }
}

Running Multiple Stages with the Same agent, or environment, or options

While the sequential stages feature was originally driven by users wanting to have multiple stages in parallel branches, we’ve found that being able to group multiple stages together with the same agent, environment, when, etc has a lot of other uses. For example, if you are using multiple agents in your Pipeline, but would like to be sure that stages using the same agent use the same workspace, you can use a parent stage with an agent directive on it, and then all the stages inside its stages directive will run on the same executor, in the same workspace. Another example is that until now, you could only set a timeout for the entire Pipeline or an individual stage. But by using a parent stage with nested stages, you can define a timeout in the parent’s options directive, and that timeout will be applied for the execution of the parent, including its nested stages. You may also want to conditionally control the execution of multiple stages. For example, your deployment process may be spread across multiple stages, and you don’t want to run any of those stages unless you’re on a certain branch or some other criteria is satisified. Now you can group all those related stages together in a parent stage, within its stages directive, and have a single when condition on that parent, rather than having to copy an identical when condition to each of the relevant stages.

One of my favorite use cases is shown in the example below. In Declarative 1.2.6, we added the input directive for stages. This will pause the execution of the Pipeline until a user confirms that the Pipeline should continue, using the Scripted Pipeline input step. The input directive is evaluated before the stage enters its agent, if it has one specified, and before the stage’s when condition, if specified, is evaluated. But if you’re using a top-level agent for most of your stages, you’re still going to be using that agent’s executor while waiting for input, which can be a waste of resources. With sequential stages, you can instead use agent none at the top-level of the Pipeline, and group the stages using a common agent and running before the stage with the input directive together under a parent stage with the required agent specified. Then, when your Pipeline reaches the stage with input, it will no longer be using an agent’s executor.

pipeline {
    agent none

    stages {
        stage("build and test the project") {
            agent {
                docker "our-build-tools-image"
            }
            stages {
               stage("build") {
                   steps {
                       sh "./build.sh"
                   }
               }
               stage("test") {
                   steps {
                       sh "./test.sh"
                   }
               }
            }
            post {
                success {
                    stash name: "artifacts", includes: "artifacts/**/*"
                }
            }
        }

        stage("deploy the artifacts if a user confirms") {
            input {
                message "Should we deploy the project?"
            }
            agent {
                docker "our-deploy-tools-image"
            }
            steps {
                sh "./deploy.sh"
            }
        }
    }
}

These are just a few example of the power of the new sequential stages feature in Declarative 1.3. This new feature adds another set of significant use cases that can be handled smoothly using Declarative Pipeline. In my next post, I’ll show the another highly requested feature - the new ability to restart a Pipeline run from any stage in that Pipeline.

Security Hardening: New API token system in Jenkins 2.129+

$
0
0

About API tokens

Jenkins API tokens are an authentication mechanism that allows a tool (script, application, etc.) to impersonate a user without providing the actual password for use with the Jenkins API or CLI. This is especially useful when your security realm is based on a central directory, like Active Directory or LDAP, and you don’t want to store your password in scripts. Recent versions of Jenkins also make it easier to use the remote API when using API tokens to authenticate, as no CSRF tokens need to be provided even with CSRF protection enabled. API tokens are not meant to — and cannot — replace the regular password for the Jenkins UI.

Previous problems

We addressed two major problems with the existing API token system in Jenkins 2.129:

First, reported in JENKINS-32442, user accounts in Jenkins have an automatically generated API token by default. As these tokens can be used to authenticate as a given user, they increase the attack surface of Jenkins.

The second problem was reported in JENKINS-32776: The tokens were previously stored on disk in an encrypted form. This meant that they could be decrypted by unauthorized users by leveraging another security vulnerability, or obtained, for example, from improperly secured backups, and used to impersonate other users.

New approach

The main objective of this new system is to provide API tokens that are stored in a unidirectional way on the disk, i.e. using a hashing algorithm (in this particular case SHA-256).

While this means that you will not be able to see the actual API tokens anymore after you’ve created them, several features were added to mitigate this potential problem:

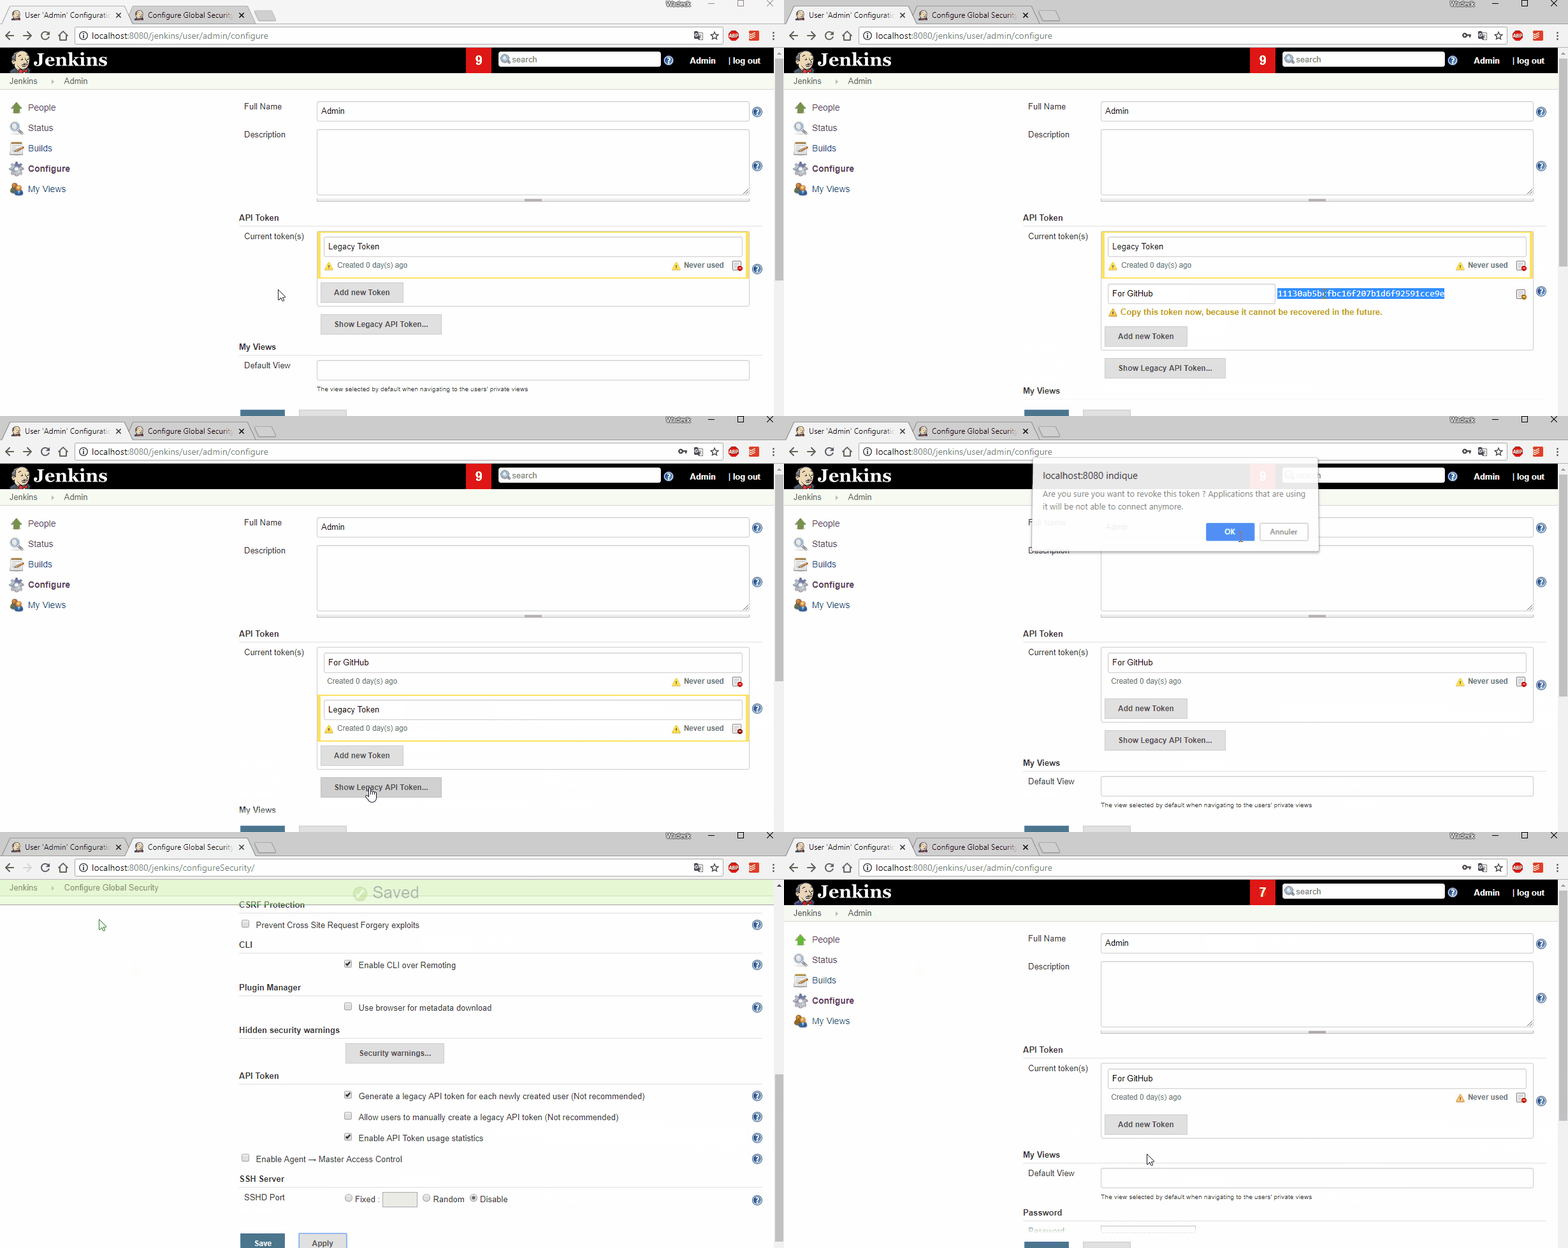
  • You can have multiple active API tokens at the same time. If you don’t remember an API token’s value anymore, just revoke it.

  • You can name your tokens to know where they are used (and rename them after creation if desired). We recommend that tokens use a name that indicates where (for example the application, script, or host) where it will be used.

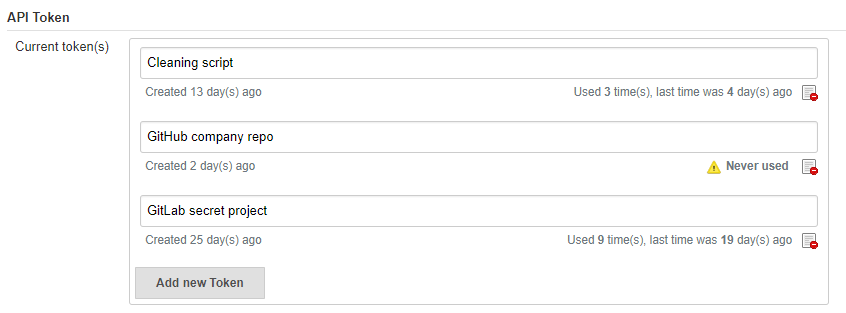
  • You can track the usage of your tokens. Every token keeps a record of the number of uses and the date of the last use. This will allow you to better know which tokens are really used and which are no longer actively required. Jenkins also encourages users to rotate old API tokens by highlighting their creation date in orange after six months, and in red after twelve months. The goal is to remind the user that tokens are more secure when you regenerate them often: The longer a token is around, perhaps passed around in script files and stored on shared drives, the greater the chance it’s going to be accessed by someone not authorized to use it.

token usage
Figure 1. Token usage tracking
  • You can revoke API tokens. When you know that you are not using a given token anymore, you can revoke it to reduce the risk of it getting used by unauthorized users. Since you can have multiple API tokens, this allows fine-grained control over which scripts, hosts, or applications are allowed to use Jenkins as a given user.

Migrating to new API tokens

To help administrators migrate their instances progressively, the legacy behavior is still available, while new system is also usable.

On the user configuration page, the legacy token is highlighted with a warning sign, explaining that users should revoke it and generate a new one (if needed) to increase security.

legacy renewal
Figure 2. Legacy token renewal still possible

New options for administrators

In order to let administrators control the pace of migration to the new API token system, we added two global configuration options in the "Configure Global Security" page in the brand new "API Token" section:

  • An option to disable the creation of legacy API tokens on user creation.

  • An option to disable the recreation of legacy API tokens by users, forcing them to only use the new, unrecoverable API tokens.

Both options are disabled by default for new installations (the safe default), while they’re enabled when Jenkins is upgraded from before 2.129.

security configuration options
Figure 3. Security Configuration options
legacy removal
Figure 4. Remove legacy token and disable the re-creation

New administrator warnings

When upgrading to Jenkins 2.129, an administrative monitor informs admins about the new options described above, and recommend disabling them.

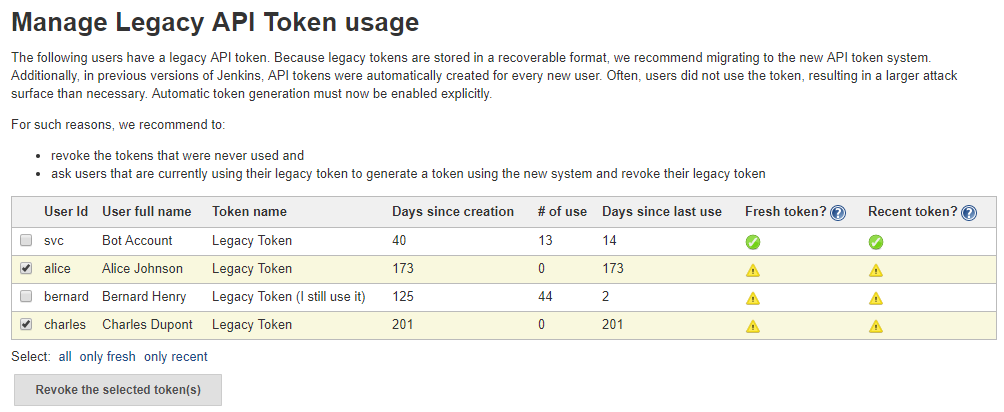
Another administrative warnings shows up if at least one user still has a legacy API token. It provides central control over legacy tokens still configured in the Jenkins instance, and allows revoking them all.

monitor screen
Figure 5. Legacy token monitoring page

Summary

Jenkins API tokens are now much more flexible: They allow and even encourage better security practices. We recommend you revoke legacy API tokens as soon as you can, and only use the newly introduced API tokens.

GSoC Project Update: Alpha release of Remoting Kafka Plugin

$
0
0

I am happy to announce that we have recently released an alpha version of Remoting Kafka Plugin to the Experimental Update Center. You can check the CHANGELOG to see the features included in this initial release.

Overview

Current versions of Jenkins Remoting are based on the TCP protocol. If it fails, the agent connection and the build fails as well. There are also issues with traffic prioritization and multi-agent communications, which impact Jenkins stability and scalability.

Remoting Kafka Plugin is a plugin developed under Jenkins Google Summer of Code 2018. The plugin is developed to add support of a popular message queue/bus technology (Kafka) as a fault-tolerant communication layer in Jenkins. A quick introduction of the project can be found in this introduction blogpost.

How to use the plugin?

The instructions to run the plugin in alpha version are written here. Feel free to have a try and let us know your feedback on Gitter or the mailing list.

Jenkins Essentials flavor for AWS

$
0
0

Jenkins Essentials

Jenkins Essentials is about providing a distribution of Jenkins in less than five minutes and five clicks. One of the main ideas to make this a reality is that Jenkins will be autoconfigured with sane defaults for the environment it is running in.

We are happy to report we recently merged the change that provides this feature for AWS. We use an AWS CloudFormation template to provision a working version of Jenkins Essentials, automatically configured to:

  • dynamically provision EC2 agents, using the EC2 plugin;

  • use the Artifact Manager on S3 plugin, so that artifacts are not stored anymore on the master’s file system, but directly in an S3 bucket.

I recorded a short demo video last week showing the basics of this:

While there are still many items to complete to provide a usable version for end-users, we are making steady progress towards it.


You can learn more about Jenkins Essentials from theGitHub repository, or join us on ourGitter channel.

Jenkins User Conference China Beijing Recap

$
0
0

This is a guest post by Forest Jing, who runs the Shanghai Jenkins Area Meetup

697401A7 21B5 4E10 A931 EBF00064951C

On June 30, 2018 in sunny Beijing, the capital of China, we welcomed over 200 attendees to Jenkins User Conference China (JUCC). This is the first JUCC in Beijing and we are overwhelmed by the interest and love for Jenkins. The conference had sessions in DevOps, Continuous Delivery, Jenkins X, Pipeline, and Container. The GreatOps community, event host, invited John Willis, a thought leader of DevOps to deliver the keynote speech. John’s topic was "DevOps: Almost 10 years - What A Strange Long Trip It’s Been." It was very insightful to learn of the history of DevOps and John’s point of view on the practice.

776B4887 1CA6 45E8 A34A AF2C798844E3

Lily Lin from Micro Focus presented, "How to practice CI/CD for large-scale micro service based on Jenkins Pipeline."

10B1F2C4 5557 4932 9289 263B5ADC3041

James Rawlings, one of the core Jenkins X contributors traveled from the United Kingdom to present, "Jenkins X for the future, Easy CI/CD for Kubernetes."

B43935A0 8146 4E9F 8EBB 1038D9EF14A5

After James’ presentation, there were many questions about Jenkins X, Jenkins users in China are very interested in Jenkins X. We all posed Jenkins "X" gesture.

79DD49AF F548 4AC6 9A47 43E51F1B1661

We also invite Shuwei Hao from Alibaba, Michael Hüttermann who is the author of DevOps for Developers, Xiang Lu from CPI.

92D64F56 2762 4031 B58D 6030BC53C924

Mr Huaqiang Li and Xiaojie Zhao ran a workshop for help attendees master Jenkins Pipeline and Jenkins X in the cloud environment.

EAD67E78 1C86 4A5B 96C6 92431F26240E

Here are additional pictures from our event

53C9990A 4859 423C 929E CC0D15E94CC5
C4526E0F 5CA7 4B7D 8A66 942F3ADDB905

Special THANKS to BC who is the co-organizer of JUCC to host the main track and Alyssa and Maxwell for your help with our event.

Next up, Jenkins User Conference China Shenzhen in November. Let’s Jenkins X and DevOps!


Pipeline as YAML: Alpha release

$
0
0

About me

I am Abhishek Gautam, 3rd year student from Visvesvaraya National Institute of technology, India, Nagpur. I was a member of ACM Chapter and Google student developer club of my college. I am passionate about automation.

Project Summary

This is a GSoC 2018 project.

This project aims to develop a pull request Job Plugin. Users should be able to configure job type using YAML file placed in root directory of the Git repository being the subject of the pull request. The plugin should interact with various platforms like Bitbucket, Github, Gitlab, etc whenever a pull request is created or updated.

Plugin detects the presence of certain types of reports at conventional locations, and publish them automatically. If the reports are not present at their respective conventional location, the location of the report can be configured in the YAML file.

Benefits to the community

  • Project administrators will be able to handle pull request builds more easily.

  • Build specifications for pull requests can be written in a concise declarative format.

  • Build reports will be automatically published to Github, Bitbucket, etc.

  • Build status updates will be sent to git servers automatically.

  • Users will not have to deal with pipeline code.

  • If there will be no merge conflicts or build failures, the PR can be merged into target branch.

Phase 1 blog post

Implementations till now

Alpha version of the plugin is released. It supports all features of Multi-Branch Pipeline and offers the following features.

Build description is defined via YAML file stored within the SCM repo. This plugin will depend on GitHub plugin, Bitbucket plugin, Gitlab plugin if users will be using respective platforms for their repositories.

  1. Conversion of YAML to Declarative Pipeline: A class YamlToPipeline is written which will load the "Jenkinsfile.yaml" and make use of PipelineSnippetGenerator class to generate Declarative pipeline code.

  2. Reporting of results, only xml report types is supported for now.

  3. Use of Yaml file (Jenkinsfile.yaml) from target branch.

  4. Git Push step: To push the changes of pull request to the target branch. This is implemented using git-plugin, PushCommand is used for this from git-plugin. credentialId, branch name and repository url for interacting with Github, Bitbucket, etc will be taken automatically from "Branch-Source" (Users have to fill this details of branch source in job configuration UI). (You can seeHow to run the demo)

  5. StepConfigurator: To generate pipeline code for all supported steps in Jenkins. This is using Jenkins configuration-as-code plugin (JCasC plugin) to configure a particular step object and then that step object is passed to Snippetizer.object2Groovy() method to generate the script of that step.

Jenkinsfile.yaml example

For the phase 1 prototype demonstration, the following yaml file was used. Note that this format is subject to change in the next phases of the project, as we formalise the yaml format definition.

#  Docker image agent exampleagent:label: my_labelcustomWorkspace: path_to_workspacedockerImage: maven:3-alpineargs: -v /tmp:/tmp

  tools:
    maven : maven_3.0.1
    jdk : jdk8configuration:# Push PR changes to the target branch if the build succeeds.# default value is falsepushPrOnSuccess: false# Trusted user to approve pull requestsprApprovers:
    - username1
    - username2
    - username3environment:variables:variable_1: value_1variable_2: value_2# Credentials contains only two fields. credentialId must be present in the Jenkins Credentialscredentials:
    - credentialId : fileCredentialIdvariable : FILE# In user scripts Username and Password can be accessed by LOGIN_USR and LOGIN_PSW# respectively as environment variales
    - credentialId : dummyGitRepovariable : LOGINstages:
  - name: stage1agent: anysteps:
      - sh: "scripts/hello"
      - sleep:
          time: 2
          unit: SECONDS
      - sleep: 2
      - junit:
          testResults: "target/**.xml"
          allowEmptyResults: true
          testDataPublishers:
            - AutomateTestDataPublisher
            - JunitResultPublisher:
                urlOverride: "urlOverride"# Post section for "stage1". All Conditions which are available in Jenkins# declarative pipeline are supportedpost:failure:
        - sh: "scripts/hello"# Outer post section. Just like declarative pipeline.post:always:
    - sh: "scripts/hello"

Coding Phase 2 plans (Completed)

  • Decide a proper YAML format to use for Jenkinsfile.yaml

  • Create Step Configurator for SPRP plugin. JENKINS-51637. This will enable users to use Pipeline steps in Jenkinsfile.yaml.

  • Automatic indentation generation in the generated PipelineSnippetGenerator class.

  • Write tests for the plugin.

Coding Phase 3 plans

  1. Test Multi-Branch Pipeline features support:

    1. Support for webhooks (JENKINS-51941)

    2. Check if trusted people have approved a pull request and start build accordingly (JENKINS-52517)

  2. Finalize documentation (JENKINS-52518)

  3. Release 1.0 (JENKINS-52519)

  4. Plugin overview blog post

Coding Phase 3 plans after release

  1. Support the “when” Declarative Pipeline directive (JENKINS-52520)

  2. Nice2have: Support hierarchical report types (JENKINS-52521)

  3. Add unit tests, JenkinsRule tests, and ATH tests (JENKINS-52495, JENKINS-52496)

  4. Automatic Workspace Cleanup when PR is closed (JENKINS-51897)

  5. Refactor snippet generator to extensions (JENKINS-52491)

Phase 2 evaluation presentation video

Video:

Phase 2 evaluation presentation slides

Security updates for Jenkins core

$
0
0

We just released security updates to Jenkins, versions 2.133 and 2.121.2, that fix multiple security vulnerabilities.

For an overview of what was fixed, see the security advisory. For an overview on the possible impact of these changes on upgrading Jenkins LTS, see our LTS upgrade guide.

Subscribe to the jenkinsci-advisories mailing list to receive important notifications related to Jenkins security.

Accelerate with Jenkins X

$
0
0
Accelerate

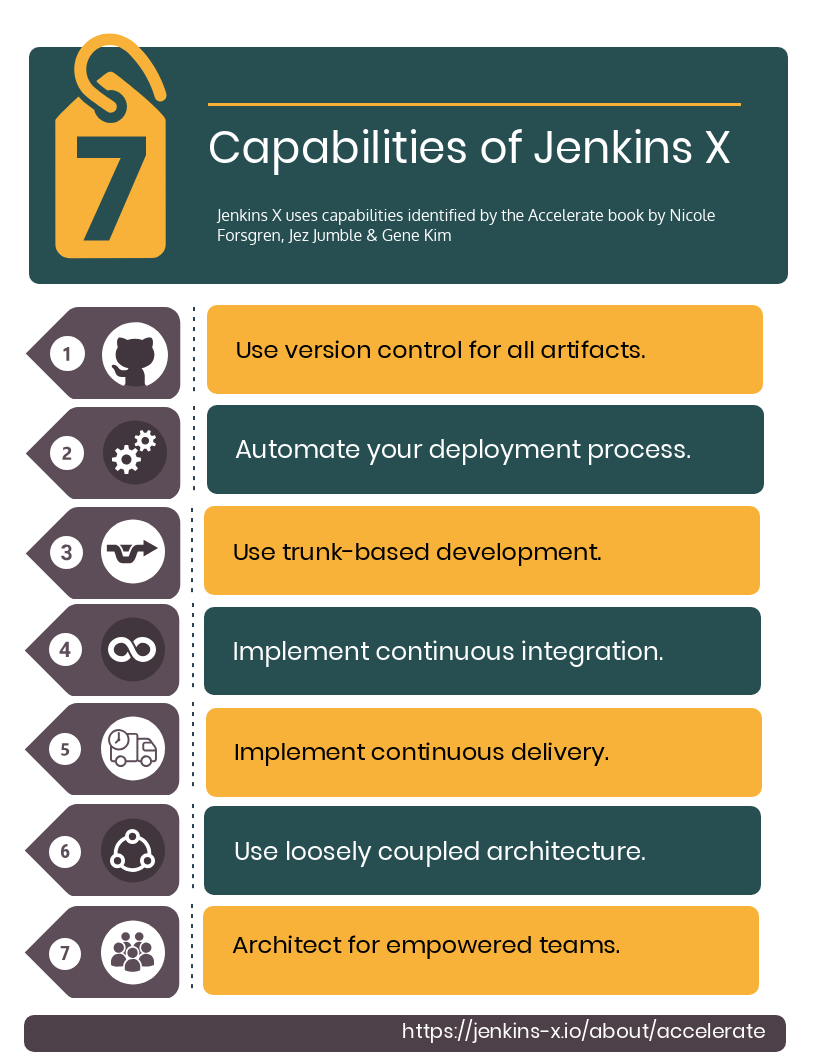
Jenkins X uses Capabilities identified by the "Accelerate: The Science Behind Devops"

Jenkins X is a reimagined CI/CD implementation for the Cloud which is heavily influence by theState of DevOps reports and more recently the book "Accelerate: The Science Behind Devops" byNicole Forsgren,Jez Humble andGene Kim

Years of gathering data from real world teams and organisations which has been analyzed by inspiring thought leaders and data scientists from the DevOps world, "Accelerate" recommends a number of capabilities that Jenkins X is implementing so users gain the scientifically proven benefits, out of the box. We’ve started documenting the capabilities that are available today and will continue as more become available.

Jenkins X Capabilities

Credit: thanks to tracymiranda for the image

Use version control for all artifacts

The Weaveworks folks coined the term GitOps which we love. Any change to an environment, whether it be a new application, version upgrade, resource limit change or simple application configuration should be raised as a Pull Request to Git, have checks run against it like a form of CI for environments and approved by a team that has control over what goes into the related environment. We can now enable governance and have full traceability for any change to an environment.

Related Accelerate capability: Use version control for all production artifacts

Automate your deployment process

Environments

Jenkins X will automatically create Git backed environments during installation and makes it easy to add new ones usingjx create environment. Additionally when creating new applications via a quickstart (jx create quickstart), Java based SpringBoot (jx create spring) or importing existing applications (jx import), Jenkins X will both automatically add CI / CD pipelines and setup the jobs, git repos and webhooks to enable an automated deployment process.

Out of the box Jenkins X creates Staging and Production (this is customisable) permanent environments as well as temporary environments for preview applications from Pull Requests.

Previews Environments

We are trying to move as much testing, security, validation and experimentation for a change before it’s merged to master. With the use of temporary dynamically created Preview Environments any pull request can have a preview version built and deployed, including libraries that feed into a downstream deployable application. This means we can code review, test, collaborate better with all teams that are involved in agreeing that change can go live.

Ultimately Jenkins X wants to provide a way that developers, testers, designers and product managers can be as sure as they can that when a change is merged to master it works as expected. We want to be confident the proposed change does not negatively affect any service or feature as well as deliver the value it is intended to.

Where Preview Environments get really interesting is when we are able to progress a PR through various stages of maturity and confidence where we begin to direct a percentage of real production traffic like beta users to it. We can then analyse the value of the proposed change and possible run multiple automated experiments over time using Hypothesis Driven Development. This helps give us better understanding of how the change will perform when released to all users.

Related Accelerate capability: Foster and enable team experimentation

Using preview environments is a great way to introduce better test automation. While Jenkins X enables this we don’t yet have examples of automated tests being run against a preview environment. A simple test would be to ensure the application starts ok and Kubernetes liveness check pass for an amount of time. This relates to

Related Accelerate capability: Implement Test AutomationRelated Accelerate capability: Automate your deployment process

Permanent Environments

In software development we’re used to working with multiple environments in the lead up to a change being promoted to a live production environment. Whilst this seems business as usual it can cause significant delays to other changes if for any reason that it is deemed not fit via some process that didn’t happen pre merge to master. Subsequent commits then become blocked and can cause delay of urgent changes being promoted to production.

As above Jenkins X wants any changes and experiments to be validated before it is merged to master. We would like changes in a staging environment to be held there for a short amount of time before being promoted, ideally in an automated fashion.

The default Jenkins X pipelines provide deployment automation via environments. These are customisable to suite your own CI / CD pipeline requirements.

Jenkins X recommends Staging should act as a near as possible reflection on production, ideally with real production data shadowed to it using a service mesh to understand the behaviour. This also helps when developing changes in preview where we can link to non production services in staging.

Related Accelerate capability: Automate your deployment process

Use trunk-based development

The Accelerate book found that teams which use trunk based development with short lived branches performed better. This has always worked for the Jenkins X core team members so this was an easy capability for Jenkins X to implement when setting up Git repositories and CI/CD jobs.

Implement Continuous Integration

Jenkins X sees CI as the effort of validating a proposed change via pull requests before it is merged to master. Jenkins X will automatically configure source code repositories, Jenkins and Kubernetes to provide Continuous Integration of the box.

Implement Continuous Delivery

Jenkins X sees CD as the effort of taking that change after it’s been merged to master through to running in a live environment. Jenkins X automates many parts in a release pipeline:

Jenkins X advocates the use of semantic versioning. We use git tags to calculate the next release version which means we don’t need to store the latest release version in the master branch. Where release systems do store the last or next version in Git repos it means CD becomes hard, as a commit in a release pipeline back to master triggers a new release. This results in a recursive release trigger. Using a Git tag helps avoid this situation which Jenkins X completely automates.

Jenkins X will automatically create a released version on every merge to master which can then potentially progress through to production.

Use loosely coupled architecture

By targeting Kubernetes users of Jenkins X can take advantage of many of the cloud features that help design and develop loosely coupled solutions. Service discovery, fault tolerance, scalability, health checks, rolling upgrades, container scheduling and orchestration to name just a few examples of where Kubernetes helps.

Architect for empowered teams

Jenkins X aims to help polyglot application developers. Right now Jenkins X has quickstarts and automated CI/CD setup with language detection for Golang, Java, NodeJS, .Net, React, Angular, Rust, Swift and more to come. What this also does is provide a consistent Way of Working so developers can concentrate on developing.

Jenkins X also provides many addons, for example Grafana and Prometheus for automated metrics collection and visualisation. In this example centralised metrics help understand how your applications behave when built and deployed on Kubernetes.

DevPods are another feature which enables developers to edit source code in their local IDE, behind the scenes it is then synced to the cloud and rapidly built and redeployed.

Jenkins X believes providing developers automation that helps them experiment in the cloud, with different technologies and feedback empowers them to make the best decisions - faster.

Fancy a closer look?

Myself, James Strachan andRob Davies are going to be presenting and running workshops atDevOps World | Jenkins World. We’ll also be hanging out at the Jenkins X demo area so come and say hello and see what’s the latest cool and exiting things to come out of Jenkins X. Use JWFOSS for 30% discount off registration

Want to get involved?

Jenkins X is open source, the community mainly hangs out in theJenkins X Kubernetes slack channels and for tips on being more involved with Jenkins X take a look at our contributing docs. We’ve been helping lots of folks get into open source, learn new technoligies and languages like golang. Why not get involved?

Demo

If you’ve not already seen it here’s a video showing a spring boot quickstart with automatic CI/CD pipelines and preview environments.

DevOps World-Jenkins World 2018 Agenda is Live

$
0
0
devops world 2018

This year the Jenkins project introduced a few exciting efforts: Configuration as Code, Jenkins X, Jenkins Essentials, Blue Ocean and Pipeline. With DevOps World-Jenkins World San Francisco and Nice only a few short months away, we’ve made sure to include plenty of sessions related to these exciting efforts on the agenda. With that said, the agenda for both cities is now live and will include workshops and deep dive sessions on these efforts and much more. Project contributors for these efforts will be present at both conferences as well, come say ‘hello’. Here’s a glimpse of what’s on the agenda:

Workshops

  • Building Continuous Delivery for Microservices with Jenkins X

  • Creating a Deployment Pipeline with Jenkins 2

  • Jenkins Administration Fundamentals

  • Jenkins Pipeline Fundamentals

  • And more

Sessions

See the full agenda for both cities here:

You can plan on this to be highly educational, wildly engaging… overall an excellent space for collaborative conversations with project maintainers, contributors, and active community members.

See you there!

If you need more persuasion, use the code JWFOSS to get 30% discount off your pass.

Remoting Kafka Plugin 1.0: A new method to connect agents

$
0
0

I am very excited to announce that we have recently released 1.0 version of Remoting Kafka Plugin under Jenkins Plugin. You can check the CHANGELOG to see the features included in this release.

About me

My name is Pham Vu Tuan, I am a final year undergraduate student from Singapore. This is the first time I participate in Google Summer of Code and contribute to an open-source organization.

Mentors

I have GSoC mentors who help me in this project Oleg Nenashev and Supun Wanniarachchi. Besides that, I also receive great support from developers in remoting project Devin Nusbaum and Jeff Thompson.

Overview

Current versions of Jenkins Remoting are based on the TCP protocol. If it fails, the agent connection and the build fails as well. There are also issues with traffic prioritization and multi-agent communications, which impact Jenkins stability and scalability.

This project aims to develop a plugin in order to add support of a popular message queue/bus technology (Kafka) as a fault-tolerant communication layer in Jenkins.

Benefits to the community

  • Provide a new method to connect agent to master using Kafka besides existing methods such as JNLP or ssh-slaves-plugin.

  • Help to resolve the existing issues with the TCP protocol between master and agent communication in Jenkins.

  • Help to resolve traffic prioritization and multi-agent communications issue in Jenkins.

Why Kafka?

When planning for this project, we want to use traditional message queue system such as ActiveMQ or RabbitMQ. However, after some discussion, we decided to have a try with Kafka with more suitable features with this project:

  • Kafka itself is not a queue like ActiveMQ or RabbitMQ, it is a distributed, replicated commit log. This helps to remove message delivery complexity we have in traditional queue system.

  • We need to support data streaming as a requirement, and Kafka is good at this aspect, which RabbitMQ is lack of.

  • Kafka is said to have a better scalability and good support from the development community.

Architecture Overview

The project consists of multiple components:

  • Kafka Client Library - new command transport implementation, producer and consumer client logic.

  • Remoting Kafka Plugin - plugin implementation with KafkaGlobalConfiguration, KafkaComputerLauncher and KafkaSecretManager.

  • Remoting Kafka Agent - A custom JAR agent with remoting JAR packaged together with a custom Engine implementation to setup a communication channel with Kafka. The agent is also packaged as a Docker image in DockerHub.

  • All the components are packaged together with Docker Compose.

The below diagram is the overview of the current architecture:remoting kafka architecture

With this design, master is not communicating with agent using direct TCP communication anymore, all the communication commands are transfered with Kafka.

Features

The project is now under the third coding phase and we have some features available in 1.0 release.

1. Kafka Global Configuration with support of credentials plugin to store secrets.

remoting kafka configuration

2. Launch agent with Kafka Launcher.

launch agent kafka

3. Launch agent from CLI using agent JAR with secret provided to ensure security.

agent cli

4. Run jobs, pipeline using Kafka agent.

demo jobs

5. Kafka communication between master and agent.

kafka commands

Remoting operations are being executed over Kafka. In the log you may see:

  • Command execution (SlaveInstallerFactoryImpl.isWindows())

  • Classloading (Classloader.fetch())

  • Log streaming (Pipe.chunk())

How to run demo

We have setup a ready-to-fly demo for this plugin. You can try to run a demo of the plugin by following this instruction. Features in the demo:

  • Docker Compose starts preconfigured Master and agent instance, they connect automatically using Kafka launcher.

  • Kafka is secured and encrypted with SSL.

  • There few demo jobs in the instance so that a user can launch a job on the agent.

  • Kakfa Manager supported in localhost:9000 to support monitoring of Kafka cluster.

Phase 2 Presentation Slides

Phase 2 Presentation Video

Viewing all 1087 articles
Browse latest View live