Quantcast
Channel: Jenkins Blog
Viewing all 1087 articles
Browse latest View live

Performance Improvements to Role Strategy Plugin

$
0
0

The task for my Google Summer of Code program was to improve the performance of the Role Strategy Plugin. The performance issues for Role Strategy Plugin had been reported multiple times on Jenkins JIRA. With a large number of roles and with complex regular expressions, a large slow-down was visible on the Web UI. Even before GSoC started, there were a number of patches which tried to improve performance of the plugin (by Deepansh Nagaria and others).

At the time, there was no way to reliably measure improvements in performance. Therefore, we started by creating aframework for running micro-benchmarks on Jenkins Plugins. Benchmarks using the framework were added to the Role Strategy Plugin find performance critical parts of the plugins and to measure the improvements of a change. This blog post summarizes the changes that were made and performance improvements measured.

Caching matching roles

A couple of major changes were made to the Role Strategy Plugin to improve its performance. First, we started collection of roles that matched a given project name. The Role Strategy plugin before version 2.12 used to run over regular expressions for every role that it had for every permission checking request it got. Storing this produced set of roles in the memory provides us large improvements in performance and avoids repeated matching of project names with regular expressions. For keeping the plugin working securely, we invalidate the cache whenever any update is made to the roles.

After this change, we were able to observe performance improvements of up to 3300%. These improvements were visualized usingJMH Visualizer.
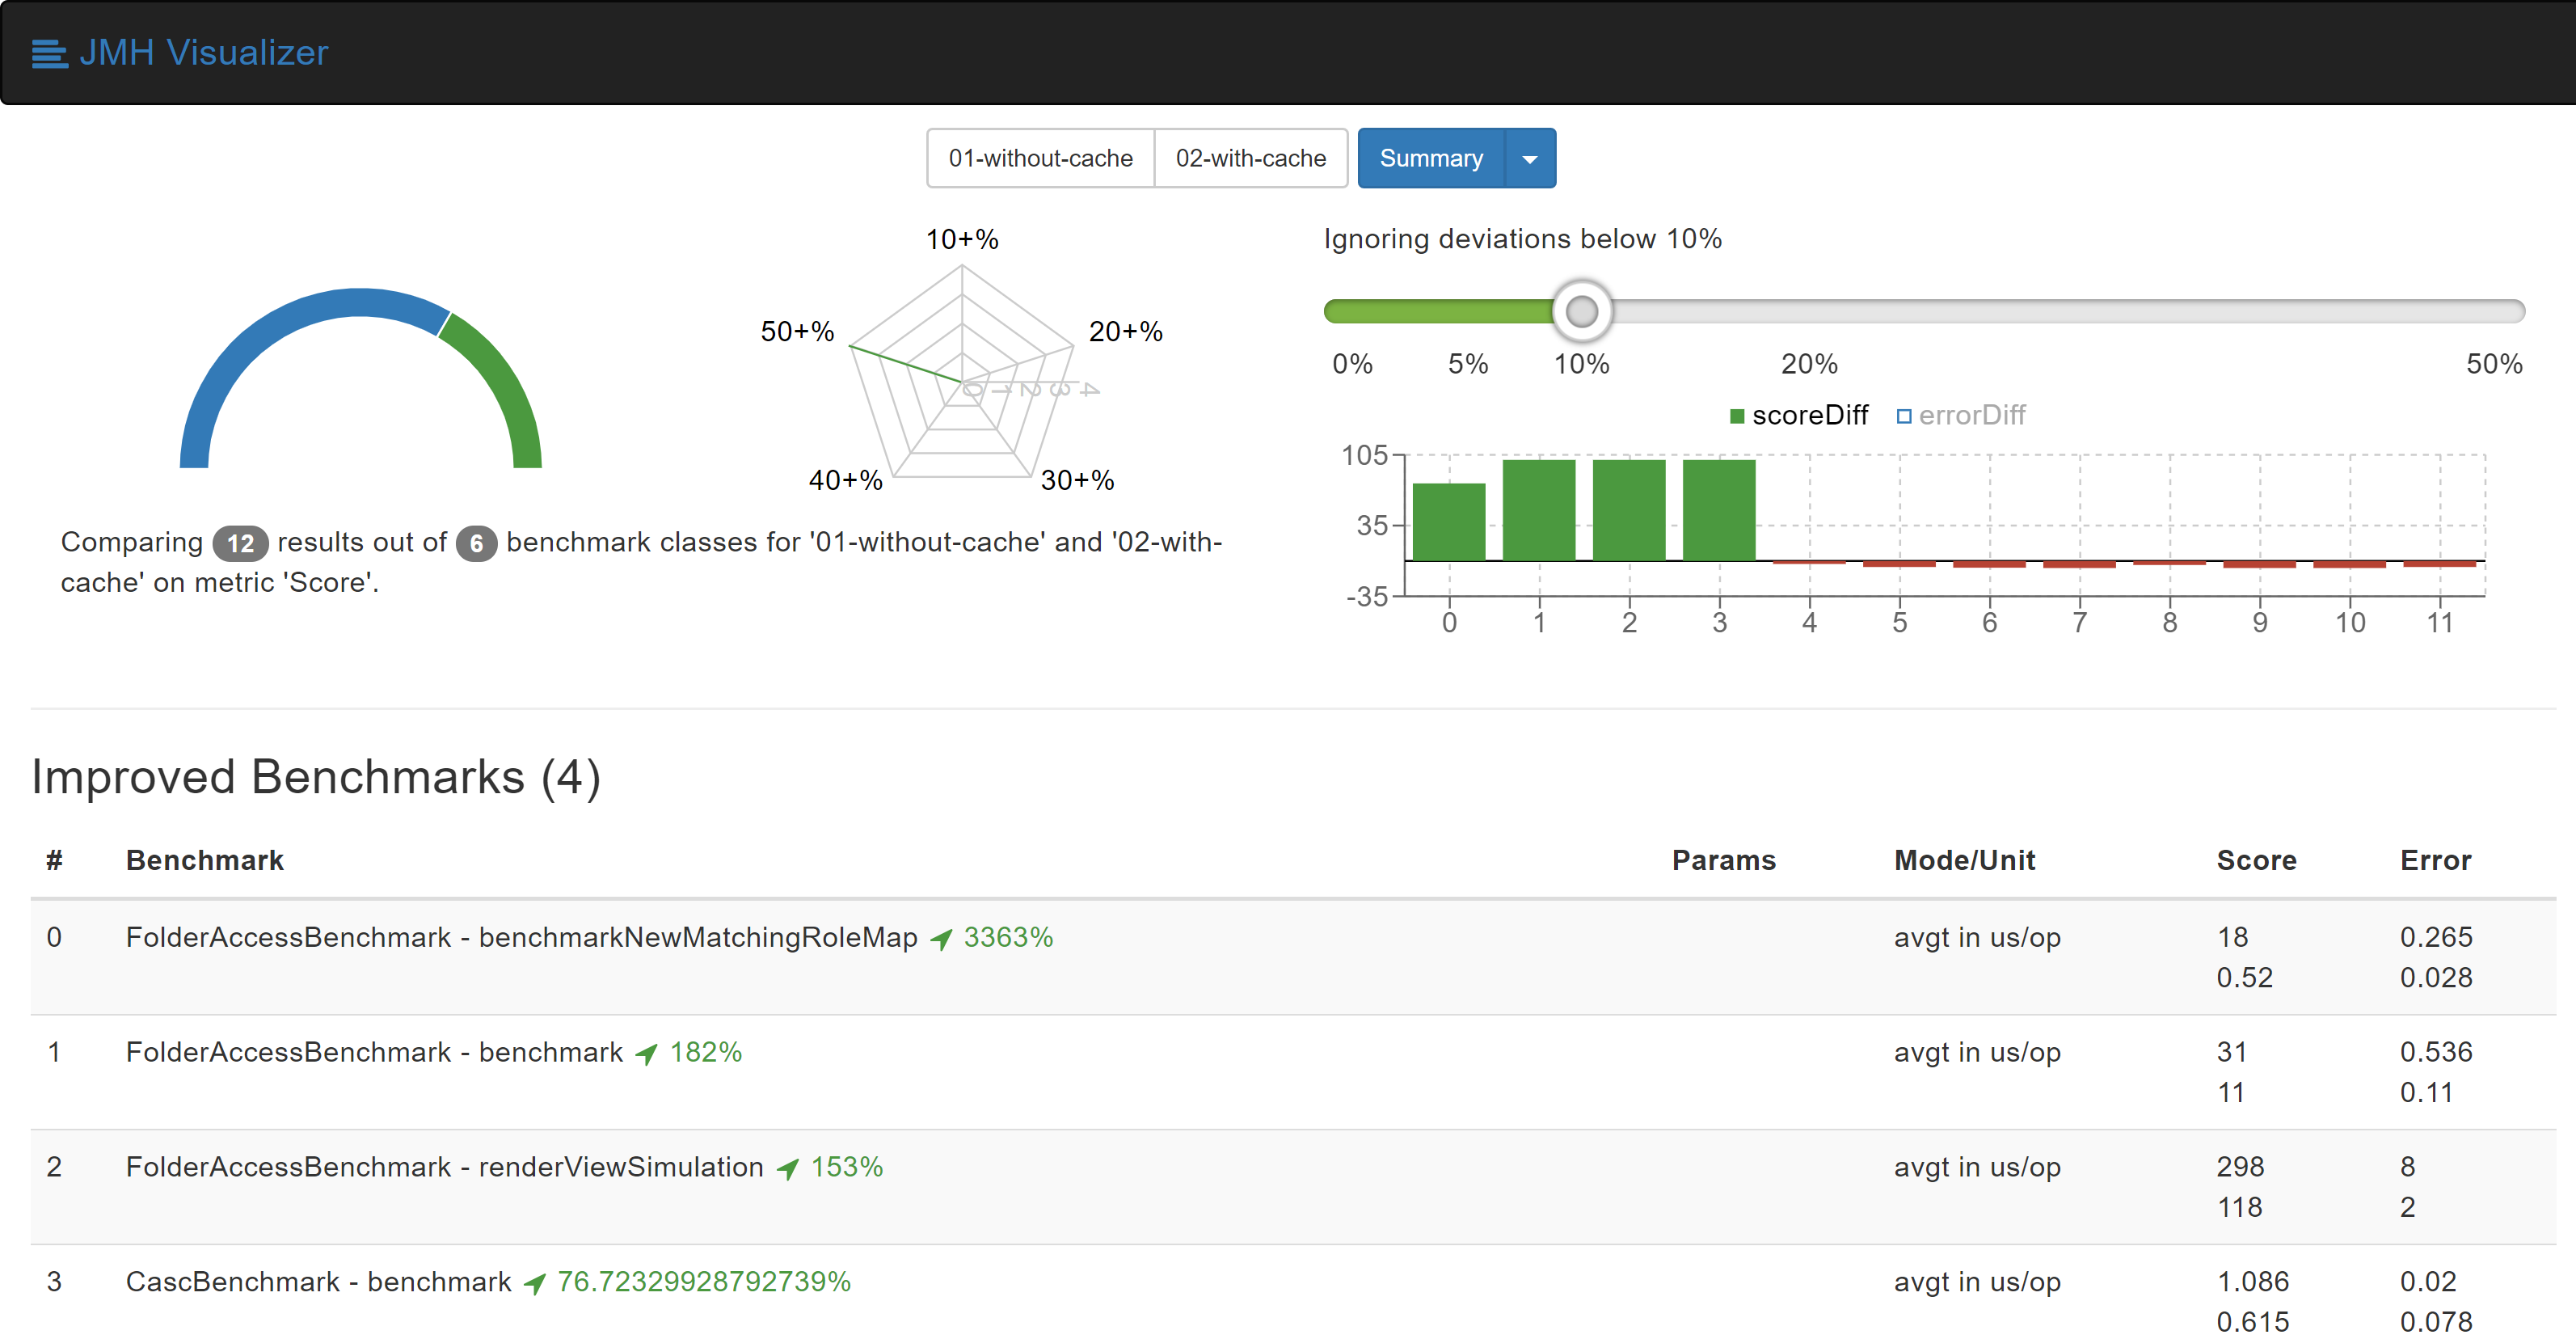
Benchmarks results after caching matching roles

More information is available at pull request on GitHub:https://github.com/jenkinsci/role-strategy-plugin/pull/81

Calculating Implying Permisions when plugin is loaded

Jenkins' permission model allows one permissions to imply other permissions. When a permission check is made, we need to check if the user has any of permissions that would imply this permisison. For every permission checking request that that the Role Strategy, it used to calculate all the implying permissions. To avoid this, we now calculate and store implying permissions for every permission in the Jenkins system when the plugin gets loaded.

After both of these changes, we were able to experience improvements of up to 10000%. The benchmark results show it better:
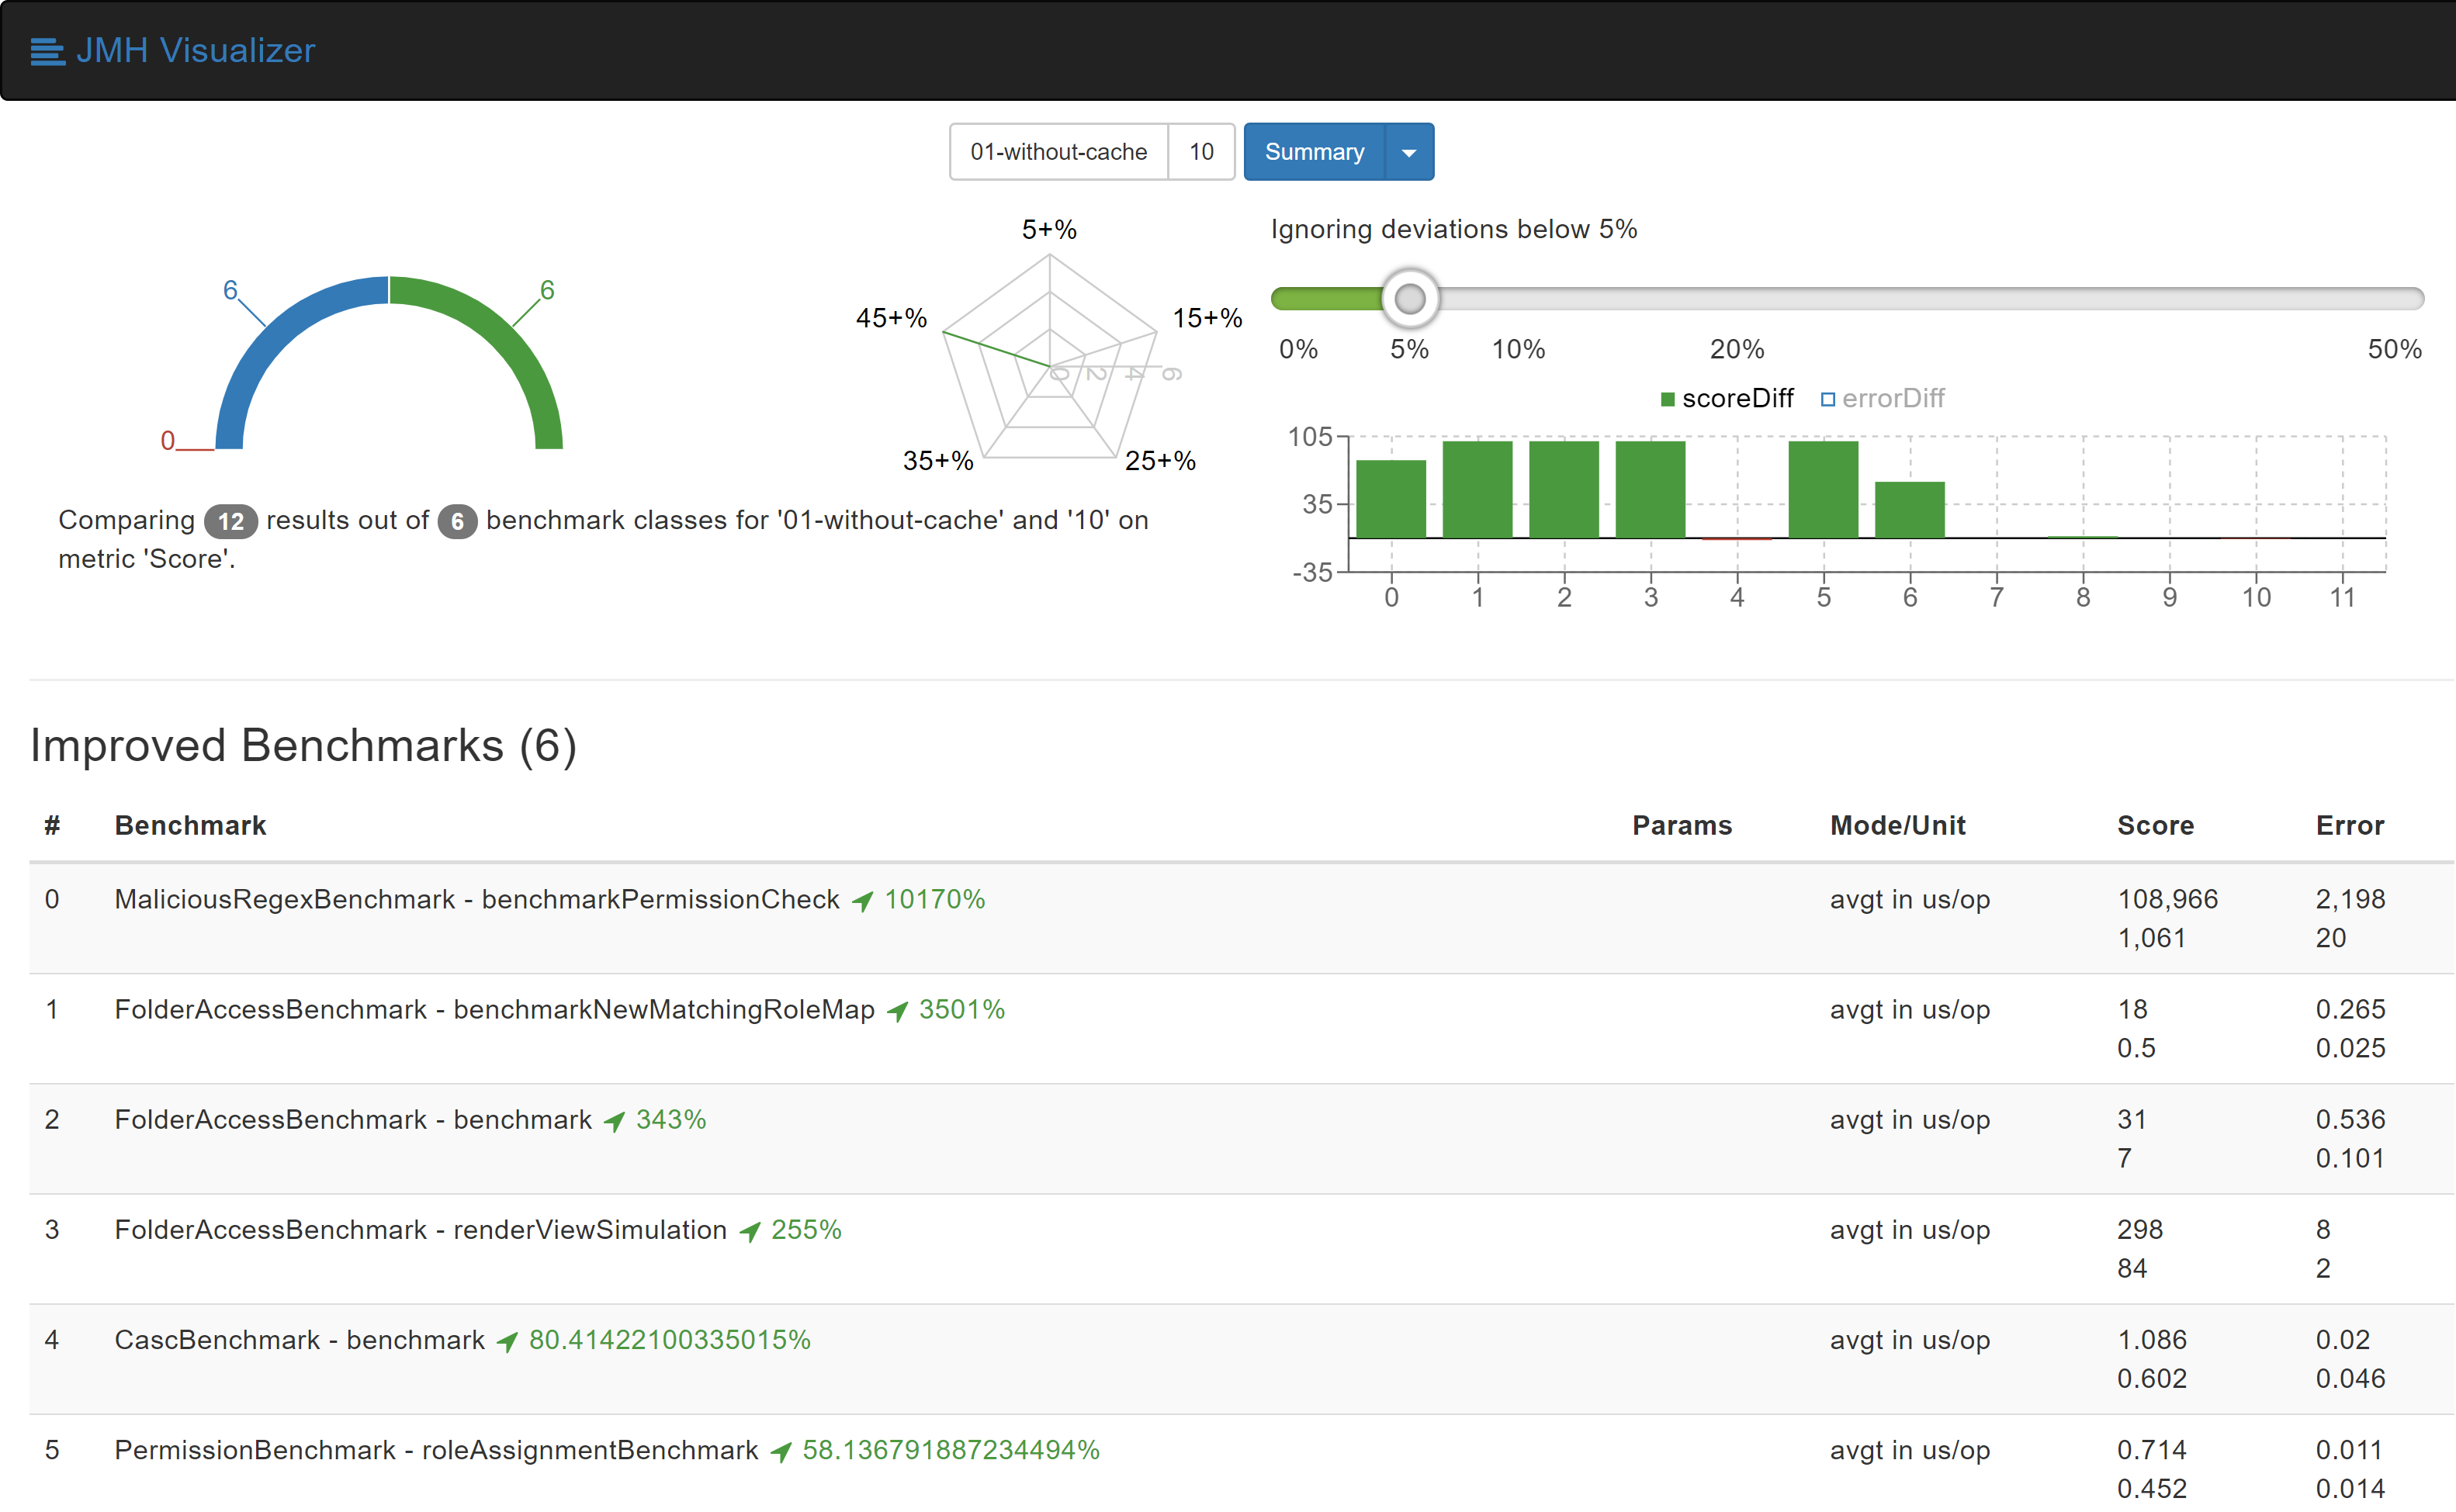
Benchmarks results after both changes

More information about this change can be found at the GitHub pull request:https://github.com/jenkinsci/role-strategy-plugin/pull/83

Both of these changes were integrated into the Role Strategy Plugin and the improvements can be experienced starting with version2.13.

Bonus: Configuration-as-Code export now works for Role Strategy

With Configuration-as-Code plugin version1.24 and above, export of your configuration as YAML now works!
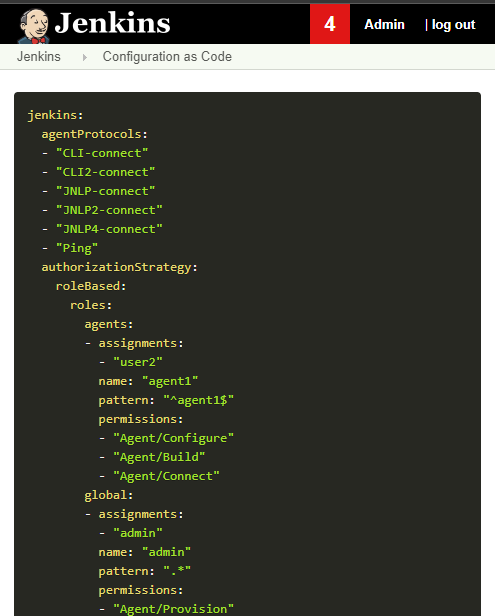
Role Strategy configuration export working with JCasC 1.24

As an alternative to Role Strategy Plugin, I also created the brand new Folder Authorization Plugin. You can check out the blog post for more information about the plugin.

I would love to hear your comments and suggestions. Please feel free to reach out to me through either theRole Strategy Plugin Gitter chat or throughJenkins Developer Mailing list.


Jenkins World Contributor Summit and Ask the Expert booth

$
0
0

Jenkins turns 15 years old! Jenkins World brings together DevOps thought leaders, IT executives, continuous delivery practitioners and the Jenkins community and ecosystem in one global event, providing attendees with the opportunity to learn, explore, network face-to-face and help shape the next evolution of Jenkins development and solutions for DevOps.

There is also the Jenkins Contributor Summit in San Francisco. The Jenkins Contributor Summit is the place where current and future contributors get together to discuss, learn and collaborate on the latest and greatest efforts within Jenkins project. The morning portion of the summit is a mix of presentations by the core contributors. The presentations highlight what each effort is about and what community members can do to help. In the afternoon breakout sessions with Birds of a Feather tables for in-depth discussion, and collaboration with sub-project contributors.

I feel very honored to have been a part of this.

Jenkins World 2019

Day 1

Day one started with the contributor summit. This was a chance for everyone to get together and talk about contributions and put faces to names. Most people I had only met via video chat or on gitter so I was super excited. We gathered to hear about the start of the Jenkins open source landscape.

Contributor Summit Agenda

Next up was the BoF/Unconference. I was leading these sessions and I felt they went really well. We had fellow org admins Martin d’Anjou and Jeff Pearce give a talk about Google Summer of Code projects.

Unconference

Google Summer of Code student Natasha Stopa presented her project, Plugin Installation Manager Library/CLI Tool. This is a super cool project and very well received in the community.

GSOC Student

We closed out the session with a presentation from Steven Terrana from Booz Allen Hamilton and the awesome Jenkins Templating Engine. If you have not had a chance to try this, please make sure you do at https://github.com/boozallen/jenkins-templating-engine.

Community Plugin

Main Expo Hall

Day two and onward saw me and other Jenkins org admins in the Ask the Expert booth for the Jenkins community.

Jenkins World 2019

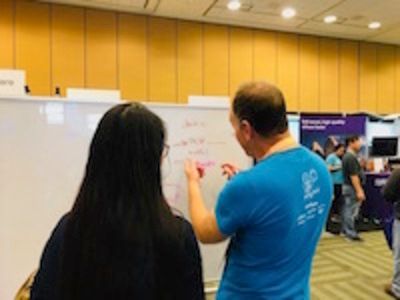
This was a really cool experience and gave me a chance to hear about things the community is working on and help with issues they are facing. There were a range of questions from Jenkins X to many of the plugins I maintain such and the Jenkins Prometheus and the Sysdig Secure Scanning plugins. There were also a lot of Kubernetes questions. There is a lot of marketing data regarding the increased usage of Kubernetes but I was seriously surprised by the massive interest in Jenkins on Kubernetes. Of course there were opportunities for selfie requests.

Community Booth

Lunch time demos got underway and we had a busy schedule. First up was the awesome Mark Waite to talk about theGit plugin. A lot of people use git in Jenkins. Thank you so much for all that you do Mark.

Lunch Time Demo - Mark Waite

Jenkins org admin Martin d’Anjou was next on deck to talk about the Google Summer of Code. So amazing to think that the Google Summer of Code is also in its 15th year like Jenkins!

Lunch Time Demo - Martin d’Anjou

Natasha Stopa is a Google Summer of Code student and she presented her project Plugin Installation Manager Library/CLI Tool. Natasha really put a lot of hard work in to this plugin and it was really awesome to see the turn out and support during her presentation.

Lunch Time Demo - Natasha Stopa

Finally there was me. I presented the Sysdig Secure Scanning Jenkins plugin which I am a maintainer of. I thank everyone who attended

Lunch Time Demo - Marky Jackson

Right after the lunch time demos I also oversaw the Jenkins open space. This was an opportunity for the community to talk about items and let them flow organically. I really enjoyed this session and felt it was also well received.

Jenkins Open Space

We closed out the day and the event with a picture of some of the Jenkins org admins and Google Summer of Code students. Missing from this photos are fellow org admins, Lloyd Chang and Oleg Nenashev

Closing Day

Closing

This was an amazing experience. Huge thanks to CloudBees, the Jenkins community, Google Summer of Code, Tracy Miranda, Alyssa Tong and my employer Sysdig.

To think Jenkins is 15 years old is amazing! There has been so much accomplished and the future is so bright. I am so thankful for the opportunity to serve and be a part of the open source community. Here’s to 15 more years all!

If you are interested in joining any one of the Jenkins open source special interest groups, look here. We can use your help: https://jenkins.io/sigs/

If you are interested in joining the Summer of Code, look here: https://jenkins.io/projects/gsoc/ If you want to chat with us, find us here: https://jenkins.io/chat/ Or if you want to email us, reach out at: https://jenkins.io/mailing-lists/

Some photos outtakes:

Outtakes
Outtakes
Outtakes
Outtakes

Managing Jenkins with jcli

$
0
0

As a developer, I usually use Jenkins like this:

  • Find a job which is related with my current work

  • Trigger that job

  • Check the output of the build log

Sometimes, I might need to check the update center. Maybe a new plugin is needed, or I need to update an existing plugin. Or, I want to upload a plugin from my computer. For all these cases, I just don’t need a UI or even a browser. I like to use a CLI to complete most of my tasks. For example, I use kubectl to manage my Kubernetes cluster, to create or modify the kubernetes resources. So, I start to think, 'Why not use a CLI to manage my Jenkins?'.

Why create a new one?

First, I almost forgot about the existing Jenkins CLI, written in Java. Let me introduce how to use that one.

Visit Jenkins page from http://localhost:8080/jenkins/cli/. You’ll see a command like java -jar jenkins-cli.jar -s http://localhost:8080/jenkins/ help. So, a jar file needs to be download. We can use this command to complete this task wget http://localhost:8080/jenkins/jnlpJars/jenkins-cli.jar.

Now you can see that this is not a Linux-style CLI. Please consider some points below:

  • The users must have a JRE. This is not convenient for developers who don’t use Java.

  • The CLI is too wordy. We always need to type java -jar jenkins-cli.jar -s http://localhost:8080/jenkins/ as the initial command.

  • Cannot install it by some popular package manager, like brew or yum.

Of course, the Java CLI client is more native with Jenkins. But I’d like to use this more easily. So I decided to create a new CLI tool which would be written in Go and which would natively run on modern platforms.

That’s the story of creating jcli.

Features

  • Easy to maintain config file for jcli

  • Multiple Jenkins support

  • Plugins management (list, search, install, upload)

  • Job management (search, build, log)

  • Open your Jenkins with a browser

  • Restart your Jenkins

  • Connection with proxy support

How to get it?

You can clone jcli from the jenkins-cli repo. For now, we support these three most popular OS platforms: MacOS, Linux, and Windows.

MacOS

You can use brew to install jcli.

brew tap jenkins-zh/jcli
brew install jcli

Linux

It’s very simple to install jcli into your Linux OS. Just need to execute a command line at below:

curl -L https://github.com/jenkins-zh/jenkins-cli/releases/latest/download/jcli-linux-amd64.tar.gz|tar xzv
sudo mv jcli /usr/local/bin/

Windows

You can find the latest version by clicking here. Then download the tar file, cp the uncompressed jcli directory into your system path.

How to get started?

It’s very simple to use this. Once you get jcli on your computer, use this command to generate a sample configuration:

$ jcli config generate
current: yourServer
jenkins_servers:
- name: yourServer
  url: http://localhost:8080/jenkins
  username: admin
  token: 111e3a2f0231198855dceaff96f20540a9
  proxy: ""
  proxyAuth: ""
# Goto 'http://localhost:8080/jenkins/me/configure', then you can generate your token.

In most cases, you should modify three fields which are url, username and token. OK, I believe you’re ready. Please check whether you install the github plugin in your Jenkins:

jcli plugin list --filter name=github

That’s the end. It’s still in very early development stage. Any contribution is welcome.

Introduce React Plugin Template

$
0
0

The template’s main repo is at React Plugin Template

This template is part of the project Working Hours UI Improvement duringGoogle Summer of Code 2019, which improved the UI of Working Hours Plugin using this pattern to develop Jenkins plugins with React. The Working Hours Plugin repository can be found at Working Hours Plugin.

Overview

Developing plugin for Jenkins has always been easy to do with its Jelly based UI render system, but Jelly seems to be pretty heavy when we want to use more modernized frameworks like React, or if we need to make the plugin UI more customized. This is what this template is built for.

And with React integrated, development of Jenkins plugin is more modernized, developer can now use tons of React libraries, the way to use libraries is now tinier and safer with webpack, in short, coding with Jenkins plugin can be much easier.

Features

FeatureSummary

React Integrated

React is integrated, you can take full control of the UI

Using Iframe

Using iframe can create a new javascript env, we can get rid of some side effects of some polyfills which was added globally.(such as Prototype.js)

Maven Lifecycle

npm commands are integrated into Maven lifecycle with help of Frontend Maven Plugin

Webpack

Webpack helps us reduce the size of the bundle, also avoids pollution on the global namespace.

Jenkins Crumb attached

Crumb is attached to Axios client, now you can send requests in the way you used to do in React.

Express as devserver

You can run your react app in a standalone page so you can develop in webpack hot reload mode, also with webpack proxy, the standalone app is still accessible to the jenkins dev server.

Axios as http client

Axios hugely simplify the way to make requests.

Screenshots

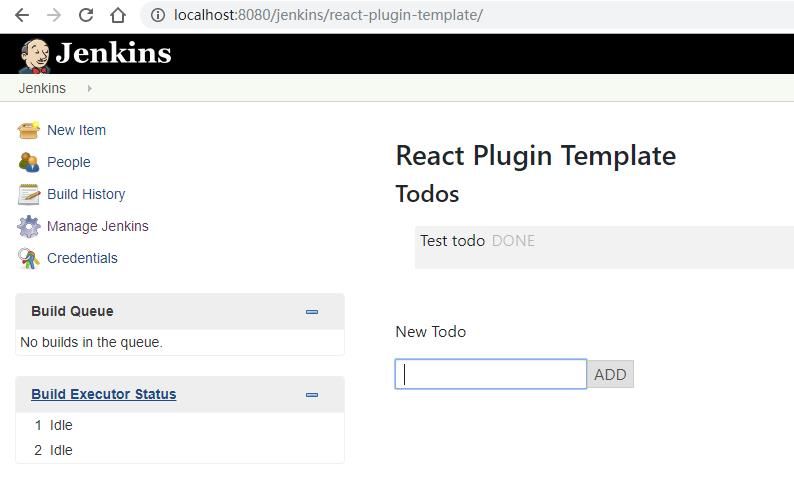
Example Plugin UI

plugin ui Management Link

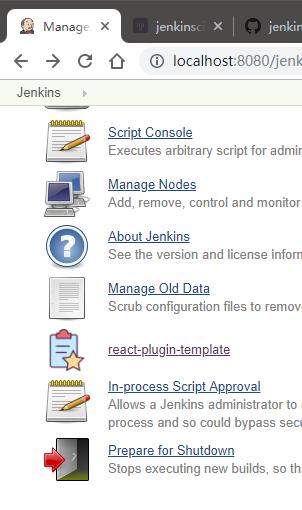
management link

Getting Started

Clone the repo:

git clone https://github.com/jenkinsci/react-plugin-template.git
cd react-plugin-template

Install the Maven dependencies and node modules.

mvn install -DskipTests

Run standalone React app with hot reload

npm run start

Run plugin

mvn hpi:run -Dskip.npm -f pom.xml

Send HTTP requests

As Crumb Issuer is default enabled in Jenkins and each ajax request is required to contain a Jenkins Crumb in request header, so be sure to use the axiosInstance which is already set up with Jenkins Crumb and exported at src/main/react/app/api.js.

export const apiGetData = () => {return axiosInstance.post("/data");
};

Or if you want to use your own http client, remember to add the Jenkins Crumb to your request’s header, the Crumb’s key and content could be found at src/main/react/app/utils/urlConfig.js, then you can set the header like below.

const headers = {};
const crumbHeaderName = UrlConfig.getCrumbHeaderName();if (crumbHeaderName) {
  headers[crumbHeaderName] = UrlConfig.getCrumbToken();
}

Write your own request handler

Now you can customize your request pattern as you want, also we need to write a handler.

Jenkins is using stapler to preprocess the requests, so if you need a request handler. For example and also in this template, you can use an Action class to create a sub-url, and then a StaplerProxy to proxy the request like a router. More info about a handler can be found here Stapler Reference.

Example handler

ManagementLink would get the request and then hand it off to the PluginUI

@ExtensionpublicclassPluginManagementLinkextends ManagementLink implements StaplerProxy {

    PluginUI webapp;

    publicObject getTarget() {return webapp;
    }publicString getUrlName() {return"react-plugin-template";
    }
}

PluginUI, stapler would then find methods in the target class, in this case, it finds doDynamic, then we can choose the next handler by return the methods result, in this case, getTodos or setTodos, and PluginUI just function like a url router.

publicclassPluginUI{public HttpResponse doDynamic(StaplerRequest request) {
        ...

        List<String> params = getRequestParams(request);switch (params.get(0)) {case"get-todos":return getTodos();case"set-todos":return setTodos(request);
        }
        ...
    }
}

Data Persistence

You can save your data with a descriptor

@ExtensionpublicclassPluginConfigextendsDescriptor<PluginConfig> implements Describable<PluginConfig>

And after each time you change data, call save() to persist them.

publicvoid setTodos(@CheckForNullList<Todo> value) {this.todos = value;
        save();
    }

And in your handler, you can get the config class by calling

config = ExtensionList.lookup(PluginConfig.class).get(0);

Customize your plugin

Be sure to modify all the occurrence of react-template

  • At org/jenkinsci/plugins/reactplugintemplate/PluginUI/index.jelly , change the iframe’s id and its source url.

  • At src/main/react/app/utils/urlConfig.js change

  • At src/main/react/server/config.js , change the proxy route.

  • At src/main/react/package.json , change the start script’s BASE_URL

  • At pom.xml , change the artifactId

  • At org/jenkinsci/plugins/reactplugintemplate/PluginManagementLink.java , change names.

Also use the same value to modify the occurrence in src\main\react\app\utils\urlConfig.js.

Customize a page for your plugin

A management Link is recommended, which would get your plugin a standalone page, along with a entry button in the /manage system manage page.

management link

How does this template work?

This template is putting a webpack project inside a Maven project, and this template is just chaining the build result by copy the webpack output to the plugin’s webapp folder to make it accessible from the iframe, then Jelly render the iframe and the client gets the Plugin UI.

Why iframe?

Over time, Jenkins has added a lot of various javascript libraries to every regular page, which now causes problems for using modern Javascript tooling and as such, we decided to inline the new react based pages in their own sandbox which prevents collisions with other libraries, and maybe the iframe is a good sandbox case.

Introducing the Jira Software plugin for Jenkins

$
0
0
This is a guest post by Rafal Myslek from Atlassian.

According to a recent survey we conducted, software & IT teams on average use 4+ tools to move code from development to customer-facing production. As a result, teams struggle with keeping the status of work updated and understanding the overall health of their delivery pipeline.

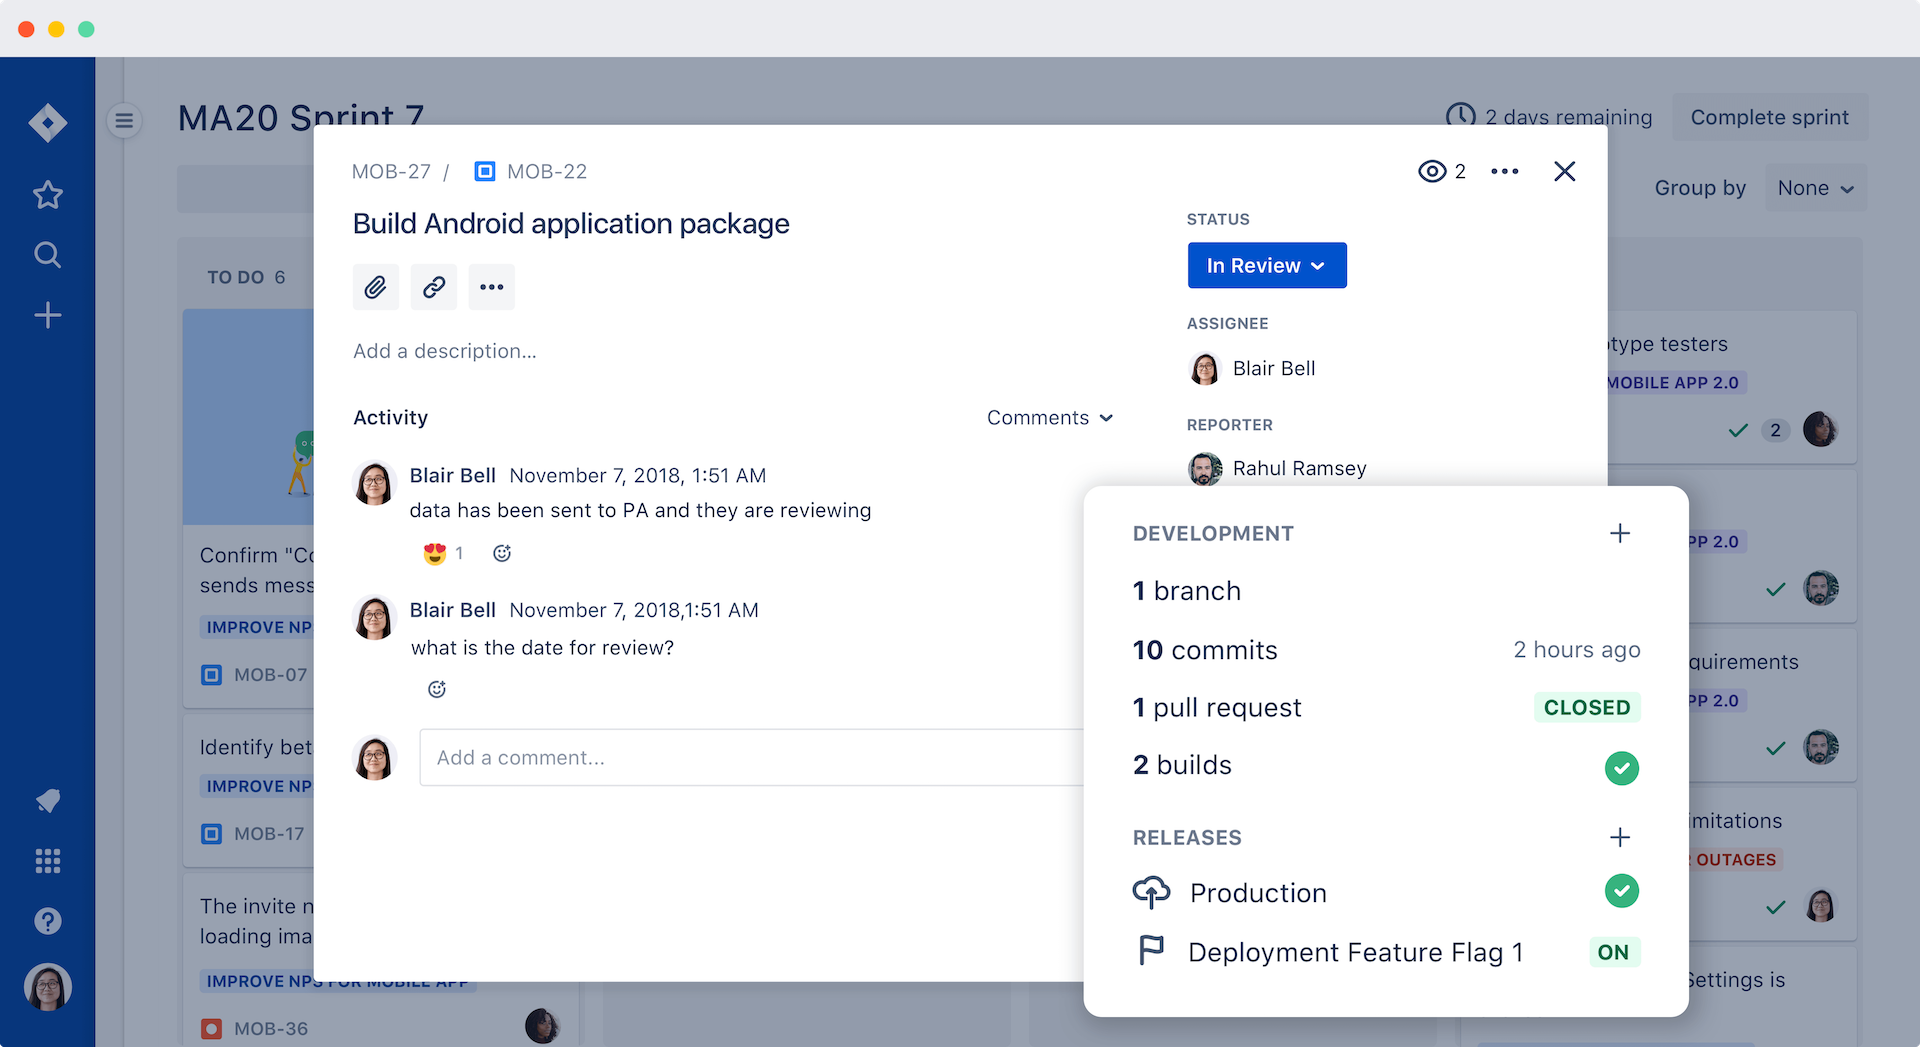
To solve this problem, I am excited to announce that we built an official Jenkins plugin for Jira Software Cloud. The plugin automatically associates build and deployment information from Jenkins with relevant Jira issues and exposes key information about your pipeline across Jira issues, boards and via JQL. This means you can use Jira Software to automatically update and track issues through your complete development pipeline, from backlog to release.

I hope this plugin adds value to you and your team. If you are interested in contributing or forking this plug-in you can head over to our project on the Jenkins GitHub repo to get started.

Better collaboration between teams

Use Jenkins build information in Jira Software to create a workflow between QA and developers and create a rapid feedback loop for testing at any point in your development process.

This new information view is so powerful because historically it was dispersed across multiple tools only accessible to a few members of your team. Now anyone involved in the software delivery process can self-serve this information. For example, product managers, QA, and support teams can view which features have been deployed to customers and which are still waiting in staging environments.

With better information sharing between tools in your delivery stack, you can also improve cross-collaboration between teams. Teams such as QA and operations can collaborate in the software teams next sprint. For example, you can use build information in Jira Software to create a workflow between QA and developers and create a rapid feedback loop for testing at any point in your development process.

Use Jira’s Querying Language for advanced views

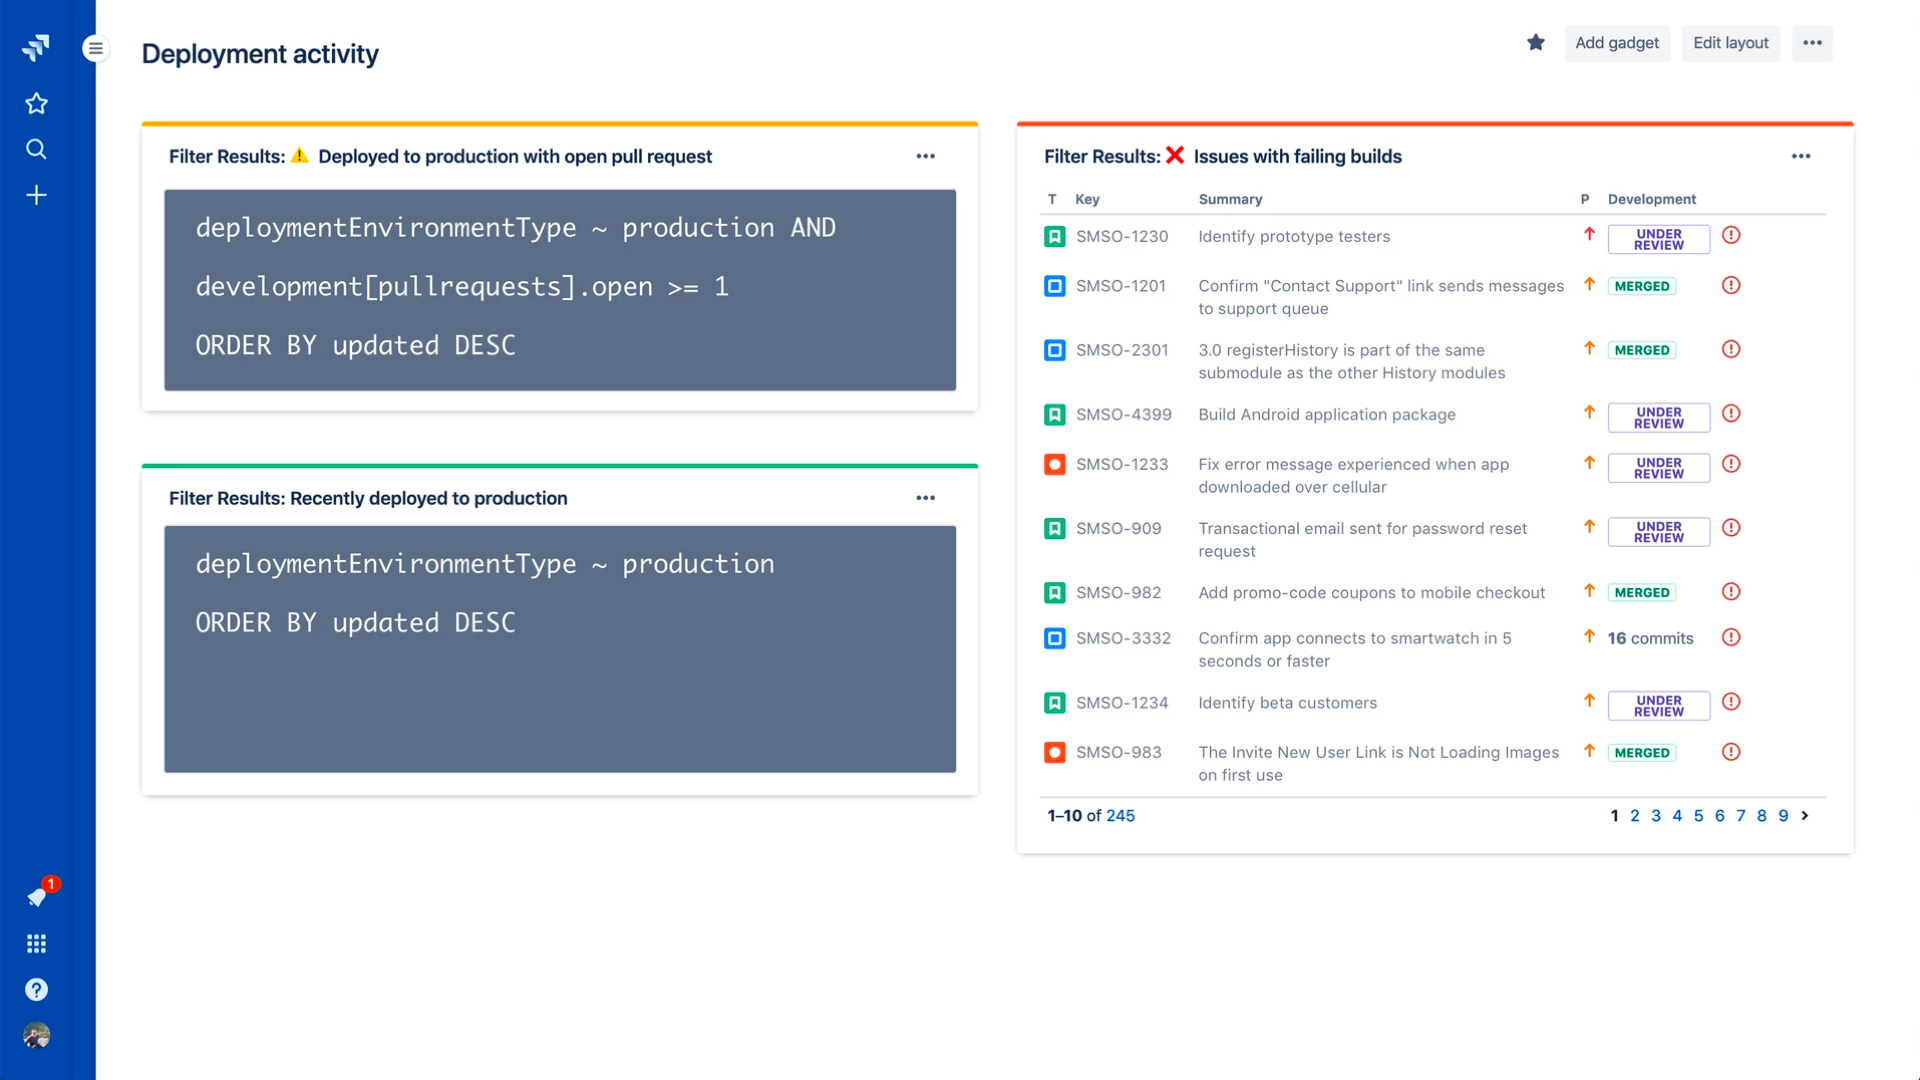
Build powerful views into your development pipeline with support for JQL.

In addition to building better ways to collaborate, these integrations also give your team deeper insight into the development pipeline from within Jira Software. You can now create powerful views into your delivery pipeline with JQL queries across multiple connected tools. For example, you can write a custom JQL query to report all Jira issues that have been deployed to production but still have an open PR.

deploymentEnvironmentType ~ “production“ AND development[pullrequests].open

Get started

In Jira Software Cloud

Create OAuth credentials in Jira for Jenkins

  1. Navigate to Jira home > Jira settings > Apps.

  2. Select OAuth credentials.

  3. Select Create credentials.

  4. Enter the following details:

In Jenkins

Install the Jenkins plugin

  1. Login to your Jenkins server and navigate to the Plugin Manager.

  2. Select the 'Available' tab and search for 'Atlassian Jira Software Cloud' as the plugin name then install it.

Set up Jenkins credentials

  1. In Jenkins, go to Manage Jenkins > Configure System screen and scroll to the Jira Software Cloud integration section.

  2. Select Add Jira Cloud Site > Jira Cloud Site. The Site name, ClientID, and Secret fields display.

  3. Enter the following details:

    • Site name: The URL for your Jira Cloud site, for example yourcompany.atlassian.net.

    • Client ID: Copy from OAuth credentials screen (Client ID column).

    • Secret: Select Add > Jenkins.

      • For Kind, select Secret text.

      • For Secret, copy from OAuth credentials screen (Secret column).

      • For Description, provide a helpful description

  4. Select Test settings to make sure your credentials are valid for your Jira site.

How to use the plugin

To start using the integration:

  1. Go into a specific pipeline in Jenkins ( Note: Your pipeline must be a 'Multibranch Pipeline' ).

  2. From the left-hand menu, select Pipeline Syntax.

  3. In the Snippet Generator, select jiraSendDeploymentInfo or jiraSendBuildInfo from the dropdown list of Sample Steps and fill in the relevant details.

  4. Select Generate Pipeline Script and copy/paste the output into your Jenkinsfile on the relevant Repository you are using. This will be used to notify Jira when you run that pipeline on that repo.

For sending build information

This is an example snippet of a very simple ‘build’ stage set up in a Jenkinsfile. After the pipeline is run, it will post the build information to your Jira Cloud site by looking at the branch name. If there is a Jira issue key (e.g. “TEST-123”) in the branch name, it will send the data over to Jira.

Jenkinsfile example

pipeline {
     agent any
     stages {
         stage('Build') {
             steps {
                 echo 'Building...'
             }
             post {
                 always {
                     jiraSendBuildInfo site: 'example.atlassian.net'
                 }
             }
         }
     }
 }

For sending deployment information

This is an example snippet of two stages that run on any change to the staging or master branch. Again, we use a post step to send deployment data to Jira and the relevant issues. Here, the environmentId, environmentName, and environmentType need to be set to whatever you want to appear in Jira.

Jenkinsfile example

pipeline {
     agent any
     stages {
         stage('Deploy - Staging') {
             when {
                 branch 'master'
             }
             steps {
                 echo 'Deploying to Staging from master...'
             }
             post {
                 always {
                     jiraSendDeploymentInfo site: 'example.atlassian.net', environmentId: 'us-stg-1', environmentName: 'us-stg-1', environmentType: 'staging'
                 }
             }
         }
         stage('Deploy - Production') {
            when {
                branch 'master'
            }
            steps {
                echo 'Deploying to Production from master...'
            }
            post {
                always {
                    jiraSendDeploymentInfo site: 'example.atlassian.net', environmentId: 'us-prod-1', environmentName: 'us-prod-1', environmentType: 'production'
                }
            }
         }
     }
 }

The entire Jenkinsfile may look something like this. This is only meant to represent an example of what the Jira snippets could look like within a stage or step.

Jenkinsfile example

pipeline {
     agent any
     stages {
         stage('Build') {
             steps {
                 echo 'Building...'
             }
             post {
                 always {
                     jiraSendBuildInfo site: 'example.atlassian.net'
                 }
             }
         }
         stage('Deploy - Staging') {
             when {
                 branch 'master'
             }
             steps {
                 echo 'Deploying to Staging from master...'
             }
             post {
                 always {
                     jiraSendDeploymentInfo site: 'example.atlassian.net', environmentId: 'us-stg-1', environmentName: 'us-stg-1', environmentType: 'staging'
                 }
             }
         }
         stage('Deploy - Production') {
            when {
                branch 'master'
            }
            steps {
                echo 'Deploying to Production from master...'
            }
            post {
                always {
                    jiraSendDeploymentInfo site: 'example.atlassian.net', environmentId: 'us-prod-1', environmentName: 'us-prod-1', environmentType: 'production'
                }
            }
         }
     }
 }

Questions or feedback?

If you have any questions, please contact Atlassian support and they will route it to the correct team to help you.

Audit Log Plugin for Jenkins Releases 1.0

$
0
0

Thanks to our Outreachy interns over the past year, I’m proud to announce the initial release of the Audit Log plugin for Jenkins. This plugin is the first major project completed related to Outreachy, and I’d like to give a brief overview of the functionality that was developed for this release. The primary goal of this plugin is to introduce an audit trail of various Jenkins events using structured logging and related audit logging standards. Initially, this plugin covers audit events related to core Jenkins concepts like user accounts, jobs, builds, nodes, and credentials usage. More specifically, this tracks:

  • User login and logout events

  • Credentials usage

  • User creation (when using the Jenkins user database as a security realm)

  • User password updates (ditto)

  • Starts and ends of builds

  • Creation/modification/deletion/copying of items (which correspond to projects, pipelines, folders, etc.)

  • Creation/modification/deletion of nodes.

This plugin defines and exports standardized log event classes and schemas corresponding to these events. Other plugins can add audit-log as a dependency to define their own audit events using Apache Log4j Audit and its catalog editor; then they can use the Maven plugin for generating the audit event classes for use in the plugin.

The other major feature of this plugin is configuring where to output these audit logs. By default, audit logs will be written in HTML files (rotated once per day) to $JENKINS_HOME/logs/html/audit.html which are viewable through the "Audit Logs" root action link. In the system settings, a section for audit logging is added where the main audit log output can be configured. This can initially be configured to output via either a JSON log file in $JENKINS_HOME/logs/audit.log by default or to a syslog server using RFC5424 encoding.

Overall, this experience has been rather interesting. Besides having an opportunity to mentor new contributors, Outreachy has helped open my eyes to the struggles that developers from around the world are dealing with which can be improved upon to help expand our communities. For example, many countries do not have reliable internet or electricity, so the use of synchronous videoconferencing and other heavyweight, synchronous processes common to more corporate-style development are inadequate in this international context. This doesn’t even begin to account for the difference in timezones which is not always an issue, though both problems are addressable by using asynchronous communication methods like chat and email. This notion of asynchronous communication is an important aspect of the Apache Way, for example, which emphasises processes that allow for vendor neutral communities to form and thrive around a project.

This mentoring project was valuable to myself as well. As a software engineer myself, project management is not my specialty, so this gave me a great opportunity to develop my own PM skills and technical leadership. My own typical discovery process for feature development involves experimenting directly with the code to see what features make sense to prioritize and which would take a vast effort to implement. Changing my own discovery process to avoid implementing the features myself was difficult to adjust to, though I did defer any of my own feature contributions to this plugin until after the initial release. In order to appropriately scope the project, I still had to spend a bit of time reading through the Jenkins codebase to determine which tasks could be implemented simply (e.g., good newbie-friendly issues), which tasks might require changes to Jenkins itself (previously discovered to take too long for these relatively short Outreachy rounds), and which tasks would require intimate familiarity with Jenkins and would likely be infeasible for new developers to Jenkins. Thanks to the work done in discovery and delivery, I’ve also identified potential features for Log4j itself which could be used in future versions of this plugin.

Overall, I think we did a good job of balancing the scope of this project without spending too much time in any specific area. The first release of this plugin is now available in the Jenkins Update Center. In the future, I hope to learn more about developing Jenkins UI components so that we can create a more dynamic and Jenkins-like configuration page for choosing where logs are output. While I don’t intend on using this plugin for further Outreachy rounds, I do hope to see more interest in it over time as the more security-conscious users out there discover this new plugin.

2019 Jenkins Board and Officer elections. Nominations are open!

$
0
0
This is a repost of the original announcement made by Kohsuke Kawaguchi in the Jenkins Developer mailing list. Minor changes were applied to reflect the posting date and to provide more links.

Nominations for the 2019 Jenkins Board elections open for three governing board positions and five officer positions, namely: Security, Events, Release, Infrastructure and Documentation.

The terms of office for these positions are:

  • Officer positions (1 year): November 4, 2019 to November 3, 2020

  • Governing board members (2 years): November 4, 2019 to November 3, 2021

To nominate someone, simply send an email to jenkinsci-board@googlegroups.com with their name and position you nominate them for. Please share any information on why you are making the nomination. Self nominations are also welcome.

The board positions and officer roles are an essential part of Jenkins' community governance and well-being. I highly encourage everyone to consider participating.

Key dates

  • Oct 04, 2019: Nominations close

  • Oct 08, 2019: List of nominees posted to mailing list

  • Oct 11, 2019: Nominees’ personal statements made available

  • Oct 14, 2019: Voting begins

  • Oct 27, 2019: Voting closes at 5pm Pacific Time

  • Nov 04, 2019: New representatives announced

Hacktoberfest 2019. Contribute to Jenkins!

$
0
0

Once again, Hacktoberfest is back! During this October event, everyone can support open-source by contributing changes, and can earn limited edition swag. We invite you to contribute to Jenkins, regardless of your experience and background. You can write code, improve documentation and design, localize Jenkins or create new artwork. Any GitHub pull request counts!

Quick start

  1. Sign-up to Hacktoberfest on the event website.

  2. Join our Gitter channel.

  3. Everything is set, just start creating pull-requests!

    • This year Hacktoberfest does not require labeling pull requests, but please mention Hacktoberfest in your pull requests for faster reviews (see FAQ: Marking Pull requests)

See the details below.

Hacktoberfest

How to contribute?

There are many ways tocontribute to Jenkins. It is not just about code, any pull request in GitHub counts towards the Hacktoberfest goal.

  • Code - Contribute to the code or automated tests. We have components written in Java, JavasScript, Groovy, Go, Ruby and other languages.

  • Write - Improve documentation, write blogposts, create tutorials or solution pages

  • Localize - Help us to Localize Jenkins to other languages

  • Design - artwork and UI improvements also count!

  • Organize - Organize a local meetup for Jenkins & Hacktoberfest (see our event kit)

  • Spread the word - Share your accomplishments in social media using the #hacktoberfest and #jenkinsci hashtags (or CC @jenkinsci in Twitter).

Where to contribute?

The Jenkins project is spread across multiple organizations on GitHub (jenkinsci, jenkins-infra, jenkins-zh). You are welcome to contribute to any repository in any of these organizations, or to any other Jenkins-related repository on GitHub. If you adopt Jenkins in your own open-source projects (e.g. Jenkins Pipeline or Configuration as Code), it counts as well!

If you are a newcomer contributor, we have prepared a list of featured projects/components where you will get a warm welcome. All these projects have newbie-friendly tasks, contributing guidelines, and active maintainers who have committed to assist contributors and to quickly review pull requests. The list of featured projects will be updated during the event, and we will make sure to create more newbie-friendly tasks if needed.

If you wonder about Jenkins X, it also part of Hacktoberfest this year! They offer various topics, including hacking Jenkins X or improving its documentation. See this blogpost for the announcement and links.

How to get help?

If you are stuck or have any question, see our Hacktoberfest FAQ page for the common questions. If it does not help, please reach out to us in our Gitter chat.

Any meetups this year?

There are many events being organized by open-source communities. You can join one of these events. We invite to join the Jenkins Online Meetups on Oct 03 (APAC/EMEA - 7AM UTC,EMEA/Americas - 2PM UTC).

There will be also area meetups in Munich, Beijing, St. Petersburg and other cities. You can find the full list here.


Google Summer of Code Mentor and Org Admin Perspective

$
0
0

I was fortunate enough to participate in the Google Summer of Code 2019 as a mentor and org admin. This was great and I wanted to share in hopes of encouraging more people to join. You can learn more about the Google Summer of Code here: https://jenkins.io/projects/gsoc/

Community Bonding

The first phase of the project is the community bonding phase. This is where the student and other mentors come together to lay out the plan for the project. It is important to set expectations and ensure that the student is well aware of what will take place and also made to feel welcome.

Parichay Barpanda was the student and he was super awesome from the get go. The project he was working on was the Gitlab Branch Source Plugin. More can be found here: jenkinsci/gitlab-branch-source-plugin

From the mentor side it was myself and Justin Harringa. Justin was just amazing throughout this project and I seriously could not have done this without him. He was encouraging, empathetic and just all around great. I would gladly serve with him again.

We laid out our plan and guidance and got to work.

First Evaluations

The first evaluation was quickly upon us and Parichay was ready! The work he put in was nothing shy of amazing. We did our 1st demo and he really rocked it. A video of that demo can be found on : Youtube

Second Evaluations

There was not much time to rest before we realized that phase II end was upon us but Parichay was ready. Again, he nailed it.

That demo can be found here

Mentors Submit Final Evaluations

We had our final evaluation and at this point Parichay was seasoned. He was getting issues assigned to him, working on little bug fixes and setting his roadmap for features. He absolutely blew Justin and I away.

Parichay’s final evaluation demo can be seen here

At the conclusion of the final demo’s, Justin and I met and went over Parichay’s final evaluation. At this point we had met twice a week for several months, we have reviewed code daily, we had community involvement and most of all we had seen Parichay grow into a seasoned software developer.

Justin and I were without a doubt passing Parichay on his entire body of work. I am actually tearing up typing this because I am so proud of Parichay.

Org Admin

Being an org admin for the 2019 Google Summer of Code project for the Jenkins organization was truly rewarding and couldn’t have been accomplished without the help from Oleg Nenashev, Martin d’Anjou, Jeff Pearce and Lloyd Chang.

As an org admin we handled issues with mentors, community members and disagreements involving work. These items were only a few and as a team we handled them accordingly.

We regularly met to discuss and plan. Coordinating and dealing with a project like Google Summer of Code is no small feat but this team made it super easy and I am so thankful for them and all that I learned.

Closing

In looking back at this experience I am so grateful for the opportunity I was given. This was such a rewarding experience to not only be able to mentor but also be an org admin. Not only will I be back next year (we are already in the planning stages) but I highly encourage people reading this to consider joining. You will not be disappointed.

I am so thankful for all the students, mentors and fellow org admins. Your dedication to open source is so valued. You showed and continue to show what this project is all about, and that is being welcoming, open and transparent. Helping people grow as individuals while learning skills is what I love about this community.

Thank you to everyone and I hope your futures are bright!

JCasC Community Bridge Dev Tools - Phase 1

$
0
0

Community Bridge Introduction

Community Bridge is an initiative by the Linux Foundation to accelerate the adoption, innovation and sustainability of open source projects. I came across this initiative in a blog post. I had been contributing to Jenkins at the time and decided to have a chat with Oleg Nenashev and Tracy Miranda regarding the possibility of a project under the Community Bridge initiative. Fortunately for me JCasC ( Jenkins Configuration as Code) had the mentors as well as the project idea in place to start a project. After a few regular meetings we ironed out the details of the programme and on August 7th I began with my journey!
JCasC Developer Tools — JSON Schema

JSON files when submitted to a server undergo a validation to determine whether the values and the format are correct and that they conform to a well defined schema, this schema is known as a JSON Schema. A YAML file can also be validated using a JSON Schema. The main premise of JCasC is to load YAML files written by developers into the Jenkins instance. An example of a JCasC YAML file is:

---jenkins:systemMessage: “Hello World”numExecutors:2---

The above YAML configuration will configure Jenkins to display a message Hello world with the number of executors set to two. In order to validate the YAML we have a schema. This schema is written using jelly files (Executable XML files) and currently it is not a valid schema. The first phase of the project is based around rewriting the schema generation to java and developing a better test framework for it, because currently the schema is not testable.

Phase 1 — JCasC Dev Tools

The first week I got into studying how the schema was generated.With the support of two of my awesome mentors Tim Jacomb and Joseph Peterson I finally got an understanding of the current schema. So JCasC has a set of configurators for describing a YAML file. They are: a) Base Configurators b) Hetero Describable Configurators c) Data Bound Configurators These configurators together successfully describe a YAML file. We proceeded to generate the schema with the help of individual description of each of these configurators. The JSON Schema has a set of components, consider the above yaml file as an example:

---
{"jenkins": {"type": "object","properties": {"systemMessage": {"type": "string"
      },"numExecutors": {"type": "integer"
      }
    }
  }
}---

So here Jenkins is the base configurator and it has a set of attributes viz systemMessage and numExecutors, so our schema needs to be able to describe a set of attributes for every field in the schema. Some of the fields that our JSON Schema uses to describe the YAML are:

1) type : String, int, Boolean etc.

2) properties : A set of fields describing the part field.

3) id: Unique Identifier for the field Thus the above schema successfully verifies the YAML configuration.

JAVA Rewrite

We used JSON Objects to build components of the schema.The basic flow that is followed to generate the schema is as follows:

a) Iterate through the Base Configurators.

b) Iterate over the list of Base Configurator.Attributes and add each attribute to the schema.

c) Iterate over the HeteroDescribable Configurators and add each configurator to the schema along with its required properties.

The set of PR’s Resolved during Phase 1 are as follows:

That is all from me guys, I am currently preparing for phase 2 and working towards fixing any pending issues of Phase 1. Thanks for reading.

Phase 2 Goals:

We would primarily target VSCode integration in phase 2 with the aim of:

a)Validation of JCasC YAML files with the schema

b)Autocompletion

c)Integration with a live Jenkins instance.

Contributions

We would love to get feedback from you on the stuff we are working on. Contributions to the project would be highly appreciated.

Plugin Documentation-as-Code: Moving docs to GitHub

$
0
0

In September 2019 we announced support of GitHub as a source of documentation for the Jenkins Plugin Site. Thanks to Zbynek Konecny and Olivier Vernin and other contributors, now it is possible to store plugin documentation right inside plugin repositories instead of Jenkins Wiki which was historically difficult to maintain for plugin maintainers and for the Jenkins infrastructure team.

This blogpost may be interesting to plugin maintainers and to those who want to contribute to the Jenkins documentation. I will describe how to migrate plugin documentation to GitHub and to get pages like this one:

GitHub Documentation example

Why?

By using plugin GitHub repositories for documentation, plugin maintainers can follow the Documentation-as-code approach and make documentation changes a part of the pull requests so that documentation follow-ups do not get forgotten. It also gives an opportunity to review the documentation changes and to add documentation contributor recognition, especially if the story is combined with Release Drafter.

Unfortunately, before September 2019 usage of GitHub documentation was causing some issues. First of all, many plugin maintainers have already moved their documentation to GitHub, and it caused fragmentation of the documentation (Wiki, GitHub, jenkins.io). To address it, plugin maintainers still had to maintain stub Wiki pages with redirects, and users had to spend some time to find out where the real documentation is located. By supporting GitHub as a documentation source, we allow maintainers to phase out the plugin Wiki pages while improving the user experience.

And there are even more pressing reasons to do the migration now…​ If you are subscribed to the developer mailing list, you may have also seen an announcement by R. Tyler Croy about Jenkins Wiki stability issues and making it read-only as a temporary measure to stabilize the instance (mailing list thread). Although the functionality has been partially restored afterwards, there is a consensus in the Infrastructure team that we should gradually move to alternate solutions.

Examples

Since the announcement in September, more than 50 plugins were moved from Wiki to GitHub. Few examples:

Role Strategy example

How to enable GitHub documentation for your plugin?

  1. Convert documentation from Wiki to GitHub Asciidoc or Markdown format if you have not done it yet.

    • It can be done in a semi-automatic way, see the guidelineshere.

  2. Change the <url> field in pom.xml so that it points to GitHub (guide). Examples of valid links:

  3. Optional: Add badges to the page to improve look&feel and to provide quick links for users. There are standard badges for changelogs, chats, plugin site, and installation numbers.

  4. Release the new plugin version

  5. Wait a few hours till the change propagates. After that, the Jenkins Plugin Site will show the new documentation from GitHub.

What’s next?

The story is tracked as WEBSITE-406 which is a part of the wider subproject for using GitHub as a source of data for the Jenkins plugin site and update managers (WEBSITE-637). Later steps include support showing changelogs from GitHub releases, pulling plugin tags from GitHub, showing plugin logos, and using Repository Permission Updater as a source of the maintainer information.

How to contribute?

October is a great time to contribute! Plugin documentation is one of the featured projects for Hacktoberfest, and we will welcome all contributions to the documentation and to the codebase.

Contributing to Documentation

We are looking for contributors who are interested to improve plugin documentation and to help us with migration from Wiki to GitHub. For dozens of plugins the documentation is already in GitHub, and you are welcome to submit pull requests against any repository.

Migrating documentation:

If you have any questions about contributing to the documentation, please see this page or reach out to us in the Docs SIG Gitter chat.

Code contributions

Would you like to write some code in Java or JavaScript? Or would you like to work on CSS styles and improve Jenkins design? In such case you are welcome to contribute to the Jenkins Plugin Site. It is our own plugin marketplace implementation, and we invite contributions to this area. The plugin site is really easy to develop.

Thinking About Jenkins Security - DevOps World | Jenkins World 2019

$
0
0
This is a speaker blogpost for a DevOps World | Jenkins World 2019 talk in Lisbon, Portugal

Come join us at DevOps World | Jenkins World 2019 for "Thinking about Jenkins Security", a talk about securing your Jenkins server. We’ll review the layers that secure Jenkins and describe techniques that you can use to protect your Jenkins server.

Topics will include:

  • The secure by default configuration that Jenkins provides

  • Risks associated with reducing default security settings

  • Authentication and authorization alternatives

  • Using "least privilege" principles

  • Jenkins credentials and trusted access to resources

  • Software updates and Jenkins project security notices

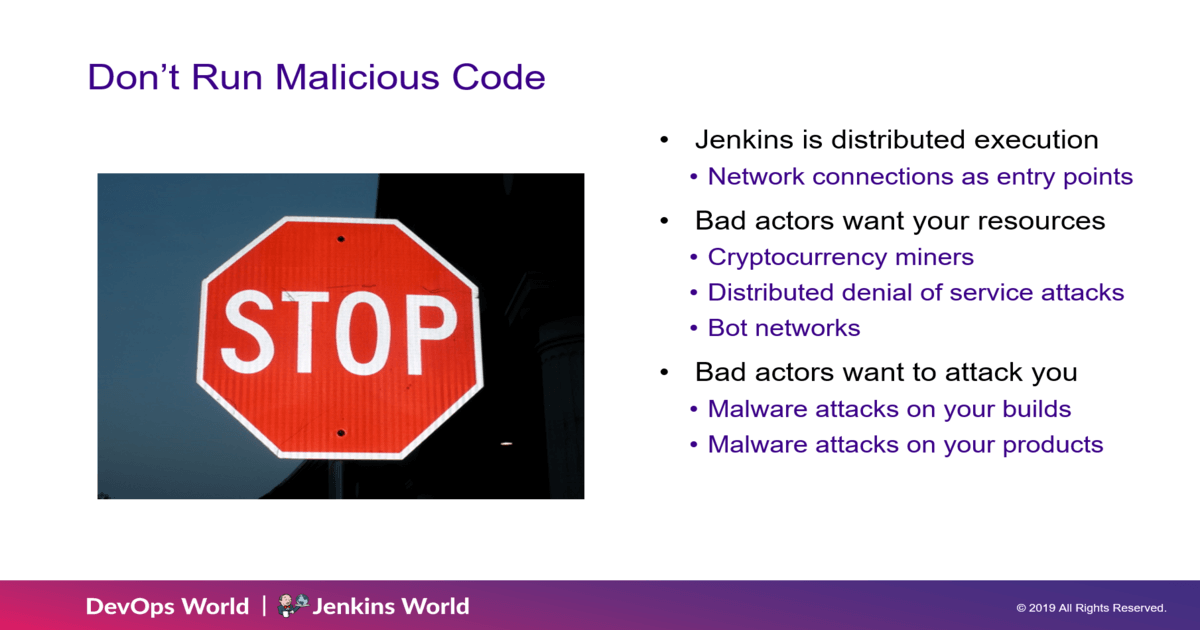
do not run malicious code

We’ll intermix descriptions of good practices with some security horror stories. The horror stories remind us of our mistakes; we will discuss how to detect them and how to prevent them.

Come join us for the presentation in Lisbon!

Slides

Jenkins Performance: Avoiding Pitfalls, Diagnosing Issues, and Scaling for Growth - DevOps World | Jenkins World 2019

$
0
0
This is a speaker blogpost for a DevOps World | Jenkins World 2019 talk in Lisbon, Portugal

With Halloween upon us, there’s no better time to discuss Jenkinstein! Are you suffering from Jenkins performance issues? Are users complaining about a slow UI or even scarier, is Jenkins going down frequently?

Jenkinstein

Come join me at DevOps World | Jenkins World 2019 for "Jenkins Performance: Avoiding Pitfalls, Diagnosing Issues, and Scaling for Growth", a talk about JVM administration and best practices from the front lines of supporting thousands of Jenkins installations worldwide. During this talk we’ll cover how to prevent your Jenkins instance from becoming a Jenkinstein!

Topics we will be discussing:

  • JVM administration best practices

  • Horizontal scaling

  • Analyzing thread dumps, GC logs, and heap dumps

  • Real world data showing 3500% performance increases

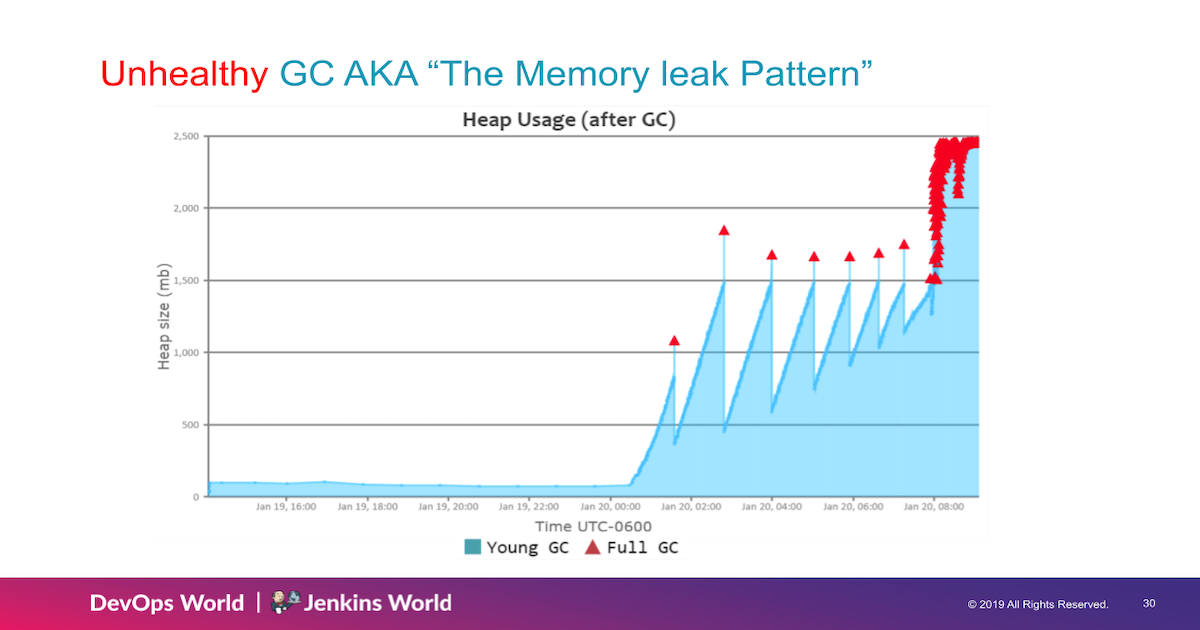
  • Garbage collection

gc unhealthy

We’ll be discussing how you can forecast for growth, and baseline using key performance indicators like application throughput and latency, by analyzing spooky data like Garbage Collection logs!

Come join me for the presentation in Lisbon! There will be candy!

Slides

DevOps World | Jenkins World San Francisco in Living Colors

$
0
0

DevOps World | Jenkins World San Francisco was August 12 - 15, 2019. The event was delivered in vivid colors starting with flowing banners hung from street lamp posts to the big screens in breakout rooms, to the expo hall. The energy and enthusiasm in the Moscone convention center made the colors even more vibrant, thanks to the people attending the conference.

Here’s a recap of the conference in pictures:

DevOps World | Jenkins World 2019 - San Francisco

1D5 2235

Keynote - Evolution of the Continuous Delivery Foundation

Tracy Miranda opened the keynote explaining the evolution of the Continuous Delivery Foundation.

Keynote - Evolution of the Continuous Delivery Foundation

1D5 0437

Influencers, Creators, and Members

The influencers, creators, and members of the CD Foundation: Tracy Miranda (far left), Andy Glover (Netflix), Tara Hernandez (Google), Chris Aniszczyk (Linux Foundation), Dave Stanke (Google), Kohsuke Kawaguchi (Jenkins creator), Jayne Groll (DevOps Institute), James Strachan (Jenkins X creator). “We want to help set Jenkins up for success, into the next decade”, Tyler Croy (not in picture).

Influencers, Creators, and Members of the Continuous Delivery Foundation

1D5 1310

Contributor Summit

The inaugural Continuous Delivery Foundation Contributor Summit and it was a full house!

Continous Delivery Foudnation Contributor Summit

IMG 8264

15 Years of Jenkins

A remarkable milestone for the Jenkins project, a celebration of Jenkins turning 15…​cake included!

Fifteen Years of Jenkins

1D5 0614

Bee Diverse Luncheon

Interactive and engaging luncheon celebrating diversity

Bee Diverse Luncheon Entrance

1D5 5576

Bee Diverse Luncheon Leading Voices

1D5 5606

Bee Diverse Luncheon Group Discussions

1D5 5682

Jenkins Contributors and Experts

Jenkins contributors and experts on hand to educate and share lightning talks and provide one on one Jenkins support.

Jenkins Lightning Talks

1D5 3207

Jenkins Experts Answering Questions

1D5 2953

Jenkins Experts Discussing and Helping

IMG 8278

Jenkins Experts Gathered

1D5 3573

DevOps Superheroes

Even though the conference offered endless learning and networking possibilities, and major milestones worth celebrating, I felt the true highlight of the conference was the celebration of each individual, “You”. “You” are the super hero, the driving force behind the incredible innovations to advance technology to where it is today. Here’s celebrating the super heros in all of YOU!

DevOps Superheroes

1D5 2286

Superheroes and the Wookie

1D5 1643

Four Superheroes

1D5 2949

Kohsuke Kawaguchi - Founding Superhero

1D5 3034

A DevOps League of Superheroes

1D5 4067

Crowd of Superheroes

1D5 4243

This party will be coming to Lisbon, Portugal on December 3-5, 2019. We hope to see our EU Jenkins fans at DevOps World | Jenkins World Lisbon. Use JWFOSS for a 30% discount off your pass.

Hope to see you in Lisbon!

How to build the top mobile game for every platform imaginable

$
0
0

Context

You have been tasked with managing the Jenkins instance for the highest grossing mobile game in the world. You learn that this involves helping the game studio iterate their work against eight different target platforms, each with their SDK, on four different main pipelines, plus a lot of extra auxiliary jobs. And, of course, the studio wants all of this to go smoothly, in order to maintain a good pace of features and bugfixes for every release - a release happening every two weeks. Hitting hundreds of millions of players worldwide.

How are you going to make sure that the environment stays correctly configured, with the right versions of the required software; helping the studio maintain stability and scalability of their pipelines; ensuring operability of the Jenkins instance; improving the speed of the builds month after month?

It’s OK to sweat. You are going to need some help!

This is just a regular day in the office for a build engineer working at King. Facing a very broad problem, with high quality standards and even higher stakes. Thankfully, we are not alone. We have access to a lot of tools - either open source tools, tools developed by the studios or tools developed by our stellar build infrastructure team in Barcelona - to help carry us all the way to the publish line. We put all of these tools together, and by their powers combined, we provide fast, easily operable workflows for the studios, cutting minutes here and there, ensuring the features a smooth sail from dev, to master, to release.

I will explain all of the tricks we use at King to speed builds up, and to make Jenkins operation easier for our studios on December 4, 2019, at DevOps World | Jenkins World Lisbon. Use JWFOSS for 30% discount on registration! For now, let’s take a look at some of them.

Where do we start?

We use on-premise elastic infrastructure, spawning machines from certain templates whenever they are needed. This means that for every build, we are getting a fresh environment - no intermediate artifacts leftover or anything of the sort, which is good. That also means that we need to clone our repositories and compile everything every time, which is bad. However, we have solutions for these two problems.

We make full use of linkclones/snapshots when spawning a VM. Every night we run a bootstrapper that will power on the base image and perform whatever operations we decide on it, before turning it back into a template and re-creating the snapshot. In the case of Candy Crush, we update our caches, and this helps us cut some time off of git clone and compilation. We call this bootstrapper “cacheo”. It looks more or less like this:

Cacheo
1. Start elastic agent template image2. Connect it to Jenkins3. Perform cleanup4. Trigger git reference cache jobs5. Trigger all the builds you want cached6. Turn off template image, delete the agent and recreate the linked clone snapshot

Every studio can specify on which templates will cacheo run, and what will it do in each of them. Maybe you want to make sure your Android license is on point. Or download some packages from artifactory. Perhaps pre-load your gradle dependencies. Whatever it is, cacheo does it for you and updates your base images every night.

One of the most common uses is to pre-fill a local git cache, and when doing so, the improvement is very visible, especially on Windows:

This means, speeding up source code fetching by 55% on Windows, on average. That is a LOT!!

But what about actual compilation?

All of our major games use the same engine; we bring this code in by means of submodules. This means there is a big bunch of shared code that needs to be compiled and linked whenever we build the game. And it’s not rare that this shared code is bigger than the actual game code! Thankfully, the engine team lent us a hand, and they developed a way to package the compiled shared code. Normally, the game code lives alongside a specific version of the shared code, which doesn’t get updated too frequently. Sometimes once a month, sometimes to grab a hotfix. This translates to us potentially compiling the exact same shared code for quite some time, every time we build the game. Thanks to these prebuilt artifacts, we are able to skip a huge part of the compilation, at the cost of a simple artifactory download.

Cacheo
if generate_prebuilt_libs:
    compile_project()

    generate_empty_cmakelists()

    for dependency in dependencies:
        merge_compiled_dependency_into_metalib(dependency)
        write_dependency_to_generated_cmakelists_as_alias_for_metalib(dependency)

elif use_prebuilt_libs:
    add_generated_cmakelists_with_metalib_as_dependency()

    compile_project()

Thanks to these prebuilt libraries, we are able to skip a big chunk of the compilation, and it builds up really quickly! Iterative work on several branches, as long as they have the same engine version, gets sped up in noticeable ways. There are, however, specific cases when we do choose to build the shared code regardless, such as when we build release candidates for instance.

Just so you get an idea, times on this table are on average:

LinuxMacOSWindows

NFS

2 min 11s

2min 34s

8min 32s

Local

1 min 20s

1min 35s

3min 49s

Difference

39% faster

39% faster

55% faster

I just don’t want to have to deal with bureaucracy

Operating Jenkins can be quite complicated. Talk about “Tell me something I don’t know”, right? And with so many moving pieces (elastic infrastructure, plugins, dirty workspaces), it might not be easy for everyone to run specific maintenance tasks. We have a lot of small pipelines, created by the build infrastructure group, that we can use to diagnose and work around certain errors, as well as gather useful information that might be otherwise difficult to find. These pipelines do things like printing all the installed plugins, deleting offline on-demand agents, cleaning disconnected VMs from vSphere, or re-run puppet in a specific Jenkins instance. And any user can run these jobs, there is no need to be an admin. This allows the team to unblock themselves if they need to by using these jobs. Here’s one that I particularly like. How many times have you modified a pipeline and, when trying to run it, the first thing that happens is that Jenkins says that it needs approval?

Script Approval
importorg.jenkinsci.plugins.scriptsecurity.scripts.*@NonCPS// Disclaimer - this can have serious security consequences// Be mindful when you run this!defcall() {
    sa = ScriptApproval.get()
    toApproveScripts = sa.getPendingScripts().collect()
    println ("toApproveScripts: " + toApproveScripts)
    toApproveScripts.each {pending ->
        sa.get().approveScript(pending.getHash())
        println ("approvedScripts: " + pending.getHash())
        }
    sa.save()
}

The best part? All our Jenkins instances include these jobs, by default, so no one misses out on the fun.

iOSWindows

No prebuilts

20min 17s

40min 30s

Prebuilts

10min 2s

23min 20s

Difference

51% faster

43% faster


2019 Jenkins Board and Officer Elections Update

Next: Jenkins Health Advisor by CloudBees is out!
Previous: How to build the top mobile game for every platform imaginable
$
0
0

Jenkins Elections

The Jenkins community is conducting the 2019 elections for Board and Officer positions. The call for nominations has concluded. We received many nominations. Based on the people who are willing to accept their nomination and the uncontested officer positions, we will have 3 votes:

  1. A vote to elect 3 board members

  2. A vote to elect the Jenkins security officer

  3. A vote to elect the Jenkins events officer

Candidates

Each candidate has provided a statement to help guide voters on why they should vote for the candidate. Refer to the candidate statements for more details. The candidates running for a board position are:

  • Alex Earl

  • Oliver Gondza

  • Ullrich Hafner

  • Oleg Nenashev

  • Mark Waite

  • Zhao Xiaojie (a.k.a. Rick to many of you)

The candidates running for Security Officer are:

  • Daniel Beck

  • Wadeck Follonier

The candidates running for Events Officer are:

  • Alyssa Tong

  • Zhao Xiaojie (a.k.a. Rick to many of you)

Voter Registration

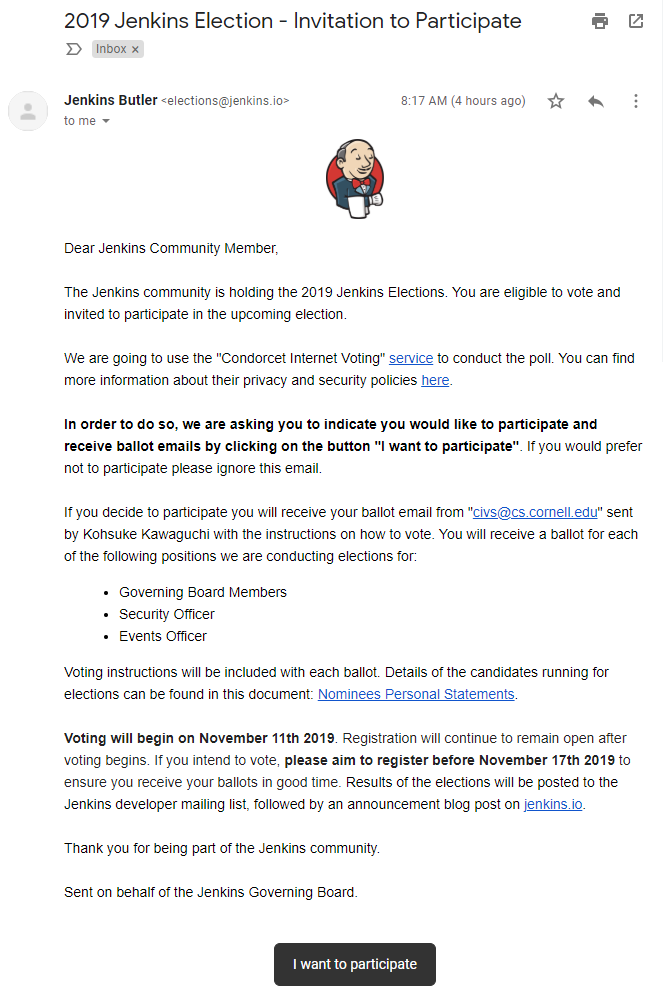
This is the first time in a while that we are running a Jenkins election; we are learning as we go. Jenkins elections aim to be very inclusive. We do not restrict elections to just code committers. Anyone who has a Jenkins account registered before September 1, 2019 is eligible to vote. Jenkins, being the successful project it is, has approximately 100 000 accounts that meet that criteria. As a result we are contacting eligible voters and requesting that they explicitly ‘opt-in’ to participate in the voting.

If you meet the criteria, you will receive an email at your registered jenkins.io email address. It will be from elections@jenkins.io with the title ‘2019 Jenkins Election - Invitation to Participate’. The email will provide election details and will include an "I want to participate" button.

Voter Registration

Voter Confirmation

Once you click on the link, you should see a confirmation screen as follows:

Voter Registered

If you do not receive the email by November 14, 2019 or if you have any problems voting, please comment on the Jenkins Election 2019 Jira issue.

Voting

The voting will officially open on November 11, 2019. Candidates will receive an email from the Condorcet internet voting sent by Kohsuke Kawaguchi. One email will be sent for each vote (so 3 in total: 1 for board, 1 for event officer and 1 for security officer). The vote will ask to rank the candidates using a screen like this:

Voter Ballot

Election Dates

Here is a summary of the key election dates:

Election results will be posted to the Jenkins developer mailing list, followed by an announcement blog post on jenkins.io.

If there are any delays to the proposed dates we will aim to communicate that as soon as we can. Thank you very much for all the candidates showing the Jenkins spirit of service to their community. We encourage everyone to register to vote and participate in the Jenkins community.

DateEvent

Now

Voter registration ongoing

Nov 11, 2019

Voting begins

Nov 17, 2019

Voter registration closes

Nov 24, 2019

Voting closes a 5:00 PM Pacific Time

Dec 3, 2019

New representatives announced

Uncontested Officer Positions

When an officer position has only one candidate that is willing to accept the nomination, there is no reason to vote on that position. The individual becomes an officer as the sole candidate for the position.

Uncontested officers include:

NameRole

Olivier Vernin

Infrastructure Officer

Oliver Gondza

Release Officer

Mark Waite

Documentation Officer

Jenkins Health Advisor by CloudBees is out!

Next: Welcome to the Matrix
Previous: 2019 Jenkins Board and Officer Elections Update
$
0
0

Angry Jenkins logo

Managing any software presents its own unique challenges. Jenkins Masters are no exception. For example,

  • How do you keep a finger on the pulse of everything going on in your Jenkins environment? Are you looking at every new defect opened in the issue tracker?

  • How do you make sure that your master or agents don’t silently fail? Are you monitoring its logs? All of its internal components? If something does go wrong, how do you fix it??

  • How do you avoid the infamous “angry Jenkins” logo?

That’s why we created Jenkins Health Advisor by CloudBees.

Here at CloudBees, we have years of experience supporting our customers who are using Jenkins, including our proprietary products build on top of Jenkins like CloudBees Core. As a result, our support team is made up of automation experts with Jenkins knowledge you can’t get anywhere else.

Automated health checks started when our support engineers created a platform so they could write rules to detect known issues on support bundles provided by our customers, and redirect them to the required knowledge source to diagnose and resolve the issue.

After years of internal usage we decided to share this service with the community and we are pleased to introduce a new freemium service available to every Jenkins user: Jenkins Health Advisor by CloudBees.

Jenkins Health Advisor by CloudBees automatically analyzes your Jenkins environment, proactively identifies potential issues and advises you of solutions with detailed email reports.

Jenkins Health Advisor by CloudBees logo

Jenkins Health Advisor by CloudBees can detect a large range of issues from simple configuration issues to security and best practices concerns - all critical elements of Jenkins implementations. Getting started is done in 3 steps, and within 24 hours you will receive your first report.

Jenkins Health Advisor by CloudBees overview

We hope that you will appreciate this service and it will help you to keep your masters healthy.

Take a few minutes to read our documentation, discover the service and don’t hesitate to contact us on the Jenkins community channels (Gitter, jenkinsci-users@googlegroups.com, …​).

Don’t miss also the opportunity to meet our support team on the "Ask the experts" booth at DevOps World | Jenkins World 2019.

Useful links:

Welcome to the Matrix

Next: Jenkins macOS native installer deprecation
Previous: Jenkins Health Advisor by CloudBees is out!
$
0
0

I often find myself needing to run the same actions on a bunch of different configurations. Up to now, that meant I had to make multiple copies of the same stages in my pipelines. When I needed to make changes, I had to make the same changes in multiple places throughout my pipeline. Maintaining even a small number of configuration was difficult for larger pipelines.

Declarative Pipeline 1.5.0-beta1 (now available from theJenkins Experimental Update site) adds a new matrix section that lets me specify a list stages once and then run that same list in parallel on multiple configurations. Let’s take a look!

Single configuration pipeline

I’ll start with a simple pipeline with build and test stages. I’m using echo steps as placeholders for my build and test actions.

Jenkinsfile
pipeline {
    agent none
    stages {
        stage('BuildAndTest') {
            agent any
            stages {
                stage('Build') {
                    steps {
                        echo 'Do Build'
                    }
                }
                stage('Test') {
                    steps {
                        echo 'Do Test'
                    }
                }
            }
        }
    }
}

Pipeline for multiple platforms and browsers

I’d like to run my build and tests on a combination of platforms and browsers. The new matrix directive lets me specify a set of axes. Each axis has a name and a list of one or more values. When the pipeline is run, Jenkins will take those and run my stages on all possible combinations of values from each axis. All cells in a matrix run in parallel (limited only by the number of available agents). Stages within each cell are run sequentially.

My matrix has two axes: PLATFORM and BROWSER. I have three values for PLATFORM and four values for BROWSER resulting in my stages being run with twelve different combinations. I’ve changed my echo steps to use the axis values for each cell.

Jenkinsfile
pipeline {
    agent none
    stages {
        stage('BuildAndTest') {
            matrix {
                agent any
                axes {
                    axis {
                        name 'PLATFORM'
                        values 'linux', 'windows', 'mac'
                    }
                    axis {
                        name 'BROWSER'
                        values 'firefox', 'chrome', 'safari', 'edge'
                    }
                }
                stages {
                    stage('Build') {
                        steps {
                            echo "Do Build for ${PLATFORM} - ${BROWSER}"
                        }
                    }
                    stage('Test') {
                        steps {
                            echo "Do Test for ${PLATFORM} - ${BROWSER}"
                        }
                    }
                }
            }
        }
    }
}
Log output (truncated)
...
[Pipeline] stage
[Pipeline] { (BuildAndTest)
[Pipeline] parallel
[Pipeline] { (Branch: Matrix - OS = 'linux', BROWSER = 'firefox')
[Pipeline] { (Branch: Matrix - OS = 'windows', BROWSER = 'firefox')
[Pipeline] { (Branch: Matrix - OS = 'mac', BROWSER = 'firefox')
[Pipeline] { (Branch: Matrix - OS = 'linux', BROWSER = 'chrome')
[Pipeline] { (Branch: Matrix - OS = 'windows', BROWSER = 'chrome')
[Pipeline] { (Branch: Matrix - OS = 'mac', BROWSER = 'chrome')
[Pipeline] { (Branch: Matrix - OS = 'linux', BROWSER = 'safari')
[Pipeline] { (Branch: Matrix - OS = 'windows', BROWSER = 'safari')
[Pipeline] { (Branch: Matrix - OS = 'mac', BROWSER = 'safari')
[Pipeline] { (Branch: Matrix - OS = 'linux', BROWSER = 'edge') (hide)
[Pipeline] { (Branch: Matrix - OS = 'windows', BROWSER = 'edge')
[Pipeline] { (Branch: Matrix - OS = 'mac', BROWSER = 'edge')
...
Do Build for linux - safari
Do Build for linux - firefox
Do Build for windows - firefox
Do Test for linux - firefox
Do Build for mac - firefox
Do Build for linux - chrome
Do Test for windows - firefox
...

Excluding invalid combinations

Now that I have my basic matrix created, I’ve noticed that I have some invalid combinations. Microsoft Edge only runs on Windows and there isn’t a Linux version of Safari.

I can remove invalid cells from my matrix using exclude directives. Each exclude has one or more axis directives with name and values. The axis directives inside an exclude generate a set of combinations (similar to generating the matrix cells). The matrix cells that match all the values from an exclude combination are removed from the matrix. If I have more than one exclude directive, each are evaluated separately to remove cells.

When dealing with a long lists of values to exclude, I can use notValues instead of values to specify axis values we don’t want excluded. Yes, that’s a double negative, so it can get a little confusing. I try to use it only when I really need it.

In my sample pipeline below, I specifically exclude the linux, safari combination and I also exclude any platform that is notwindows with the edge browser.

This pipeline uses two axes but there is no limit on the number of axis directives.

Also, in this pipeline each exclude specifies values for both axes, but that is not required. If we wanted to run only "linux" cells, we could use the following exclude:

exclude {
    axis {
        name 'PLATFORM'
        notValues 'linux'
    }
}
pipeline {
    agent none
    stages {
        stage('BuildAndTest') {
            matrix {
                agent any
                axes {
                    axis {
                        name 'PLATFORM'
                        values 'linux', 'windows', 'mac'
                    }
                    axis {
                        name 'BROWSER'
                        values 'firefox', 'chrome', 'safari', 'edge'
                    }
                }
                excludes {
                    exclude {
                        axis {
                            name 'PLATFORM'
                            values 'linux'
                        }
                        axis {
                            name 'BROWSER'
                            values 'safari'
                        }
                    }
                    exclude {
                        axis {
                            name 'PLATFORM'
                            notValues 'windows'
                        }
                        axis {
                            name 'BROWSER'
                            values 'edge'
                        }
                    }
                }
                stages {
                    stage('Build') {
                        steps {
                            echo "Do Build for ${PLATFORM} - ${BROWSER}"
                        }
                    }
                    stage('Test') {
                        steps {
                            echo "Do Test for ${PLATFORM} - ${BROWSER}"
                        }
                    }
                }
            }
        }
    }
}
Log output (truncated)
...
[Pipeline] stage
[Pipeline] { (BuildAndTest)
[Pipeline] parallel
[Pipeline] { (Branch: Matrix - OS = 'linux', BROWSER = 'firefox')
[Pipeline] { (Branch: Matrix - OS = 'windows', BROWSER = 'firefox')
[Pipeline] { (Branch: Matrix - OS = 'mac', BROWSER = 'firefox')
[Pipeline] { (Branch: Matrix - OS = 'linux', BROWSER = 'chrome')
[Pipeline] { (Branch: Matrix - OS = 'windows', BROWSER = 'chrome')
[Pipeline] { (Branch: Matrix - OS = 'mac', BROWSER = 'chrome')
[Pipeline] { (Branch: Matrix - OS = 'windows', BROWSER = 'safari')
[Pipeline] { (Branch: Matrix - OS = 'mac', BROWSER = 'safari')
[Pipeline] { (Branch: Matrix - OS = 'windows', BROWSER = 'edge')
...
Do Build for linux - firefox
...

Controlling cell behavior at runtime

Inside the matrix directive I can also add "per-cell" directives. These are the same directives that I would add to a stage and they let me control the behavior of each cell in the matrix. These directives can use the axis values from their cell as part of their inputs, allowing me to customize the behavior of each cell to match its axis values.

On my Jenkins server I have configured agents with labels that match the OS for each agent ("linux-agent", "windows-agent", and "mac-agent"). To run each cell in my matrix on the appropriate operating system, I configure the label for that cell using Groovy string templating.

matrix {
    axes { ... }
    excludes { ... }
    agent {
        label "${PLATFORM}-agent"
    }
    stages { ... }// ...
}

Occasionally I run my pipeline manually from the Jenkins Web UI. When I do that, I’d like to be able to select just one platform to run. The axis and exclude directives define the static set of cells that make up the matrix. That set of combinations is generated before the start of the run, before any parameters are processed. What this means is that I can’t add or remove cells from a matrix after the job has started.

The "per-cell" directives, on the other hand, are evaluated at runtime. I can use the "per-cell" when directive inside matrix to control which cells in the matrix are executed. I’ll add a choice parameter with the list of platforms, and add conditions to the when directive, which will either let all platforms execute, or only execute cells that match my selected platform.

pipeline {
    parameters {
        choice(name: 'PLATFORM_FILTER', choices: ['all', 'linux', 'windows', 'mac'], description: 'Run on specific platform')
    }
    agent none
    stages {
        stage('BuildAndTest') {
            matrix {
                agent {
                    label "${PLATFORM}-agent"
                }
                when { anyOf {
                    expression { params.PLATFORM_FILTER == 'all' }
                    expression { params.PLATFORM_FILTER == env.PLATFORM }
                } }
                axes {
                    axis {
                        name 'PLATFORM'
                        values 'linux', 'windows', 'mac'
                    }
                    axis {
                        name 'BROWSER'
                        values 'firefox', 'chrome', 'safari', 'edge'
                    }
                }
                excludes {
                    exclude {
                        axis {
                            name 'PLATFORM'
                            values 'linux'
                        }
                        axis {
                            name 'BROWSER'
                            values 'safari'
                        }
                    }
                    exclude {
                        axis {
                            name 'PLATFORM'
                            notValues 'windows'
                        }
                        axis {
                            name 'BROWSER'
                            values 'edge'
                        }
                    }
                }
                stages {
                    stage('Build') {
                        steps {
                            echo "Do Build for ${PLATFORM} - ${BROWSER}"
                        }
                    }
                    stage('Test') {
                        steps {
                            echo "Do Test for ${PLATFORM} - ${BROWSER}"
                        }
                    }
                }
            }
        }
    }
}

If I run this Pipeline from the Jenkins UI and set the PLATFORM_FILTER parameter to mac, I’ll get something like the output below:

Log output (truncated - PLATFORM_FILTER = 'mac' )
...
[Pipeline] stage
[Pipeline] { (BuildAndTest)
[Pipeline] parallel
[Pipeline] { (Branch: Matrix - OS = 'linux', BROWSER = 'firefox')
[Pipeline] { (Branch: Matrix - OS = 'windows', BROWSER = 'firefox')
[Pipeline] { (Branch: Matrix - OS = 'mac', BROWSER = 'firefox')
[Pipeline] { (Branch: Matrix - OS = 'linux', BROWSER = 'chrome')
[Pipeline] { (Branch: Matrix - OS = 'windows', BROWSER = 'chrome')
[Pipeline] { (Branch: Matrix - OS = 'mac', BROWSER = 'chrome')
[Pipeline] { (Branch: Matrix - OS = 'windows', BROWSER = 'safari')
[Pipeline] { (Branch: Matrix - OS = 'mac', BROWSER = 'safari')
[Pipeline] { (Branch: Matrix - OS = 'windows', BROWSER = 'edge')
...
Stage "Matrix - OS = 'linux', BROWSER = 'chrome'" skipped due to when conditional
Stage "Matrix - OS = 'linux', BROWSER = 'firefox'" skipped due to when conditional
...
Do Build for mac - firefox
Do Build for mac - chrome
Do Build for mac - safari
...
Stage "Matrix - OS = 'windows', BROWSER = 'chrome'" skipped due to when conditional
Stage "Matrix - OS = 'windows', BROWSER = 'edge'" skipped due to when conditional
...
Do Test for mac - safari
Do Test for mac - firefox
Do Test for mac - chrome
Come join me at DevOps World | Jenkins World 2019 for "Declarative Pipeline 2019: Tips, Tricks and What’s Next". I’ll go over what’s been added to Pipeline in the last year (including matrix) and discuss ideas about where pipeline should go next.

Conclusion

In this blog post, we’ve looked at how to use the matrix directive to make concise but powerful declarative pipelines. An equivalent pipeline created without matrix would easily be several times larger, and much harder to understand and maintain.

Matrix is now available from the experimental update center. It will be released to the main update center as soon as we’re done putting the finishing touches on the documentation and online help.

Jenkins macOS native installer deprecation

Next: Do Plugins Store Credentials In A Secure Way? - DevOps World | Jenkins World 2019
Previous: Welcome to the Matrix
$
0
0

In addition to WAR files and Docker images, the Jenkins project provides native installers for each weekly and LTS release. There are installers available for Linux distributions, Windows, macOS and other operating systems. There are also installers provided by third parties. You can find the list of these installers on the Downloads page.

In this blog post, we announce the upcoming deprecation of the macOS native installer. We will review the replacement options and the rollout plan.

Why?

Maintaining installers is a significant maintenance effort for the project because installers require testing and, sometimes, specific platforms and environments for packaging. When installers lose relevance for the majority of the Jenkins audience, we remove them or handover maintenance to third parties on other areas. For macOS, there are currently two types of packages: native installers with GUI for desktop versions and Homebrew packages. Since Homebrew is now a defacto standard package manager for macOS users, from the Jenkins standpoint it made sense to deprecate the native installers.

Why now? There is ongoing work on automating Jenkins Core releases within the Jenkins infrastructure. Long story short, we are moving Jenkins release pipelines to Kubernetes on Microsoft Azure. This environment does not offer macOS machines that are needed to produce native installers. If you are interested to know more, there will be a How Jenkins Builds and Delivers Jenkins in the Cloud talk presented by Olivier Vernin at DevOps World | Jenkins World 2019 Europe in Lisbon (use the JWFOSS code for a 30% discount!).

We could have used an external service for building macOS installers, but it would have added an additional point of failure and implementation/maintenance overhead. So we discussed it in the developer mailing list and agreed that it is better to just deprecate and then remove the packages.

Replacing native installers

In the case of macOS, there are two main alternatives available: managing the service manually or migrating to Homebrew packages. Before doing a migration, we highly recommend backing up your instance.

Managing Jenkins with WAR file on macOS

If your Jenkins instance was previously set up with a native installer, to update Jenkins it will be enough to replace the jenkins.war file in the installation directory and restart the instance. The services will keep running as it was configured before the migration. The default installation directory is /Applications/Jenkins/jenkins.war

Managing Jenkins with Homebrew

Installing Jenkins with Homebrew is a way to go for those who want to install Jenkins using a package manager. There are two Homebrew formulas for Jenkins: jenkins for Weekly releases and jenkins-lts for LTS ones. These packages are supported by a third party (Homebrew community), and they may be not as frequently updated as packages supported by the Jenkins project directly.

Before doing a migration from macOS Native installers to HomeBrew, please make sure to backup your Jenkins instance. There are no automatic migration tools available, and the installation may corrupt your JENKINS_HOME or service configuration files in edge cases.

If you switch to Homebrew, you will need to properly migrate the JENKINS_HOME data to the new location. We do not provide an official migration guide, but it is possible to find some guidelines on the Web.

Sample commands:

  • Install the latest Weekly version: brew install jenkins

  • Install a specific Weekly version: brew install jenkins@YOUR_VERSION

  • Start the Jenkins service: brew services start jenkins

  • Restart the Jenkins service: brew services restart jenkins

  • Update the Jenkins version: brew upgrade jenkins

For more information see the documentation for Homebrew packages on the macOS Download pages.

Rollout plan

  1. macOS native packaging is considered as deprecated starting from Jenkins 2.206 and Jenkins LTS 2.204.1

  2. For Jenkins Weekly macOS native packaging will be removed with the switch to the new Jenkins release flow. The exact date is to be determined.

    • After the change, there will be no macOS native installers produced for new Jenkins Weekly releases

    • Releases for previous versions will be available in this archive

  3. For Jenkins LTS macOS will be removed with the switch to the new Jenkins release flow in the LTS baseline. This change will happen only after the deployment of the new release flow in Jenkins Weekly.

    • After the switch, there will be no macOS native installers produced for new Jenkins LTS releases

    • Releases for previous versions will be available in this archive

See the discussion on the developer mailing list for more information.

Questions and feedback

If you have any questions or want to provide feedback, please use the developer mailing list thread mentioned above Platform SIG channels (chat, google group). Any feedback will be much appreciated because we plan more installer/ and platform deprecations in the future.

Do Plugins Store Credentials In A Secure Way? - DevOps World | Jenkins World 2019

Next: Matrix building in scripted pipeline
Previous: Jenkins macOS native installer deprecation
$
0
0
This is a speaker blog post for a DevOps World | Jenkins World 2019 talk in Lisbon, Portugal and has been posted in line with NCC Group responsible disclosure policy. Related Jenkins security advisories:2017-11-08,2017-11-16,2018-06-25,2018-07-30,2018-09-25,2019-02-19,2019-03-06,2019-03-25,2019-04-03,2019-04-17,2019-08-07,2019-09-12,2019-10-01,2019-10-16,2019-10-23. Some of the vulnerabilities have been announced without a fix, see Jenkins Security Spring Cleaning 2019. The most of the announced vulnerabilities are fixed at the moment of this blogpost publishing.

Come join us at DevOps World | Jenkins World 2019 for "The Story, the Findings and the Fixes Behind More than 100 Jenkins Plugins Vulnerabilities", a talk about the most common vulnerabilities found during research in more than 100 plugins. We’ll review how to prevent these vulnerabilities during plugin development so that a more secure Jenkins CI and CD environment can be built.

When I first began familiarising myself with Jenkins, I found myself almost overwhelmed by the amount of plugins to choose from. Most of these plugins are developed by third party developers or companies and can assist the user in a range of ways. They can extend the core functions, they can offer solutions to repetitive tasks or they can help with using a service. For example, they could help with publishing to an artifact store or spinning up cloud instances. However, before a plugin can use a network based service that requires credentials to connect, those credentials have to be typed in and saved somewhere. This raises the question, are those credentials stored securely? Or not? When I started looking at different plugins this was one of the first areas I investigated. I found a Jenkins security advisory describing this issue and came to the conclusion that this could be a problem in some plugins, albeit one that could be fixed easily. I found an example of weakly stored credentials in the Publish Over Dropbox Plugin; this plugin used a simple web form with a textbox element to display the token in the plugin’s settings page. This token was stored in plaintext:

PluginWebForm

The following Jelly code was behind the web form and shows that a password field wasn’t used:

<f:entrytitle="${%Token}"field="authorizationCode"><f:textbox/>

The related plugin .xml file contained the secret key in plaintext:

<org.jenkinsci.plugins.publishoverdropbox.impl.DropboxTokenImplplugin="publish-over-dropbox@1.2.2"><scope>GLOBAL</scope><id>woodspeed</id><description></description><authorizationCode>lYD2VnNz</authorizationCode><accessCode>lYD2VnNz</accessCode></org.jenkinsci.plugins.publishoverdropbox.impl.DropboxTokenImpl>

Jenkins offers at least two ways to store credentials in an encrypted format:

  • Using a Secret type offered by Jenkins

  • Third party plugin called Credentials Plugin

The first case is the easiest solution, because Jenkins will automatically handle the encryption and decryption.

Developers should also use the password field tag instead of the textbox field, as shown in the following Jelly control example:

<f:entrytitle="${%Secret Access Key}"help="..."><f:passwordfield="secretKey"/></f:entry>

If you would like to know what other vulnerabilities I discovered and how to fix them, come and join us for the presentation in Lisbon! In case you are unable to attend the conference, you can read more at Story of a Hundred Vulnerable Jenkins Plugins.

Viewing all 1087 articles
Browse latest View live